

|
|
|
|
|
|
#1
 02-05-2015, 06:16 AM
|
|||
|
|||
|
1971 Mercedes W108 280SE conversion to diesel daily driver
Hello!
I have been posting updates on this build on some other forums and thought that some of the readers here might be interested. Progress is already advanced, but here's how it started: Legislation in Ireland means that any car older than 1980 is exempt from the NCT or National Car Test. Road tax is at a fixed rate of 56 Euro per year for vehicles more than 30 years old. I have been hatching a plan for quite some time to take advantage of both of these exemptions. I currently drive a 2.0L diesel Mercedes 190. It costs me more than 700Euro per year in road tax, so you can see my motivation! Yesterday, I purchased a 280SE with a 3.5L V8 engine first registered in 1971. My plan was to replace the engine with a 2.5L normally aspirated diesel and the auto box with a manual one. I drive just over 300 miles a week and, once I find an engine & gearbox, I hope to do it in the 280SE! Currently there is quite a long list of to-dos, but very few which are essential to forward motion: Rust bubbles on almost every panel (seems to have been painted relatively recently with poor prep. Indicator stalk doesn't stay in position when switched on. Some lights/indicators not working. No heater or blower. engine and gearbox swap Front windscreeen delaminating quite badly very bad wind noise, I think due to poor window and door seals. Sunroof which tilts but doesn't slide. Non functioning and partially functioning electric windows. Lots of missing wooden trim from the interior. It drives beautifully, I love it already from that respect. It was quite dull getting into my 190 having driven the new one home. 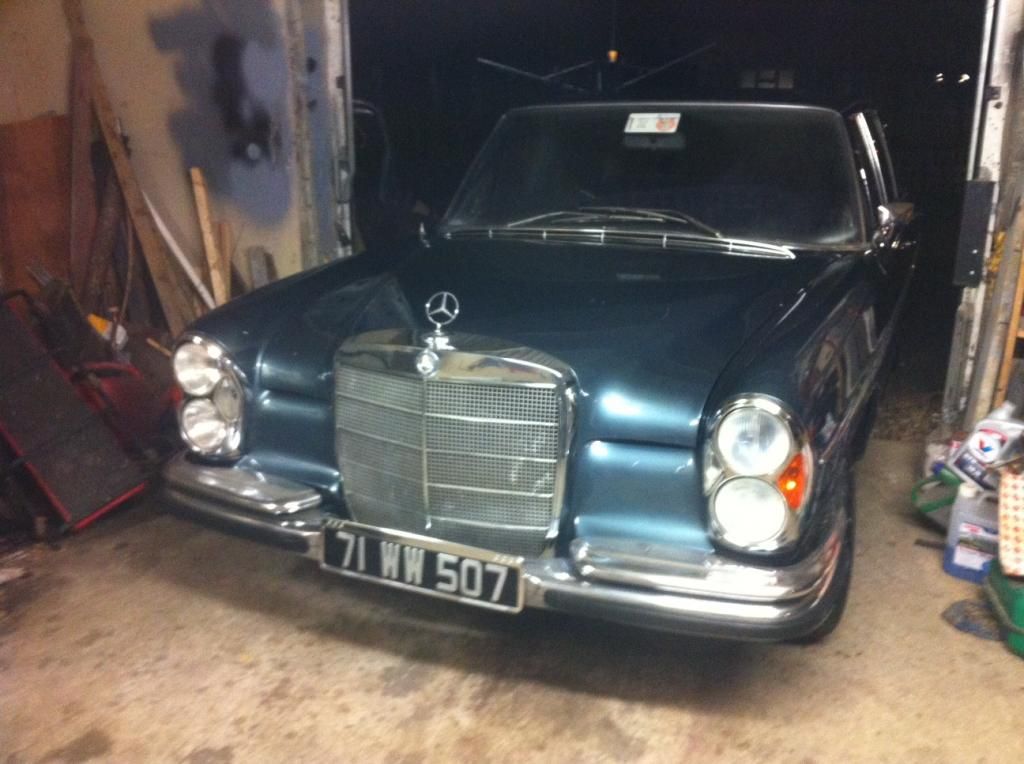

|
|
#2
02-06-2015, 04:23 AM
|
|||
|
|||
|
You can see the front suspension is just about absent in the pic below. The passenger door is not closed, the alignment is actually pretty good! The paint is pretty fresh, but bubbling through from underneath, so will need doing again.
 Here's a close-up trying to show the bubbling above and below the trim strip. This is the worst patch for size, but I have issues on almost every panel. Around the rear screen is the worst I can see externally.  This is the inside of the passenger door. In their wisdom, someone blocked up the factory drain holes with filler and drilled new ones which weren't at the lowest point of the door!  The whole underside was sprayed with Schutz prior to sale. I've scraped off a couple of the rusty patches here, no surprises, I could see they were there before I bought it. It's mostly just surface rust which I'll blast off and re-paint.  The front screen has moisture damage also, so I'm a bit afraid of what I might find in terms of metal when I remove the windscreen rubbers! 
|
|
#3
02-06-2015, 12:43 PM
|
|||
|
|||
|
Subscribed!
|
|
#4
02-09-2015, 04:36 AM
|
|||
|
|||
|
Still on the catch-up here, it's not that I'm working fast!
 So, front suspension going back together! The whole lot was removed, blasted and primed where required and new bushes/bearings, etc fitted. This was the rustiest bit, some corrosion worth stopping. 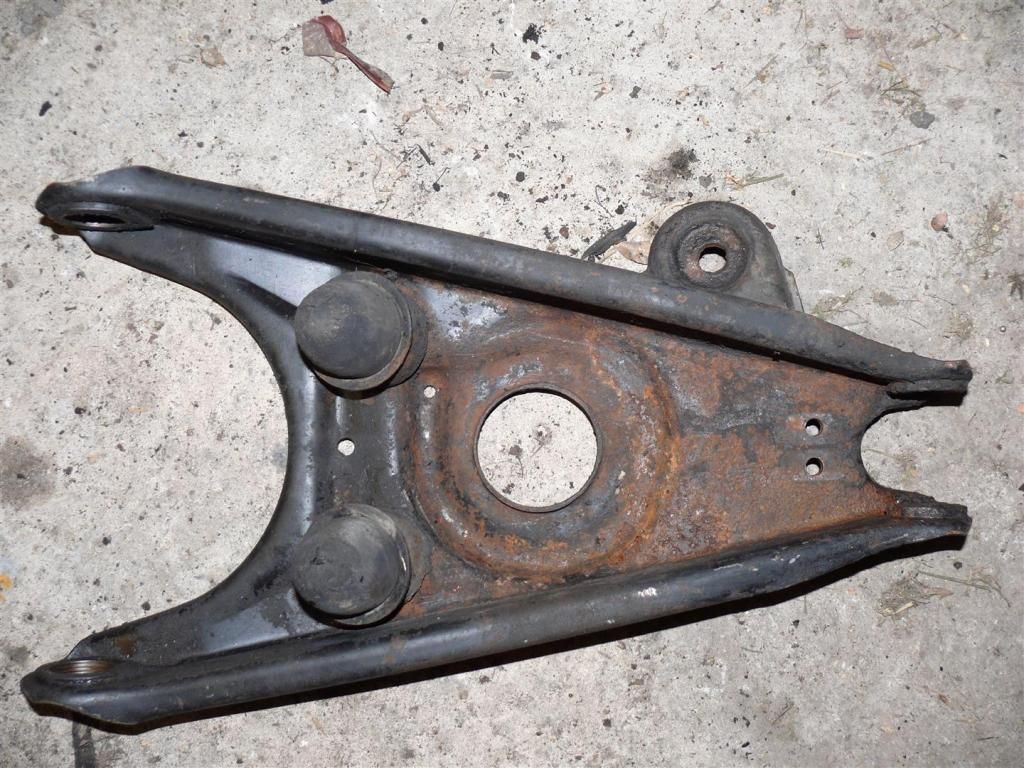 Springs and brake backing plates were scruffy looking too. Turned out both backing plates had stress fractures, so were welded up before re-fitting. 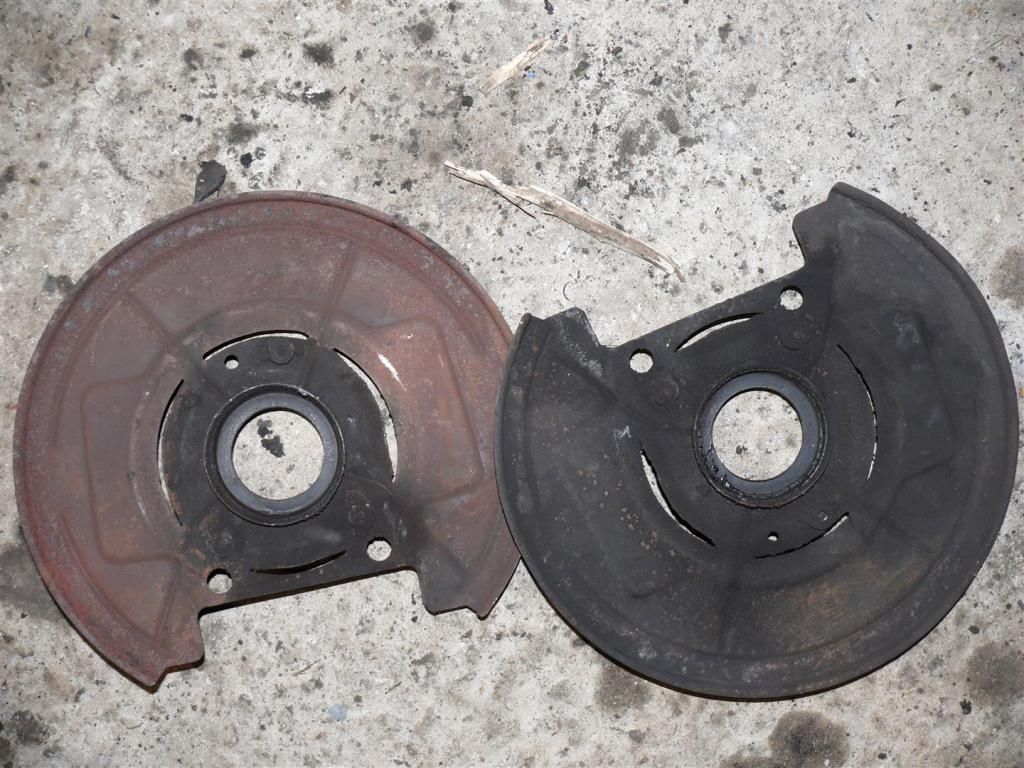 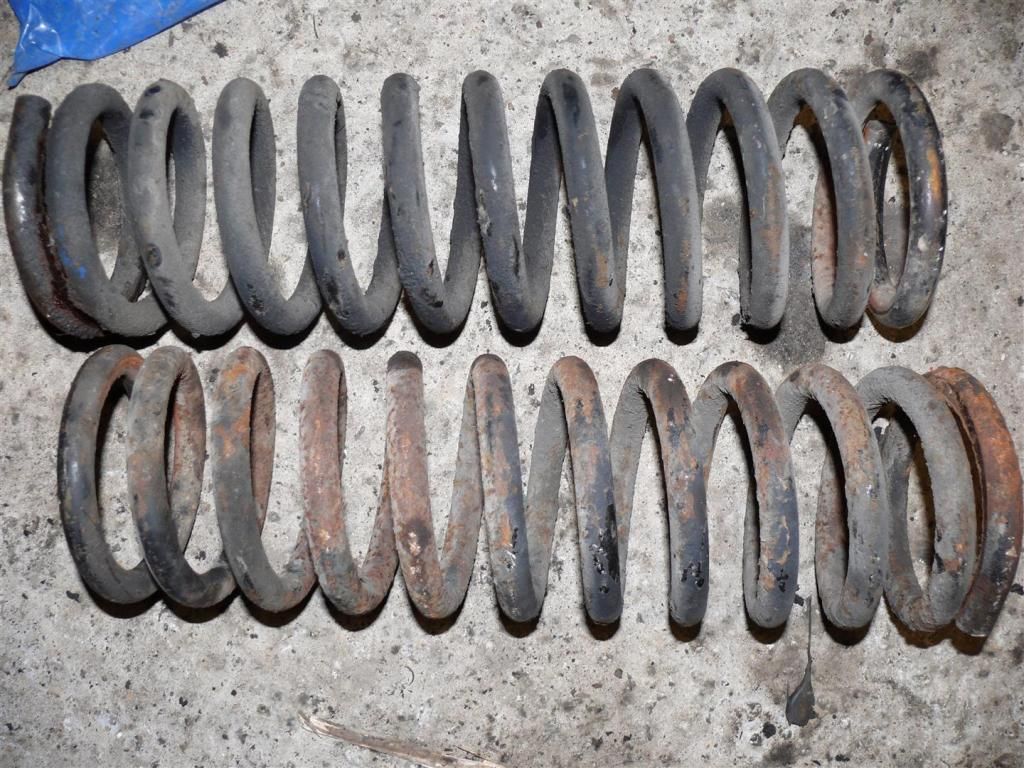 I only blasted the spring turrets on the subframe as I expected I would have to chop up the middle of it to make the new engine fit. It turned out I didn't need to! It was in good nick in the middle anyway. 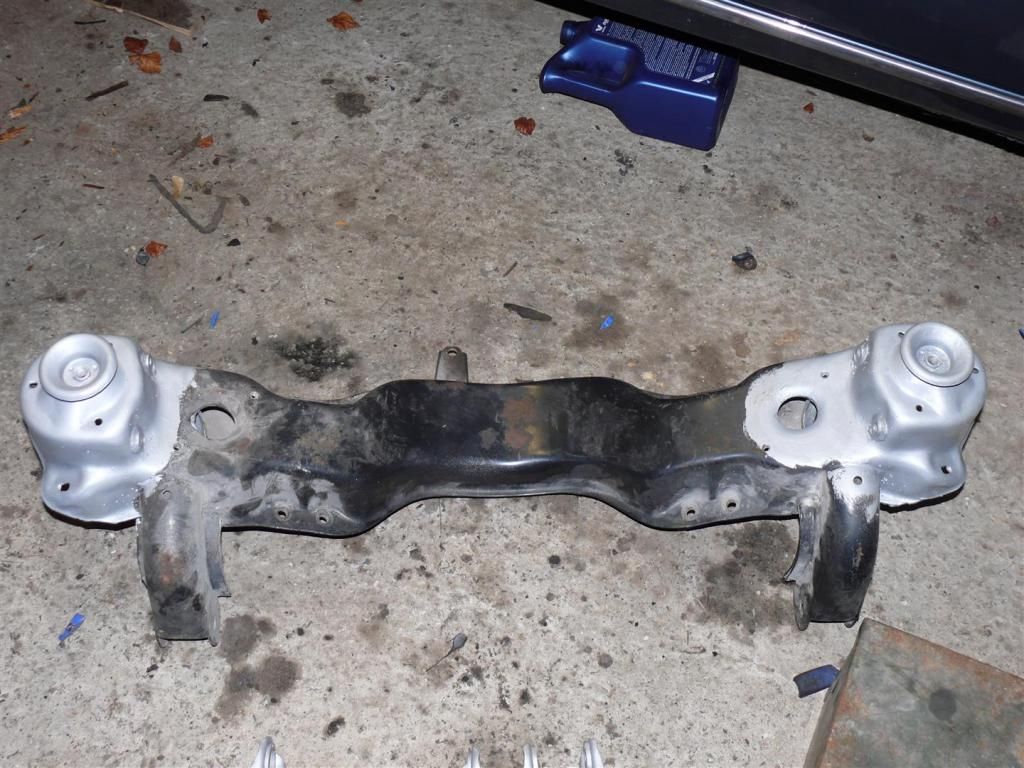 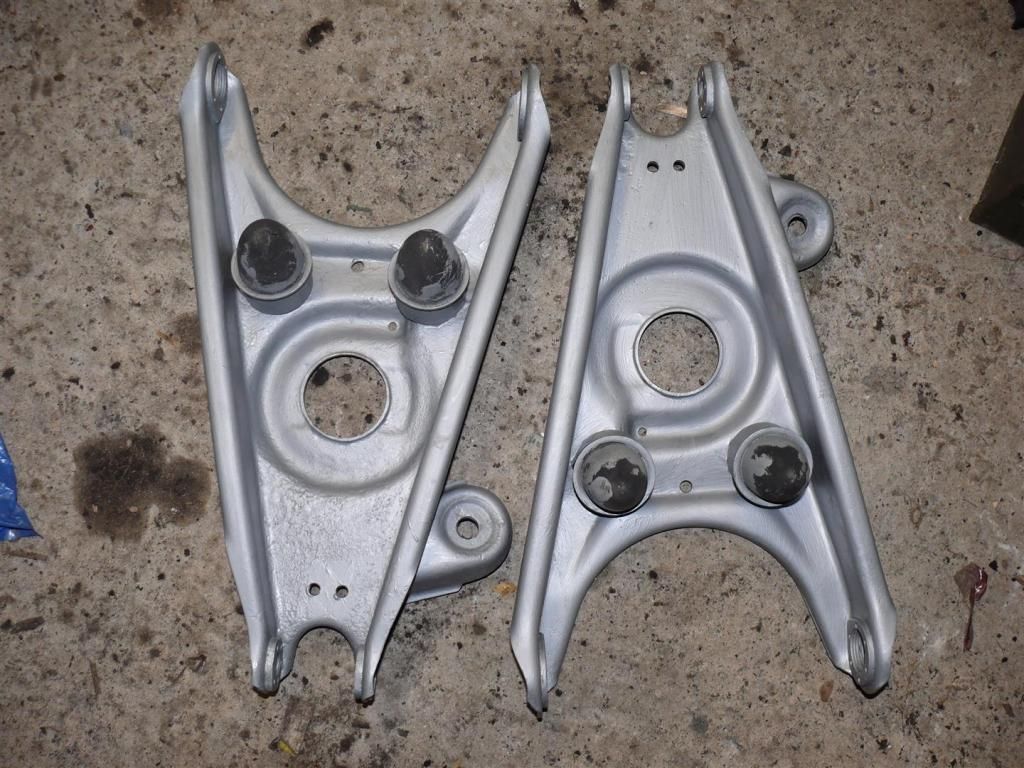 
|
|
#5
02-12-2015, 07:09 AM
|
|||
|
|||
|
I had awful trouble trying to get the springs back into the front of the car. the problem is that with spring clamps attached, the spring won't fit as the clamps get in the way. If I just put the spring in without any clamps and jack up the lower control arm, there is too much of an angle between the bottom of the spring and the control arm for it to get any purchase and it just slides out.
I finally came up with a solution. The lower control arm has a hole in it inside the spring seating area, so it occurred to me that I might be able to fit the spring clamp from the inside. All the usual "Be careful with springs" warnings apply here. Springs can store enormous amounts of energy which, when released, can cause a lot of damage to you and/or your car. They should be treated with a great deal of respect. Position yourself in the least likely path of an escaping spring. Use long bars/sticks to poke at stuff rather than your soft and valuable fingers! So, here's what I did. The spring has a right way up. One end finishes in a short straight section, the other end finishes in the normal curve of the spring as you can see in the photos below. 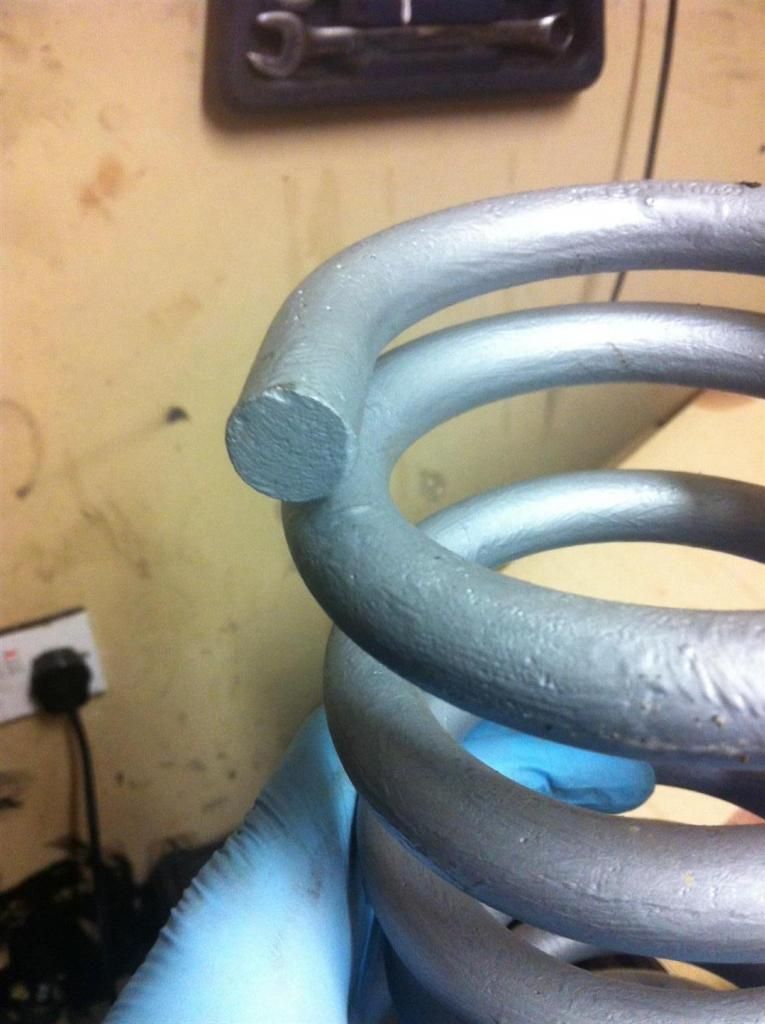 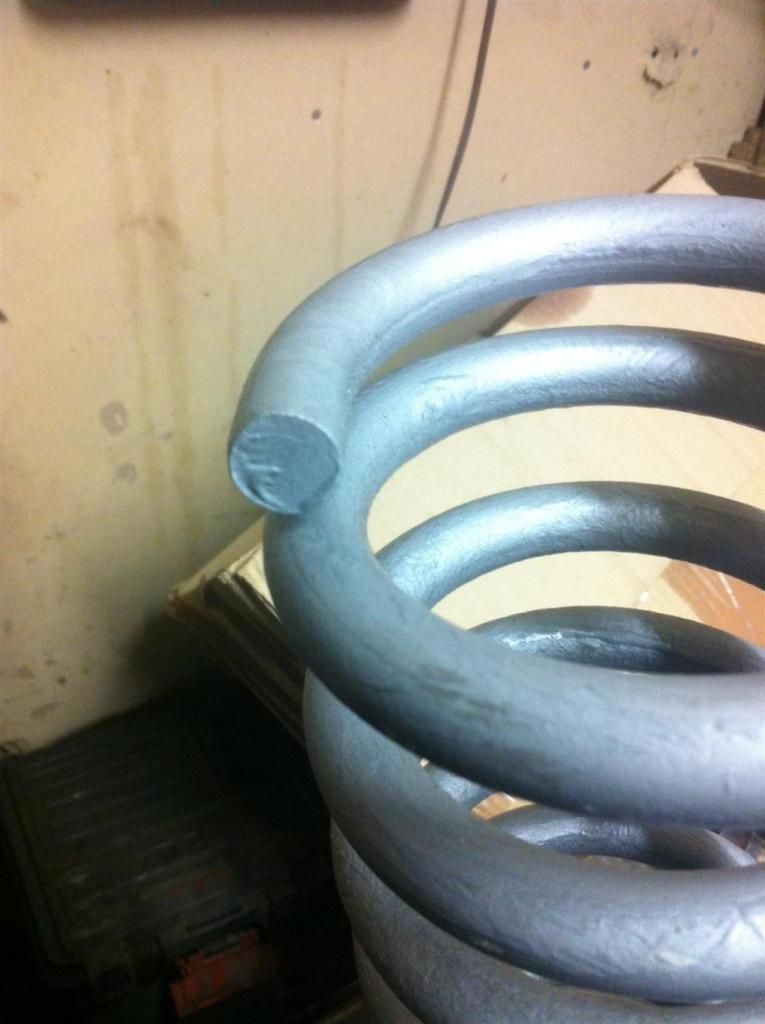 So, if you fit just 1 spring clamp from the inside of the spring so that it is acting on the side of the spring which faces towards the centre of the car, the spring will bow outwards opposite the site of the clamp: 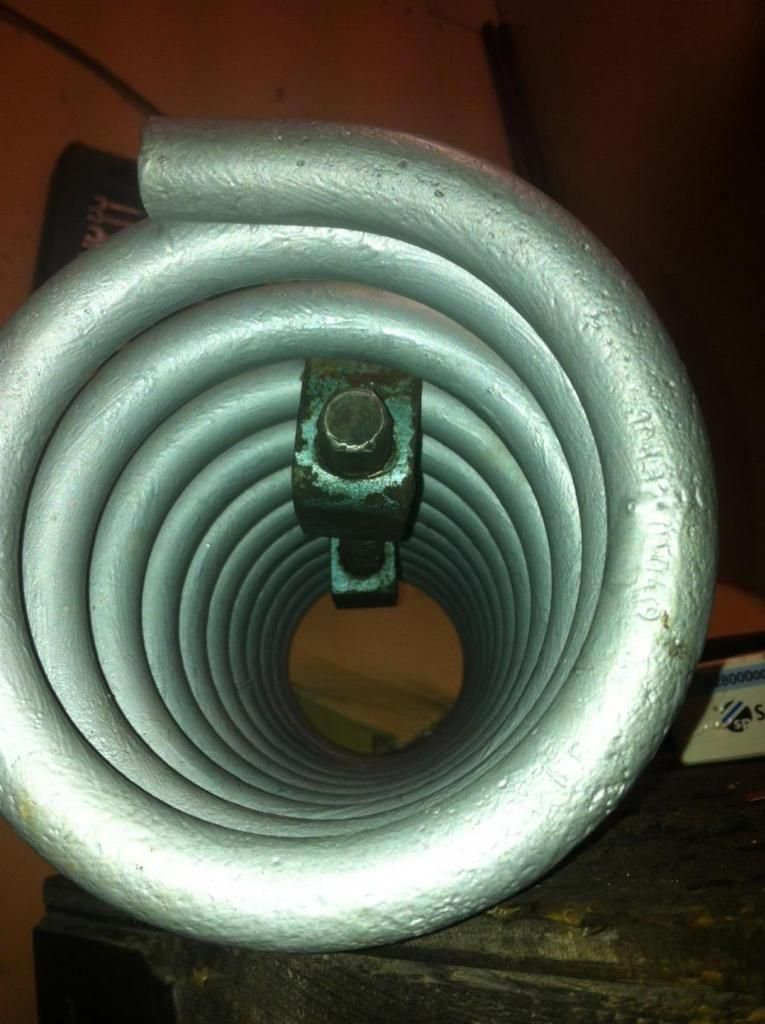  with the spring bent like this, there's a much more favourable angle between the bottom of the spring and its seat on the lower control arm. 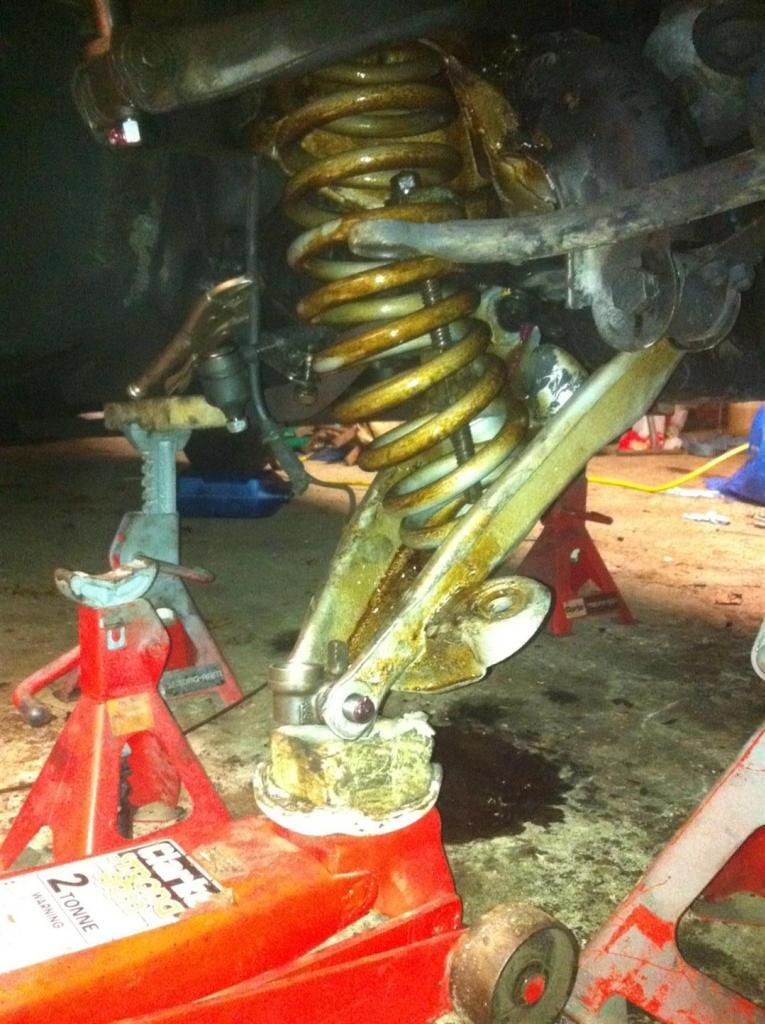 It is then possible to lift the control arm with a jack, compressing the spring. I used a trolley jack positioned so that it could roll out from under the car as the control arm end moved outwards. There's a critical point where the spring clamp has to be removed because if you compress the spring too much, it will "hold on" to the spring clamp. Once the clamp is out, you can compress as much as is required to prop the control arm allowing access to connect the kingpin and fix the whole assembly. 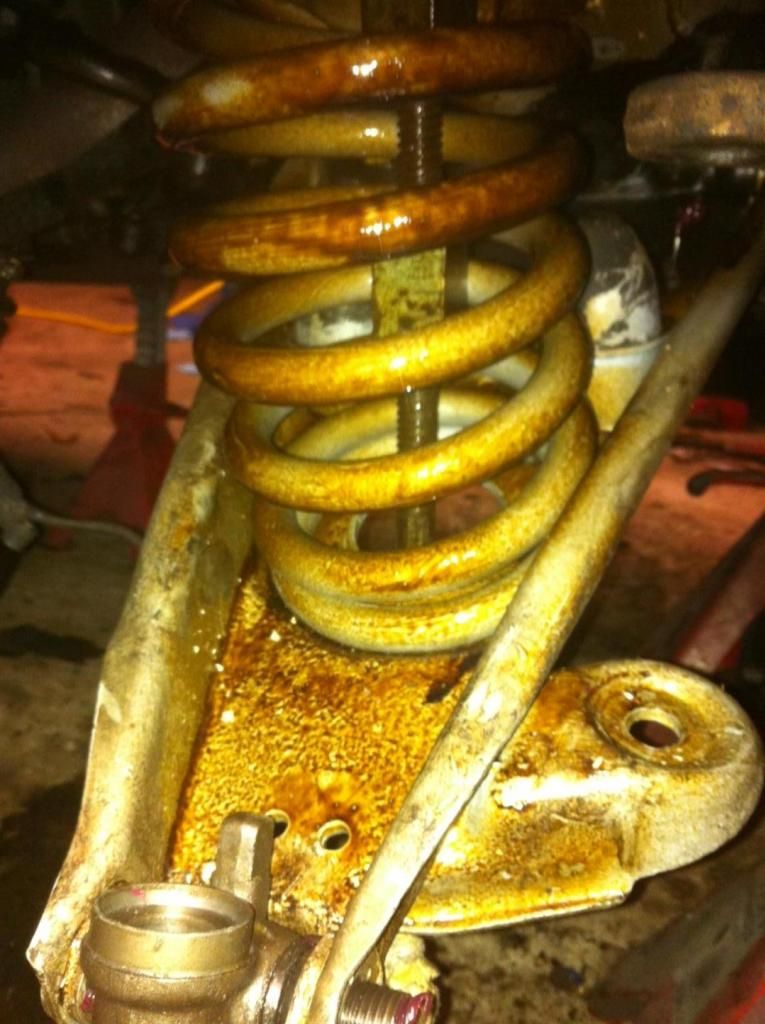 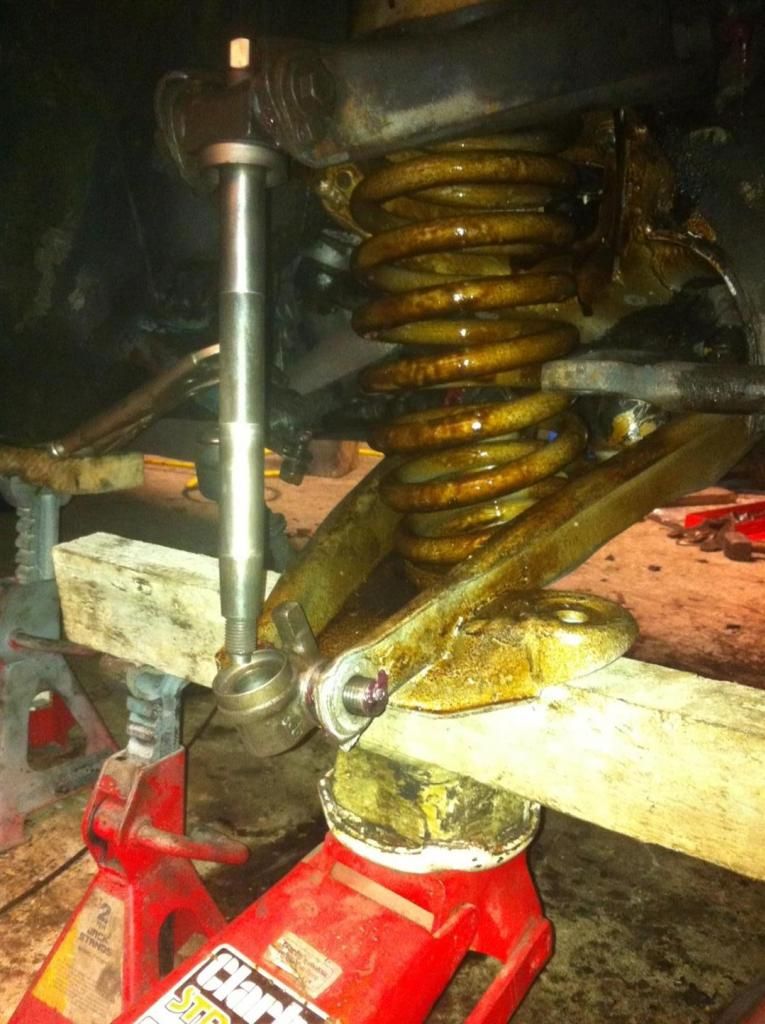 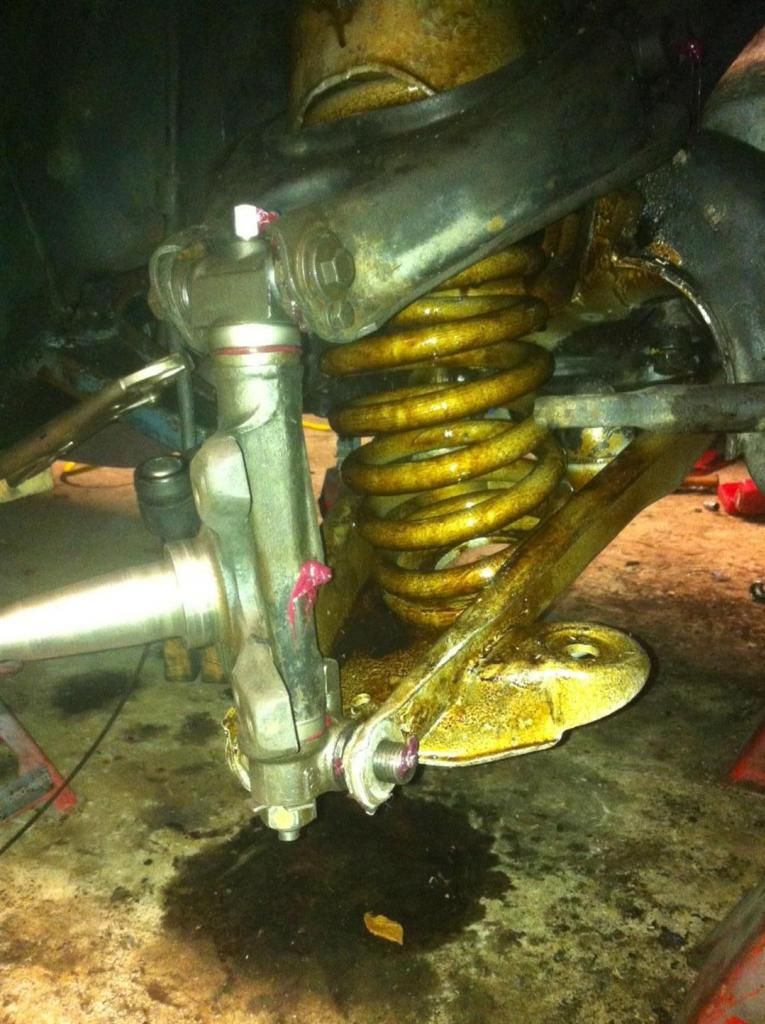 It took me hours to come up with this cunning plan, but I got the second side done in about 30 mins!
|
|
#8
02-18-2015, 05:25 AM
|
|||
|
|||
|
Work proceding on stripping the donor vehicle. It was slow and painstaking and it doesn't help that I was paranoid and being super-careful about tracing and labelling every cable.
Sorry about the poor phone quality pictures. The donor car:  Here's the power plant. It's had some boy-racer treatment, but doesn't seem to have suffered badly, still runs sweetly and very cleanly. 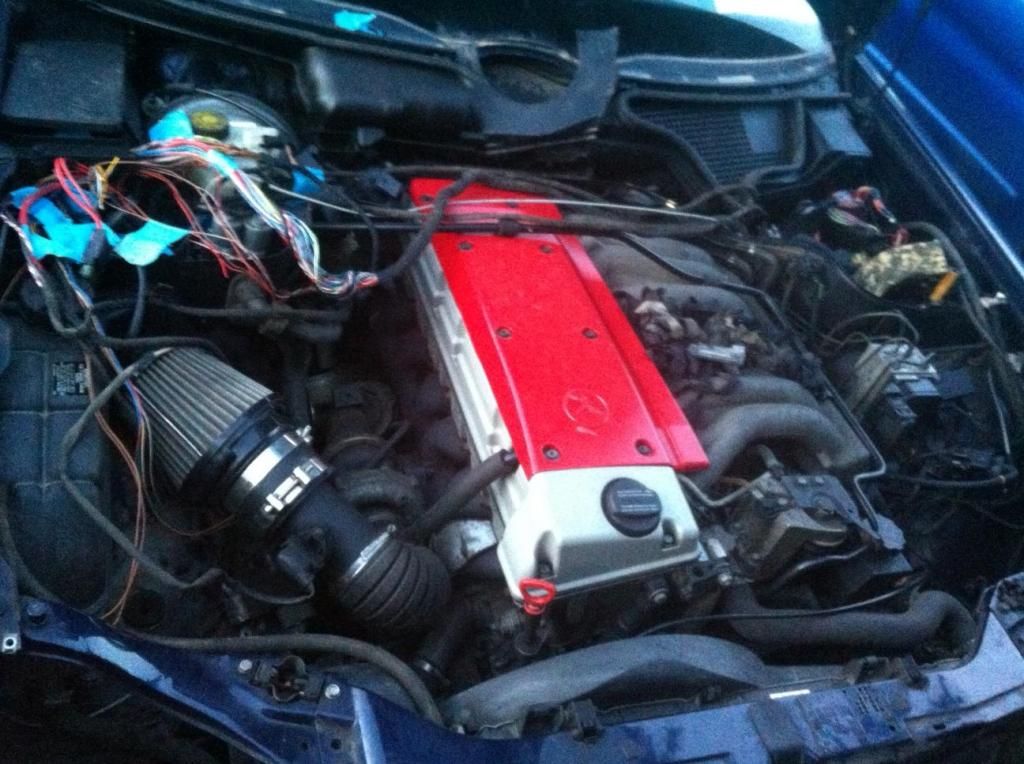
|
|
#9
02-19-2015, 06:05 PM
|
||||
|
||||
|
Your donor vehicle is nicer than my daily driver.
|
|
#10
02-20-2015, 05:15 AM
|
|||
|
|||
|
Quote:
Its lack of value here is almost entirely down to the regulations governing taxation. To operate this car in Ireland with a 3.0L engine costs about 1,500 Euro in road tax and 1.20 per litre or 4.54 per US gallon for fuel. So, this is a 14 year old car which costs a fortune to run, is starting to require replacement of suspension and brake components, has expensive spare parts. I bought it for 500. Nothing wrong with it except for a little rust on the front wings. The 1971 car I will end up with reduces that 1500 in road tax down to 56 since it is calssified as vintage. If I fuel it with vegetable oil, the savings are further increased. By going old, I also avoid the obligation to undergo an annual roadworthiness test. It makes for a powerful argument.
|
|
#11
02-20-2015, 06:47 AM
|
||||
|
||||
|
I didn't realise that Ireland also has the crazy road tax problems we have here in Holland. I hope you get to drive your newly adapted vehicle before they change the rules. Last year here in Holland you could drive a classic car with a diesel engine at a reasonable rate but now they have to be older than 40 years old. Keep an eye out for more modern engine changes to your old chassis. The UK has rules that makes that descrimination.
I think the use of all diesels will be limited in Northern Europe before too long... ...they'll probably ban them in the end.
__________________
1992 W201 190E 1.8 171,000 km - Daily driver 1981 W123 300D ~ 100,000 miles / 160,000 km - project car stripped to the bone 1965 Land Rover Series 2a Station Wagon CIS recovery therapy! 1961 Volvo PV544 Bare metal rat rod-ish thing I'm here to chat about cars and to help others - I'm not here "to always be right" like an internet warrior  Don't leave that there - I'll take it to bits!
|
|
#12
02-20-2015, 11:50 AM
|
||||
|
||||
|
1971 Mercedes W108 280SE conversion to diesel daily driver
Interesting.
Last edited by Lucas; 02-23-2015 at 12:44 AM.
|
|
#13
02-25-2015, 06:12 AM
|
|||
|
|||
|
This was a big moment, I finally finished the electrical strip down, wohoo!
I could make the engine run with only 4 12V connections and 2 fuel pipes. It was such a relief as the electronics were the part I was most worried about for the whole job. I just had 2 permanent 12V feeds, 2 which were switched by the ignition key and 1 for the starter solenoid. It was very satisfying. The wiring all still looks a bit of a mess but I can tidy it up once I know where to put everything in the project car. This spaghetti is mainly the old instrument cluster connections (I still hope to find a tacho and glow plug indicator light in there) and the computer diagnostic port connection. 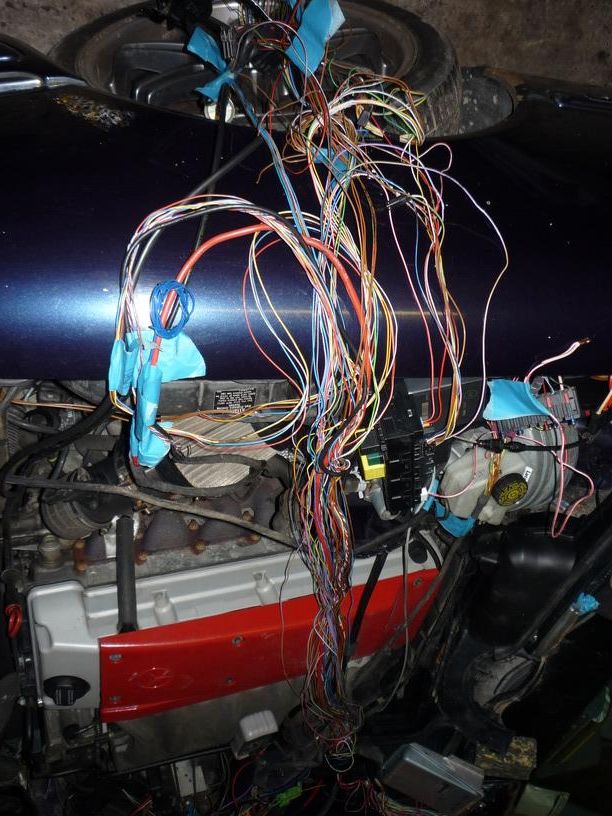 On the other side of the donor engine bay is another box of tricks, power for the ECU comes from here and some other stuff. 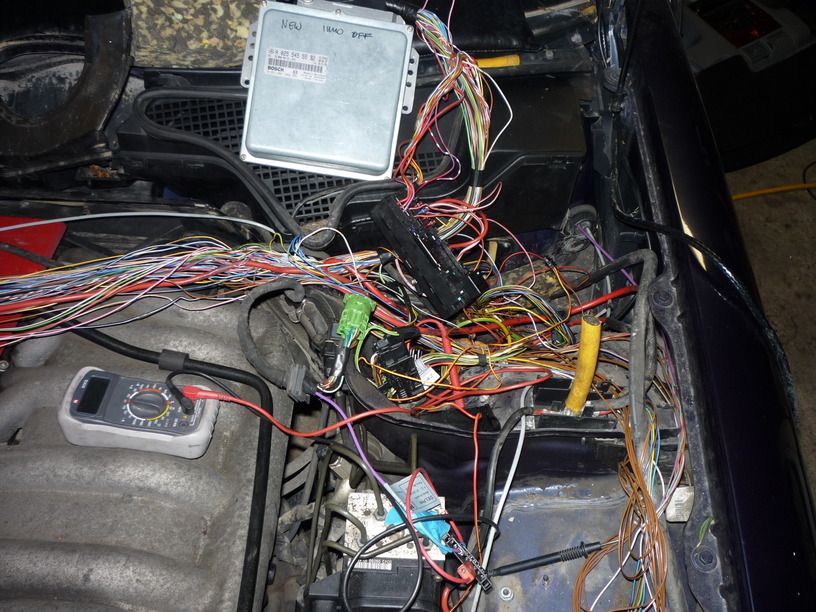 The interior isn't looking great. It turns out I didn't need anything from in here and could have left the dash intact, but I needed to get in there to trace some wires in order to learn this! I'll know for the next one ;-) 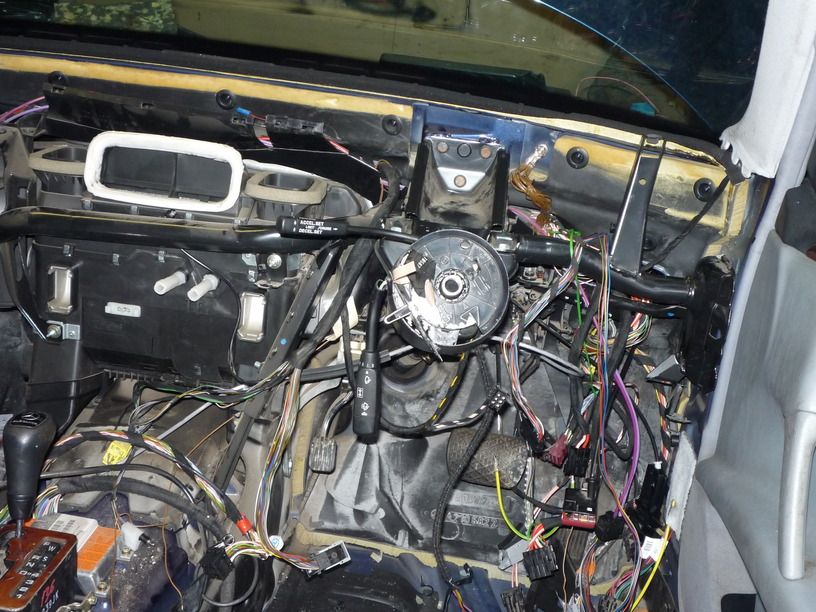 So, this is it with all the required electronics sitting on top of the engine. Attention now moves to the mechanical strip down! 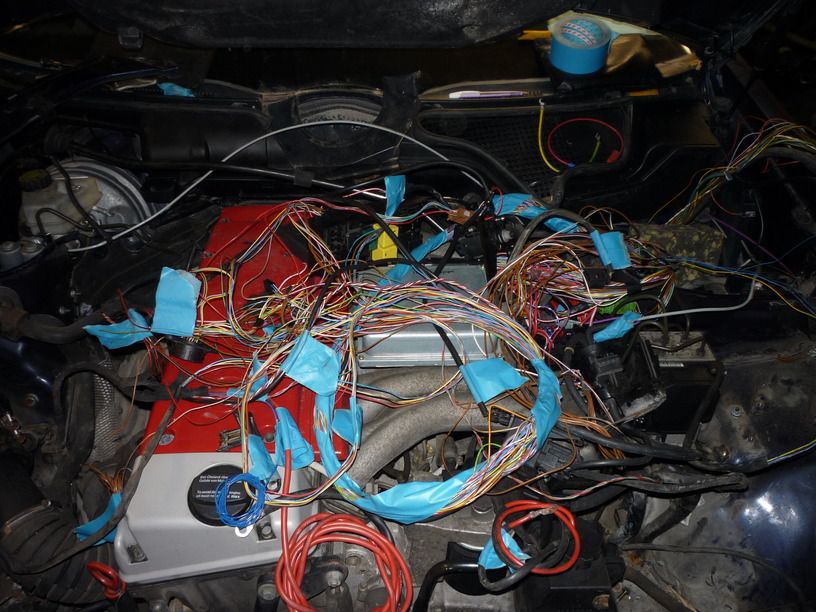
|
|
#14
02-25-2015, 02:27 PM
|
||||
|
||||
|
Oh man I thought my W201 was bad for wiring- obviously I don't know I'm born.
__________________
1992 W201 190E 1.8 171,000 km - Daily driver 1981 W123 300D ~ 100,000 miles / 160,000 km - project car stripped to the bone 1965 Land Rover Series 2a Station Wagon CIS recovery therapy! 1961 Volvo PV544 Bare metal rat rod-ish thing I'm here to chat about cars and to help others - I'm not here "to always be right" like an internet warrior Don't leave that there - I'll take it to bits!
|
|
#15
03-05-2015, 06:07 AM
|
|||
|
|||
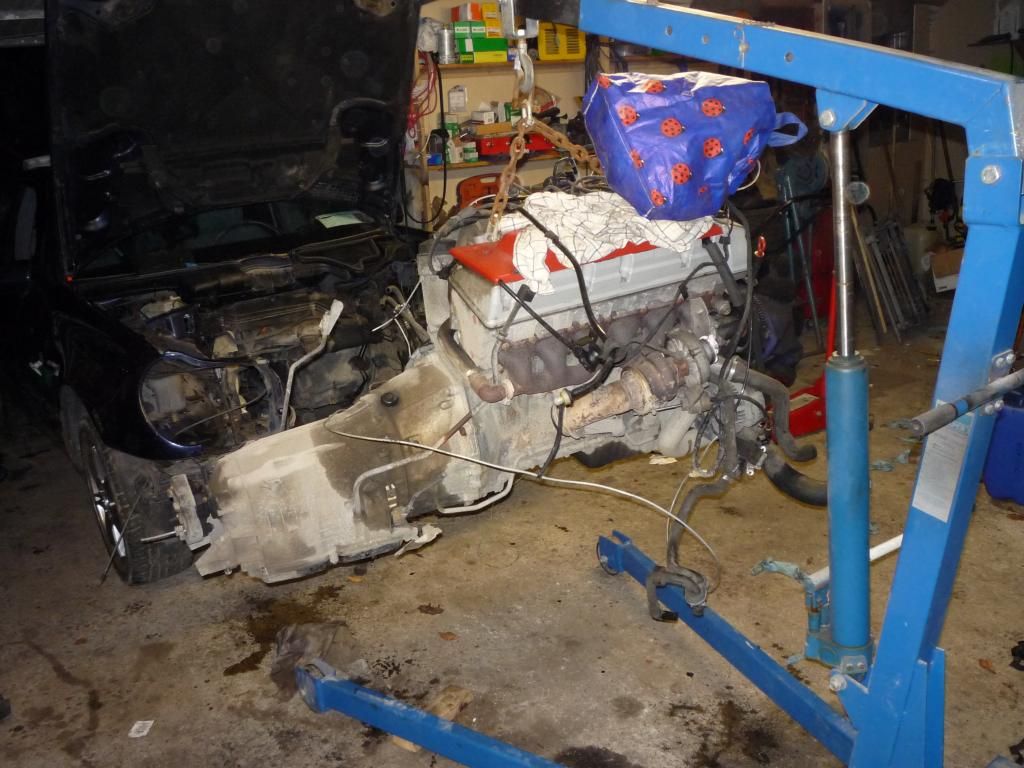 There she is, swinging in the breeze! The auto box was removed and I ordered what I hoped would be the necessary bits to install a clutch and flywheel. No tuning done at all, I plan to run it completely standard, so about 170bhp and bag loads of torque. Who knows, I might get enthusiastic further down the line, but This will be my daily driver, so fuel economy is a factor too.
|
 |
| Bookmarks |
|
|


 Linear Mode


