

|
|
|
|
|
|
#1
 04-05-2009, 06:48 PM
|
|||
|
|||
|
560sl flex plates and diff mount. NEED HELP
Got a 560sl, 86.Just want to install flex plates and diff mount.Anyone have a step by step of how to do this.Center mount and bearing are fine.I have it up on blocks,transmission is supported by jack.I have the front flex plate bolts out.I just need a little help from there.Thanks ahead of time
Last edited by Paratroop; 04-05-2009 at 07:02 PM. 
|
|
#2
04-05-2009, 11:24 PM
|
|||
|
|||
|
You will need to remove the exhaust. Its not to hard. Then remove the heat shields. Now you can loosen the drive shaft coupling nut, usually a large channel lock pliers will loosen this nut. Now the front shaft will slide backwards and you can replace the forward flex coupling. To disengage the flex coupling from the flanges put a large drift in each hole from the rubber side and pry on the hole, I prefer a tapered brass drift.
For the rear flex you will need to remove the two bolts that retain the center bearing. That will allow you to pull the rear shaft forward. Once everything is tight and in place including the trans mount, then tighten the driveshaft coupling nut. Good Luck
__________________
To see my 129 parts for sale visit: John Roncallo
|
|
#4
09-21-2009, 07:15 PM
|
|||
|
|||
|
Here it is with the two covers removed. Yours transmission will look slightly different because this is a modified installation.
The lower drive shaft in the second picture shows the drive shaft coupling nut. chances are you wont have to remove the exhaust and loosen this but that would be the text book proceedure. The upper drive shaft is a newer drive shaft without a nut. It has the same spline and caries nearly 2 times the HP of the 560SL shaft. It has not coupling nut and the shaft is just allowed to slide freely. Obviously MB found it not to be needed.
__________________
To see my 129 parts for sale visit: John Roncallo Last edited by Roncallo; 09-21-2009 at 07:25 PM.
|
|
#5
09-21-2009, 10:10 PM
|
|||
|
|||
|
Once you have loosened the giant 46mm nut, it can be a real pain to compress the driveshaft to remove the flex plates. This is because the splines corrode and fill with crap where they are exposed. Generally, you can move the driveshaft enough with force to get the flex plates out. But then you should use PB Blaster and a pick to clean the splines so the slip joint will move freely. Then with the new plates in, you should drop the car roll the it BW and FW a few feet, then tighten the giant nut.
__________________
Chuck Taylor Falls Church VA '66 200, '66 230SL, '96 SL500. Sold: '81 380SL, '86 300E, '72 250C, '95 C220, 3 '84 280SL's '90 420SEL, '72 280SE, '73 280C, '78 280SE, '70 280SL, '77 450SL, '85 380SL, '87 560SL, '85 380SL, '72 350SL, '96 S500 Coupe
|
|
#6
09-21-2009, 10:49 PM
|
|||
|
|||
|
Roncallo, great it really helps with photos. by the way how hard is it to loosen that nut?
ctaylor738, is the splines on each flange for flex disc? or just front flange? I also bought center bearing and bearing mount. Is it hard to press in bearing to bearing mount? Heard other cars it can be difficult to press in also could damange without right equipment so shop need to do with machine. is that right? Thanks again for help guys. Last edited by motozine; 09-21-2009 at 11:00 PM.
|
|
#7
09-22-2009, 08:20 AM
|
|||
|
|||
|
The splines are just in front (I think) of the center support. The giant nut clamps on to them.
If you contemplate doing your center support, be sure to mark the driveshaft halves so you can put them back together in the same position. Never done a center bearing, just the support. I dimly recall that you need a press to do the bearing.
__________________
Chuck Taylor Falls Church VA '66 200, '66 230SL, '96 SL500. Sold: '81 380SL, '86 300E, '72 250C, '95 C220, 3 '84 280SL's '90 420SEL, '72 280SE, '73 280C, '78 280SE, '70 280SL, '77 450SL, '85 380SL, '87 560SL, '85 380SL, '72 350SL, '96 S500 Coupe
|
|
#9
09-22-2009, 11:11 AM
|
|||
|
|||
|
Yes, the splines need to go back the way they came apart.
3-4 hours for the job assuming nothing goes wrong, not counting running parts or the trip to the machine shop.
__________________
Chuck Taylor Falls Church VA '66 200, '66 230SL, '96 SL500. Sold: '81 380SL, '86 300E, '72 250C, '95 C220, 3 '84 280SL's '90 420SEL, '72 280SE, '73 280C, '78 280SE, '70 280SL, '77 450SL, '85 380SL, '87 560SL, '85 380SL, '72 350SL, '96 S500 Coupe
|
|
#10
09-22-2009, 08:14 PM
|
|||
|
|||
|
Later drive shafts including the 560SL have alignment marks from the factory see picture. The drive shaft "U" joint is very difficult because its staked in see photo. I have found the "U" joint online from only one place Parts America and have had good luck re staking it in. The big nut is usually not as tight as it is supposed to be and can generally be removed with a large channel lock.
If you are going down this far you will have no choice but to remove the exhaust and exhaust shields. It's not to difficult. when you service the center bearing you should replace the center bearing and rubber support as well as the spline boot as a minimum. Only replace the U joint if needed.
__________________
To see my 129 parts for sale visit: John Roncallo
|
|
#11
09-22-2009, 08:16 PM
|
|||
|
|||
|
Quote:
__________________
To see my 129 parts for sale visit: John Roncallo
|
|
#12
09-22-2009, 11:30 PM
|
|||
|
|||
|
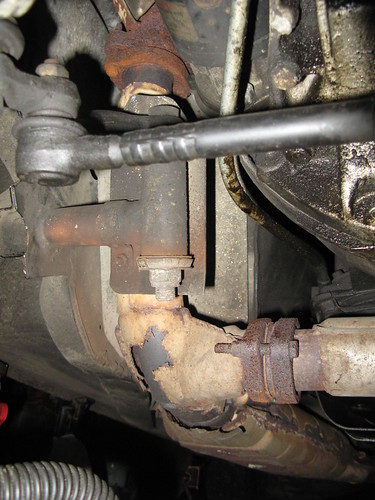
This evening I spent little more time to look close after heat shield out.
 I see exhaust need to be removed but I'm not confident removing old rusted bolts ties exhaust together. I don't know i can loosen'em without breaking it. Do you think I can have enough room just lowering the exhaust to floor from unmounting rubber exhaust hangers? I see 3 hangers all together. Didn't try because concern that will snap breaking front section somewhere due to weight or exhaust  More advise please. Really appreciate. Thanks.
|
|
#13
09-23-2009, 06:56 PM
|
|||
|
|||
|
If the exhaust was last installed with the original style copper coated nuts you will have no problem. You will need to remove the two nuts supporting the right side to the exhaust manifold and separate the cross over pipe by removing the two bolts.
Do not worry about snapping a stud on this car they can just be driven out and replaced. The Germans did this very well. Of coarse replace everything using the copper coated nuts form MB. the only difficult part of this exhaust system is removing the rear muffler from the forward pipes, but you have no need to do that.
__________________
To see my 129 parts for sale visit: John Roncallo
|
|
#15
09-24-2009, 07:05 AM
|
|||
|
|||
|
Quote:
__________________
To see my 129 parts for sale visit: John Roncallo
|
 |
| Bookmarks |
| Thread Tools | |
| Display Modes | |
|
|


 Linear Mode


