

|
|
|
|
|
|
#1
 09-22-2013, 07:53 PM
|
|||
|
|||
|
Mercedes Benz 560 SL / SEL / SEC Timing Chain Replacement
I am making this thread for people that may consider trying to replace their timing chain guides by themselves. I must give fair warning to people that are not mechanics that this job is by no means a DIY (Do it yourself) kind of job unless you have a solid background in automotive repairs. While it's not impossible to do, there are some procedures that could end up costing the inexperienced a lot of money.
Here is what a fractured guide will look like on the left passenger inboard side. Keep in mind this guide is not supposed to move. This guide was factured in the center. Keep reading for more details. [video=http://www.youtube.com/watch?v=dyrA3ys1vms] 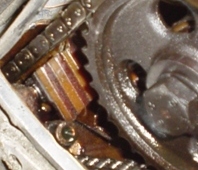 Above is a thumbnail photo of what happens soon after the guide fractures. In the video we are showing a fractured guide that has not yet fallen into the path of the timing chain and sprockets. 90% of the time when the top portion of the guide falls into the chain path it will create an interference situation that bends the valves. In addition to the 3 cylinder head guides and the tensioner guide there are also two more nylon guides down low behind the timing cover in addition to another tensioner guide that runs on a separate chain drive for the oil pump. Given their location and the extreme amount of labor involved in getting at them, often times these lower guides are left until such time as the engine is overhauled. Luckily these other two lower guides are not known to be as problematic as the upper guides and the tensioner guide. That's not to say they shouldn't be replaced, just that often times the cost and amount of time to do so usually merit pulling the engine and going thru the engine. At the very least pulling the cylinder heads will make for a cleaner re-install of the timing cover should you elect to replace the lower block mounted guides. So often times many will just replace the 3 upper cylinder head guides, the tensioner guide, the tensioner itself plus the chain. I highly recommend using ONLY OE Mercedes-Benz parts for this job or parts approved by Peach/Pelican parts. But everyone knows what SELLC would say. These repairs shown are of a 1989 Mercedes Benz 560 SL and are about the same for all 560's except for little differences with regards to the engine attachments. While this procedure is shown with the intake manifold removed, removal of the intake is not necessary and is removed on this vehicle to address other seal related maintenance not related to timing chain guides. The photos pick up assuming you have already removed the valve covers, power steering pump + bracket, Alternator + Bracket. The power steering pump and alternator can often times be set off to the side.  In this photo above we are getting the timing marks in line and marking the position on the left drivers side. In this photo you can see the small marks in the center of the cam shaft are aligned.  In this photo we are showing the timing marks on the right passengers side. 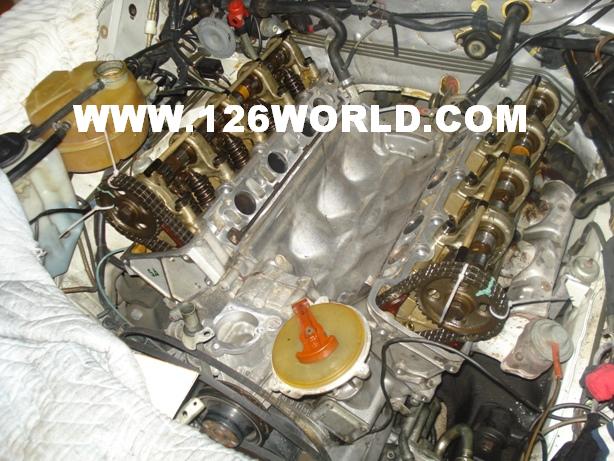 In this photo we are showing the engine set to TDC. Sometimes when I am doing the job by myself I use tie-wraps to keep the chain and sprocket together when the time comes to pull them. It also helps when you use an impact to loosen the center cam bolt. Be careful when removing them so they do not fall in the engine. 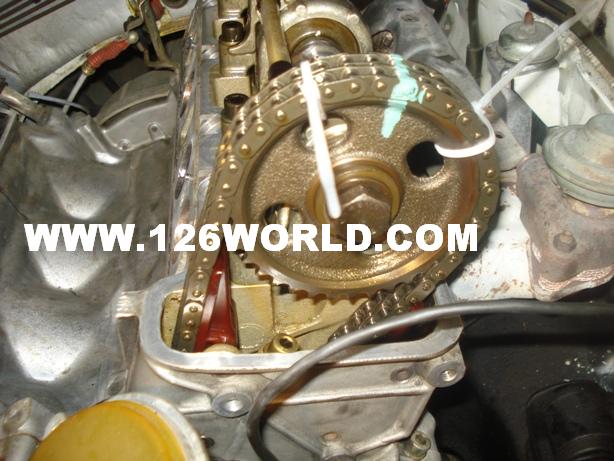 This photo shows the left drivers side cam marked and secured prior to cam sprocket bolt being removed. 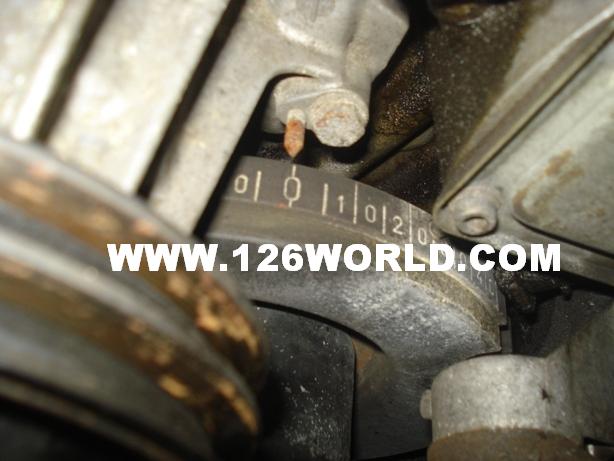 This photo above shows the crankshaft timing marks. Notice it's pointing to the Zero position. You will also want to ensure the ignition distributor rotor is pointing to the #1 position. If the crank reads zero and and the distributor rotor is pointing to #1 plus your cam marks are lined up your ready to start. 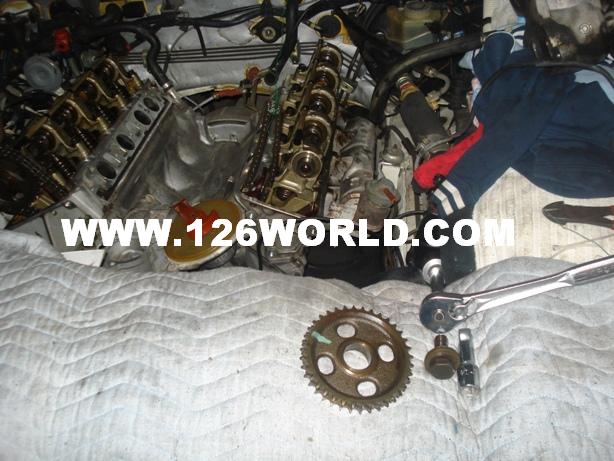 Using an impact wrench put a quick zap on the bolt just to break it loose. It would be a very good idea to secure the camshaft with a pair of channel locks. There are nubs in the center of the cam you can use to secure the cam but you must mind the camshaft oiling tube, it has plastic clips that can break very easy. Once the bolt is broken free it should thread out by hand. Set the bolt to the side and then run a wire from the hood down to the cam sprocket. Leave enough slack that you can use the wire to suspend the timing chain. Use the wooden end of a hammer to tap on the back side of the sprocket. Mind the timing chain, try to center just below it. Remember you are doing the tapping with the wood end of the hammer. Never use the steel portion of the hammer. A rubber mallet may work but small bits often fall off and I don't care for them in this situation. A good couple taps and you should see it moving. Wiggle it and pull towards you near the end. Mind the chain! 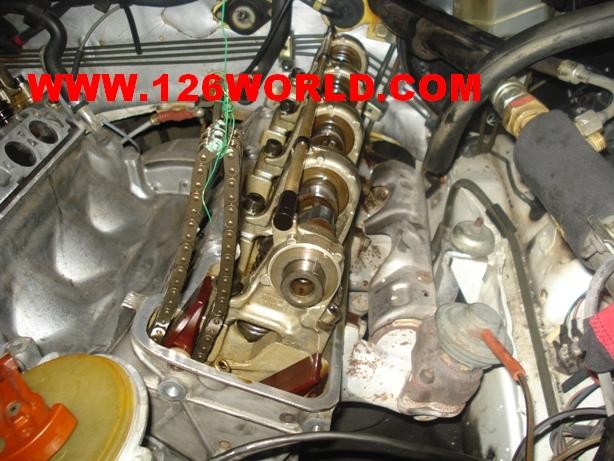 When the cam sprocket comes off you want to hold the chain up and work the gear out. DO NOT LET THE CHAIN FALL IN THE ENGINE! IT MUST REMAIN TAUGHT. Use the wire to keep it up while you begin to replace the guides. 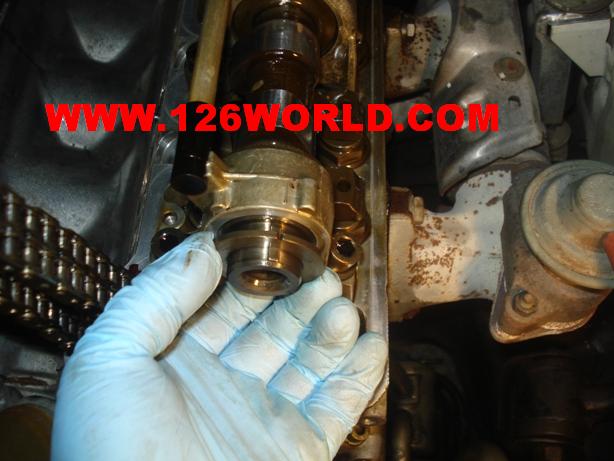 You want to mind this washer. It could fall in the engine. Re-Install your bolt now to ensure it does not fall. 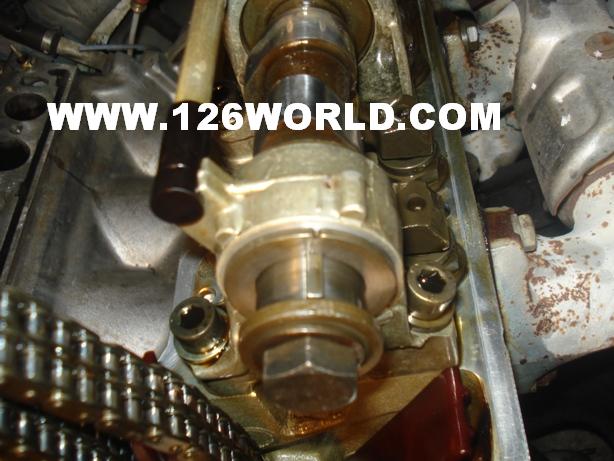 Here the bolt is screwed in hand tight to retain the sprocket to cam washer/timing mark. 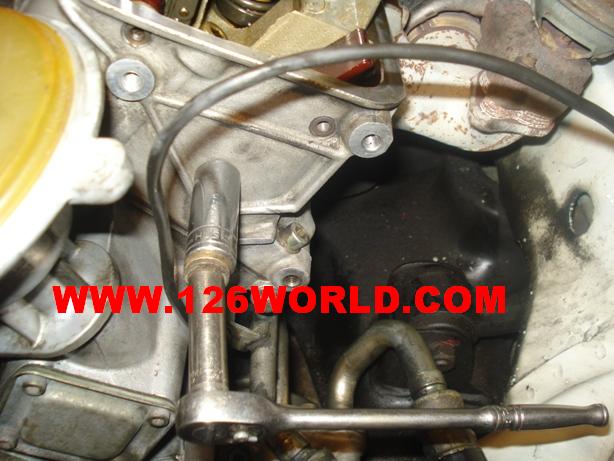 Pulling the guides is somewhat easy once you have done a lot of them. There is a nice little tool out there to pull them but as of yet I have been using extra valve cover bolts with a socket and washers to fashion my own pin puller. If you cant get your mind around the concept just buy a puller. When pulling the pins without a puller tool you have to be VERY careful not to jam the pin into the tool while its pulling. Some areas have un-even surfaces and you will have to fill the gaps to get them to pull out. It is possible to strip and bend these pins. What I mean by stripping them is you can literally pull the threads out of the pin if the pin lacks the clearance to pull out without hitting on the socket. This can happen even with the tool if you are not careful but the tool greatly increases your chances of success. In the event you pull the threads out of one I have found that a high quality big steal screw and a pry bar will work them out, but then you will need a new pin. 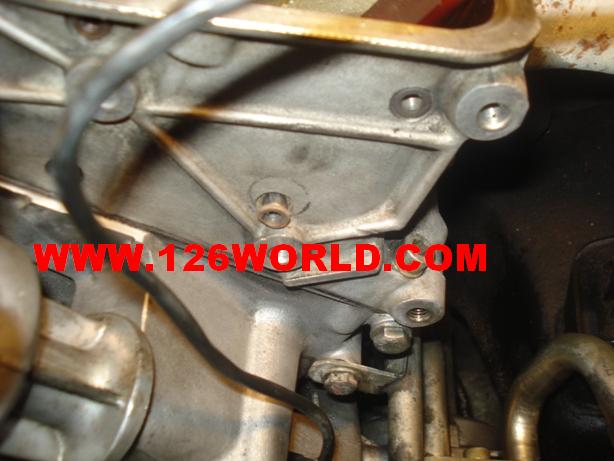 Here you can see the pin has been pulled. From here you should be able to pull the pin out by hand. 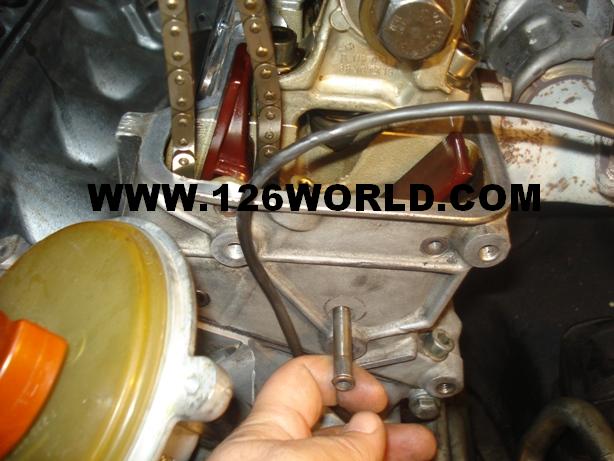 The pin shown in this photo is the last one that holds the guide. Be sure to be holding the guide so it does not fall into the engine once this pin is removed. 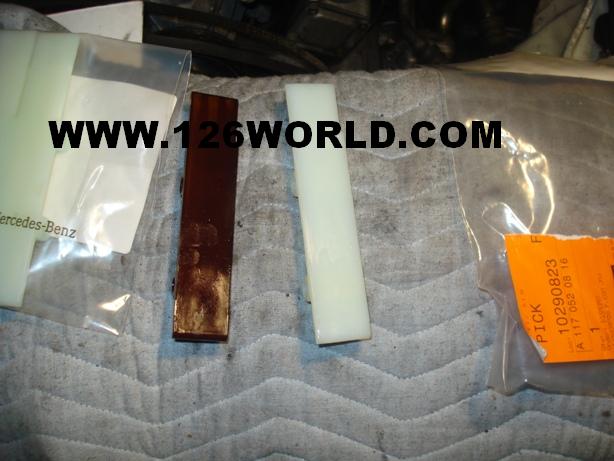 Here is a side by side of the old guide with the brand new Mercedes-Benz guide. You can feel how brittle these parts get with age when they are side by side. 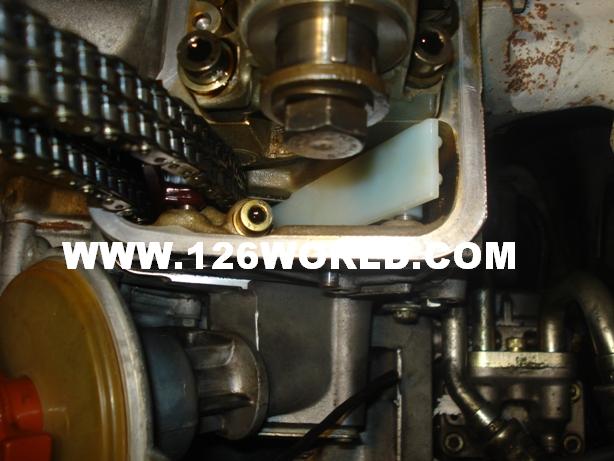 Slide your new guide in and push the pins thru. Be sure to line up the holes on the guide to the holes in the head. You may have to lightly tap them in order to get past the resistance of the plastic but I mean lightly tap! Remember you have to be sure they are slightly in their bores once you clear the guide before driving them the rest of the way in. You will also have to apply some sealant to the end to prevent oil seapage. This is shown in the next photo. 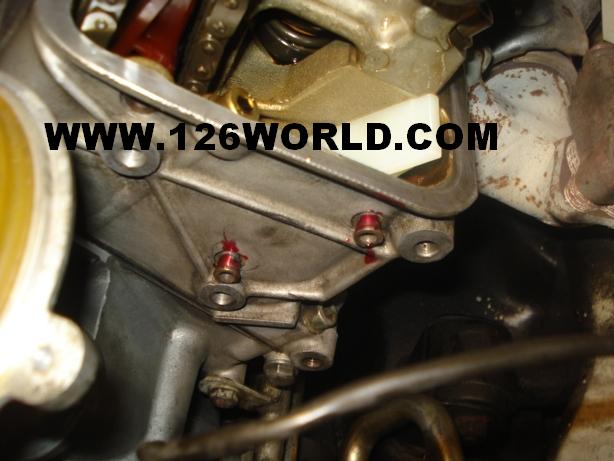

|
|
#2
09-22-2013, 08:01 PM
|
|||
|
|||
|
Here I have the pins thru the guides and aligned with their bores. I like to use a little Red loc-tite. Once you have applied your sealant get a 7mm socket and hammer, use them to drive the guides down in their bores. You will know its seated when the tune of the blows changes to a solid knock. You don't have to get carried away. Bent pins will be very difficult to center and could damage the bore so be sure to check they are all straight before you re-install.
 Remove the distributor. There should be a small hash mark in the center of the ignition rotor terminal, it should be aligned with a small hash mark in the distributor hosing. You can also use a marker to draw a line too. The distributor must be removed to access and remove the inboard left drivers side rail pins. 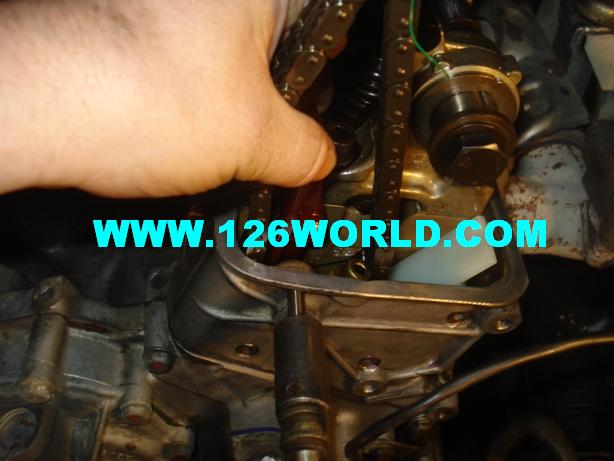 In this particular case this guide was so brittle it fractured on the lower pin. There was only 90,000 miles on this 1989 installed guide so it's easy to see how this fracture eventually falls out and into the drive path of the chain and sprockets. When that happens say goodbye to about 5-8K unless you like doing head gaskets. It ends up bending all the valves on the drivers side head and cracking the valve cover as well. This customer was extremely lucky this guide was caught in time. 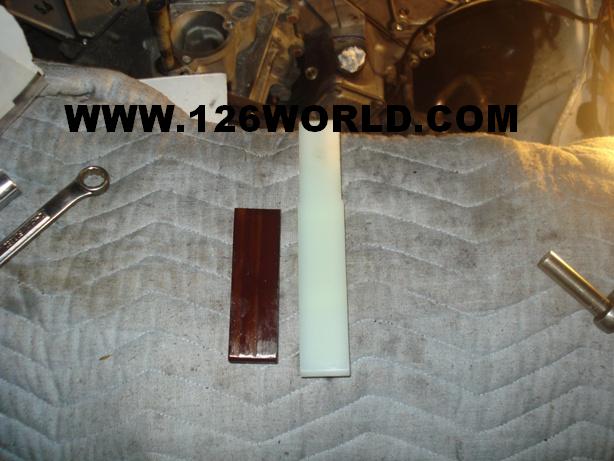 Here is a photo of the fractured guide. This paticular guide is also the same as the passengers side. It is the notorious guide that you hear about causing an early death to a Mercedes engine. 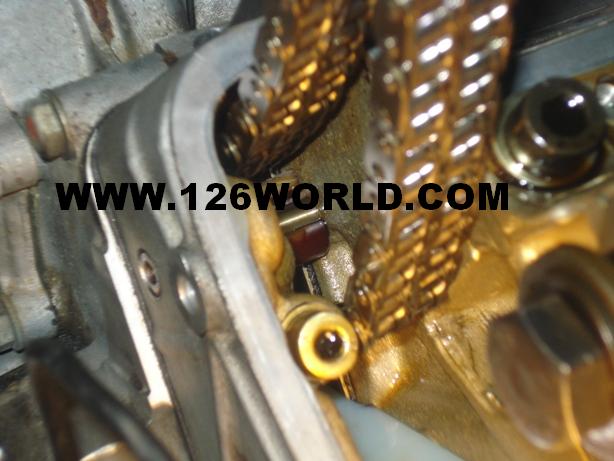 Here you can see the lower half of the left drivers side inboard chain guide. Notice how it's just hanging there by a thread of material! It would not have been long before this guide would have created an interference problem that would sent the pistons crashing into the valves. In this rare case where it has not yet fallen you must also take extreme caution not to drop it in there yourself! Once the lower pin is pulled you must have some needle nose pliers holding the guide, and even then it's tricky to work it out without the material crumbling or having it slide out of the pliers. If you are ever lucky enough to see this scenerio better hope you have enough luck left to get it out.  Another look at the top half of the fractured upper guide on the left drivers inboard side. 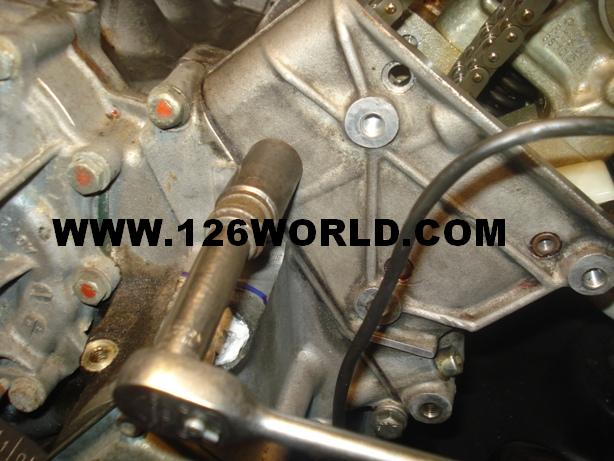 The lower pin is being removed. Mind you this is one of the easier pins to remove compared to the rest. 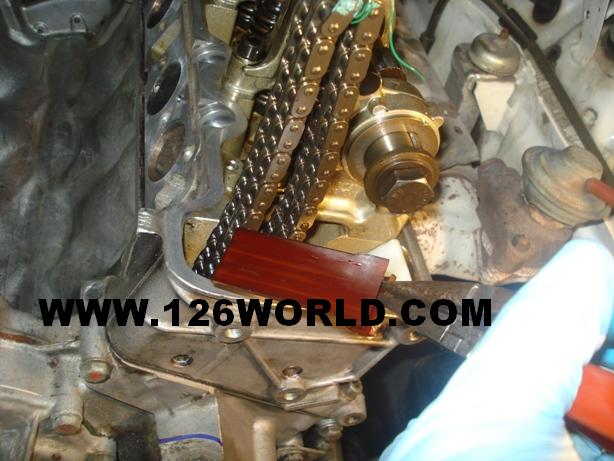 Here I manage to pull out the fractured lower half of the fractured upper guide on the left drivers inboard side. It's a little tricky but I managed to do it without any help. 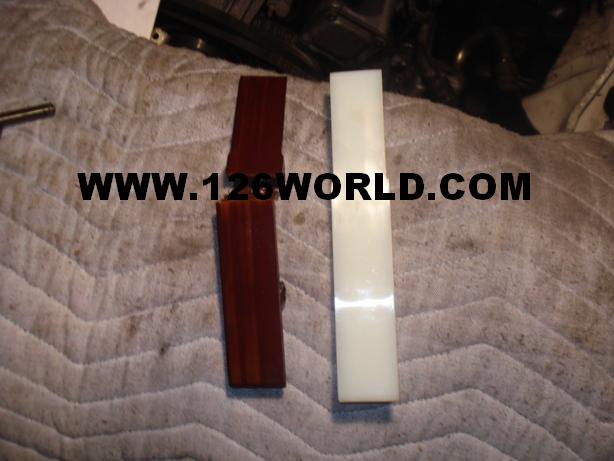 Here is the top and bottom half of the fractured left drivers inboard guide next to a brand new one. 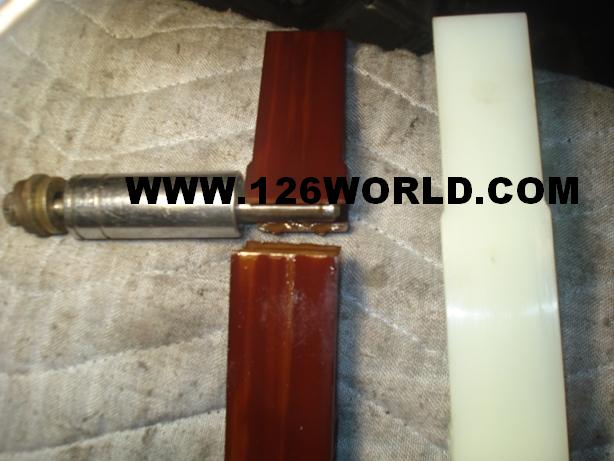 Here is a photo of the unit with the pin. Also show is a makeshift pin puller fashioned out of regular tools and some spare valve cover bolts. If you do not have spares take one to a hardware store and buy one the same size and thread. Try to get grade 8 or better. Might want to pick up two or three in case it gets ugly. 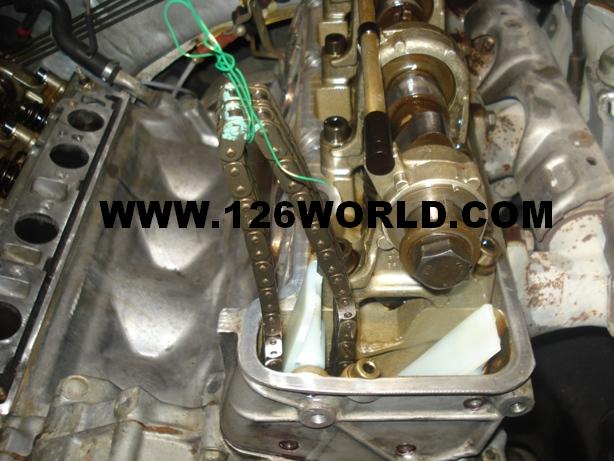 Here is a photo showing the installed left passengers side inboard guide rail with pins locked in place.
|
|
#3
09-22-2013, 08:02 PM
|
|||
|
|||
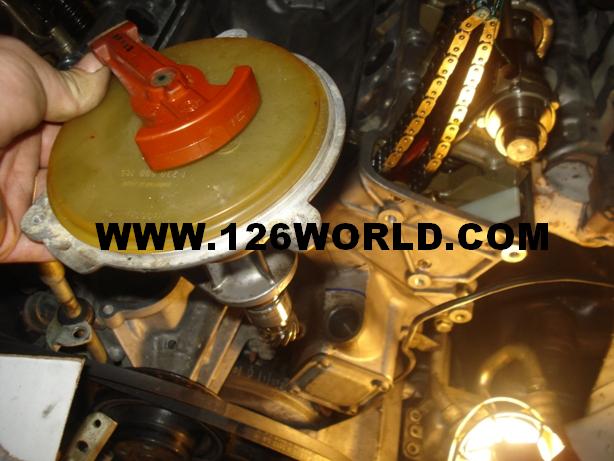
 Here we have re-installed the cam sprocket. Be careful when re-install the gear on the chain, you don't want to break your new guides. This is where putting a line on the chain and sprocket comes in handy because you get a front view. Be sure everything is aligned before you tap the sprocket on. If you dont have it lined up and you tap on it too hard it will push the cam back in its bore and create some serious issues. It must be aligned and this is where experience with repairs or at the minimum patience will come in handy. It's tedious maneuvering. 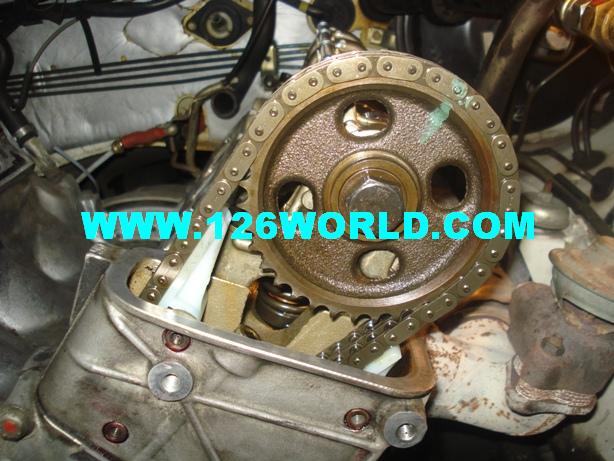 Another shot of the guides installed with the sprocket. Chain in the front is exactly in the same spot. 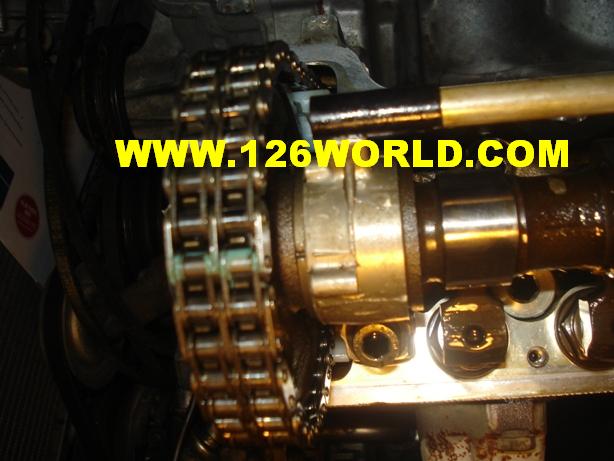 Here is a shot of the back side timing marks. They too must be dead on after installation of the cam sprocket. 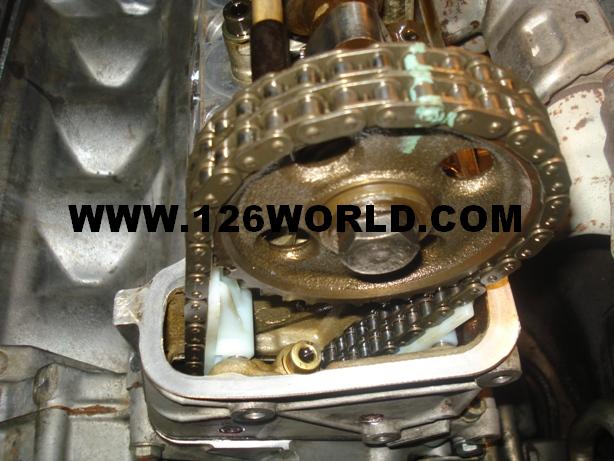 Here is another view of the new timing chain guides installed on the left drivers side cylinder head. 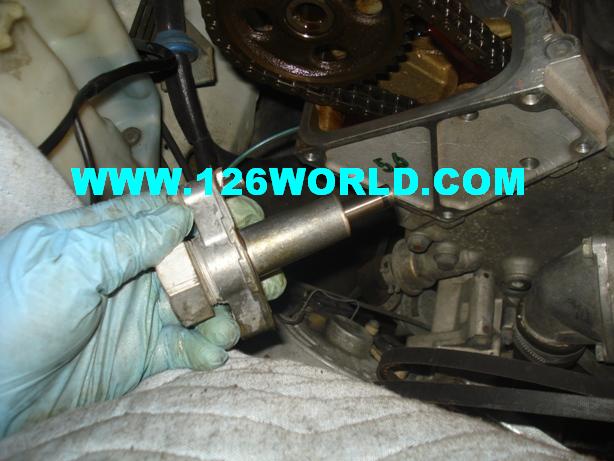 Moving to the right passengers side you must remove the timing chain tensioner as shown above. It is located on the side of the front right cylinder head. Remove the two bolts that hold it on. Do not remove the big center cap. 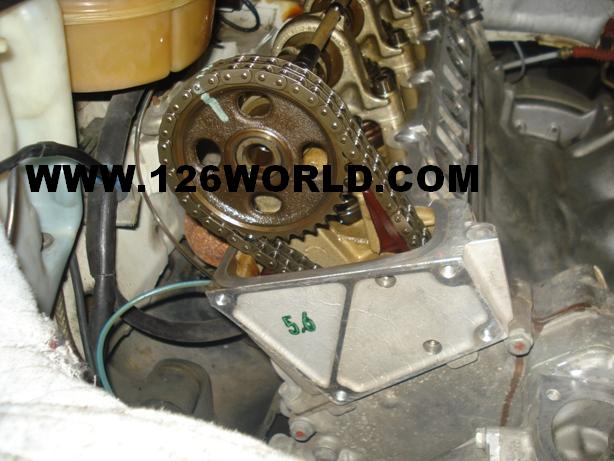 Here I have removed the right passengers side camshaft sprocket bolt. Same thing as above on the left drivers side.  When removing the right passengers side cam sprocket you will hear a noise. That noise will be the cam shifting clockwise off the cam lobe. This is normal but you will have to rock the camshaft back when re-installing the cam sprocket. Tie up the chain just like you did on the drivers side. There is also a washer + spacer on this side so put the cam sprocket bolt back in hand tight to keep them from falling into the engine. 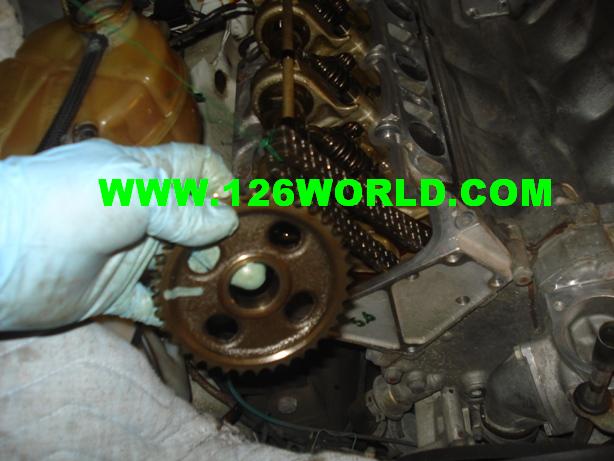 Here is a photo of the right passengers camshaft sprocket removed.  Here we have another well known guide related fatality. This is the "Tensioner" guide rail and it too is made of a Nylon like material. As you can see from the deep grooves in the rail it too is getting close to sawing the guide in half! This guide attaches to a steel "Banana" like arm. The tensioner applies tension to this arm which in tern tensions the chain. The chain makes contact with the guide at all times. When this guide falls off the chain will ride on the aluminum arm, causing metal shavings to enter the engine and also prevents the tensioner from doing it's part in taking up chain slack. This too can cause piston to valve clearance fatalities. Unfortunately we didn't have any of these in stock and thus the customer elected to do the job right and replace them. Often times people try to get away without replacing this guide, or the tensioner. That is a very bad idea unless you do your own repairs and don't mind rebuilding the heads. If you are paying someone else to do the work best to budget for these items and take advantage of the overlaping labor of having them replaced "While the mechanic is in there". As promised I am finishing this thread off with details on how to replace the right passengers side guide rail and tensioner rail. Maybe in the next few weeks I will post up photos of how to roll a new timing chain in, however it's important to remember that if you are going to replace the chain the guides must all be installed prior to rolling in the new chain. 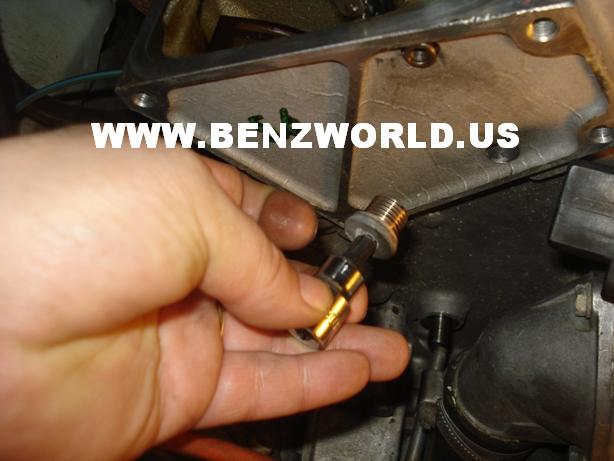 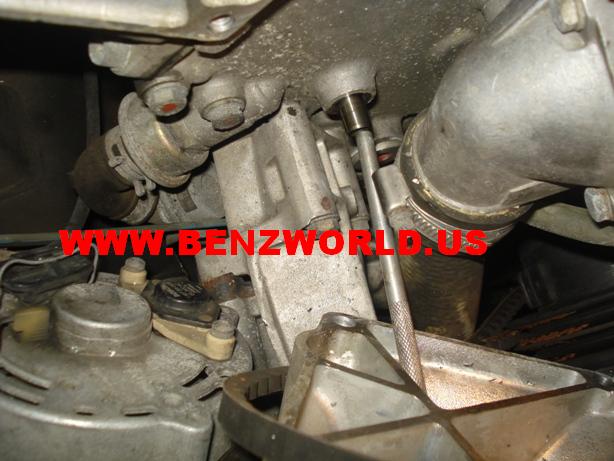 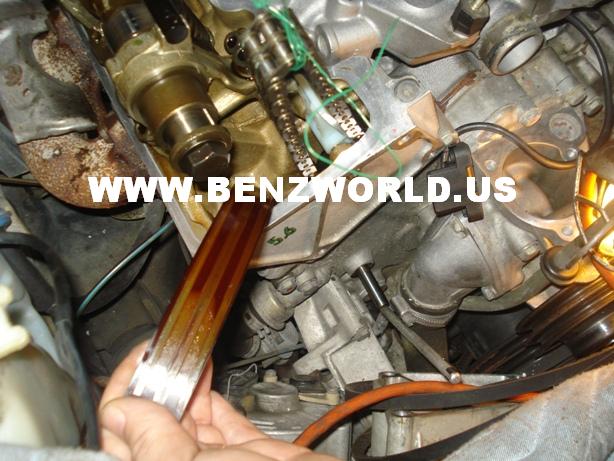 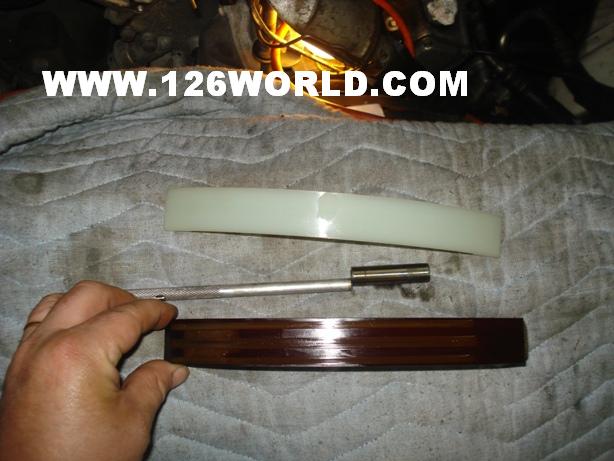 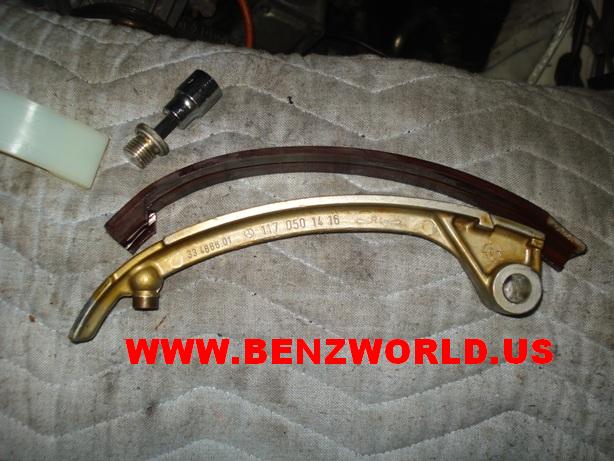 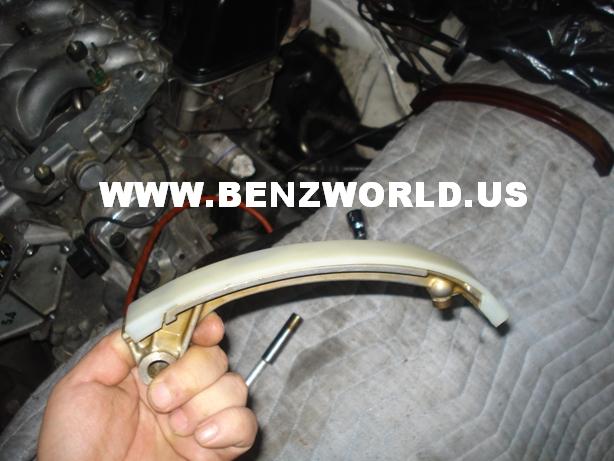 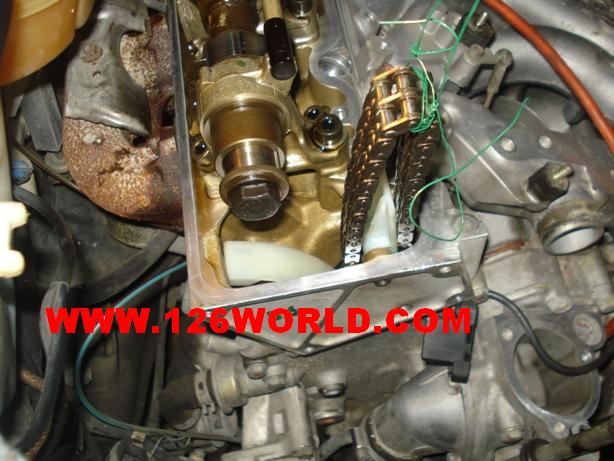  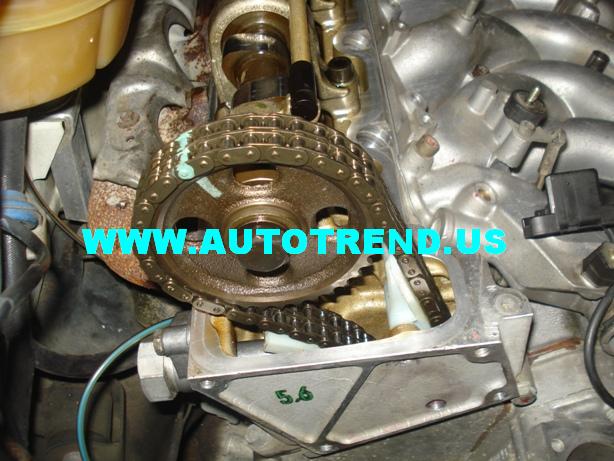 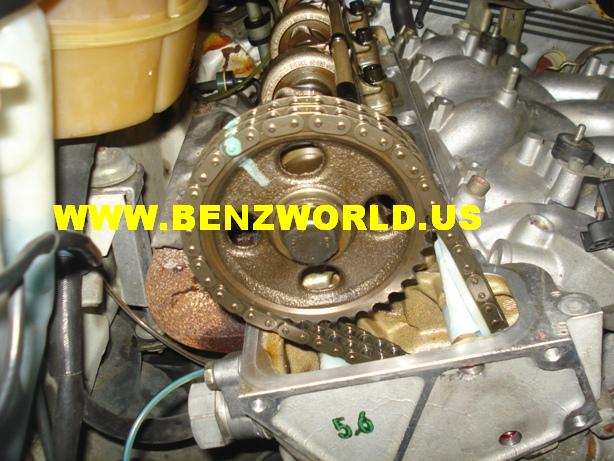 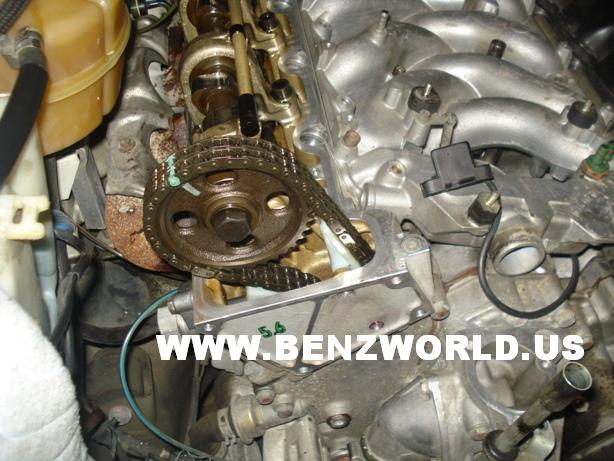 If you are replacing the timing chain now would be the time to roll the new one in. I will start a seperate thread for rolling in the timing chain later.  Please note - autotrend / benworld / 126world does NOT sell new parts. It is a private service/repair shop and does not deal in new parts sales! Contact Pelican/Peach parts or Mercedes Benz for your new parts needs. USE OF INFORMATION IS AT YOUR OWN RISK. Thank you. Last edited by SELLC; 09-22-2013 at 10:14 PM.
|
|
#4
09-24-2013, 06:59 PM
|
|||
|
|||
|
Thanks for the information. I have an 89 560SL
I have started noticing a slapping sound during startup...Not Always.... I am thinking it's time for a new timing chain!!!! Close to 200,000 on the odometer. How do you know if the tensioners need to be changed. Basically according to your information, I only need to remove the power steering & Alternator equipment, and the distributor. I try and do all the repairs on my own. I have rebuilt engines, etc. the only thing I haven't tried to tackle is rebuilding transmissions.. so hopefully I can handle this. Any suggestions, information, photos etc. that you have is appreciated. I'll have to figure out how to make that tool?? Thanks
|
 |
| Bookmarks |
|
|


 Linear Mode


