 |
 |
 |
 |

|


|
|
|
|
|
|
#1
|
||||
|
||||
|
how to remove W201 style front LCA bushing without special tool
I'm replacing the front LCA bushings on the '87 300D. The aft bushings are the W201 style that press in from the rear vs the more common two-piece bushing style (first picture, option C, parts 17c and 19). How can I remove the old bushing without the special tool (second picture)? I was thinking of a 2-1/2" pipe and some bolts as studs to emulate the tool but I can't find a stub of 2-1/2" pipe at local hardware stores. A notched 2" pipe with a hose clamp around the legs might get it started but it'll be awfully flimsy if the notches are as long as the bushing. Any better ideas than the $1300 special tool?
Sixto 87 300D |
|
#2
|
||||
|
||||
|
sawzall or burn it out.
__________________
Click here to see a photo album of my '62 Sprite Project Moneypit (Now Sold) |
|
#3
|
|||
|
|||
|
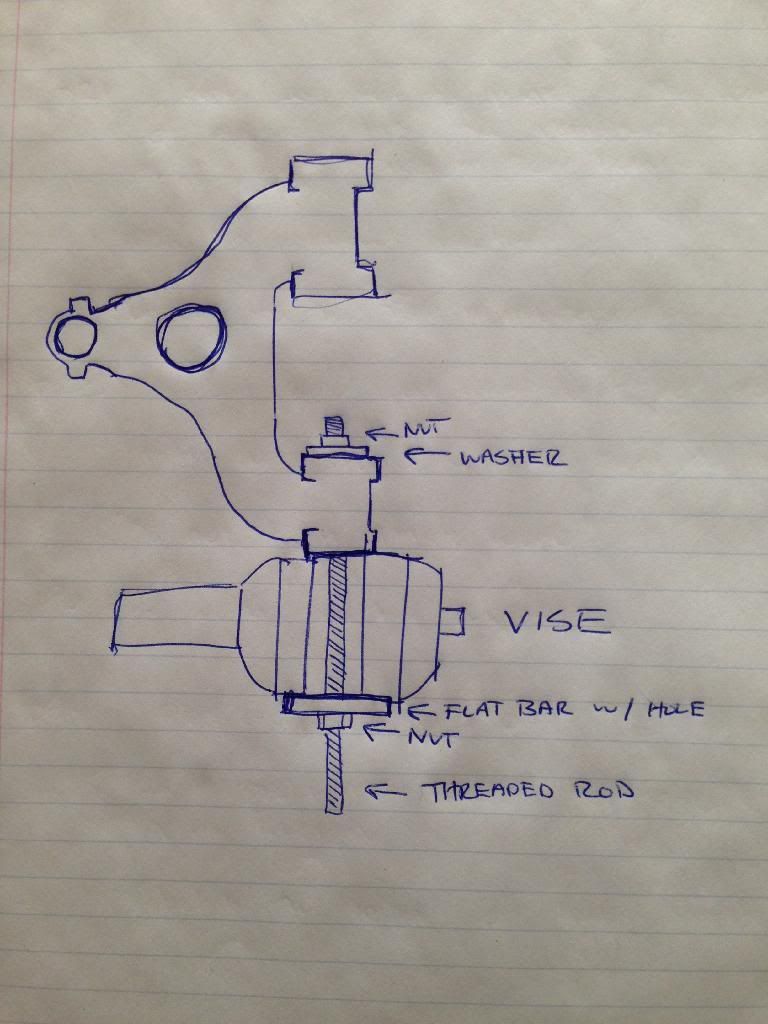
That wouldn't work because he needs the metal sleeve out. I used a big threaded rod, a washer, and a vise. I'm going to have to draw for you what I did because I can't explain it.
There are knock offs of that tool on eBay for like $200. Here we go, Use an air chisel to push back the lip of the bushing on the side you're going to put against the vise so the edge of the vise sits on the end of the edge of the control arm itself. It took a second person to hold up the control arm to get everything positioned and started. We started by me holding the nut on the outside of the vise and my friend tightened the nut on the inside of the control arm until that nut was into the control arm tube. Then I tightened from the outside of the vise to pull it the rest of the way through.  To do the other bushings that are the "124 style" Use a big drill or a cutting disc to tear up the flared end of the aluminum flared tube that runs through the bushing. Then, I heated up the sleeve, and used an air chisel to drive out one of the bushings. Once one is out you can then attack the other one from inside the control arm tube and it comes out pretty quickly. To get them back in the FSM recommends using soap since it will not attack the rubber. I cleaned the bores of the control arm with a light wire wheel, then rubbed some soapy water in the bores, and some soapy water on the bushings. Observe the proper orientation of the flats in the new bushings, and I was able to drive them in with a rubber mallet.
__________________
68 280SL - 70 280SL - 70 300SEL 3.5 - 72 350SL - 72 280SEL 4.5 - 72 220 - 72 220D - 73 450SL - 84 230GE - 87 200TD - 90 190E 2.0 - 03 G500 Nissan GTR - Nissan Skyline GTS25T - Toyota GTFour - Rover Mini - Toyota Land Cruiser HJ60 - Cadillac Eldorado - BMW E30 - BMW 135i Last edited by DieselPaul; 02-19-2014 at 10:07 AM. |
|
#4
|
||||
|
||||
|
Thanks! The split style forward bushings came out easily. I'll give the shadetree puller a try since I have neither a Sawzall nor a torch
 The flange is about halfway to clearing the LCA bore with all the pounding it's taken. The flange is about halfway to clearing the LCA bore with all the pounding it's taken.Sixto 87 300D |
|
#5
|
|||
|
|||
|
Quote:
I used an air hammer, cut the flare off of the center sleeve then drive it out, takes about 2 minutes per control arm
__________________
13 Years professional Auto Tech ASE Master Tech GM Master Tech |
|
#6
|
||||
|
||||
|
I'm stuck on the drive it out part. I tried what DieselPaul suggested but all that accomplished was deforming the bore opening :/ FWIW, an S&K 36mm socket is a perfectly sized drift. I pressed out the center section then hack sawed through the sleeve. I cut clear through at the ends but I can't cut through the middle section without cutting the LCA at the ends. Argh! Mind you this car has no rust having spent 20 years in Dallas and rest in San Jose.
Sixto 87 300D |
|
#7
|
|||
|
|||
|
Sorry it didn't work, they slid right out on my 200TD that lived in DC at the embassy in the snow, and in Columbus in the snow.
__________________
68 280SL - 70 280SL - 70 300SEL 3.5 - 72 350SL - 72 280SEL 4.5 - 72 220 - 72 220D - 73 450SL - 84 230GE - 87 200TD - 90 190E 2.0 - 03 G500 Nissan GTR - Nissan Skyline GTS25T - Toyota GTFour - Rover Mini - Toyota Land Cruiser HJ60 - Cadillac Eldorado - BMW E30 - BMW 135i |
 |
| Bookmarks |
|
|