

|
|
|
|
|
|
#1
 02-25-2009, 11:23 AM
|
|||
|
|||
|
W111 big steering box problem
Dear all,
This morning I tried to reduce the play in my W111 3.5 Coupe steering box by adjusting the screw on top of it. I know that ideally this should be done with the steering box out of the car, but I did it that way several times in the past on former W108/109/111/112 I had as well as on BMWs with satisfactory results. But this morning, after undoing the top nut and counter nut, I was turning the center screw clockwise when the whole top (a kind of big washer on top of the steering box in which the center screw bolts in) kind of popped up. That kind of big washer came up of about 2 to 3 mm in one go, and is now turning inside the steering box housing together with the center bolt. When I start the engine, the steering box is now leaking big time from there. What happened? Can this be repaired? Even without power steering I am now scared to drive around to have it seen by a mechanic in case I lose the steering all together Help! 
|
|
#3
02-26-2009, 07:30 AM
|
|||
|
|||
|
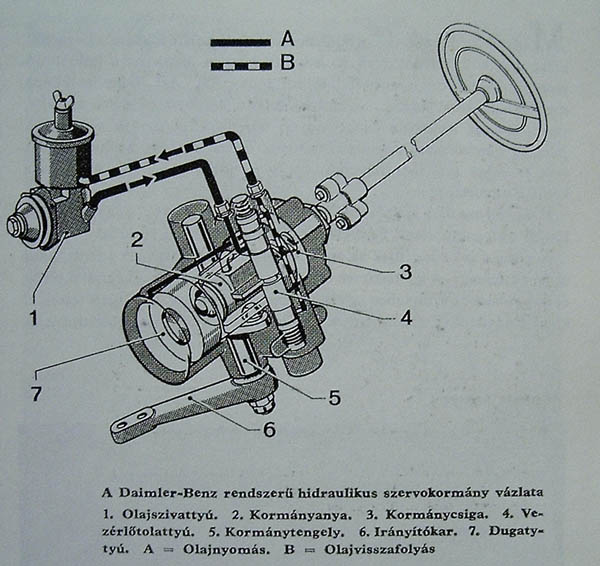
Try this link.
http://www.davidpetryk.net/Mercedes/Steering.htm It's over in the DIY section under "Steering".
|
|
#4
02-26-2009, 10:43 AM
|
|||
|
|||
|
Thanks. That's quite a nice article. But unfortunately the W126 steering box is different and does not have that big washer like top cover around the pressure adjustment. My challenge is to understand how this top plate holds in place. Is it screwed in? Is it put in by force? From outside or from inside? There is a little hole on the side of it that seems to indicate it can be turned, as per the one on the input shaft side. For now it turns easily both ways, but does not seem to bolt in or out. It just stays at the same level.
Any help on how I should go about it, if possible without taking the steering box out, would be very appreciated.
|
|
#5
02-26-2009, 10:23 PM
|
|||
|
|||
|
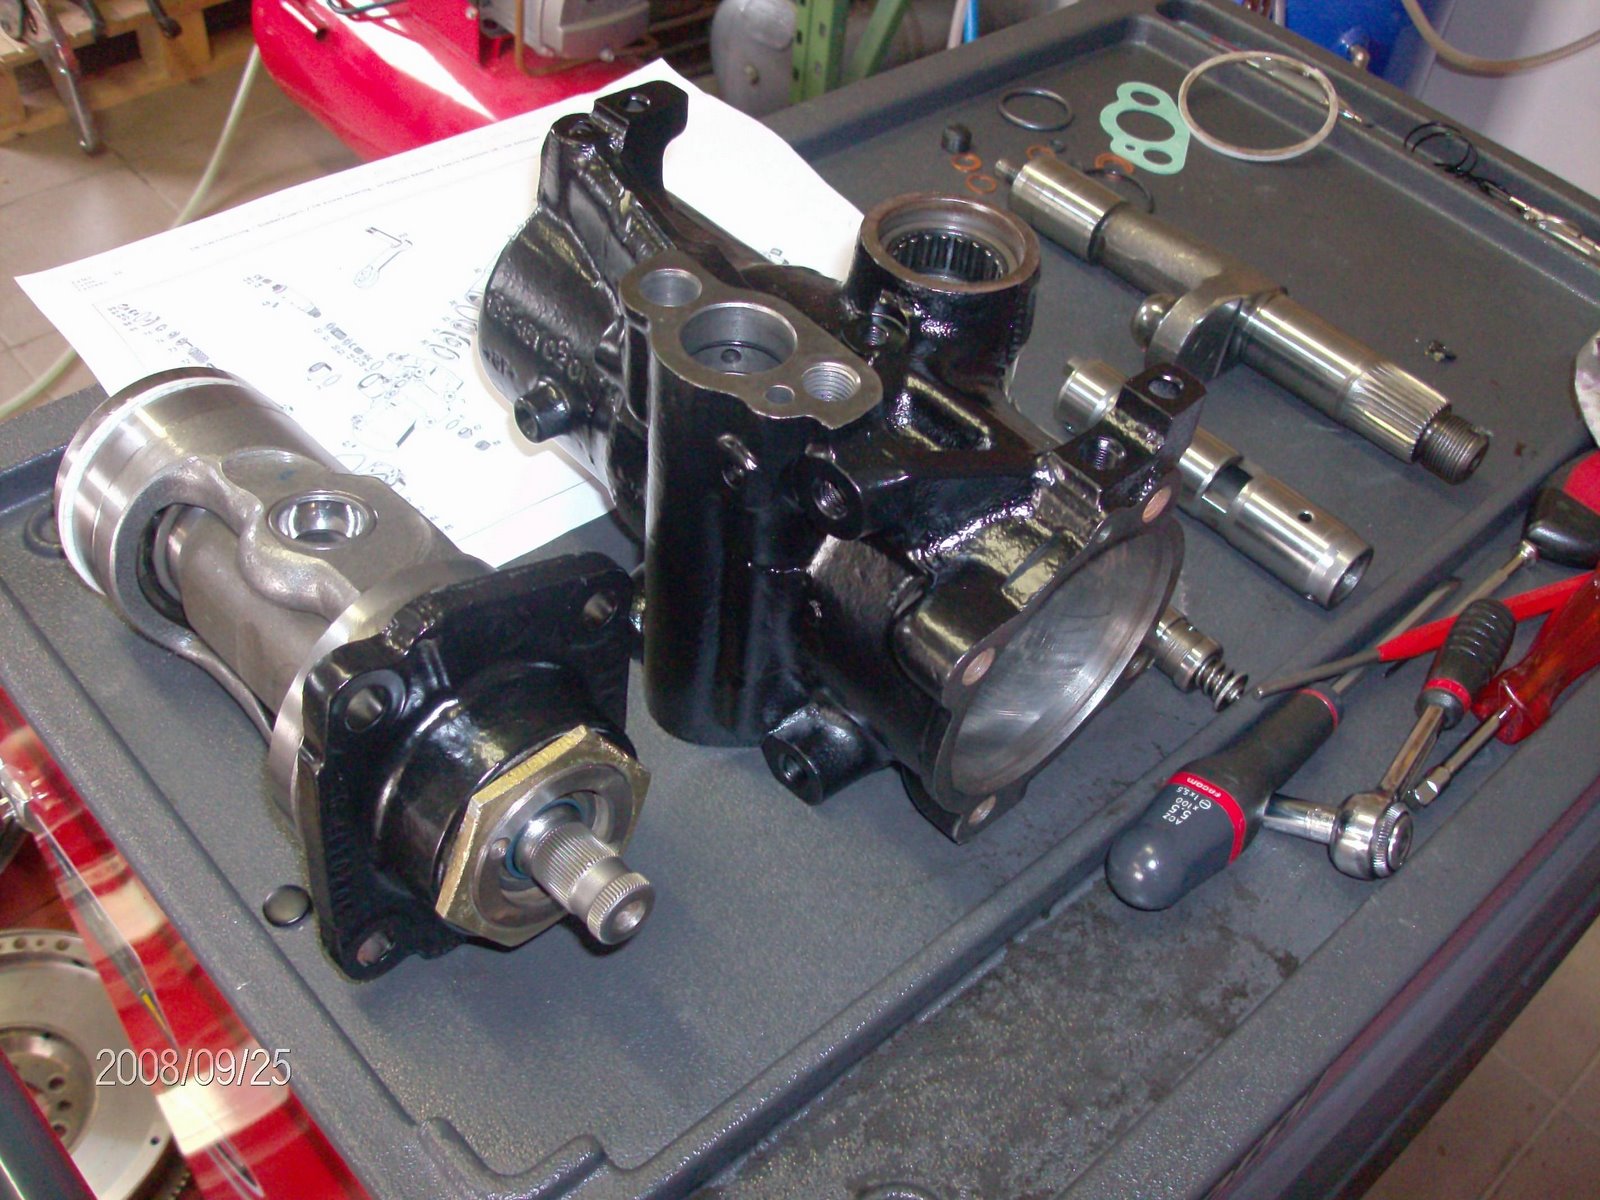
OK. I managed to find an exploded parts diagram on EPC. I tried to reproduce the image here but I couldn't import it from There. If anyone has access to EPC the disc that came up is shown on the second picture under "steering" with the ref 452. I now understand better what may have happened. By screwing clockwise the adjustment bolt I may have pushed the steering shaft to the maximum. As it could not move further the disc popped up instead. I will try to undo the adjustment bolt as much as I can and push back that disc into place. Apparently it is not threaded, it just holds in place with what seems to be a seal. I will first try that solution on Saturday. If it doesn't work I will have to find another solution.
BTW, to reduce the play in the steering box, if I interpret the EPC picture correctly, the adjustment bolt should be turned counter clockwise, not clockwise, because of the spring under the steering shaft. If you feel I'm on my way for another disaster, please let me know!
|
|
#6
02-27-2009, 06:18 AM
|
|||
|
|||
|
Is this similar to yours?
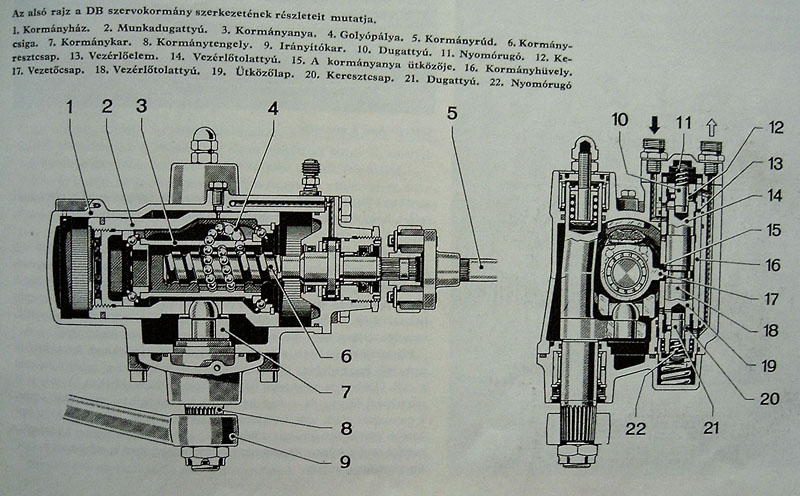    http://mb-w108.atw.hu/ ..hope it heps a bit.. Not experienced with steering gears,but looks doable without removing the box...couple of o-rings need to be replaced also... P.S. a bit more(in German): http://www.mercedesclubs.de/scriptdaten/vdhforum/DCForumID1/4522.html Last edited by vox_incognita; 02-27-2009 at 06:35 AM.
|
|
#7
02-27-2009, 07:35 AM
|
|||
|
|||
|
Thanks! This is very useful. The first picture shows clearly that the disc in question goes in there by pressure, as there is no thread on top of the bearing (top of the gearbox on the picture). I'm now wondeing if I should take that disc out completely and replace the seal (not that easy as the exhaust manifold of the 3.5 is on the way) or push it back in there as is. I think I will first try to push it back as is. If it leaks, I may then order the whole seal kit and have the gearbox overhauled.
I followed that link on the restauration of that blue 250S. Man, what a job! This is truely impressive!
|
|
#8
02-27-2009, 09:50 PM
|
||||
|
||||
|
You are not gonna like my thoughts...
First off, I've never seen the inside of one of these but have much experience with diagrams like this one. I think that a snap ring or one of those wire rings that fits a groove like a snap ring does has come out of it's groove. To me, it looks like as you tighten the adjusting nut, it pulls the adjusting bolt out of the end of the shaft. As it does so, it compresses a spring against the lower of the two sleeves which the presses against the upper sleeve (which looks more like a disk). The upper sleeve is held in the shaft by what looks like a snap ring. All of this then pulls the shaft and sector or whatever the thing is called tighter against the worm.  I think you will need to pull the nuts and cover off to reseat the snap ring and should replace the cover o-rings while you are at it. Michael
__________________
Usta haves '69 250/8, '76 280C, 1971 250C 114.023, 1976 450SEL 116.033 Current have, 1983 300SD 126.120
|
|
#9
02-27-2009, 11:40 PM
|
|||
|
|||
|
You said you turned the adjuster-screw CLOCKWISE, and then the adjuster-cover popped OUT.
It's my understanding that, unlike most other manufacturers, these Mercedes steering boxes require turning the adjuster-screw COUNTERCLOCKWISE to tighten them. From the 'X-ray' view, it appears that the cover is normally retained in the housing, against a snap-ring, by tension on the adjuster, which you apparently released by loosening the adjuster-screw. You should be able to tighten that screw and draw the cover back in, but now you probably should go ahead and replace the cover O-ring seal too. Happy Motoring, Mark
__________________
DrDKW Last edited by Mark DiSilvestro; 02-28-2009 at 12:36 AM.
|
|
#10
02-28-2009, 12:23 AM
|
|||
|
|||
|
Michael,
thank you very much for the picture.This is very useful and makes me understand even better what happened. As Mark notes, I turned the adjusting bolt clockwise. As the cover is threaded, this made the bolt go down and push on the steering shaft downwards. Once the shaft was pushed to the maximum, the threaded cover came up by reaction. By looking at the scheme, this did not apply any force on the snap ring, on the contrary. In fact the snap ring is what retains the cover in, via the pressure of the spring. The very fact that the covers does not come completely out despite being loose indicates that the snap ring is still in place. At least I hope so! I keep my finger crossed! Thanks for the help. Tomorrow, if the weather allows, I will try to sort this out.
|
|
#11
02-28-2009, 01:42 AM
|
||||
|
||||
|
GGR,
I think you are right. I didn't know that the cover is threaded and can see how turning the bolt would push the cover up. Glad I could help. Michael
__________________
Usta haves '69 250/8, '76 280C, 1971 250C 114.023, 1976 450SEL 116.033 Current have, 1983 300SD 126.120
|
|
#12
02-28-2009, 01:43 AM
|
||||
|
||||
|
I wonder how many folks noticed that I mislabeled the needle bearing?
")
__________________
Usta haves '69 250/8, '76 280C, 1971 250C 114.023, 1976 450SEL 116.033 Current have, 1983 300SD 126.120
|
|
#13
02-28-2009, 08:27 AM
|
|||
|
|||
|
I wondered if this was a "ready made" cut and paste image or if you were the one who added names and arrows. Thanks for having taken the time to do that. This was really helpful. The help we find on these fora is incredible. My girlfriend summarises it like this: she sees me coming with a bad face and understands something went wrong on the car. Then she sees me cry for help on the internet, receive support from all over the world and go back working on the car with a big smile on my face. Or when past technology is kept alive with the one of the future...
|
|
#14
02-28-2009, 01:28 PM
|
||||
|
||||
|
It was me. I stole the first picture from vox incognita's reply, cropped it and added the text labels. That way, I wouldn't be reduced to things like "it's a really small circle thingy just above the "L" shaped part that goes around the bolt that is sicking out the top"
I live to fix broken things and help people understand how things work. Michael
__________________
Usta haves '69 250/8, '76 280C, 1971 250C 114.023, 1976 450SEL 116.033 Current have, 1983 300SD 126.120
|
 |
| Bookmarks |
|
|


 Linear Mode


