

|
|
|
|
|
|
#1
 01-13-2013, 12:04 PM
|
|||
|
|||
|
Starting My '67 230S Rally Tribute
While my car is trekking across country from Seattle to Connecticut (glad I sprung for enclosed shipping), I've been collecting non-mechanical tidbits to start my Rally Tribute. The 230S, manual transmission, will remain mostly stock. No rear axle or engine swaps to make it more competitive. But I'll try a few tricks here and there that may have been available back then. I will be assisted by John Rogers, a friend of the family and well known race car mechanic. John is one of the few outside of the factory museum to restore a M-B W154 Grand Prix car here in the states. He did "Wagen 7" when it was owned by Roxbury neighbor Joel Finn. So I think I'm in good hands. And we will be using the same shop too surrounded by photos of the progress of Wagen 7's restoration.
I've assembled a pair of Super Oscars from the UK, a rectangular NOS Marchal for a reversing lamp. a beauty of a Marchal spot for the prominent position high up on the grill. Inside, I purchased an NOS Airguide compass, 2 Aux inputs, a vintage Butler gooseneck map light, chrome fire extiguisher, vintage battery cutoff switch (courtesy of Mr. Rogers). Also bought a VDO outside temperature gauge to help warn of icy conditions. Daniel Stern Automotive lighting is advising me on what I need to get all of the exterior and interior electrical components functioning properly. It is to arrive tomorrow and brought to Auto Turismo Sport Ltd. in New Milford, Connecticut (autoturismosport.com) for a safety check, complete fluid replacement, lubrication, new hoses and filter changes. Hopefully the suspension and all the rubber parts are in good shape. I'll keep the thread going with pictures if anyone is interested. And if anyone knows who has some belly pans or skid plates let me know.
__________________
 Michael Maddalena Mint2Me.com Warren, Connecticut 203.417.6856 Todays great finds at: http://www.mint2me.com Follow us on Twitter: http://twitter.com/itsmint2me 
|
|
#2
01-13-2013, 12:39 PM
|
||||
|
||||
|
Board member Nonns has some work in this field:
http://www.peachparts.com/shopforum/vintage-mercedes/305438-1967-230s-w111-fintail-rally-car-project-w-pics.html Also: Mercedes-Benz 230 S: Project Cars: Classic Motorsports Also x 2: http://www.myfinnyracer.co.za/
|
|
#3
01-18-2013, 06:12 PM
|
|||
|
|||
|
Rally Project: Step I
The 230S arrived in Connecticut after a 2 week journey across country. It is in the capable hands of Steve and Dan at Auto Turismo Sport. My maiden voyage didn't work out too well. It arrived with zero gas in the tank. It ran rough and I barely made it to the station. After a quick 10 gallons I thought all would be cured. But alas, that was not to be. It had sucked up so much crude it would only run in 30 second intervals.
Today we sent a scope into the tank and witnessed a veritable aquarium of crude. So the tank will come down, get boiled and relined. The rest of the car is absolutely remarkable. All the rubber bits underneath are in fine fettle. The bottom is totally rust free. And the interior is just not to be believed. The paint could use a wet-sand but that part is down the road-a-piece. For now, we install the electronic ignition, chassis lube, fluid change, clean the fuel lines and carbs, get the tank in and we are off to the race shop.
__________________
Michael Maddalena Mint2Me.com Warren, Connecticut 203.417.6856 Todays great finds at: http://www.mint2me.com Follow us on Twitter: http://twitter.com/itsmint2me
|
|
#4
01-19-2013, 12:14 PM
|
|||
|
|||
|
Quote:
 If you can't find original skids--they're around, but $$ and not often up for sale--a set can probably be fabricated from patterns pretty easily. Or have someone in WA with a Fintail pop in to see this guy and have dimensions taken... there may be just enough Finnie owners here and in Australia who'd like a set of underbelly pans to get patterns and a short run made: Race Skids (the URL struck me as "I race children" at first, races-kids vs race-skids. LOL) Just saw this: 
__________________
Looking for Early 108 windshield surround wood in decent-to-good condition.
|
|
#5
01-19-2013, 12:20 PM
|
|||
|
|||
|
Seeing that pic makes me wonder what kind of protection there might be for the tombstone headlight glass, or if a set of acrylic inserts can be molded to pop in to the headlights instead of the glass, or maybe a piece can be heted and curved to fit over the glass.
Not that easy or cheap to replace them today.
__________________
Looking for Early 108 windshield surround wood in decent-to-good condition.
|
|
#6
01-19-2013, 01:40 PM
|
||||
|
||||
|
Nice car - check those fuel hoses as well, but I'm sure you are. It seems fintails attract a certain crowd.
  Some good reading (and better pics) here: Mercedes-Benz recreates its finned flier for historic racing | Hemmings Blog: Classic and collectible cars and parts The Mercedes-Benz rally cars of the 1950s to the 1970s (gallery) - Driving Dutchman Last edited by JMela; 01-19-2013 at 01:57 PM.
|
|
#7
01-19-2013, 02:22 PM
|
||||
|
||||
|
Stone guards were available for Mercedes headlights. Right now the only picture I could find is of stone guards for the W111 paint, and some on a W116, but imagine these covering the headlights:
 
__________________
Stop paying for animal enslavement, cruelty, and slaughter. Save your health and the planet. Go vegan! I did 18 years ago. https://challenge22.com/ DON'T MESS WITH MY MERCEDES!  1967 W110 Universal Wagon, Euro, Turbo Diesel, Tail Fins, 4 Speed Manual Column Shift, A/C 1980 W116 300SD Turbo Diesel, DB479 Walnut Brown, Sunroof, Highly Optioned, 350,000+ Miles
|
|
#8
01-20-2013, 08:15 AM
|
|||
|
|||
|
Stone Guards and shipping damage...
Funny you should mention headlamp protection. I did a bit of surfing and there are a number of suppliers for mesh stainless. I'm going to talk to John Rogers (Rogers Racing) about making a set. Who knows *if you know how to make stuff it might not be that hard?
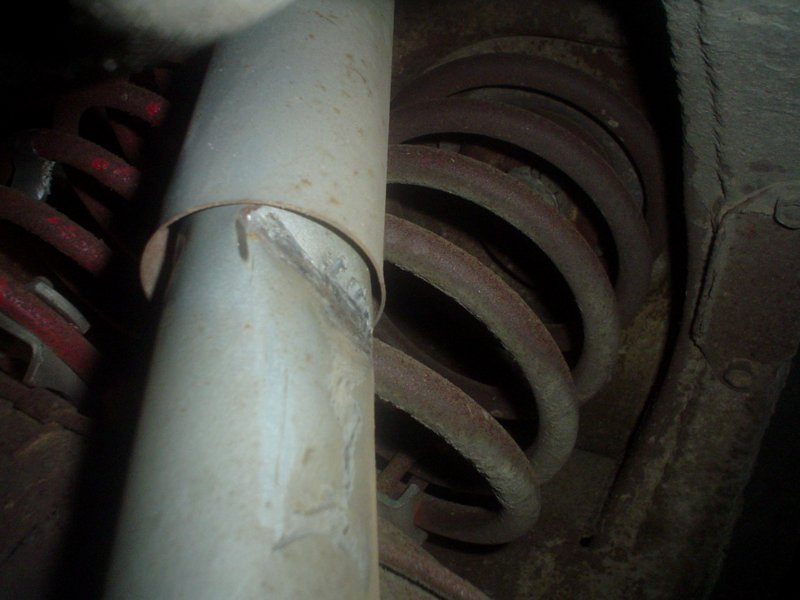
Once the Merc was up in the air we discovered the 2 rear shocks were damaged in shipping. Apparently they looked like a tempting place to secure some snatch straps. I'll put in a claim for replacements but I'm always reluctant to change 2 out of 4 of anything...
__________________
Michael Maddalena Mint2Me.com Warren, Connecticut 203.417.6856 Todays great finds at: http://www.mint2me.com Follow us on Twitter: http://twitter.com/itsmint2me
|
|
#9
01-20-2013, 01:04 PM
|
||||
|
||||
|
I'm sorry to hear about the shipping damage! My roommate and I recently had 5 cars transported from Washington to Arizona. They crushed his 1965 Ford station wagon's rear shock absorbers just like yours. It was so bad that they were locked up.
  They also ripped off part of the underside of my 1980 300SD because they used it to chain down the car and really reefed on it: 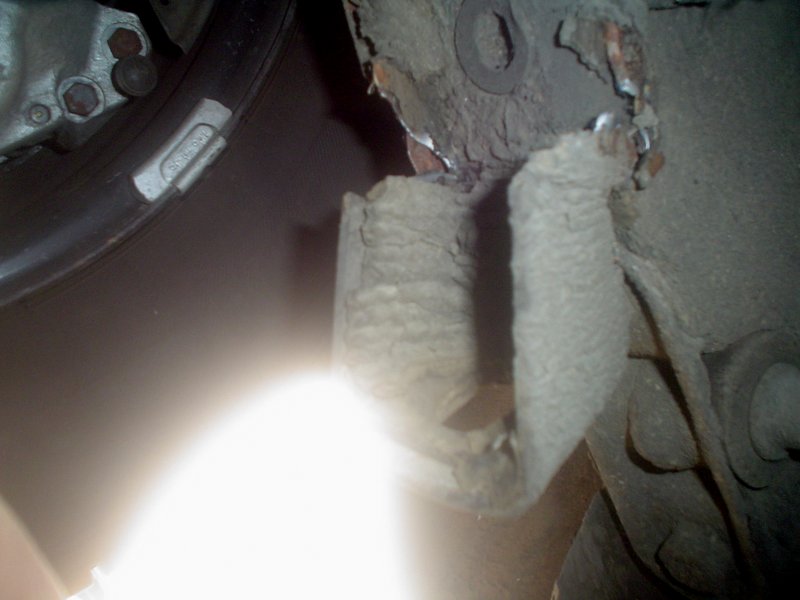 They also ripped off the rear license plate of my roommate's 1992 Mercury, his 1960 Ford truck was full of junk auto parts that didn't belong to us, and the cars were covered in dirt an oil. My 300SD had so much oil on it that I couldn't see out of the windows to drive the car home. It looked like it had been submerged in an oil bath. On top of this, despite confirming may times, even as the transport truck was on the way to pick up the cars in Washington, that while we were flexible with the pickup date, they absolutely could not be delivered before June 2nd because we would not have the lease to the property or even be in Arizona at the time. Despite all of this, they delivered the cars 5 days too early and since we weren't even in the state yet, the transporter abandoned the cars (including a Jaguar that wasn't even ours--it was destined to a customer in Beverly Hills, California) in front of a dusty storage yard at midnight. The next day the storage yard brought them in and once we got to Arizona and found out where our cars were, I had to pay $300 of my own money to get them out. It was a fiasco and neither discountautotransport.net (place I contacted for transport) nor Y & A Transportation (actual transport) want to pay for any damages or reimburse me for the storage fees. I filed claims with the Better Business Bureau for both companies. Discount Auto Transport claims they are not responsible and Y & A Transportation never responded. I'm not sure what else to do other than hire a lawyer, but it's not like I have any money to spare. The 5th car transported with them was my roommate's 1965 W111 220S. It seems to have fared okay other baking out in the hot 115 degree sun with the windows up for 5 days. I hope you can get reimbursed for the damage they did. It's not like OEM shock absorbers don't cost hundreds of dollars.
__________________
Stop paying for animal enslavement, cruelty, and slaughter. Save your health and the planet. Go vegan! I did 18 years ago. https://challenge22.com/ DON'T MESS WITH MY MERCEDES! 1967 W110 Universal Wagon, Euro, Turbo Diesel, Tail Fins, 4 Speed Manual Column Shift, A/C 1980 W116 300SD Turbo Diesel, DB479 Walnut Brown, Sunroof, Highly Optioned, 350,000+ Miles
|
|
#10
01-20-2013, 05:26 PM
|
|||
|
|||
|
I hope they do too. I used Dependable Auto Shippers because they allegedly operate their own trucks.
Maybe this is a good opportunity to swap all 4 out for a set of Koni Reds? I have them on my Alfa and they are transformative.
__________________
Michael Maddalena Mint2Me.com Warren, Connecticut 203.417.6856 Todays great finds at: http://www.mint2me.com Follow us on Twitter: http://twitter.com/itsmint2me
|
|
#11
01-21-2013, 04:37 PM
|
|||
|
|||
|
I spoke to Dependable Auto Shippers regarding the shocks. They want photos and estimate or receipt. Today I found 4 Koni shocks and decided to go for it. They are adjustable of course, so they will give me a bit of flexibility as I proceed.
I have the Euro headlights on my dining room table. Daniel Stern Lighting recommended I look at the reflectors while I am changing bulbs. I'm glad he did because they are not that great. I will take them apart and send them out to be redone. And the Becker Grand Prix radio and clock that supposedly work doesn't. So that is off to the rebuild shop in Saddlebrook, NJ. I'm going to have an iPod 3.5mm adapter wired in while I am at it. The fuel tank is coming back tomorrow. The fresh 10 gallons of fuel I dumped in is now muck. When we get it back in, we'll have to clean out the fuel system front to back. The fuel lines are beautiful so we'll only change the flexible lines near the tank. That's all folks.
__________________
Michael Maddalena Mint2Me.com Warren, Connecticut 203.417.6856 Todays great finds at: http://www.mint2me.com Follow us on Twitter: http://twitter.com/itsmint2me
|
|
#12
01-21-2013, 04:44 PM
|
|||
|
|||
|
Quote:
I recall reading on BW that it isn't possible, they tarnish again fast, the reflectors are NLA, etc. Headlight reflectors on my 1974 230 w115. - Benzworld.org - Mercedes-Benz Discussion Forum
__________________
Looking for Early 108 windshield surround wood in decent-to-good condition. Last edited by Palolo; 01-21-2013 at 05:03 PM. Reason: Added link
|
|
#13
01-21-2013, 10:18 PM
|
|||
|
|||
|
Regarding re-silvering headlamp reflectors...
My rally car project will require proper lighting so I contacted Daniel Stern Lighting. He helped me double the output on my Alfa Spider. But that just brings it up to modern standards.
I asked him about evaluating my Euro lights and this thoughtful message is his reply. If you need similar help I would go to him pronto. __________________________________________________________ Assume they're dead; optical degradation of the reflector is grossly advanced well before you can see it with the naked eye; by the time it's progressed far enough to be described as "just a little imperfect" the lamp is dead. Remember, even the most costly, beautiful show chrome is only 67% reflective, not nearly enough for optical purposes. An as-new headlamp reflector is over 99% reflective. The first step is to isolate the reflector from all other components. Remove all non-steel parts such as bulb seats and non-reflector components such as bulb shields, etc. The potmetal or sheetmetal bulb seat is usually held to the reflector by crimping which can be carefully undone with a small screwdriver after you make scratch marks on the seat and the reflector for later alignment. If it's riveted, the rivets must be carefully drilled out. The bulb shield, if present, may be sandwiched between the lens and the reflector, clipped to the reflector or bulb seat, or held to the reflector by small rivets, in which case drill them out. Once it's isolated, put the reflector into the dishwasher (bottom rack) and run it with ordinary dishwashing powder (Cascade, Electrosol, etc.) through a normal cycle. This will usually remove most all of the shiny stuff; occasionally some careful wiping or a second run-through is necessary. Take a close look at the base coat; if it's in good shape, not scratched or peeled or blistered, then you're all set; send the reflector to Martin or one of his teammates at Vacu-Coat: VacuCoat Technologies, VacuCoat, Vacuum Metallization, Metallization, Vacuum Metallize, Metallize Tell him it's an optical reflector, in need of aluminizing and high-heat protective overcoat. If the base coat is at all imperfect, contact him in advance, tell him you have a stamped-steel parabolic headlight reflector with damaged factory base coat, and ask for his recommendation for sending the reflector in (does he want the remains of the basecoat stripped, can he strip it, etc.). Most base coats can be stripped from steel reflectors with lye the easiest and safest form is Easy-Off spray oven cleaner. The original type, not the "fume free". Check the label to make sure it contains lye (Sodium Hydroxide). Wear rubber gloves, give yourself plenty of ventilation, apply the lye in a sink, let it stand for an hour or so, then rinse with hot water. Scrub gently with a plastic "Scotch Brite" pad; repeat if necessary. If the reflector has rust that has roughened its surface, it is not a feasible candidate for cost-effective refurbishment. If Vacu-Coat for whatever reason can't put on a new base coat (this is highly unlikely), then the reflector must be copper plated and polished to a high shine. Then, nickel plated and polished to a high shine. Then, send the reflectors to UVIRA in Oregon for aluminum vaporcoating and silica glass overcoat. About 8 years ago, I paid $85 for UVIRA's reflectorisation service on a pair of reflectors about the same size as yours, but it was quite a few years ago so the price might have changed. UVIRA 310 Pleasant Valley Rd Merlin, OR 97532 tel 541-474-5050 The plating shop is probably going to ask you why you're having the first two steps of a chrome plating job (copper, nickel) done but not the chrome. Chrome is *never* an acceptable reflector material; its reflectivity of 67% (at best) is far too poor for lighting/optical purposes. The vapor-coat aluminum material with glass overcoat, as done by UVIRA, is over 99% reflective as required for optical and lighting devices. Once you've got the refurbished reflector back, reinstall the bulb shield -- use small screws and nuts plus high-grade Loctite. Put the screw heads on the inside and the nuts (and Loctite) on the outside so the Loctite doesn't outgas and spoil the reflector surface. Reinstall the bulb seat, crimping as required for a secure fit. Make certain to install the bulb seat in its correct rotative position relative to the reflector (refer to your earlier scratch mark). Install new (thoughtfully-selected) bulbs, reinstall the headlamps, aim them on low beam according to the 'VOL' instructions at Daniel Stern Lighting Consultancy and Supply , and you're all set.
__________________
Michael Maddalena Mint2Me.com Warren, Connecticut 203.417.6856 Todays great finds at: http://www.mint2me.com Follow us on Twitter: http://twitter.com/itsmint2me
|
|
#14
01-22-2013, 02:39 AM
|
|||
|
|||
|
Interesting. I was actually corresponding with him on something unrelated last week--dedicated low beams for my stacked headlights. He recommends the BMW/Hella low beams, coupled with a dedicated high beam.
Hadn't thought of broaching the Euro reflectors topic with him. Thanks for the info and sources!
__________________
Looking for Early 108 windshield surround wood in decent-to-good condition.
|
|
#15
01-23-2013, 12:00 PM
|
|||
|
|||
|
I would first like to thank Tom Hanson at M-B Classic for stocking the rubber gasket between the fender and the Euro headlights for a W111. I tried Peach 1st (out of respect for the board) and then a number of others with no luck. But I'll have them from M-B Classic tomorrow.
I took apart the entire euro headlight assembly expecting to find a dead reflecting surface. But alas, that was not to be and am I glad! So i'll replace all of the bulbs (4 for each) and mount them back on "The Colonel".
__________________
Michael Maddalena Mint2Me.com Warren, Connecticut 203.417.6856 Todays great finds at: http://www.mint2me.com Follow us on Twitter: http://twitter.com/itsmint2me
|
 |
| Bookmarks |
| Thread Tools | |
| Display Modes | |
|
|


 Linear Mode


