

|
|
|
|
|
|
#1
 10-07-2011, 01:25 PM
|
|||
|
|||
|
W110 body restoration
This thread will be concerned with the body restoration and any mods I may think to add.
I'm starting by removing paint down to metal and then using POR-15 and Chassis Cote to stop rust. First, I need to start with some questions on 1965 paint and primer. 1) what was the base for the paint used then? Lead? 2) what was the base for the primer? I ask, because one day I was sanding without a respirator or dust mask. The car is outside, the rear glass was removed, the rear door was open and the opposite side window was down, but I spent some time inside the car by the rear seat and rear shelf area. I'm a little worried about what I might have breathed in. 
|
|
#2
10-07-2011, 10:02 PM
|
|||
|
|||
|
people may/will disagree but i really don't care to much for POR. I have found that no matter how much you prep the area to be coated, if it is exposed to the elements moisture will eventually get under the POR and cause the rust to resurface.
I have always had success with aggressively cleaning the rusted area, if you can not have the area media blasted you can use a wire wheel, sand paper and scotch brite pads, clean the area with mineral spirits or denatured alcohol, treat the area with phosphoric acid like Ospho, and paint over that. hope this helps
|
|
#3
10-09-2011, 08:38 PM
|
|||
|
|||
|
The original paint was made by both Glasurit and Dr Herbert .(the G & h in the colour codes) It is an Acrylic enamel and does not contain lead. I dont know of any car paint that ever did apart from that used on really early cars in the 1900's .
Dont use Por 15 on the outside of the car because you WILL have problems later with the top coats coming off. POR 15 is not paint but a liquid urethane which sets on exposure to humidity. Car paint in 1K form sets by the evaporation of the reducer in the paint. 2K sets by the catalytic reaction of the two components. All are dangerous to breath when spraying so before you worry about sanding the paint off,get a good paint application system , some proper breathing gear and a bulk lot of tyvek spray suits and gloves. Good eye protection is vital to because your eyes WILl absorb the chemicals. You need a lot of Clean rags ,buy them in bulk from charity shops. Get at least 5 liters of oil and wax remover. Wash the car first with a heavy dose of dishwashing liquid and warm water. Then go over the entire car with the wax remover. If you dont ,the Finnish paint job will fish eye and look awful. You need 5 liters of cheap paint thinners(reducer,for gun washing etc ) and at least 20 liters of top quality reducer. Once you have the paint off the panel,go over with a product high in phosphoric acid (NO,not effing coke!) such as deoxidine . Then apply two thin coats of 2k or 1k etch primer (also known as Wash primer) . This will prevent rust better than Por 15. You then give the car at least 5 coats of 2K hibuild primer with 20% reducer . (the instructions call for more but on older cars it is better that it goes on THICK.) Finally a last coat of hi build primer at 30% reducer will smooth out the surface. Follow this with a mist coat of cheap black paint . you only want a grey surface to contrast so you can block sand the panel smooth. There is plenty more comprehensive info out there but the best is the paint manufactures own websites. Also,the best advice is READ the INSTRUCTIONS and FOLLOW them. 
|
|
#4
10-10-2011, 11:38 AM
|
|||
|
|||
|
Mercmad, what about the primer? My concern there is whether or not it is hexavalent chromium.
Right now, I'm still in the stripping phase. I live in Phoenix, so I'm not that worried about elemental exposure or moisture. Most likely, I will not be doing the painting on this car. Someone locally will do it for free, as it's his hobby. I've seen his paint jobs, and it seems like he does good work.
|
|
#5
10-10-2011, 04:50 PM
|
|||
|
|||
|
The issue of hexavalent chromium doesn't even begin to exist in Paint. it's a bright yellow substance which comes from a chemical reaction obtained by electrolysis ,so uness you have chrome plated your car ,then reverse electric stripped it,there is nothing to worry about. leave all the Hex Chrome stories to the Green crowd who see demons behind every carbon atom.
|
|
#6
10-13-2011, 12:29 PM
|
|||
|
|||
|
Quote:
However, none of the responses here actually address question 2 of the original post: What is the base of the primer? Enamel, acrylic, lacquer; what is it?
|
|
#7
10-13-2011, 07:55 PM
|
||||
|
||||
|
Lead was used to shape body panel joints back then. Eastwoods has low lead or no lead body filler, or use modern fillers. They also have rust removers and/or treatments. I have no personal knowledge of them, just from the Saturday/Sunday shows.
A modern paint with clear coat would look good, IMHO.
__________________
Regards Warren Currently 1965 220Sb, 2002 FORD Crown Vic Police Interceptor Had 1965 220SEb, 1967 230S, 280SE 4.5, 300SE (W126), 420SEL ENTER > = (HP RPN) Not part of the in-crowd since 1952.
|
|
#8
10-15-2011, 04:31 AM
|
|||
|
|||
|
Quote:
American cars used Dupont laquer up to the mid fifties then Duco Dulon acrylic enamel . none of these paints contained anything harmful as witnessed by painters in the old ays not bothering with masks etc. Todays 2K paint is really lethal. It's not chromate that will kill you but ISO CYANATE . http://www.commerce.wa.gov.au/worksafe/PDF/Guidance_notes/Guide_icocyanate_haz.pdf it's effect ,besides killing lung tissue is to kill your kydneys. Once the pint has set,these effects no longer exist so you can sand to your hearts content. The use of dust masks is just common sense. You dont want to be coughing up paint dust for a couple of days after sanding down your car. All car paints have posted safety sheets which are accesible on the net. if in doubt read them. dIsocyanate - Wikipedia, the free encyclopedia
|
|
#9
10-15-2011, 08:23 PM
|
|||
|
|||
|
wbain, thank you for your post.
mercmad, thank you for the information. I'm pretty sure the paint is original, as the all the panels under the seats, carpeting, tar, etc is the same as the exterior. As I have to bust rust, weld panels, and plan on painting it a different color, the paint has to come off down to bare metal. The primer, or at least the paint layer under the top paint, is warm gray in color (machine gray?).
|
|
#10
10-15-2011, 09:37 PM
|
|||
|
|||
|
On the front radiator support should be a small metal plate with numbers. One of them will be a 3 digit code with either G or H . thats your colour code .post it up and i'll see if i can find it. mercedes had a lot of different shades of grey ,plus two distinct Blue grays. you can still get the paint mixed by any Sickens, BASF, Dupont etc stockist.
|
|
#11
12-17-2011, 04:53 PM
|
|||
|
|||
|
Apologies for the long response time. School, work (the kind that pays), work (the kind that doesn't), and the like have kept me busy. Well, school's out and now I have time to work on things again.
Any rate, I figured I should show you guys and gals what I'm up against. You can view my photobucket here: Elsa pictures by RyanJD1981 - Photobucket Here's where I'm at in the body restoration 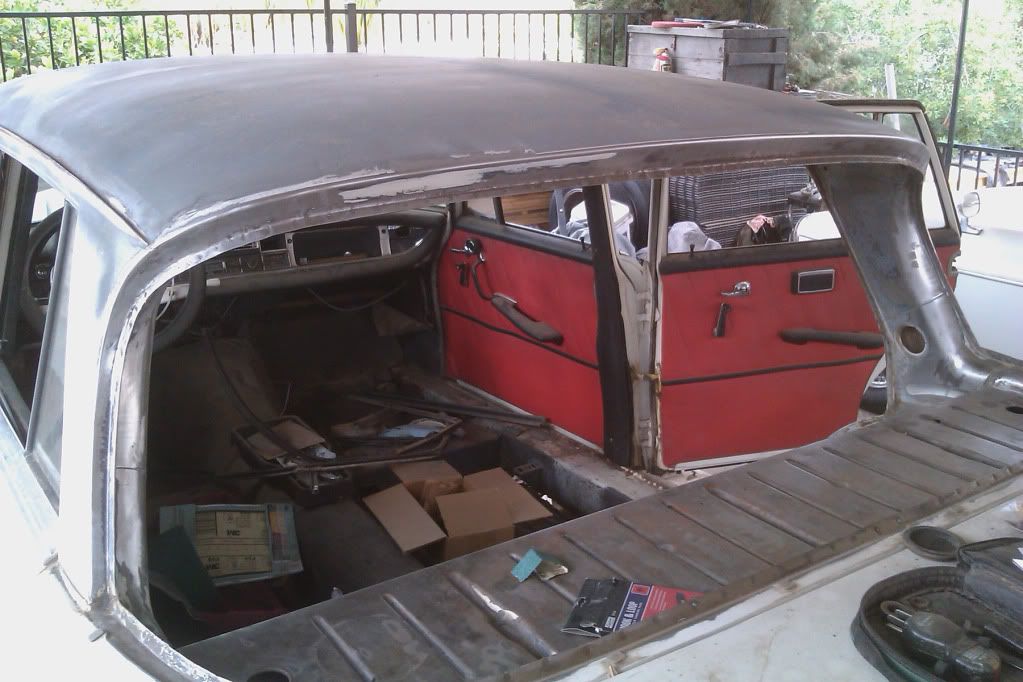 Since this will someday be the baby carrier, I need to be able to install child seats. The plan was to weld a piece of C-channel across here to make a mounting point for a top anchor. 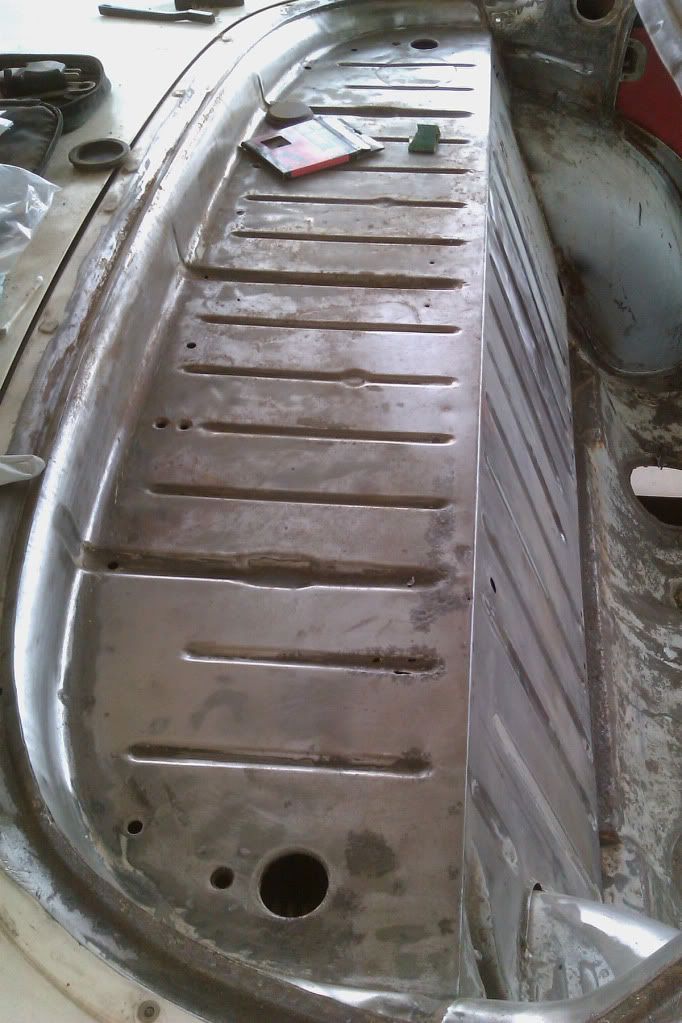 Any ideas where exactly from the back of the seat to place it? If anyone knows how to get rid of the tar on the floor boards so I can weld a new sheet in? 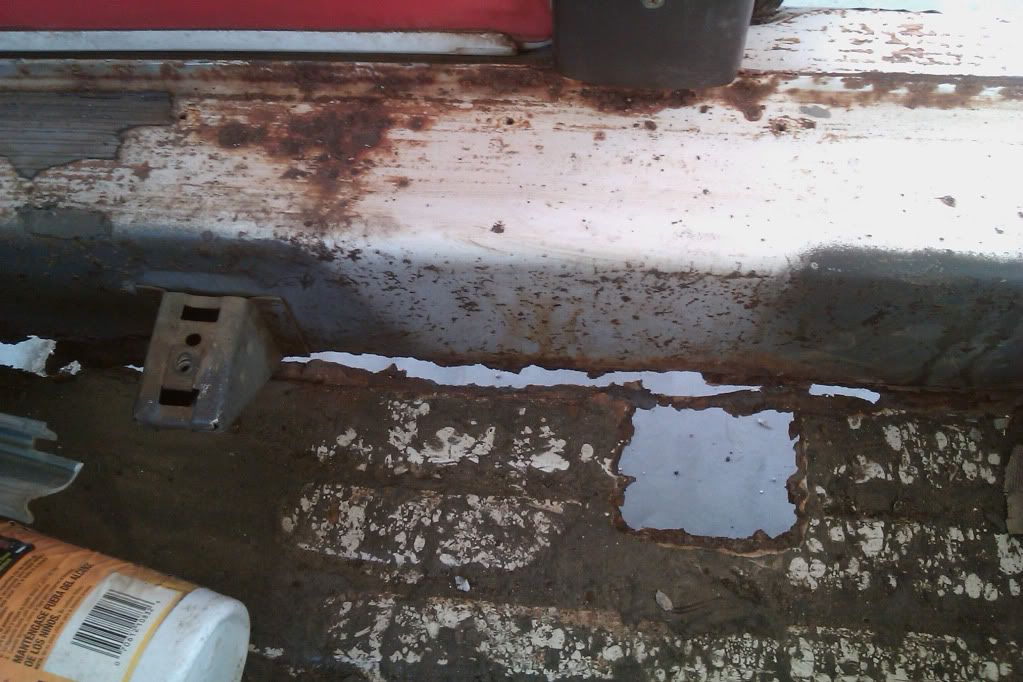
Last edited by RyanD1981; 12-17-2011 at 04:55 PM. Reason: Spelling and grammer.
|
|
#12
12-17-2011, 05:52 PM
|
|||
|
|||
|
Getting the original stuff off the floor is reasonbly easy. it's a bitumin based product so you only need a hairdryer and a decent wide spatular. heat it in small areas and scrape it off. it will take around an hour to a whole side of a W110 floor pan. If it gets too hot it will smoke but nothing dangerous. Also,becareful you dont let it stick to your skin because it burns like hell.
The stuff to replace it with for the original look are Bostic sound deadning pads available through any good car paint supplier or if you are rich, dynamat pads. Regarding the child seat brackets, here in Australia we have special bolt mounts which have been designed after extensive crash testing etc and increcibly simple and cheap. This is one example of what we have here. Simply drill a hole in the rear parcel shelf (hat rack ) and bolt it in. No need to add bracing etc . child restraint anchor bolt and bracket - hook If you look there on your car , you can also see that the factory fitted seat belt mount holes for lap and diagonal belts are in place too. you can fit a retractor to the parcel shelf mount although they tend to look a bit odd up there.
|
|
#13
12-19-2011, 07:17 PM
|
|||
|
|||
|
mercmad, my wife and I made a style/safety decision to put in 'aircraft style' lap belts, hence the reason for needing a top anchor. The hat rack area metal seems a bit thin for such an important item. There is even an area, in the second groove from the bottom, where you can see it rusted through. You also have to understand that I'm used to Jeep Wranglers and may to fight that mentality when working on the Mercedes.
|
|
#14
12-19-2011, 09:17 PM
|
|||
|
|||
|
Do not worry about the the thickness of the material in the hatrack/parcel shelf area,it's actually thicker than that used in all later mercedes which had the baby seat bolts as standard( here,I don't know about the USA which doesn't have the same safety standards as us) . As I mentioned, the seat belt attachments are located there any way. A 10KG baby in a capsule isn't going to pull the bolt out in accident .
Lap belts are dangerous and were obsolete in cars 40 years ago. human bodies in an accident go underneath the lap belt or bend forward over the belt . This is why Mercedes installed 'lap and diagonal' belts from `1959. Strangely the American legislators didn't consider seat belts to be safety items until the 1980's. As a matter of interest my Cousin Dr Simon Fraser Designed the original baby capsule when he was a designer at Porsche Design. It came about when my Cousin Daniel was born and he wasn't happy with the designs of child seats and baby capsules didn't exist. Jeep Wranglers dont even begin to be considered a safe vehicle,being a truck.  heres the layout in a W111 Coupe,apart from the top of the front seat belts,the sedans are the same. you will find the threaded holes in place already. 
|
|
#15
12-19-2011, 09:19 PM
|
|||
|
|||
 bolt location.
|
 |
| Bookmarks |
|
|


 Linear Mode


