

|
|
|
|
|
|
#152
 09-04-2016, 12:48 AM
|
||||
|
||||
|
Quote:
I'm still waiting for mine to arrive, but here is what it looks like (not my car)  I know there are a cooper extra holes for a different diff. Thanks for commenting.
__________________
"In wine there is wisdom, in beer there is strength, in water there is bacteria." 
|
|
#153
09-04-2016, 12:54 AM
|
||||
|
||||
|
Besides modifying the stock crossmember so it will fit around the new engine and support it I want to make it still look stockish.
Here is a pic of how I notched it to fit the engine. Not pretty, but the engine fit. 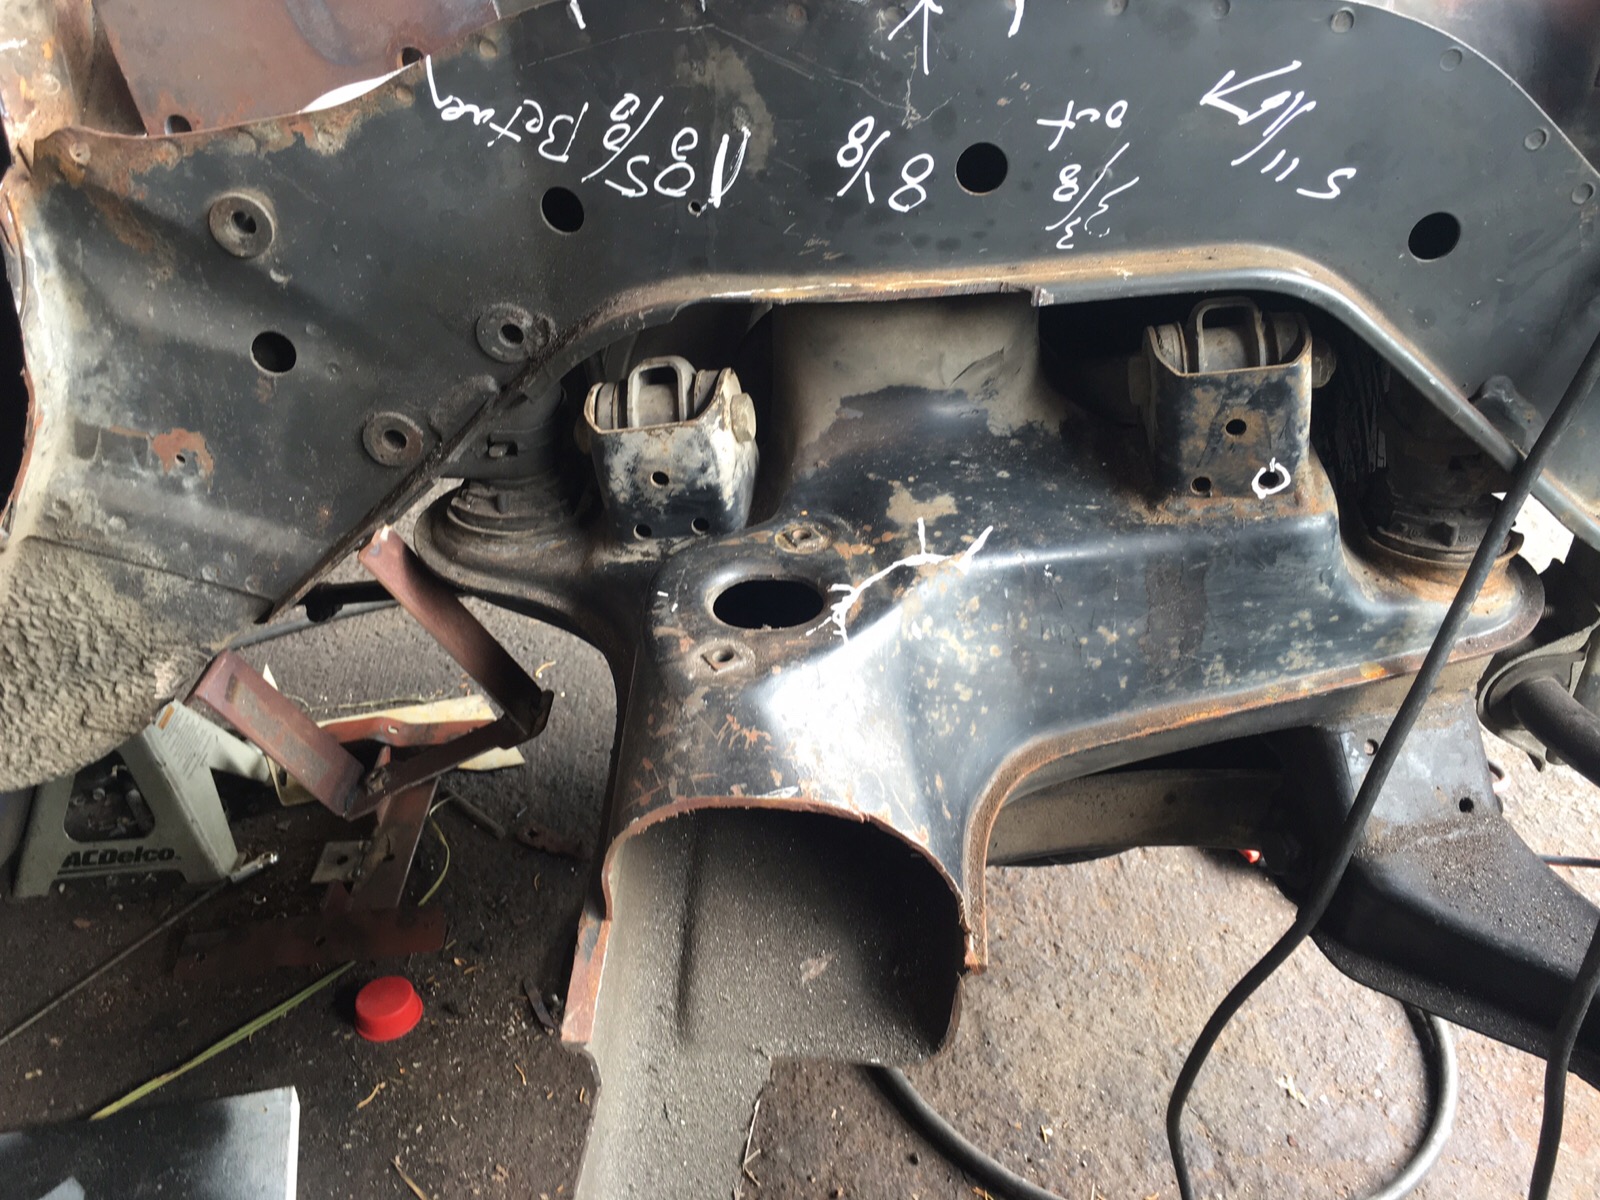
__________________
"In wine there is wisdom, in beer there is strength, in water there is bacteria."
|
|
#154
09-04-2016, 12:57 AM
|
||||
|
||||
|
The motor mounts I choose is designed to be welded to a vertical surface.
So first up is to notch the crossmember to make a vertical surface for the mount to weld to. 
__________________
"In wine there is wisdom, in beer there is strength, in water there is bacteria."
|
|
#155
09-04-2016, 01:03 AM
|
||||
|
||||
|
I do not do this for a living, and only have a 120v welder and an angle grinder for welding and cutting. So don't pick on my ugly welds!
I'm using 3/16" plate to weld to the crossmember to support the motor mount receiver. A lot of work to cut and make it look reasonable. 
__________________
"In wine there is wisdom, in beer there is strength, in water there is bacteria."
|
|
#156
09-04-2016, 01:13 AM
|
||||
|
||||
|
I cut some more 3/16" plate to weld to the inside side of the lower A-arm bracket. Then fit 2" X 3/16 tube steel between.
 This is very close to same location as what I had left after I cut away the crossmember. So to compensate I built back with more steel.
__________________
"In wine there is wisdom, in beer there is strength, in water there is bacteria."
|
|
#157
09-04-2016, 01:18 AM
|
||||
|
||||
|
This is where I ended the day. Still need to box out the balance of the crossmember and fit the motor mount receiver.
The receiver will fit above the factory crossmember seam, so I'm keeping the seam/flange for both looks and strength. 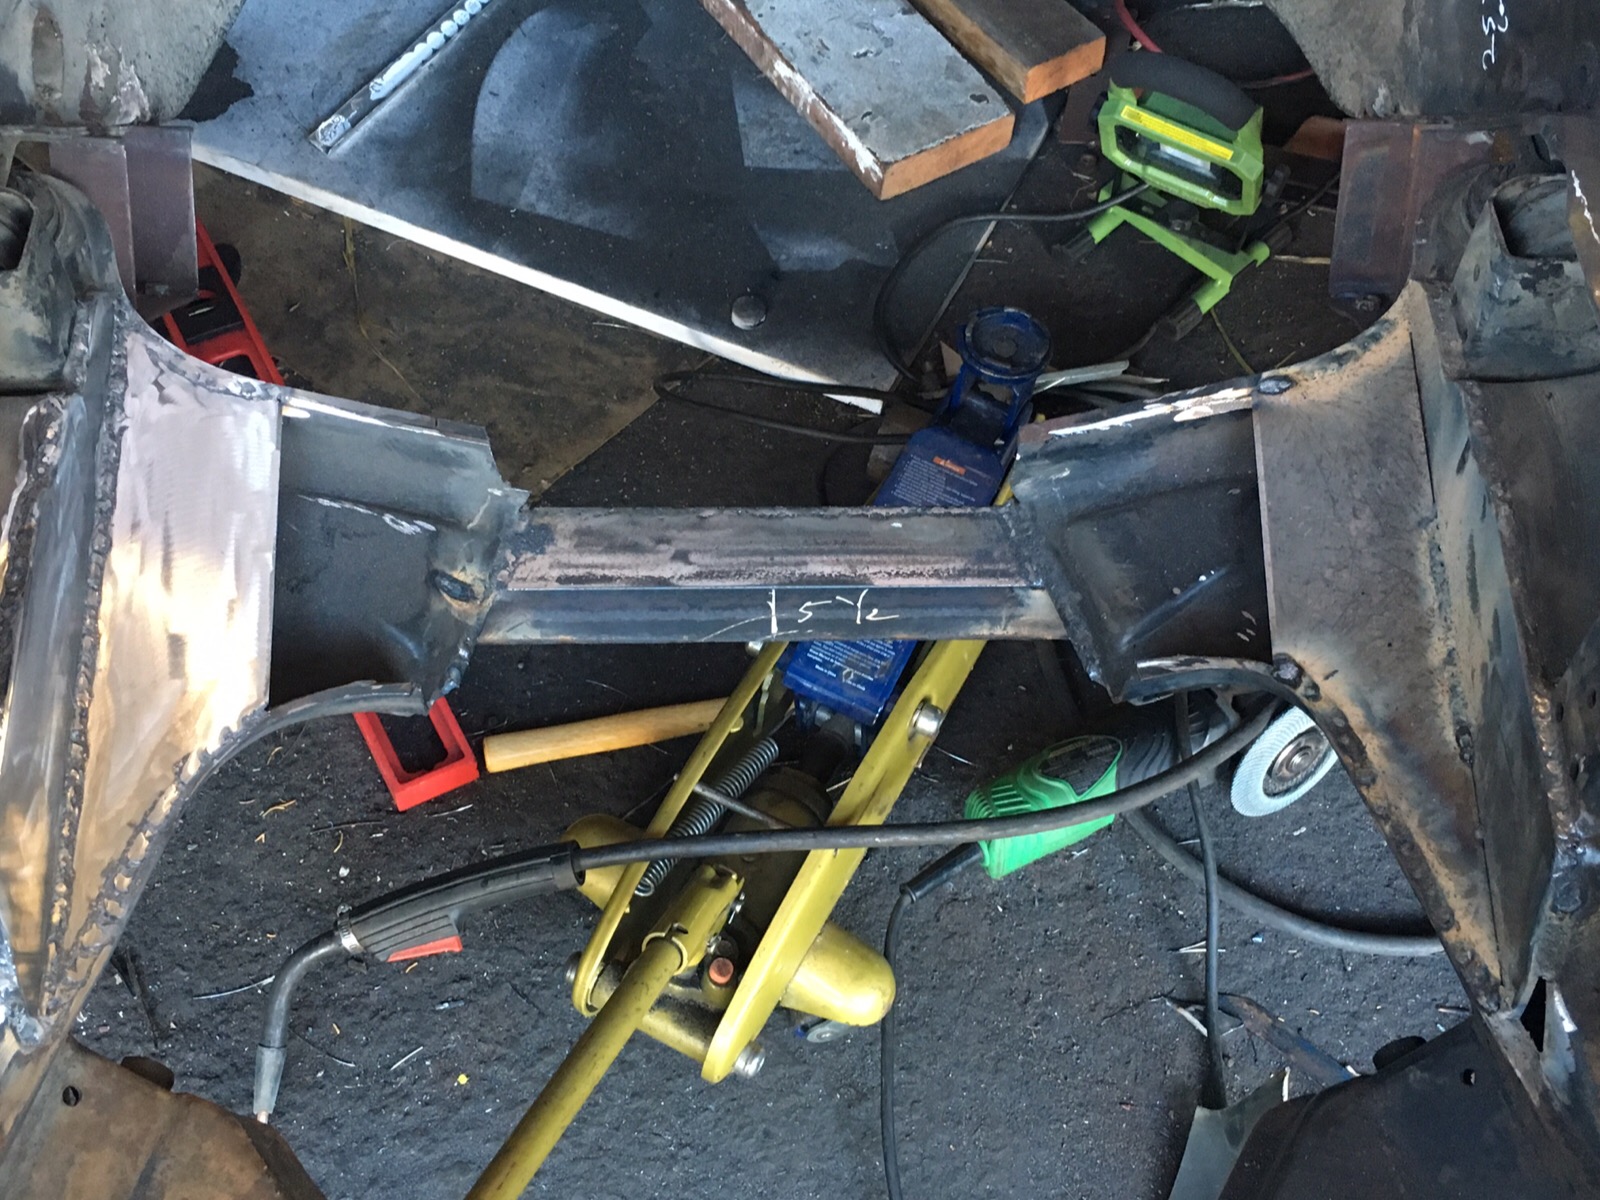
__________________
"In wine there is wisdom, in beer there is strength, in water there is bacteria."
|
|
#158
09-05-2016, 12:51 AM
|
||||
|
||||
|
Spent about 4 hours today and made some more progress.
Continued fitting and welding in 3/16" plate to build out the crossmember. Completed both sides and fit and tacked the passenger side motor mount receiver. I feel good about the placement of the mount centered over the front wheel line. Should put a balanced load on the frame, connectors, A-arms. 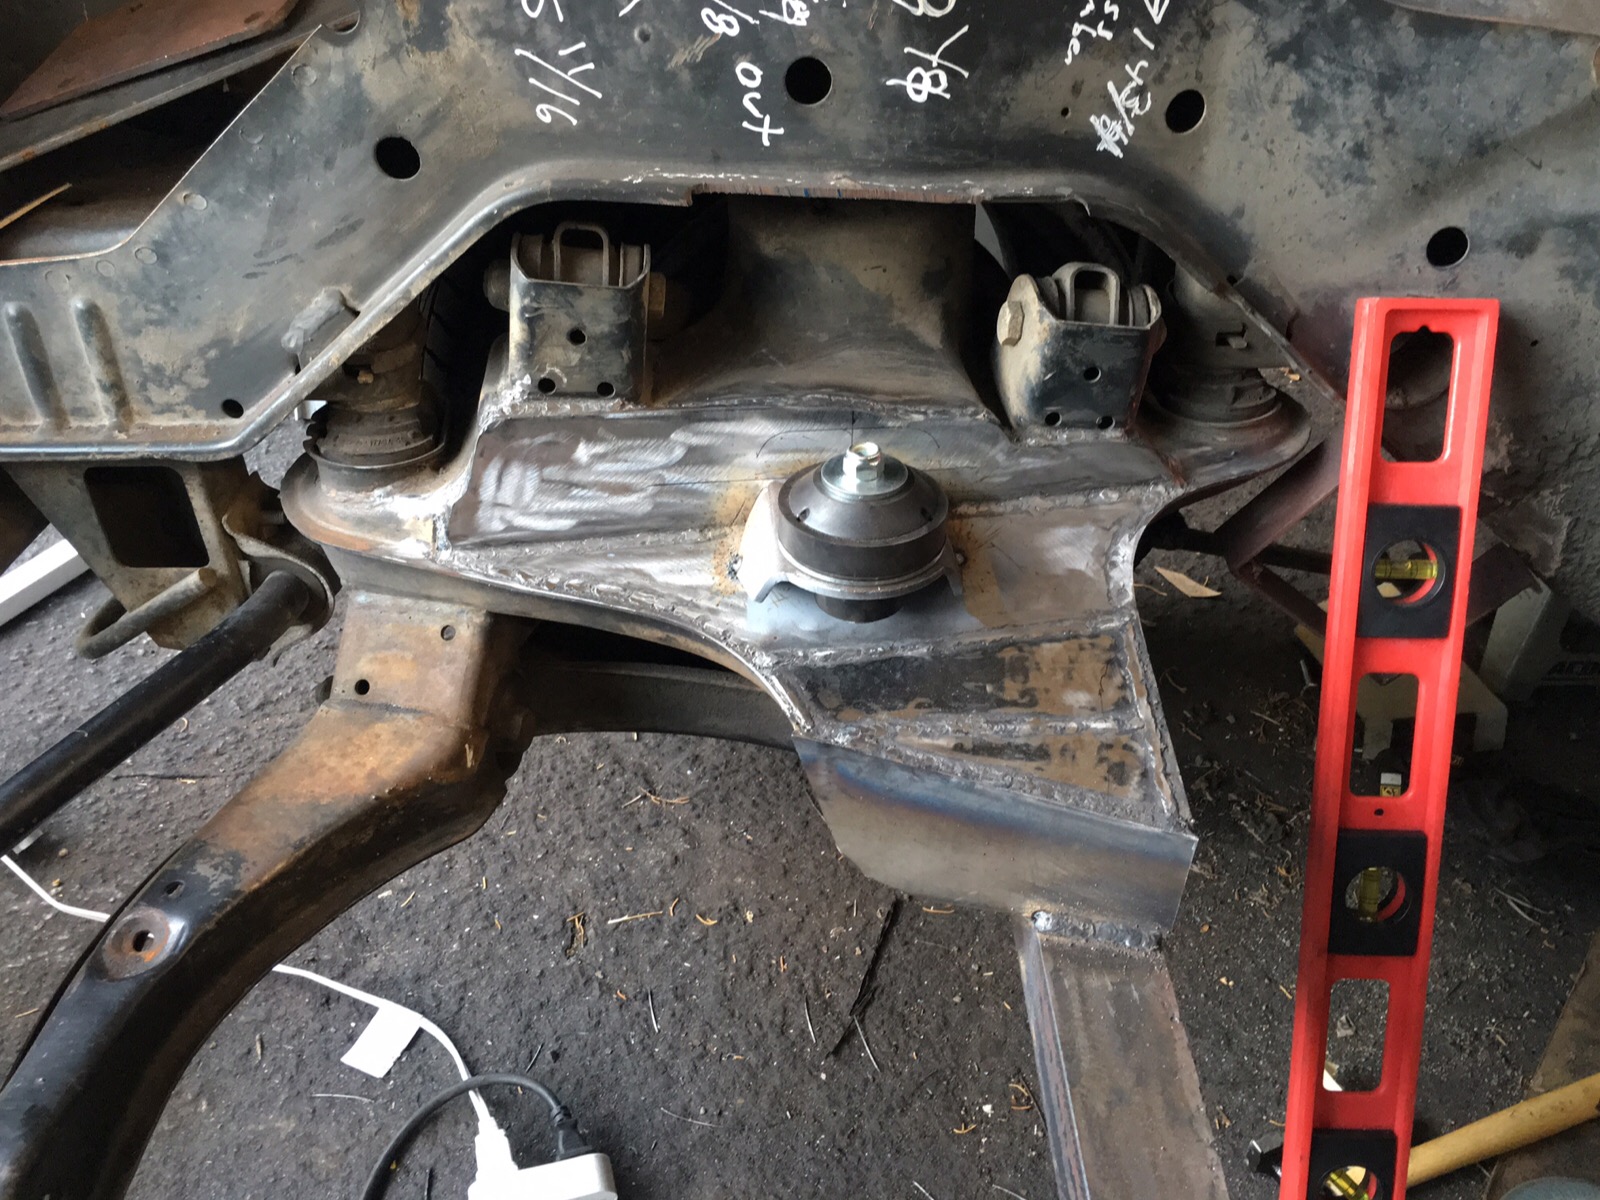
__________________
"In wine there is wisdom, in beer there is strength, in water there is bacteria."
|
|
#159
09-05-2016, 12:55 AM
|
||||
|
||||
|
Here is another pic, more from the front, to get a little different perspective.
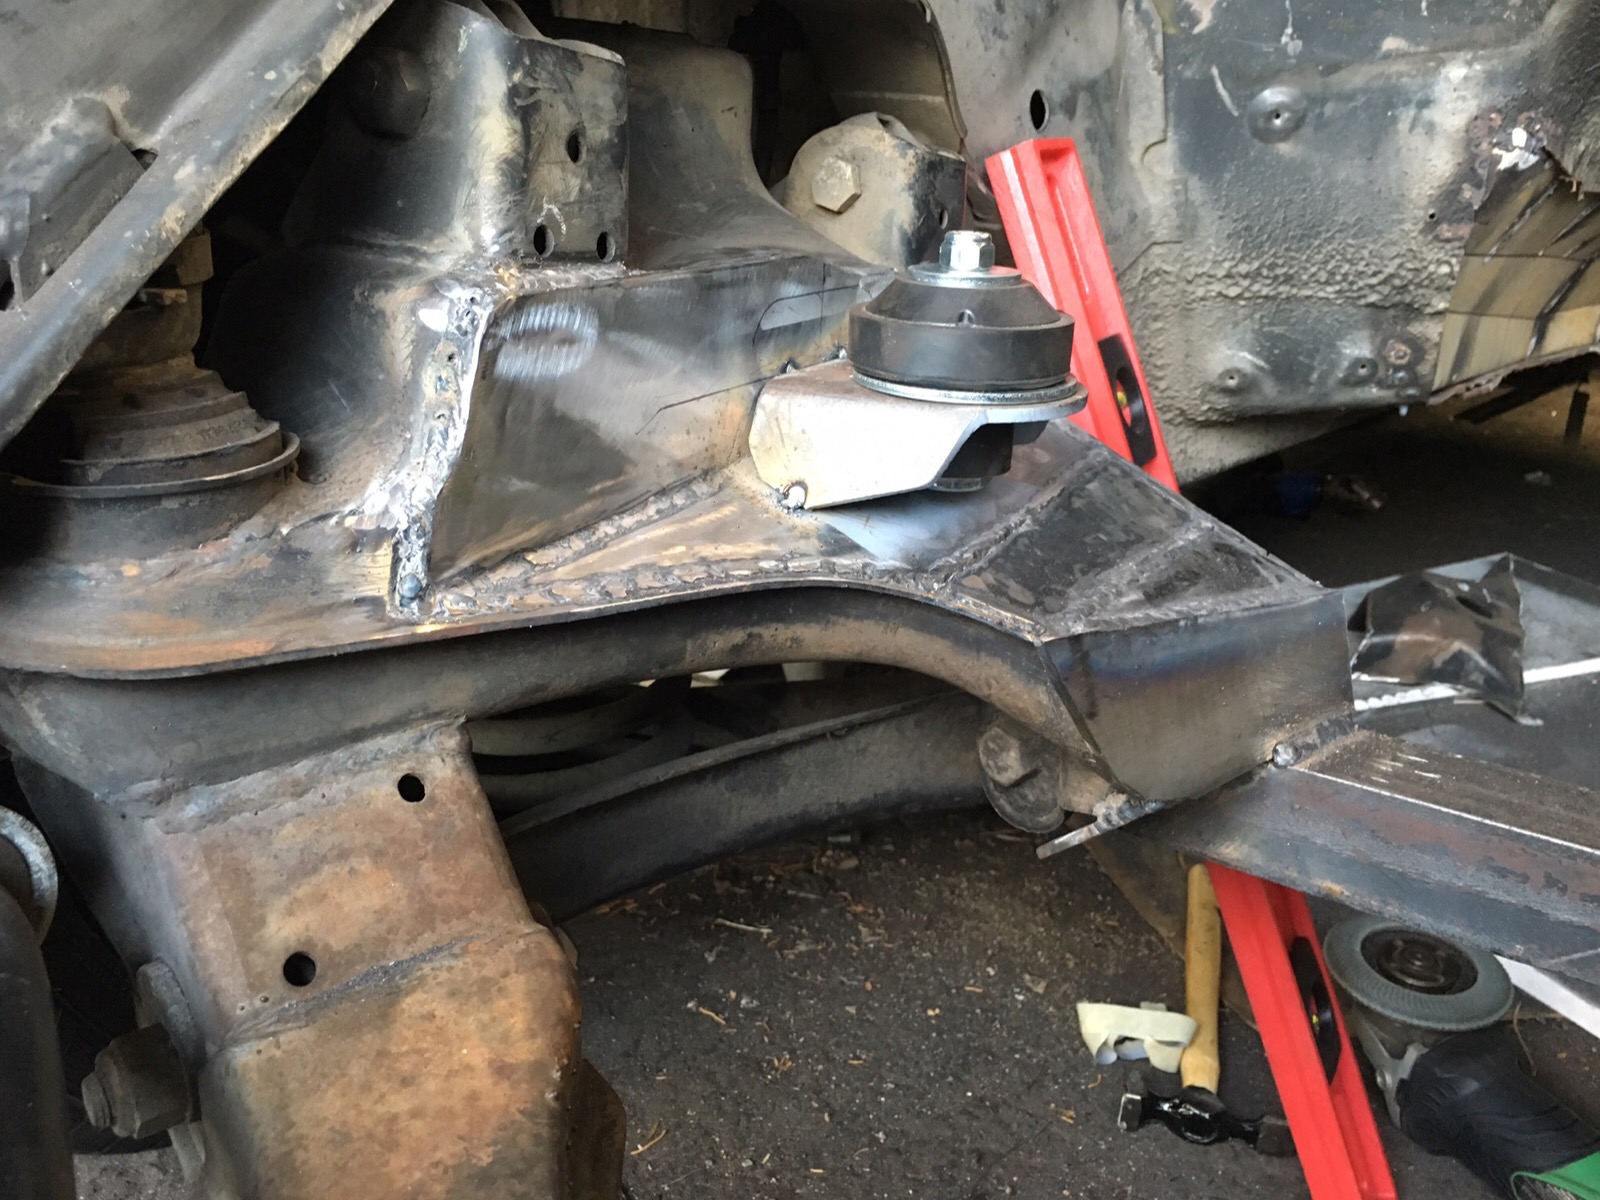 With the different angles of the plate, along with the existing crossmember bends, should offer pretty good rigidity.
__________________
"In wine there is wisdom, in beer there is strength, in water there is bacteria."
|
|
#160
09-06-2016, 12:27 AM
|
||||
|
||||
|
I finished the crossmember and welding in the new motor mount receivers. I have the mounts level and within 1/16" of where I planned for them to go and squared up with a couple points on the frame and radiator support as reference.
Then I cleaned everything up, cleaned the new metal and the existing area surrounding the crossmember with grease and adhesive remover, then primed the raw metal, then a coat of black paint. 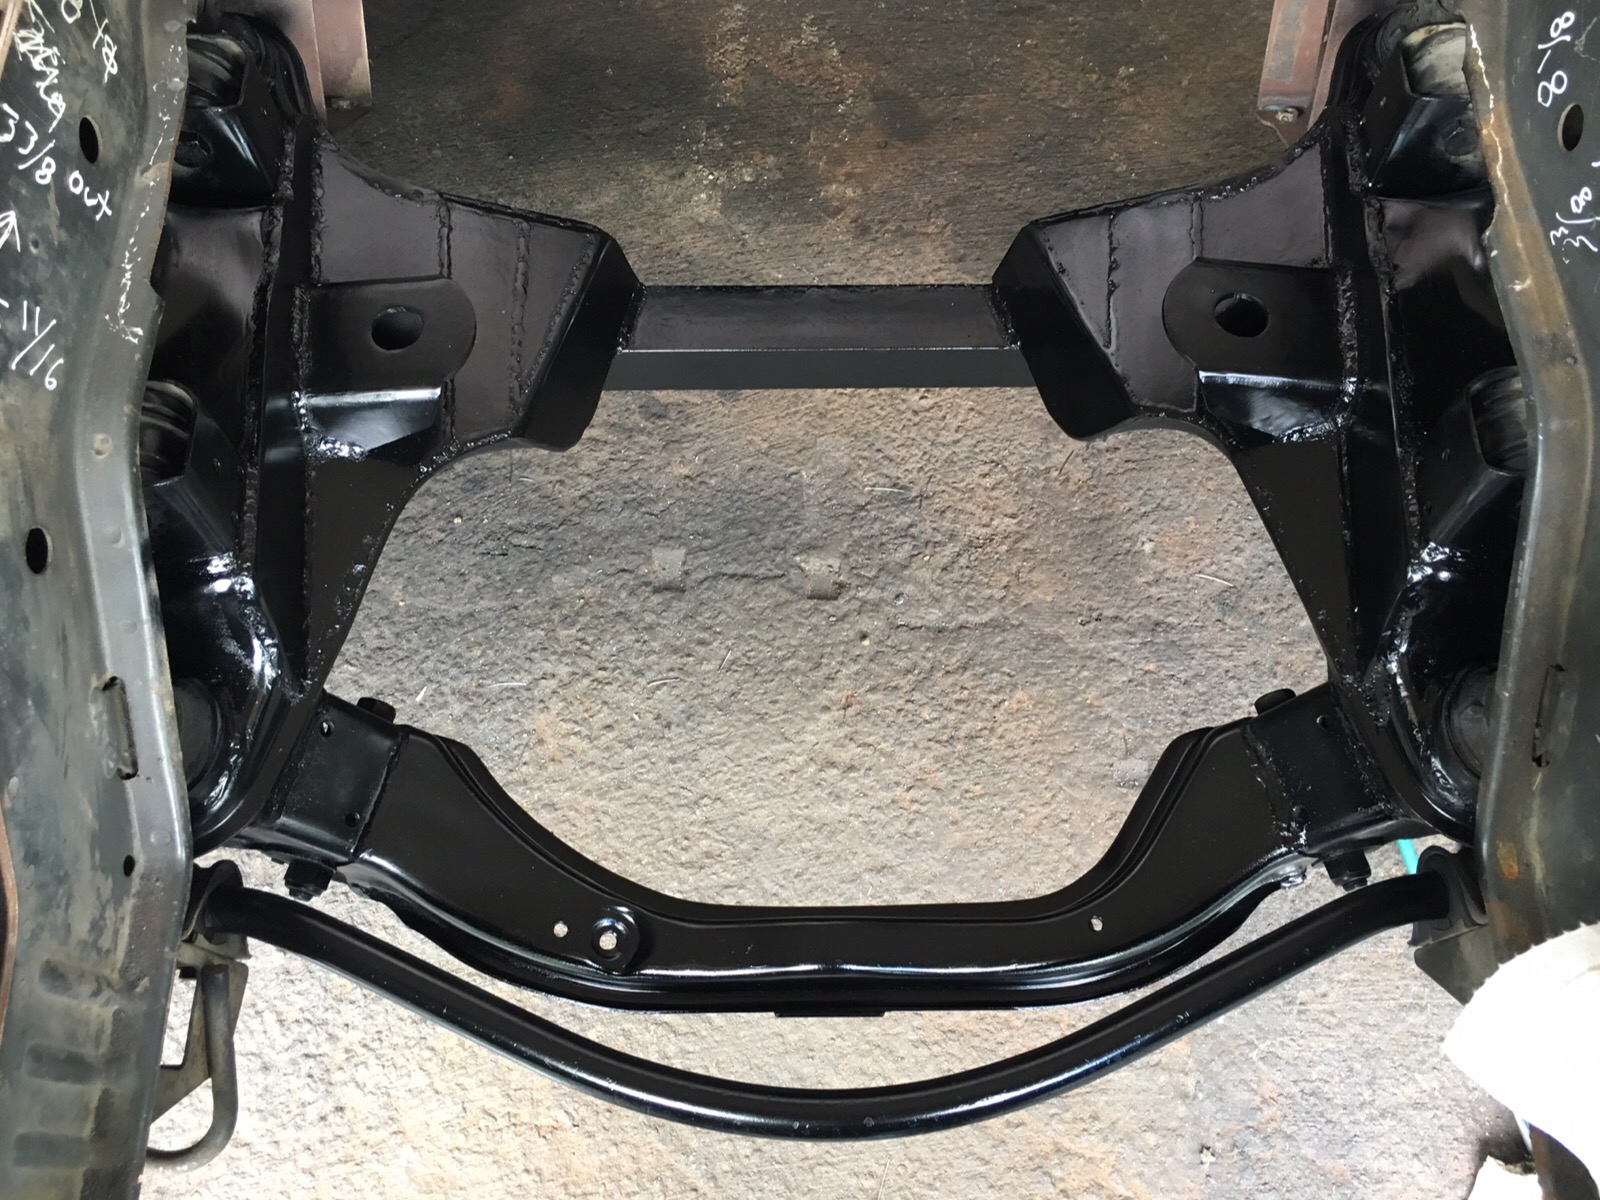 Spent some more time with the steering column and tacked in the last piece of the firewall. I was waiting for a coupling to extend the steering shelf through the firewall. More to come.
__________________
"In wine there is wisdom, in beer there is strength, in water there is bacteria."
|
|
#161
09-06-2016, 06:51 PM
|
||||
|
||||
|
That engine looks like it came out of a salt water flood car. I live in the rust belt, and I don't even see them looking like that. Not saying it's bad inside, but the rust everywhere on the outside of the block is gnarly looking. I assume your shop is going to tank it - so make sure you paint it before you stick it in. Even if you do just do a basic black!
__________________
Current: 2021 Charger Scat Pack Widebody "Sinabee" 2018 Durango R/T Previous: 1972 280SE 4.5 2014 Jeep Grand Cherokee Limited "Hefe", 1992 Jeep Cherokee Laredo "Jeepy", 2006 Charger R/T "Hemi" 1999 Chrysler 300M - RIP @ 221k
|
|
#162
09-06-2016, 10:01 PM
|
||||
|
||||
|
Quote:
But local shops rebore package includes Thermo-Clean/Hot Tank and Magnaflux before machining and Hot Jet Wash after machining. No rust on the inside though. Thanks for posting.
__________________
"In wine there is wisdom, in beer there is strength, in water there is bacteria."
|
|
#163
09-11-2016, 02:41 PM
|
||||
|
||||
|
Fun but painful.
All this metal cutting and welding is taking a toll on my body. Small little burns, angle grinder slipped with grinding disk and scuffed up my wrist good (usually wear gloves but got lazy), and all the grinding and welding sparks are a painful nuisance. But still having fun planning and fitting. I have fit and welded in the last of the firewall panels. Sanded down with a flap wheel and sprayed with Nason self etching primer. This area now ready for filler and finishing. I have 90% of the tunnel metal in place and a good bit welded in. I probably have another day in welding, sanding and priming. 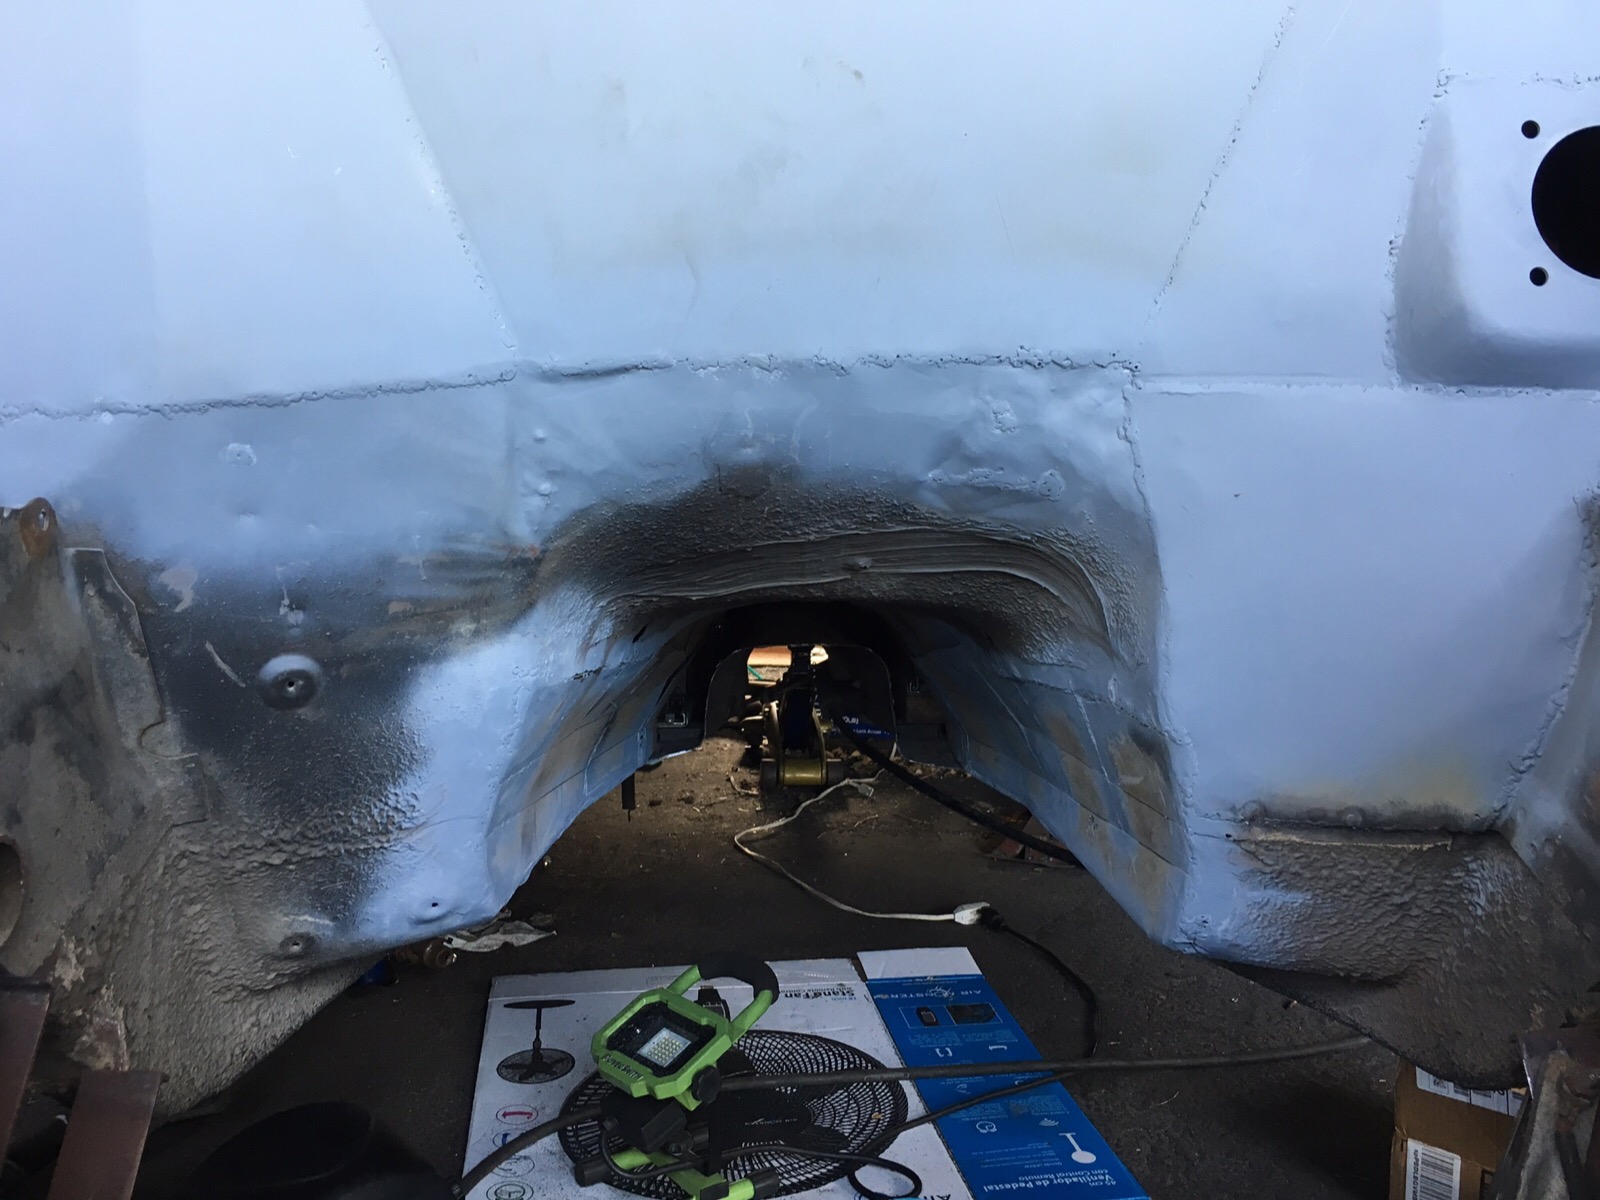 Still forming a plan to support the transmission. The unibody frame rails run to the transmission mount location for the old trans. The new mount location is about 6" further back. Plus I'm planning on more stress and weight. There is existing added metal and stiffener bends in the floor pan right at the front of the seat rails that is right about where the new trans mount is. My rough plan is to weld in some 3/16" thick 1" tubes between the tunnel and the door sill to beef up this existing strong point and it will be hid and fit under the seat rails. Then bend some 3" 3/16" plate up, over, and down the trans tunnel, (upside down "U") extending through the floor pan with the trans mount bolting between. Then add some of the same 3" X 3/16" plate to the inside floor pan about a foot or so before the end of the frame rail to the new mount location. This should spread the "load" to more of the body and reduce the stress from a single point.
__________________
"In wine there is wisdom, in beer there is strength, in water there is bacteria."
|
|
#164
09-11-2016, 08:30 PM
|
|||
|
|||
|
One note on angle grinder wheels.
Go for name brand units and even then check the wheel for open spots, ( I've had a few from a major tool maker just as bad as generic junk ). Lower end wheels have lots of voids in the grit mix, this open spot can catch an edge and throw the grinder.
|
|
#165
09-12-2016, 03:04 AM
|
||||
|
||||
|
Quote:
That and wear gloves! Luckily it didn't actually draw blood but gave me a good road rash.
__________________
"In wine there is wisdom, in beer there is strength, in water there is bacteria."
|
 |
| Bookmarks |
|
|


 Linear Mode


