
|
Washing part - 1
Washing should not be done in the direct sunlight. Shade or overcast is preferable as direct sunlight can cause waterspotting.
The first step to a good wash is a good pre-rinse. Using hose or diffuse pressure-washer spray, remove as much of the surface grime as possible with the water. When washing it is very important to work in a top to bottom pattern. This way you do not have to re-wash areas you have been over and you keep the wash-mitt cleaner.
To do things right, for the longevity of the car's finish, using 3 separate wash mitts is best. Each one has its distinct job and it will keep that job for its existence. (wash mitts are cheap, paint jobs are expensive!) Have one for the top painted surfaces and windows, have a second for the lower areas such as the body cladding and wheel-wells, and a third for the wheels and tires. By keeping separate mitts you don't grind last brake dust from the wheels into the nice shiny hood or smear tar/road grime into your fender.
That brings us to the next part of washing...soap. Please don't use dish-detergent or any household cleaners. At best it will only strip the surface of its wax and shine, at worst it will actually damage the finish. Any high quality car wash is good, I would personally recommend Zymol, 3M, or Meguiar's respective car washes.
The last element of a good washing?.the mitt. More people ruin finishes with sloppy handling or ill chosen mitts than perhaps any other mistake. Whatever you use make sure it has NO synthetic fibers in it. Even if it says 100% cotton burn test* the edges to make sure the thread used to sew it are not polyester/synthetic. A 100% cotton chenille mitt, a true natural sheepskin mitt, or a Boar's Hair brush are all good safe choices.
So now your car is out of direct sunlight, you have rinsed it thoroughly, you have your safe mitts/brushes ready for washing, a bucket of water with some high quality car wash in it (keep the water cool or luke-warm please), and you are washing your car top to bottom. When you have all that going on you are well on your way to preserving that "wow" finish everyone loves. Washing is as much preserving the finish as it is about cleaning it.
By-the-way, if your washing your car and you run across a glob of something that doesn't want to come off readily with the wash just let it go. Cleaning the paint is an entirely separate chapter. You are likely to do more damage grinding away at whatever it is than you are leaving it on there a bit longer till you can properly remove it with something specialized. As always, these are only recommendations for the person in their driveway.
*when burn testing the flame should just blacken or char the fabric, if you see any balling or ?gummy? look to it you have synthetic thread which is a major culprit of swirl marks.
Washing part - 2
In this segment of the detailing process I will address washing technique.
To sum up what we were doing from last time...you have your car in the shade, using a 100% natural mitt/brush, have rinsed it thoroughly, are using cool-luke warm water in a bucket of high quality car wash (just a capful or so to a couple gallons as too much soap will devour wax) , and you have your 3 separate mitts at the ready. You also remember that you don't want to grind at anything that wont come up easily with the regular wash.
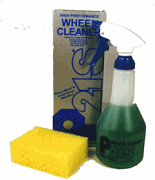
Cleaning the wheels and tires is another commonly abused area of the car. Just as household cleaners will ruin the look and possibly damage the finish of the paint, they will do exactly the same thing to your wheels! Virtually all wheels on Mercedes are painted and/or clearcoated. That finish is just as tender as the one on the hood, fenders, roof, etc. Don't do anything to it you wouldn't do to your hood! This tender finish is subject to some of the harshest conditions anywhere on the car. It gets coated with ultra-hot bits of dust from the brake pads that will actually eat into the paint given enough time and accumulation. (if it will eat into a metal brake rotor over time what will it do to your finish?)
Using a specialized and PH-balanced wheel cleaner (like Meguiars or P21S) is a must for someone looking to preserve the factory finish. Unfortunately household cleaners like 409 and Simple Green can destroy that delicate paint quicker than the brake dust. Either of those can be used on the tires, but only the tires. Remember that wheels cleaner is for wheels, tire cleaner is for tires. Tire cleaner can be damaging to wheels and wheel cleaner generally isn?t strong enough for tires.
While we are on the topic of tires I have noticed that certain silicone or petroleum distillate based tire dressings (Armor All or Son-of-a-gun) can be a real headache to clean up after next washing. A dressing like Lexol's Vinyl-X (for the wet look just apply and forget about it, for the matte/concours finish buff off with a clean rag after it has dried for a minute), Meguiar's Endurance or Mother's Back-to-Black gives all the look but doesn't turn your tire-mitt into a sludgeball.
In addition to washing the vehicle top-to-bottom you want to use linear strokes that run in the direction air travels over the car. This way if you accidentally cause swirls or light scratches they are far less noticeable than from a circular pattern. It is also important to never let the soap dry on the finish. Rinse frequently while washing only 1 section at a time. How big is a section? Well, that depends as much on you and the conditions as anything else. A section should be as much area as you can comfortably cover without any of the soap drying. (hood, trunk, top, etc)
Another point to mention is that when you have washed a section and are dipping the mitt back into the bucket give a few agitating shakes to dislodge any particulate that has worked its way into the nap of the wash-mitt. Better that it end up in the bottom of the bucket than sanding your finish?
Even after you are done with an individual area (washing and rinsing) it is a good idea to go over the car one last time in a top to bottom "finishing rinse".
*Note, if you are using a pressure washer or a commercial car wash with a pressure sprayer do not spray the radiator directly. Those things put off enough force to bend the cooling fins on the radiator and hence damage its heat shedding capacity. Then again, real pros generally try to avoid commercial "self-washes" and automated car washes entirely. In my opinion you should NEVER use those automated car washes on a car that you car about in the least. Company cars, off-roaders, and that ilk are what they are designed for.
Other small touches that make a difference would be using your headlight washers before you wash as they can become clogged over time and disuse. Also if you periodically wipe down the antenna while it is fully extended you remove the grease, grit, and grime that it accumulates. While all of this may seem extreme or overly time consuming, once you have made it routine and have a system of sorts established it saves your time and headache in the long run.
Drying
Unless your car has been washed and rinsed in only distilled water (which is not realistic) you will need to dry it to avoid water spots and mineral deposits. Plus when the surface is wet it is more attractive to dust. Also, if you plan to clean the paint or wax drying is a must. There are several schools of thought when it comes to drying. It is generally agreed that this is another process to be done in the shade.
We use synthetic chamois over the natural variants because they don?t rot, stink, get stiff, or leave oils on the paint. The synthetics hold just as much water and ring out more easily. If you?re a die-hard terry-cloth person then you may use them but drying a full sized car requires a big stack of towels. Our method is to use the synthetic chamois to get 90% of the water off on the first pass then pull the rest off with a 100% cotton terry towel.
Proper chamois technique is to have a bucket of clean water nearby. You rinse and ring before the first pass and often while going over the finish. Just as agitating the wash mitt in the bucket while washing dislodges any dirt and helps prevent swirls, so does the rinse&ring method while drying. As always if you drop the rag, mitt, or chamois STOP using it until it can be thoroughly laundered lest you grind in the grit you have spent countless hours removing. As with washing try to keep the drying strokes light in pressure and parallel to the direction of airflow over the vehicle.
Once major exterior surfaces are reasonably dried it is time to turn your attention to the doorjams, trunk sills, mirrors, and underhood. We recommend using a terrycloth rag/towel for those areas as they tend to hold dirt that can be better absorbed by the terry?s nap vs the ultra smooth synthetic chamois. Begin by opening all the doors, trunk, and hood. You may want to open and shut them briskly once or twice to dislodge as much water as possible.
Once the water is pulled up you may want to remove any dirt/grime in the area with a ?quick-detailer? such as Meguiar?s Quik Detailer or Final Inspection. These products can be wiped over a semi-dirty surface without causing swirls/scratches. They also feed the paint nutrients, extend the life of the wax, and enhance the look of the finish.
A visual inspection around the vehicle to make sure no more water has seeped out of a crevice never hurts. (wheel lug-nut holes, tail-light assemblies, mirrors, etc) If you were not cleaning the paint or re-waxing now would be the time to give the entire car a once over with the aforementioned Quik Detailer or Final Inspection.
Using a new, clean, 100% cotton terry lightly mist the finish and spread with the terry. Then flip the rag and lightly buff area with the dry side. The area covered should feel nearly frictionless with the rag. Repeat the process of mist, wipe with the wet side of terry, and lightly buff with ?dry? side over all the painted surfaces. If the Quik Detailer or Final Inspection streaks after buffing then it is an indicator you may need to re-wax.
Polishing, Cleaning and Waxing
Ah, the eternal battle with swirl marks! j/k 3M, Zymol, and Meguiars are all top quality products. I would have to give the nod to 3M or especially Meguiars. Zymol looks great but is a colossal pain in the butt to use. You can get comparable results with the others with much less effort. Unless you detail for exercise I think the other two are a better-bet all around.
Assuming you have washed and dried the finish as prescribed earlier you are ready to clean the paint and/or de-swirl. For this job I would go with the Meguiar?s professional line known as "Mirror Glaze" that comes in a tan bottle. Of course, all these steps should be done in the shade or indoors under BRIGHT lighting. (I have a several 500w Halogen spotlights)
I would start with...Meguiars #9 Swirl Remover. You can do it by hand but an orbital buffer with 100% cotton pad can speed things up if you are careful. Apply the #9 to the finish and buff vigorously. Then remove with linear strokes of a 100%(including threads/seams) terrycloth.
Following that I would examine the paint visually and under sunlight or intense light to see if you have eliminated the swirls. Remember, swirls are scratches in the paint. Therefore to remove them completely they have to be buffed out by removing paint. If you have not removed the marks or not removed them to a satisfactory degree you can repeat the previous steps with the #9 again. I always prefer to make multiple steps of something less harsh than one step of something harsher.
Assuming you have buffed the swirls out to your satisfaction the next step would be to polish. Using Meguiar?s #7 Show Car Glaze, apply and buff with a clean 100% cotton covered foam applicator pad or 100% cotton orbital buffer pad. Then remove with a separate, clean, 100% cotton terry. For ease of removal it may be helpful to work one section at a time. (hood, half the roof, trunklid, etc) If the paint feels "baby's butt smooth" go ahead and wax.
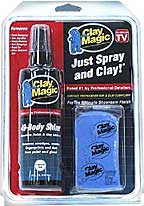
If you feel a bit of roughness on the surface of your paint you can try a high quality paint cleaning clay. For clay use, spray the area being cleaned with a surface lubricant like Meguiar's #34 Final Inspection or Quik Detailer then rub the clay back and forth over the lubed area. Keep plenty of lube on the finish and turn/knead the clay periodically. The clay is great for cleaning things ON your paint. The polish and swirl removers clean things IN your paint.
To protect your hard work you then apply either Meguiar's #26 wax or you can also try the new Meguiar's Gold Class wax for clearcoats. I have not had as much experience with the new wax but, I have used it with good results thus far. Beware, it is for clearcoats only. Simply apply the wax with a cotton covered foam applicator then remove with 100% cotton terry.
If you have completed the above steps you should have one helluva shine going. If the finish of your car didn't respond to the above steps you are in need of heavy duty refinishing. As always, if you drop a rag or applicator during ANY phase of this discard it immedately and replace with a clean one. I hope this helps out with the swirl and paint cleaning issue.
- Lee Scheeler
CategoryDiy