Dash Brake Warning Lights
on the 85 300D (W123)
by dmorrison
2/14/08
W123 dash brake warning lights, a review
Lets review the W123 brake light warning system.
In the dash, there are 2 warning lights associated with the brake system The first and most important is the Red " BRAKE " light in the dash.
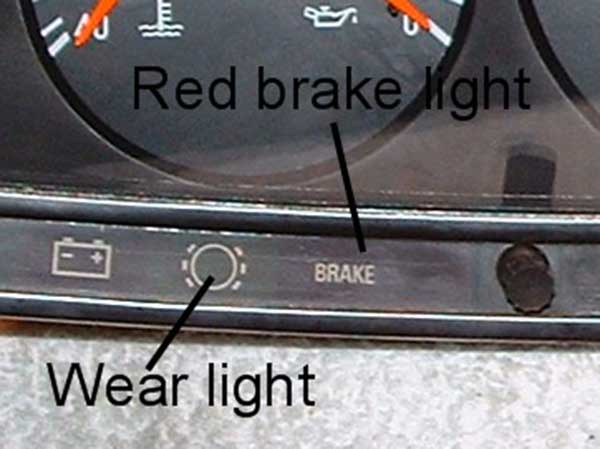
This light has 2 functions. It informs you that the parking brake is engaged and more importantly it informs you that the hydraulic brake system reservoir fluid is at a low level.
The system uses a wire schematic that you can see in picture #2.
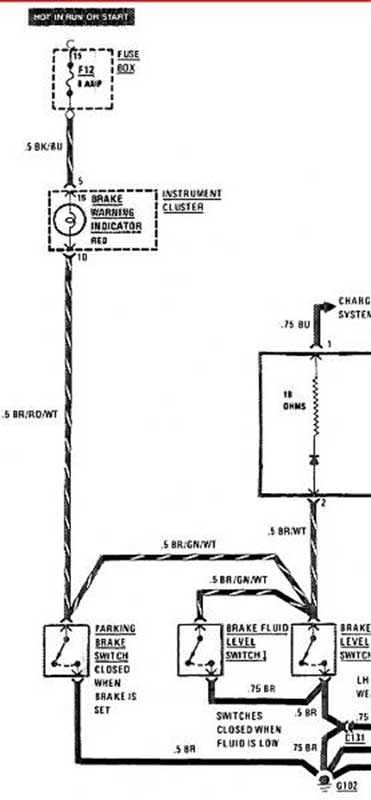
From the #12 fuse, the circuit goes to the warning light in the instrument cluster. From there it travels via cables to both circuits in the brake fluid reservoir and then to ground G102 which is located behind the instrument cluster . The black buttons at the top of the reservoir are test buttons for the floats in the reservoir.
"Reseting" them as is sometimes posted, is not quite what you are doing when you press the button. If the light is stuck on and is caused by the float. When you "reset" it you are trying to disconnect the float from the lower "on" contacts. This is whats causing the false on indication. The float ( picture # 3 ) may be getting old and not move up and down freely.
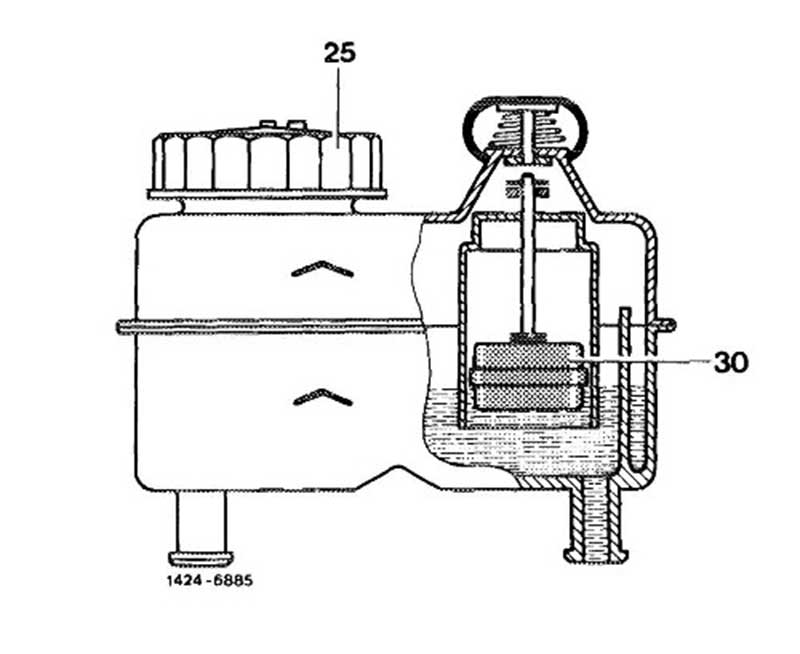
The older cars have a single chamber system and only 1 float and test button on top of the reservoir. Newer models have the dual chamber reservoir and 2 black buttons
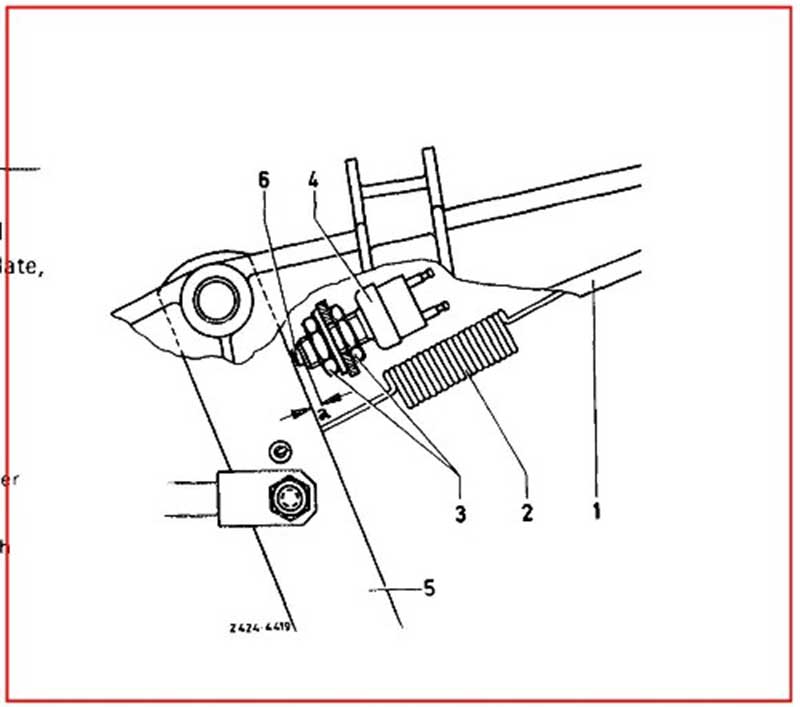
The second circuit of the Red " BRAKE " light goes to the parking brake pedal assembly and lets you know when the barking brake pedal is in any position other that fully back ( parking brake off ) Picture #4 shows the Service Manual diagram of the switch location.
To test the 3 circuits for a fault ( meaning your light is on ) you simply disconnect the wire harness going to the reservoir float or parking brake switch one at a time and check the light. If the light goes out, then it is that particular circuit. You can replace the parking brake switch but the reservoir switches cannot be replaced. A new reservoir is required. However the black rubber caps are available.
Of course first make sure that both reservoir sections are filled with brake fluid to the "MAX" line. To look at the rear chamber it is best to look on the passenger side of the reservoir towards the back of the reservoir. I usually wiggle the reservoir side to side, it makes it easier to see the fluid level change.
A second light in the dash is for the FRONT brake pad wear warning system ( picture # 1).
As posted, the wear sensors are in the front pads only. 2 wires per wheel, one in each pad. The electrical circuit ( picture #5 ) goes from the #12 fuse, to the instrument cluster power line, through the warning bulb to the 4 sets of sensors. Then to the G102 ground for the left front hand wheel and the G101 ground for the right front wheel. The G101 ground is located RH front fender behind the headlights. Interestingly enough, the wear sensor tells you that your pads are worn out by grounding the circuit ( actually completing the circuit) when the plastic cover of the wear probe sensor is ground away and the exposed probe wire touches the rotor ( that is why it flickers initially ). I actually have not seen the wire for the wear sensor as it goes to either G101 or G102 as shown in the electrical schematic, go figure.

There is not a wear warning system for the rear pads or the parking brake shoes. You should check the rear pads for every 3 front pad replacements ( not a bad idea to check them every 2 sets of front pads ) The parking prake shoes should last quite a long time, I personally have never replaced a set of parking brake shoes in all the Mercedes I have owned (9 at last count). To prevent from replacing parking brake shoes you must keep the parking brakes in adjustment and not drive the car with the parking brake on.
I hope this helps anyone who has any questions about the dash brake lights.
Dave
Discuss this DIY here.
-dmorrison
CategoryDiy