

|
|
|
|
|
|
#16
 12-20-2007, 09:55 PM
|
|||
|
|||
|
It was strait forward for the 601 head I did. I took off the sprocket from the camshaft off. Then bunged the sprocket to the celling. The hardest part for me was the chain guide rail. The plastic broke and dropped down in the engine. 3 hours later I got the thing out. I was sweating bullets. And also removing the chain guide rail.

|
|
#17
12-20-2007, 10:20 PM
|
|||
|
|||
|
Quote:
|
|
#18
12-21-2007, 12:38 PM
|
||||
|
||||
|
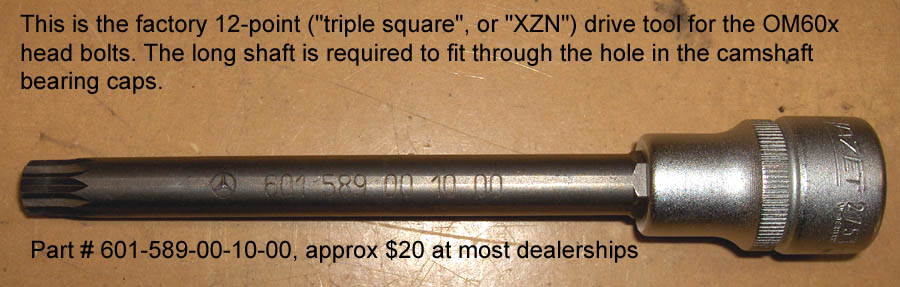
Use the proper head bolt tool - it needs a long shaft to go through the cam towers. I'd leave the camshaft installed to save time. Unbolt the head using the reverse of the tightening sequence, one turn at a time, through the whole pattern. To skip the rail removal, yes, you can cut through the chain. It's faster to pull the head with the exhaust manifold attached, take that off once the head is out of the car. The injectors & prechambers can remain in the head for now.
__________________
Check out my website photos, documents, and movies!
|
|
#19
12-22-2007, 08:25 PM
|
|||
|
|||
|
Quote:
Last edited by MTUpower; 12-22-2007 at 08:32 PM.
|
|
#21
12-23-2007, 10:11 AM
|
||||
|
||||
|
I agree with getting quality tools, when you put the head back on use NEW HEAD BOLTS! These are torque to yield bolts and require replacement once taken out
__________________
OBJECTS IN MIRROR ARE CLOSER THAN THEY APPEAR, ONLY IN A BENZ  89 560SEC 90 350SDL (Rudolph) 91 350SDL (300SDL drivetrain) 87 BMW 635CSi (Swanhild) 89 BMW M6 (euro) 99 Suzuki Hayabusa (Only the fastest thing ever) 
|
|
#22
12-23-2007, 10:32 AM
|
||||
|
||||
|
The tightening sequence is in this PDF file - see page 6:
http://www.w124performance.com/service/w124CD1/Program/Engine/602_603/01-5800hx.pdf The head bolts can be re-used if they are within spec. ALthough they are a torque-to-yield design, as long as they aren't stretched, they're fine. It doesn't hurt to replace them but not everyone wants to shell out ~$60 for new bolts. The spec is also on page 6 of the above factory procedure... basically, up to 2mm stretch is allowed, more than that and the need replacement. 
|
|
#25
12-24-2007, 02:59 PM
|
|||
|
|||
|
The head bolts are removed. 21 if I remember. I did not see any more. The intakes are removed. The cam sprocket is off and the chain tensioner is loose. In the front of the engine there are two allen heads that were removed- they faced up and were inside the valve cover. I did not remove the slide rail pins- how do I do that? The head does not budge at this point.
|
|
#26
12-24-2007, 03:12 PM
|
||||
|
||||
|
There are 26 total M10 head bolts. Make sure you have all of them removed. Then there are two smaller bolts at the front of the timing chain cavity, AND there are two more bolts that also attach the fuel filter bracket. But with those 30 bolts removed, the head should pop off with minimal effort. All the bolts are shown in the sequence in the PDF above. Print that out and bring it with you as a guide.
Either cut the timing chain, or use a stack of spacers/washers with a bolt to pull out the rail pins. Since this is a junkyard engine, I'd cut the chain, and mess with the rail pins on the workbench.
|
|
#28
12-25-2007, 12:39 PM
|
||||
|
||||
|
The long 12-pt tool should fit through the holes in the cam towers, so you should be able to still remove the head, without pulling the cam. If you don't have the tool that fits, then yeah, the cam will have to come off.

|
 |
| Bookmarks |
|
|


 Linear Mode


