

|
|
|
|
|
|
#16
 11-01-2010, 09:39 AM
|
||||
|
||||
|
Quote:
Ha, same issue on my 87 300D, The low beams are so low you can hardly see driving with them. I turned on the fog lamps and drove like that. If I use the high beams I piss everyone off... My headlights are really worn, the plastic around the edges are crumbling, it's time to just get some replacements. I have been looking at some of the aftermarket jobs off ebay. anyone use any with success? ANYTHING has got to be better than what's in there right now. 
|
|
#17
11-01-2010, 03:56 PM
|
|||
|
|||
|
I picked up some depo euro's $170 Delivered.
__________________
92 300D 2.5L OM602 OBK #59
|
|
#18
11-10-2010, 05:19 PM
|
||||
|
||||
|
Quote:
thanks   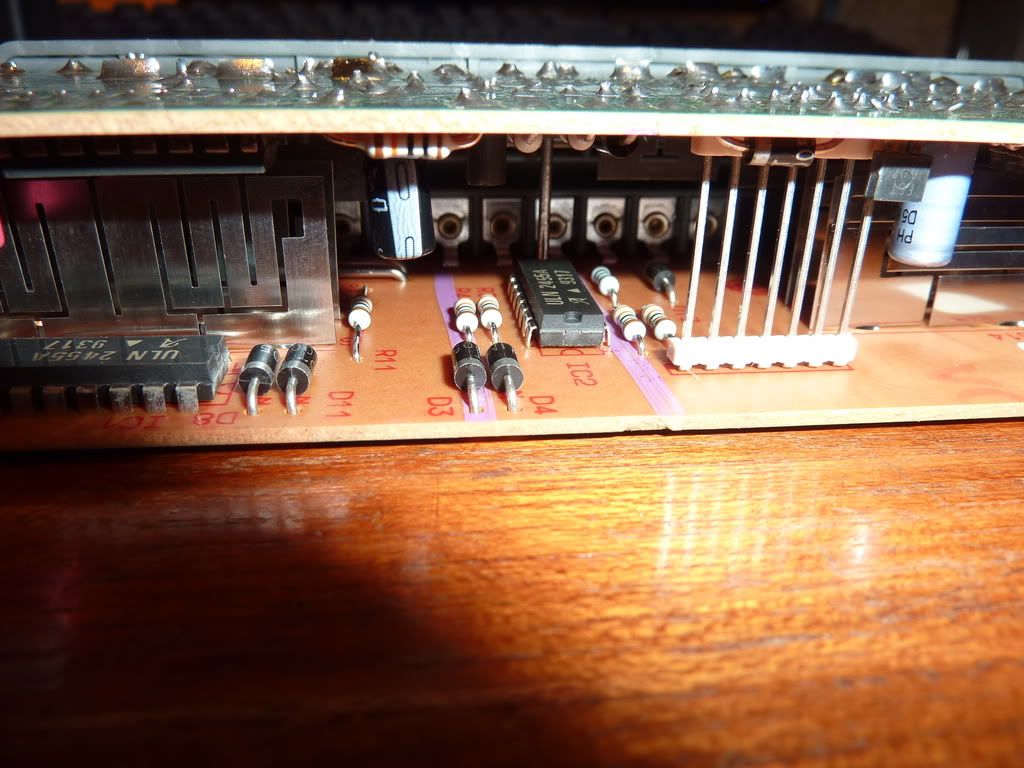 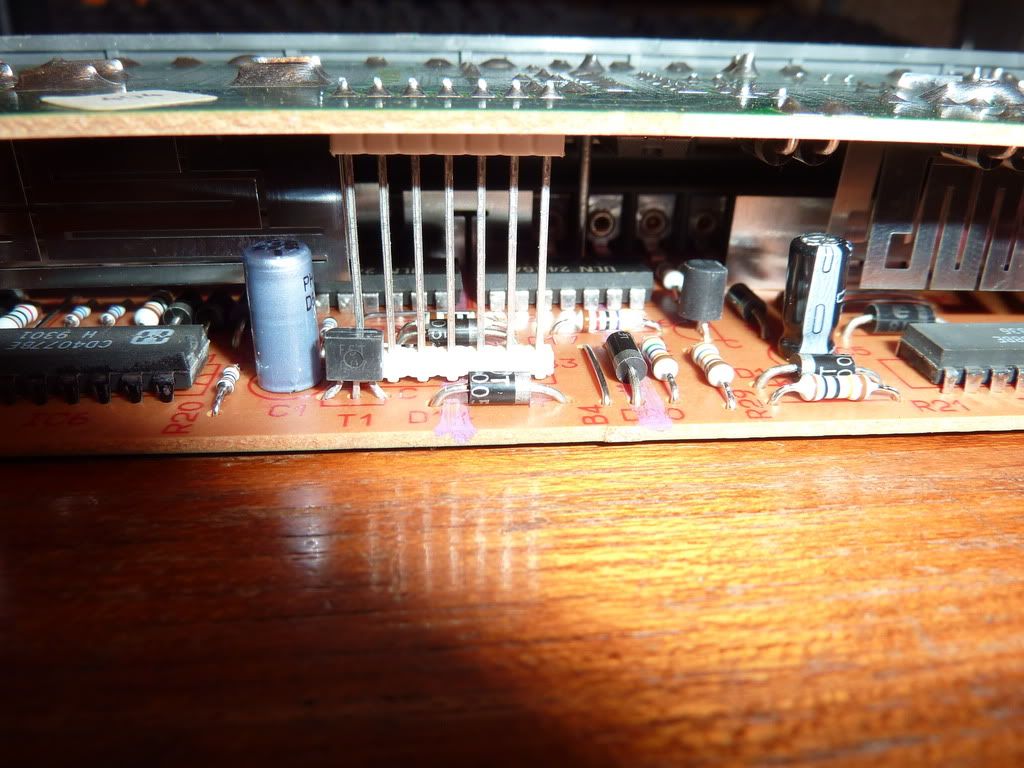
__________________
 Grey '91 350SDL 214k Dad's car Beige '81 240D 4 Speed 254k SOLD Blue '82 300D 225k SOLD White '95 E300D 46k SOLD Blue '87 190D 2.5 Turbo 315k SOLD Brown '80 240D 4 Speed 716k SOLD Beige '80 300D N/A 119k SOLD Blue '85 300D Model 186k T-Boned
|
|
#19
11-10-2010, 06:32 PM
|
||||
|
||||
|
Newer revision, but it looks like the same technology (ULN2455) now an obsolete part.
The philosophy of this circuit is that it is a comparator that funnels a bunch of outputs into a big "OR" circuit, such that any "true" condition that turns on the dash bulb out indicator lamp. I just found the headlamp inputs pins on the module followed them to the ULN part that measured them, and "snipped" the associated outputs (traces) from the ULN part. With these outputs no longer feeding the the big OR, they don't trip the dash light. You need to get a pinout of the ICs on the board. It's actually hard to find, being obsolete and all. Without having the part in my hand, I hazard not to guess at what to cut. I have spare N7 module, I could mod and sell to you!
__________________
Cheers! Scott McPhee 1987 300D
|
|
#20
11-10-2010, 08:20 PM
|
||||
|
||||
|
could you show me where the headlight pins are? that way i could try and trace them. and how much would a modded N7 cost?
Thanks
__________________
Grey '91 350SDL 214k Dad's car Beige '81 240D 4 Speed 254k SOLD Blue '82 300D 225k SOLD White '95 E300D 46k SOLD Blue '87 190D 2.5 Turbo 315k SOLD Brown '80 240D 4 Speed 716k SOLD Beige '80 300D N/A 119k SOLD Blue '85 300D Model 186k T-Boned
|
|
#21
11-10-2010, 10:17 PM
|
||||
|
||||
|
Quote:
PM me about the sales of stuff, or I'll PM you.
__________________
Cheers! Scott McPhee 1987 300D
|
|
#22
11-15-2010, 08:11 PM
|
|||
|
|||
|
Headlight Wiring Diagram
Greetings,
The entire wiring diagrams for w124 may be found here - http://www.w124performance.com/service/w124CD1/Program/ETM/ETM.pdf It's a big file (77 MB). I've isolated the headlight wiring diagrams. There are two, 1986 to 1990 which is here - http://thetwodocs.com/lights%2886-90%29.gif and 1991+ which is here - http://thetwodocs.com/lights%2886-90%29.gif I did not upload them to PeachParts as their size limit results in an image that is hard to see. Also the older schematic is very difficult to read so I have created a larger version that is more legible. It is here - http://thetwodocs.com/lights%2886-90%29_detail.gif I wish to entirely remove the low/high beam headlights from this circuit. Apparently I can remove 4 diodes as per this link - http://www.peachparts.com/shopforum/showpost.php?p=2504982&postcount=12 Or entirely bypass the relay as per this post - http://www.peachparts.com/shopforum/showpost.php?p=2587059&postcount=3 --- I'd like a little advice as to which leads I should remove from the relay and tie together. Thanks.
|
|
#23
11-18-2010, 10:10 AM
|
||||
|
||||
|
Quote:
And in post 2504982 those aren't 4 diodes, it is 2 diodes and 2 jumpers. OR you can nick the 2 encircled copper traces, one per side. But as people have noted, this is one version of the board and others exist so YMMV.
__________________
Cheers! Scott McPhee 1987 300D
|
|
#24
11-29-2010, 05:07 PM
|
||||
|
||||
|
I found the spec sheet for the chips used in this N7 module.
__________________
Cheers! Scott McPhee 1987 300D
|
|
#25
10-20-2014, 03:51 PM
|
||||
|
||||
|
Last week the BOW came on when I turned on the headlights. Very odd because the resistors I installed as part of an HID upgrade have been successfully fooling the BOW module since Jan 2013. Turns out that one of the resistors had given up the ghost. Although the resistors worked, they got very hot and that has always been a concern for me. Based on the posts from Scott McPhee earlier in this thread I was inspired to do an N7 mod. After opening my N7 it turned out to be the same version shown in arcticathlon's post
 . Using the ULN2455a product spec (Scott posted) I was able to reverse engineer that version of the N7 module and eliminate the BOW for both low & high beam . Using the ULN2455a product spec (Scott posted) I was able to reverse engineer that version of the N7 module and eliminate the BOW for both low & high beam  . .To disable the BOW for the low beams (N7 - pins 2 & 4) I disconnected the diodes in the red box shown below.  To disable the BOW for the high beams (N7 - pins 1 & 3) I disconnected the diodes in the red boxes shown below.  WARNING: Before you go cutting or removing parts from your N7 based on this post - I suggest you check your cars wiring against the wiring diagram. The factory wiring diagram (below) shows low beam as being on N7 pins 1 & 3 and high beams on 2 & 4. Using a multi-meter I was able to confirm that on my car (91 300D) pins 1 & 3 are high beams and pins 2 & 4 low beams - reversed! In this case that wouldn't have been an issue because I disabled both low & high. However I don't know if Mercedes used the same pins for low & high on all models. Check and double check before modifying your N7....  Good Luck! Last edited by 300D-91; 10-25-2014 at 01:07 PM.
|
|
#26
08-03-2015, 04:13 PM
|
|||
|
|||
|
Thank you scottmcphee and 300d-91 for your awesome pictures and details. I added HID when i replaced my headlights (buckets and all). Though they were supposed to be error free etc i threw a exterior bulb warning. My N7 was the variety 300d-91 showed the fix for. I can say that with some careful snipping, the warning bulb is off! You will need the smallest snips you can get to perform the work but all told it was a fifteen minute job. Thank you again for the super easy fix!
Last edited by k26ripley; 08-03-2015 at 07:35 PM.
|
|
#27
08-03-2015, 04:18 PM
|
||||
|
||||
|
Glad it was of help to you, best wishes.
Quote:
|
|
#29
10-11-2015, 12:19 AM
|
|||
|
|||
|
Quote:
And right now, my relays click with no + power coming from battery, yay. About to hook up power, but then I reached the part about "rotating the second side...". I'm stumped. How would this work? I searched some more and found another post by Scott that read: Quote:
I PM'd Scott and now realize that he's sold his Merc and may not be on the forum anymore. Can anyone else understand this? Help!
__________________
1987 300TD 1984 300D 755,000 KM and going strong  BC Canada
|
 |
| Bookmarks |
|
|


 Linear Mode


