

|
|
|
|
|
|
#1
 07-20-2009, 10:03 PM
|
||||
|
||||
|
Alignment & Steering Box adjustment
I replaced my ball joints, both tie rods, and the drag link. Before installing the new drag link I grabbed the pitman arm and could feel some slop in the box. I held the hex screw and loosened the lock nut and then unscrew the hex bolt or turned it CCW a little until the box felt tight. Then I held the hex bolt where it was and tightened the lock nut. I got the steering wheel centered and then aligned the new tie rods and set the toe to 0. I am sure it is within a 1-2 mm. I was getting some inner tire wear and thinking it was due to the bad chamber angle.
The steering feels a lot better but I can turn the wheel +/- about 10 degrees when heading straight before feeling an effect on the steering. Also when I make a turn the wheel does not turn back by itself to center as easy now. It feels like a have to lightly steer to straighten up after a turn. I am thinking about loosen back up the hex bolt on the box a little. It seems like the slop is coming from the flex steering coupling since after the box has all new parts. I want to make sure everything is close before taking to get the alignment checked. What should I do? 
__________________
85 300D Turbo 
|
|
#2
07-21-2009, 01:50 AM
|
||||
|
||||
|
When I was getting bad Tire wear the main cause was rotted out Lower Control Arm Bushings. I bought a complete Front End kit and changed out everthing the I thougth was no good.
I also attempted to do my own alinement and bought the Turntables, Caster/Chamber gauge and other stuff I needed. When I got to the Toe In I realized that the Toe In needs to be adjusted/referanced to the Centerline of the Vehicle; not from Front Wheel to Front Wheel. I also made the below Pin to lock my Steering Box while I did the Tow In. The pointed end of the Pin goes into a hole on the side of the Piston inside of the Steering box by way of the Drain Plug (at the bottom). The hole can be seen looking up from under the Car with the plug removed and Steering Wheel Centered. Since the Pin locks the Steering Box it also takes any sort of Steering Wheel Play from having an effect on adjustments. 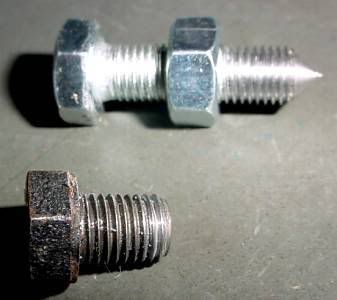
__________________
84 300D, 82 Volvo 244Gl Diesel
|
|
#3
07-21-2009, 05:41 AM
|
||||
|
||||
|
10* slop is not horrible but sounds like its time for a new one. Is it softer to one side or the other?
Last weekend I finally got a new box, even with the wheel lock on I could see it turn the wheels. Drive like a dream now.
__________________
http://superturbodiesel.com/images/sig.04.10.jpg 1995 E420 Schwarz 1995 E300 Weiss #1987 300D Sturmmachine #1991 300D Nearly Perfect #1994 E320 Cabriolet #1995 E320 Touring #1985 300D Sedan OBK #42
|
|
#5
07-21-2009, 01:19 PM
|
|||
|
|||
|
Years ago, I got a junk yard box to disect. What happens in these boxes is that the sector gear bearings wear allowing the sector gear to move up and down. The really early 123 boxes have a large nut adjustment. The later boxes must be shimmed.
This obviously was the result of disecting only one box, but it indicates that you should check this. These boxes are not easily adjusted, and the adjustment is not like most other steering boxes. BTW, AFIAC 1 to 2MM toe error is too much. You will have excessive front tire wear. Set it on zero.
|
|
#6
07-21-2009, 08:36 PM
|
|||
|
|||
|
When steering will not easily re centre itself either the steering box adjustment is now too tight or something is seizing like a tie rod end. Since you did not have this problem before adjustment I assume your adjustment is overdone. Loosen it a little as their is a small danger to leaving it overtightened enough to cause your return drag.
When your steering box is approaching centre there is less internal clearance by design. Actually the tighning sequence is supposed to deal with that central area of the recirculating steering box. So much pressure with a spring gauge on the steering wheel to pass through the central area and no more. You have to allow for designed clearances. In your case the steering box may have too much wear to be satisfactory. Or if you suspect the coupling has slack replace it and re adjust your box again. The bearing in the bottom of the steering columb if there should not have too much clearance either.
|
|
#7
07-21-2009, 10:25 PM
|
|||
|
|||
|
Quote:
With wheels on ground, grab the steering shaft & see if it turns without moving the wheels. Also shake it. It should be solid. You can set toe with 4 jack stands, string & proper sized drill bits. Set stands on each corner. Tie 1 string to front & back stand. Move stand so string contacts rear tire at diameter. Move front stand so string contacts rear of front tire and barely touches front of front tire. Set up other side the same way. Center steering wheel. Use drill bit as feeler gauge. ie 1/8" feeler for 1/8" toe. (look up proper specs.) Quote:
|
|
#8
07-22-2009, 07:30 AM
|
|||
|
|||
|
Quote:
HUH???? Please try again with this string explanation or provide a diagram. BTW, Do NOT set 1/8" toe either in OR out. Set toe on zero or front tires will wear out in VERY short order.
|
|
#9
07-22-2009, 11:11 AM
|
||||
|
||||
|
One of the problems was I got the nuts on the tie rods and drag link ends a little tight. I loosen up the lock nuts some and that improved things.
Is there a torque spec. for these nuts or advice on tightening them? I set the toe to 0* but doing it myself with string I am thinking I could be off 1 mm. I am sure the error in the alignment machines is less but 1 mm is nothing. We are talking a fraction of a degree but the closer to 0* if that minimizes tire wear is ideal. I doubt a small error (1 mm or .039") like this will show any noticeable difference in tire wear.
__________________
85 300D Turbo Last edited by NoCalMer; 07-22-2009 at 11:25 AM.
|
|
#10
07-22-2009, 03:20 PM
|
|||
|
|||
|
Yes, a thirty second of an inch is about as close as I can get them with my method. That should give you decent tire wear.
|
|
#11
07-22-2009, 03:28 PM
|
||||
|
||||
|
Quote:
 Have you described it on here? Have you described it on here?
__________________
85 300D Turbo
|
|
#12
07-22-2009, 06:06 PM
|
|||
|
|||
|
Yes, I have described it many times, some years back.
I use a couple of methods, but the key is to take the tire mounting error out of the equation. When a tire is mounted, the tread does not align perfectly with the wheel. I have used two methods to cancel out the tire mount error. One is to use a thumb tack in each tire at the same position on each tire. That is, put a thumb tack in the tire just below the level at which you can get a measuring tape across without interference and measure from tack to tack. It doesn't matter which edge of the tack as long as you always measure the same. You will need a reliable helper to line up one side CONSISTENTLY and STEADILY while you read the other end of the tape. After the measurement is taken roll the car forward until the tacks are near the same height as they were when in front and then measure again. The second method involves more tools, but works as well. Raise and mark the front tires one at a time. To mark raise a tire off the ground until it can be spun by hand. Clamp a nail onto a jack stand with vise grips or whatever. Position the jack stand nail with the point near the center of the tire tread. Get the nail point at a position where the tire can be spun and the nail scribes a line all the way around the tire. It might take a little practice to get a good scribe mark. The jack stand and nail work sort of like a lathe. With both tires marked, lower the car and roll it far enough for at least one full tire revolution. This is so that the suspension can settle in and allow the camber to come to it's natural setting. Now measure between the lines front and rear. A variation involving a little of both these methods is to scribe both front tires and then use a piece of metal tape from an old tape measure with the tiniest hole you can drill in the center of the tape near one end. Put a thumb tack through the hole and position carefully in the center of the scribed line. Then go to the other side and measure. The main advantage to this method is that it is a one person method. I have used these methods with great success. The only other home alignment I have done has been caster and camber using an old spirit level, triangular gadget. This gadget and grease under the front wheels to simulate a turn plate will give caster and camber measurement with plenty good enough resolution for a good alignment. Whan a home toe setting method involves measuring from the sidewall or from points on the tread, run, don't walk away from that method. It will NOT be reliable.
|
|
#13
07-22-2009, 08:45 PM
|
||||
|
||||
|
Good information.
I did something similar. I jacked up the front so tires were just off the ground. I then found the center of the tire and put in a tack on each tire Tied a washer on a piece of string Put a loop in the string so it was a little short then the middle of the hub down to the ground Hang the piece of string from the tack Taped down 4 pieces of paper in front of and behind each tire Rotated the tire to just where the washer was above the ground in front of the tire (make sure string does not touch tire but hang freely) Marked the paper just below the center of washer (let the washer settle) Pull the string and washer off the tack Rotated the tire so tack is on back of the tire now and hang it. Marked the paper just below the center of washer (let the washer settle) Pull the string and washer off the tack Hang the piece of string from the tack on other tire Rotated the tire to just where the washer was above the ground in front of the tire (make sure string does not touch tire but hang freely) Marked the paper just below the center of washer (let the washer settle) Pull the string and washer off the tack Rotated the tire so tack is behind tire now and hang it. Marked the paper just below the center of washer (let the washer settle) Measured with a tape the distance between the lines in the front and back. (I place the tape next to 10cm and align it with mark on paper and then put a small brick or something heavy so it will not move easily.) Say you get 1640 mm in front and 1680 mm in the back. 1680-1640=40 40/2=20 1640+20=1660 mm to set so front and back are equal 20 mm / 2 =10 mm (so both front tires need to move 10 mm out measuring in front of the tire) Measure 10 mm from each line marked on front paper and place a line parallel to the first line. Hang the piece of string from the tack on the front of tire Adjust tie rod until washer lines up with new line on each side Tightened lock clamps on tie rods. Rotate tire so tack is on back side of tire Hang the piece of string from the tack Marked the paper just below the center of washer (let the washer settle) Pull the string and washer off the tack Hang the piece of string from the tack on other tire Marked the paper just below the center of washer (let the washer settle) Measured with a tape the distance between the lines in the back. If it is 1600 mm, then it is aligned. If it is a few mm's off, then remeasure the front and repeat process until it is aligned.
__________________
85 300D Turbo
|
|
#14
07-23-2009, 08:24 AM
|
|||
|
|||
|
NoCalMer,
Your measurement method sounds good, but if I understood correctly, you are doing the measurement with the wheel off the ground. If this is correct, there will be a toe error due to camber change resulting from both wheels not being settled on level floor. BTDT. Maybe I misunderstood though.
|
|
#15
07-23-2009, 11:17 AM
|
||||
|
||||
|
Quote:
I am going to double check my tie rod ends and drag link ends this weekend and I will check the alignment again with the wheels on the ground. Thanks
__________________
85 300D Turbo Last edited by NoCalMer; 07-23-2009 at 03:11 PM.
|
 |
| Bookmarks |
|
|


 Linear Mode


