

|
|
|
|
|
|
|||||||
 |
|
|
LinkBack | Thread Tools | Display Modes |
|
#1
 06-18-2008, 12:21 AM
|
||||
|
||||
|
complete - DIY: 1996-97 E300D (W210, OM606) ignition switch removal / install
Anyone have removal instructions for the ignition switch on the W210 cars, specifically a 1996 E300D? Can I do it without removing the key cylinder, which requires a special tool? I have a starting problem (not K40, replaced it) and want to remove the ignition switch for possible repair or replacement (hopefully not the latter, it is a $400 part
 ). ).I have managed to get the lower dash panel off without getting blood on the car (but that's another story) and can see the lock cylinder/switch assembly in all its glory, just don't know how to remove it. Jeremy
__________________
 "Buster" in the '95 Our all-Diesel family 1996 E300D (W210) . .338,000 miles Wife's car 2005 E320 CDI . . 113,000 miles My car Santa Rosa population 176,762 (2022) Total. . . . . . . . . . . . 627,762 "Oh lord won't you buy me a Mercedes Benz." -- Janis Joplin, October 1, 1970 
|
|
#2
06-18-2008, 07:23 AM
|
|||
|
|||
|
Can you describe the problem you are having?
I would assume you have tried multiple keys? I have worn out both original keys which came with my '98 and had to buy replacements. They became intermittent (sometimes they would work, sometimes not). I think you unscrew the ring around the lock to release it and work from the back beneath, but I have only heard of one W210 ever needing a new ignition lock so that is why I asked what trouble you were having. You can loosen the locking ring with one of those "grippy" rubber pads used as a jar opener. That's what I used to tighten mine. When I got the car it was loose and drove me nuts.
__________________
Marty D. 2013 C300 4Matic 1984 BMW 733i 2013 Lincoln MKz 
|
|
#3
06-18-2008, 12:13 PM
|
||||
|
||||
|
I seem to have a hard time getting my point across. I must be an even worse writer than I thought.
 The issue is not the lock, it is the electrical part, the switch. We have several keys and they all work (turn) just fine in all of the cylinders on the car. Never a problem. The problem is that sometimes the car won't start. In position #2, all of the idiot lights should be on (glow plug, check engine, etc.). When the problem occurs (randomly), only the SRS light is on. The engine will crank but not fire. It is not the K40 relay, that's been replaced. It is not the electrical part of the IP, that wouldn't affect the dash lights. No codes are thrown. If we keep trying the key switch, eventually the car will start. Once started, it never dies on its own (another K40 symptom that others have reported). The next step is the switch ($400). If it isn't the switch it's one of the computers ($1000). I'd rather it be the switch, of course. I'm trying to replace the less expensive stuff first. Since electrical parts are non-returnable, I end up with a stack of unusable new parts (anyone need a brand-new K40 relay?). What I need to learn, then, is how to R&R the ignition switch. Jeremy
__________________
"Buster" in the '95 Our all-Diesel family 1996 E300D (W210) . .338,000 miles Wife's car 2005 E320 CDI . . 113,000 miles My car Santa Rosa population 176,762 (2022) Total. . . . . . . . . . . . 627,762 "Oh lord won't you buy me a Mercedes Benz." -- Janis Joplin, October 1, 1970
|
|
#4
06-21-2008, 03:36 PM
|
||||
|
||||
|
Update -- switch is out
The manuals/instructions are worse than wrong, they're not even for the same type of ignition switch! This is not to heap any blame at all on those who have been so kind as to offer their support -- the dealer doesn't list the right part either!
Once I had the ignition "module" (lock cylinder plus switch package) out of the car, I figured out how to remove the switch assembly. I'll post pictures and a DIY later, when my hands are cleaner. The switch carries the Mercedes part # 210 545 06 04. It is a purely mechanical switch -- pins and contacts -- no electronics. However, both the EPC and Smothers European show part number 210 545 03 08, which is an electronic switch (has a little pc board on it) and costs $500. This may be because my car is a very early '96 model (low VIN and mfg date 10/95). Now that I have the switch out, I can test it to see if some of the contacts in switch position 2 are flakey. If so, I may be able to clean them and restore the swich to normal operation. If not, I'll replace the switch. maybe it won't be as expensive as the electronic version. Note: This version of the switch takes the old-style metal key. The electronic key was introduced later (1997?). Jeremy
__________________
"Buster" in the '95 Our all-Diesel family 1996 E300D (W210) . .338,000 miles Wife's car 2005 E320 CDI . . 113,000 miles My car Santa Rosa population 176,762 (2022) Total. . . . . . . . . . . . 627,762 "Oh lord won't you buy me a Mercedes Benz." -- Janis Joplin, October 1, 1970
|
|
#5
06-21-2008, 05:07 PM
|
||||
|
||||
|
More update -- the switch is faulty
In the process of learning how to take the switch out and put it back in, I figured out how to make the problem come and go. There is a fault inside the switch in which Pin 15 doesn't get connected to Pin 30 at switch position #2. By "authoritatively" snapping into the #2 position, the switch almost always works; if you are wimpy about it, the contact won't work.
Monday I'll check with the dealer, see if they can find the right part number and come up with a less-than-$500 price. If so, I'll buy a new switch; if still very expensive, I'll try to take the old switch apart and clean the contacts. Interestingly, the part number for the switch in the car (210 545 06 04) is not in the EPC. The switch has covers that are held on with detents and clips so it will be possible to take apart, I'm just a little leery of internal parts that may go "sproing!" as they fly to some remote corner of the garage. The switch and lock cylinder are back in the car, which is therefore drivable for the moment. I'll work over my pictures and post a DIY later this weekend. And my fingers are healing (details in the DIY  ). ).Jeremy
__________________
"Buster" in the '95 Our all-Diesel family 1996 E300D (W210) . .338,000 miles Wife's car 2005 E320 CDI . . 113,000 miles My car Santa Rosa population 176,762 (2022) Total. . . . . . . . . . . . 627,762 "Oh lord won't you buy me a Mercedes Benz." -- Janis Joplin, October 1, 1970
|
|
#6
06-23-2008, 03:22 PM
|
||||
|
||||
|
Further update on the 1996 E300D (W210, OM606) ignition switch
Today (Monday 23 June 2008), Smothers European found me a replacement ignition switch for the 1996 E300D. It was about $100 and they even had it in stock. It took quite a bit of searching, for the EPC had initially located the wrong switch, a $500 electronic thing meant for later cars. The parts guy had no idea why this parts system failure occurred.
The switch that my 1996 E300D had in it from the factory (210 545 06 04) is not in the system at all. We did find a part number for the combination of the switch and a "protective sleeve," a metal part that holds the lock tumbler and the switch. It is 210 460 02 97 and costs about $135 without the lock cylinder. A little further searching of the system found just the switch, actually designed for another car but very similar to mine, 129 545 02 04 for $122. With the 15% MBCA discount, I went out the door with the new switch for $112. The new switch has a couple of pins that mine does not have -- my cable will simply ignore those pins as it does not have matching contacts but the plug is the same size and shape. The installation will be simple. I'll then get to work on the DIY. For other 210 owners, I'll note that the switch that I bought is obviously for a W129 car, whatever that is (an S-class of some kind?). However, I can't find the new switch (129 545 02 04) in the EPC either. The dealer's parts people are full of horror stories regarding the difficulty of R&Ring the ignition switch in W210 cars but this apparently involves the later models with the electronic key, not the 1996. I don't know if this change started with the 1997 or 1998 model year. Someone else here may be able to shed light on the confusion -- I cannot. I'm just happy to have fixed the problem with the car occasionally not wanting to start for only $100 instead of $500. Jeremy
__________________
"Buster" in the '95 Our all-Diesel family 1996 E300D (W210) . .338,000 miles Wife's car 2005 E320 CDI . . 113,000 miles My car Santa Rosa population 176,762 (2022) Total. . . . . . . . . . . . 627,762 "Oh lord won't you buy me a Mercedes Benz." -- Janis Joplin, October 1, 1970
|
|
#7
07-18-2008, 02:59 AM
|
||||
|
||||
|
This DIY was made during the replacement of the ignition switch in our 1996 E300D. It may also apply to the other 1996 and 1997 W210 cars. Parts of the procedure, specifically the removal of the driver's under-dash panel, may apply to the 1998-99 W210 cars. These later cars have a different form of ignition switch that is much harder for the individual to R&R due to the fact that they are electronic modules that must be programmed for the car into which they are being installed.
This is a rather long DIY owing to my love of reading my own writing. For those who lack the patience to tolerate my verbosity, just look at the pictures. Part 1: Removing the driver's under-dash panel. This operation is necessary to R&R the ignition switch as well as the many other goodies that hide under the dash on the driver's side. Before I began this job, I searched this and other forums and asked for pictures and instructions. Several people were kind enough to share their cache of information with me. Although I learned quite a bit by reviewing these contributions, it soon became clear that much of the information was (at least) misleading or (worse) wrong. As I figured out what was really the correct procedure for my car, I took the notes and pictures that resulted in this DIY. To make as much room for yourself as possible, put the driver's seat as far back as it will go and extend the steering column all the way out and up. You can disconnect the battery at this point although it is not really necessary (do you know about the plastic panel, behind which is a negative cable connection, so you don't have to remove the rear seat?). The first picture shows the six fasteners that must be removed before the driver's under-dash panel will come out. The panel is reinforced with sharp-edged sheet metal. Later pictures will show what happens if you do not get all the fasteners out.  Fasteners #1 and #5 are simply screws. Fastener #3 is a plastic nut. Use a pry tool and a screwdriver as shown in the next photo to remove it.  Fastener #4 holds the under-dash heat vent. Turn it 90 degrees counter-clockwise and remove the vent by pulling it out at one end as the pictures show.  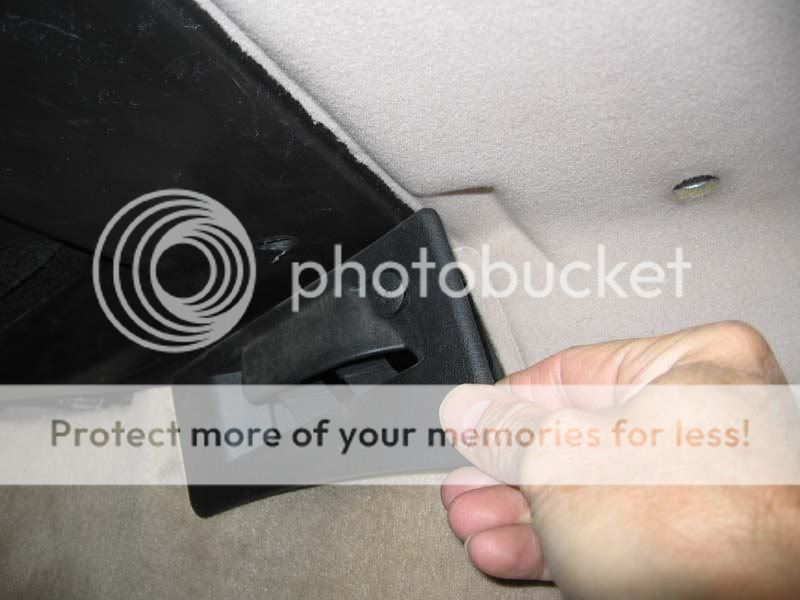 Fastener #2 holds the hood release and is hard to see -- it should have been designed to be on the other side of the lever. With the screw out, the hood release will pull down out of the panel. Using two hands, operate the lever to pop the hood open and leave the lever bent, so that you can remove the cable from the plastic parts. You will see how to do it once you get the lever into your hands. The cable can be left dangling through the hole in the panel. Don't try to remove the OBD-II connector at this time -- we'll get it after the panel comes loose.   Fastener #6 requires an 8mm socket on a fairly long extension. It is hidden up inside the panel and must be removed before the panel will come off. You must operate by feel. A magnetic socket would be nice.  The panel is reinforced with sharp-edged sheet metal. My failure to discover fastener #6 lead me to pull down hard on the front edges of the panel, trying to get it to come free. This resulted in two badly-cut finger tips. The pictures shows my left hand after several days of healing. Learn from my mistake, people!   With all of the fasteners out, removal of the panel is now simply a job of releasing all of the hidden clips, hooks, and hangers along the edges. The next four pictures show all of them.     Now the panel will drop down so you can get at the OBD-II connector. Leaving the plastic frame screwed to the panel, push the release clip shown in the next picture to the right (red arrow). Comment: I use a Red Arrow to honor my Canadian friends. This will release the cable and the connector, which will pop out of the frame. Leave the frame in the panel and the cable dangling (along with the hood release cable) and carefully remove the panel from the car. You are now ready to operate under the dash.  To re-install, simply reverse the removal procedure. Put the panel back in the footwell and replace the OBD-II cable, then thread the hood release cable through its hole. If you are concerned about it getting loose and going up through the hole, just put the lever back on the cable so it blocks any attempt of the cable to escape. It will take some wiggling to get all of the hooks and snaps that hold the panel to the frame of the dash to connect. Work gently and patiently until the panel is back in place, smacking the reluctant places with a fist (especially the plastic hooks under the steering column). [to be continued]
__________________
"Buster" in the '95 Our all-Diesel family 1996 E300D (W210) . .338,000 miles Wife's car 2005 E320 CDI . . 113,000 miles My car Santa Rosa population 176,762 (2022) Total. . . . . . . . . . . . 627,762 "Oh lord won't you buy me a Mercedes Benz." -- Janis Joplin, October 1, 1970 Last edited by whunter; 01-04-2011 at 12:39 AM. Reason: attached pictures
|
|
#8
07-18-2008, 08:23 PM
|
||||
|
||||
|
Great thread! I was always afraid to remove my bottom console as it's on there very solidly if you don't know how to properly get at it.
|
|
#9
01-03-2011, 08:34 AM
|
|||
|
|||
|
Hi Jeremy,
Any chance you might have the part number for that replacement switch that you bought? Also, any chance you remember the steps to replace? Thanks in advance! Brian
__________________
1987 560SL - 95K 1996 E300D - 183K 1997 E300D - 162K 1982 240D - 160K
|
|
#10
01-03-2011, 06:48 PM
|
||||
|
||||
|
Quote:
Here is the second part of the procedure, which I never posted as promised in Part 1 (sorry!). This applies to 1996 USA models only. It might apply to other parts of the world, I don't know. It does not apply to the 1997 E300D as that model got the $500 electronic switch, more's the pity. Disconnect the battery negative cable as a safety precaution. To unscrew the ignition switch bezel, you need a special US$50 Mercedes tool, 639 589 01 07. You may be able to use a pair of needle-nose pliers, just don't booger up the dash covering and then blame me! The key must be in position 1 and must never, never, never be moved until the whole thing is back together. If you violate this rule, the ignition switch locks internally and cannot be fixed or so Mercedes says. I would tend to believe that. If you use a bare key without your entire household key ring hanging from it, the lock will be much easier to remove. (The key must stay in the lock as it is removed from the dash.)  Remove the cable from the ignition switch assembly.  With the cable out of the way, use two small screwdrivers or pin punches to depress the two spring-loaded pins that hold the switch assembly on the steering lock. The steering lock stays in the car.  With the pins pushed in, the ignition switch module can be pushed forward (towards the front of the car) and come out of the steering lock. Now you can unscrew the transmission lock cable.  The assembly consists of the ignition switch and a plastic "sleeve."  Follow the instructions in the next picture to remove the switch from the sleeve. The sleeve doesn't have to be replaced and is also expensive so you don't want to break it in the process. The lock stays in the sleeve and the key stays in the lock. Make sure you take pictures so you can put the new switch back exactly as the old one came out including being in position #1.  I never got an explanation from the dealer as to the change in part numbers for the ignition switch for my '96 E300D. I brought the old switch with me when I went to the dealer. They ended up finding the replacement switch listed for another car, I don't remember which, possibly an S-class. For my car they found in EPC the 1997 electronic switch which is (a) wrong for my car and (b) US$500.  You have to move a plastic piece from the old switch to the new one. 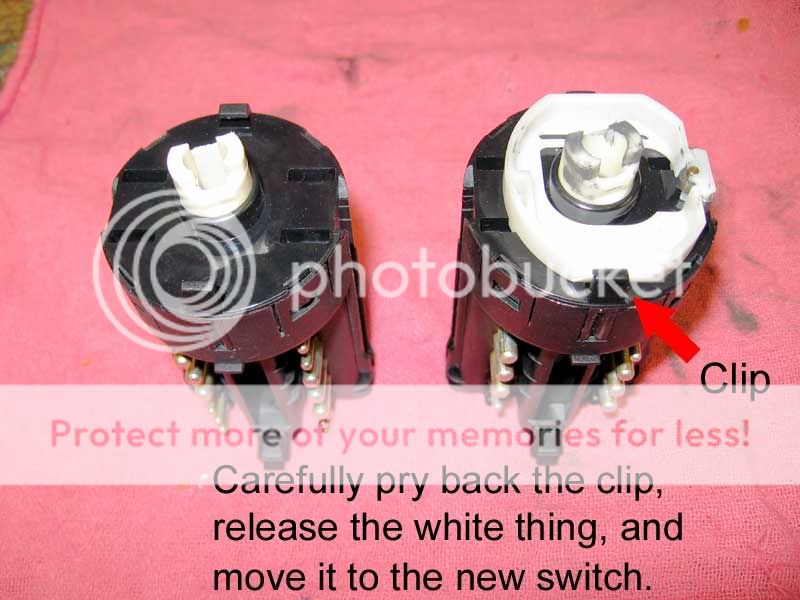 I discovered after buying the new switch that the old one simply had burned contacts and was repairable. I took the switch apart and buffed the brass (copper alloy?) contacts. The repaired old switch now lives in my spare parts box. Put the new/repaired switch in the sleeve and make sure it locks in place. Reattach the transmission lock cable. Put the assembly back into the steering lock. The upper pin may be hard to get depressed. Both pins must pop back into place. Make sure they do. Put the electrical cable back on the switch. Screw the bezel back on. Before putting the lower dash cover back, try the switch (mechanically) to make sure it works properly. Then reconnect battery negative and try it electrically. I think that's it. Anyone spotting errors please advise so I can edit. No warranty is expressed or implied. YMMV. Jeremy
__________________
"Buster" in the '95 Our all-Diesel family 1996 E300D (W210) . .338,000 miles Wife's car 2005 E320 CDI . . 113,000 miles My car Santa Rosa population 176,762 (2022) Total. . . . . . . . . . . . 627,762 "Oh lord won't you buy me a Mercedes Benz." -- Janis Joplin, October 1, 1970 Last edited by whunter; 01-04-2011 at 12:45 AM. Reason: attached pictures
|
|
#11
01-03-2011, 10:22 PM
|
||||
|
||||
|
Great thread, Jeremy. Just fyi, the electronic key/switch was introduced for the '98 W210. We've got a '98 and a '99 plus a '99 parts car. That switch is one of the things we'll salvage before it goes to the scrap yard!
|
|
#12
01-04-2011, 12:28 AM
|
||||
|
||||
|
I made copies of your threads, then merged them to make this complete DIY.
.
__________________
ASE Master Mechanic asemastermechanic@juno.com Prototype R&D/testing: Thermal & Aerodynamic System Engineering (TASE) Senior vehicle instrumentation technician. Noise Vibration and Harshness (NVH). Dynamometer. Heat exchanger durability. HV-A/C Climate Control. Vehicle build. Fleet Durability Technical Quality Auditor. Automotive Technical Writer 1985 300SD 1983 300D 1984 190D 2003 Volvo V70 2002 Honda Civic https://www.boldegoist.com/
|
|
#13
01-04-2011, 01:08 AM
|
||||
|
||||
|
1997 or 1998?
Quote:
Jeremy
__________________
"Buster" in the '95 Our all-Diesel family 1996 E300D (W210) . .338,000 miles Wife's car 2005 E320 CDI . . 113,000 miles My car Santa Rosa population 176,762 (2022) Total. . . . . . . . . . . . 627,762 "Oh lord won't you buy me a Mercedes Benz." -- Janis Joplin, October 1, 1970
|
|
#14
01-08-2011, 07:57 PM
|
||||
|
||||
|
This DIY is now in our Wiki HERE.
__________________
Bill Wood - Retired Webmaster My Personal Website 1998 Mercedes E430 2010 Toyota Sequoia My Photo Albums
|
|
#15
03-10-2012, 09:30 AM
|
|||
|
|||
|
I was trying this last night. Everything was going fine. I was and still am stuck trying to release the switch from the steering lock. I even had a friend trying to work it lose while I was depressing the pins. Any suggestions?
__________________
1995 E420 152k 1991 300D 2.5 348116 daily driver 1992 300E 2.6 196k-work in progress(head gasket)  2002 BMW 745Li 93k
|
|
| Bookmarks |
|
|


 Linear Mode


