

|
|
|
|
|
|
#1
 03-13-2011, 09:00 PM
|
||||
|
||||
|
85 300cd valve adjustment...
Ok, so I attempted my first ever valve adjustment today. I say attempted cause I'm sure I f'd it all up.
Here's the issue. The car idles really rough. I have no ideal when the last adjustment was done, if ever. At spped (70+) car almost feels like it's starving for fuel. I don't have access to a W123 manual. Could not find any definitive guides searching here and google... There are plenty of threads about setting the Intake to 10mm and the to Exhaust .35mm. No thread or pictorials on how to actually turn the screws, etc. Not really sure that I had the lobes in the correct position. (I had each a little off 12 noon... tried to line them up with that tab on the valve that to me at least looked to be a marker... If anyone knows of a good step by step, please share. I literally looked for almost 2 hours. 4 of the adjustments, you could not even get the feeler under... Found it really hard to actually do the adjustment and hold the feeler at the same time... need 3 hands. I have the correct set of wrenches to do it etc. But got it back together and it started, still shaking but somewhat better. I'll try and get some video of it later and see if anyone came help me diagnose this... 
|
|
#2
03-13-2011, 09:09 PM
|
||||
|
||||
|
the first one can be daunting.
also, if the valves were all tight, carbon may be stuck on the valve face. I'd open it back up and readjust them. are you working from a drawing of the valve orientation? dieselgiant's page has a good one to download. are you adjusting from the IP side, or the Manifold side? I think it's best to loosen the adjuster from the IP side, then use the feelers on the manifold side.
__________________
John HAUL AWAY, OR CRUSHED CARS!!! HELP ME keep the cars out of the crusher! A/C Thread "as I ride with my a/c on... I have fond memories of sweaty oily saturdays and spewing R12 into the air. THANKS for all you do! My drivers: 1987 190D 2.5Turbo 1987 190D 2.5Turbo 1987 190D 2.5-5SPEED!!!  1987 300TD 1987 300TD 1994GMC 2500 6.5Turbo truck... I had to put the ladder somewhere!
|
|
#3
03-13-2011, 09:18 PM
|
||||
|
||||
|
Quote:
|
|
#4
03-13-2011, 09:23 PM
|
||||
|
||||
|
I loosen the lock nut (the lower thin nut) then spin the adjuster nut until the feeler fits in the space a bit loose. then hold the adjuster nut still, and snug up the locker, then reinsert the feeler, then a thinner blade, and a thicker blade. if the thicker won't fit, I'm good.
__________________
John HAUL AWAY, OR CRUSHED CARS!!! HELP ME keep the cars out of the crusher! A/C Thread "as I ride with my a/c on... I have fond memories of sweaty oily saturdays and spewing R12 into the air. THANKS for all you do! My drivers: 1987 190D 2.5Turbo 1987 190D 2.5Turbo 1987 190D 2.5-5SPEED!!! 1987 300TD 1987 300TD 1994GMC 2500 6.5Turbo truck... I had to put the ladder somewhere!
|
|
#5
03-13-2011, 09:51 PM
|
||||
|
||||
|
Quote:
In this pic, 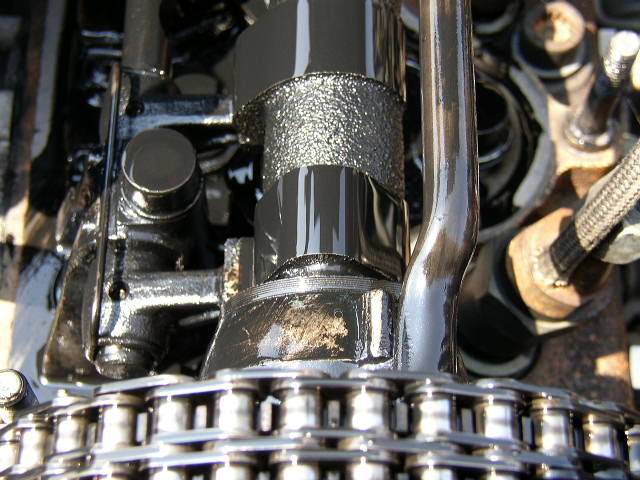 I already know I did it wrong. I positioned each lobe to be even with that tab of metal you see right in front of the first lobe and to the right... I know I had seen this guide on how to do this before but for the life of me could not find it. But good practice, as I'm going to also do the 81 300D.
|
|
#6
03-14-2011, 11:17 PM
|
||||
|
||||
|
The picture shown in the post by "ngarover" shows an incorrect position of the camshaft. The narrow (pointer) portion of the cam lobe must be pointing at the metal bar to be correctly positioned for checking the valve clearance with the feeler gauge. You can rotate the entire assembly by: Putting a 27mm socket on the crank shaft and rotating it clockwise with a rachet or a breaker bar; putting a wrench on the power steering pump pulley - if the belts are tight enough - and rotating it clockwise; bumping the starter until the narrow portion of the lobe lines up with the "bar". When done use a paint pen to mark the valve just completed. (As taught by W. Hunter.)
__________________
Pete Williams, President emeritus - MBCA-International Stars (Eastern Mich.) Now Wi. & Az. 1985 300D Manual 4 speed Green Hen's tooth 1979 MGB triple black Az car nice 1969 back 1/2 of MGB (Az home built trailer) 1991 Volvo 245 Wagon Nice AZ Restored Gold Brick 1983 Jeep CJ7 37,600 Miles Summer use only
|
|
#7
03-14-2011, 11:52 PM
|
||||
|
||||
|
actually, the exhaust valve in the pic (the closest lobe to the front) is in the correct position for adjustment, but the intake is nearly out of position. both can be measured in this position,but it's difficult on the intake with the lobe pointing at the follower... it's easier with it pointing more upward.
the base circle should be equal all the way around, so really, the only position not suitable for measurement of gap is with the lobe pointing at the follower fulcrum. the lobe needs to be pointing up in some way from it. some cams are worn, and different gaps could be measured on different sections of the base circle, but these cams need replacement. it's easy to spot the lobe pointing up. be sure to measure gap on the follower to the cam with the cam pointed away.
__________________
John HAUL AWAY, OR CRUSHED CARS!!! HELP ME keep the cars out of the crusher! A/C Thread "as I ride with my a/c on... I have fond memories of sweaty oily saturdays and spewing R12 into the air. THANKS for all you do! My drivers: 1987 190D 2.5Turbo 1987 190D 2.5Turbo 1987 190D 2.5-5SPEED!!! 1987 300TD 1987 300TD 1994GMC 2500 6.5Turbo truck... I had to put the ladder somewhere!
|
|
#8
03-15-2011, 12:14 AM
|
|||
|
|||
|
That picture is from Diesel Giant. I usually have it pointing towards the oil pipe.
Wipe off the oil pipe with some brake cleaner on a rag, then mark the pipe with a felt tip pen. "E' for exhaust and "I" for intake. also takes out the confusion of where you are. when I did them the other day, the injectors were out so made turning the engine easier. I did the intakes first and then the exhaust valves. I have a 7/8 Gear Wrench I use on the power steering nut to turn the engine. Be sure to wire up the linkage on the injection pump, before bumping the engine with the starter. It could start on you, and with the valve cover off things get exciting.  Charlie
__________________
there were three HP ratings on the OM616... 1) Not much power 2) Even less power 3) Not nearly enough power!! 240D w/auto Anyone that thinks a 240D is slow drives too fast. 80 240D Naturally Exasperated, 4-Spd 388k DD 150mph spedo 3:58 Diff We are advised to NOT judge ALL Muslims by the actions of a few lunatics, but we are encouraged to judge ALL gun owners by the actions of a few lunatics. Funny how that works
|
 |
| Bookmarks |
|
|


 Linear Mode


