

|
|
|
|
|
|
#1
 01-24-2012, 02:20 PM
|
|||
|
|||
|
Tips for mounting impact strip on 3-piece Euro bumpers?
I've done some searching both here and on the web but most of the help seems to focus on US DOT pieces. The only other tips I found was to use a soapy solution to help slide them on.
My issue is this: it looks like my impact strip is a bit short on one end and doesn't go all the way to the end of its "track" which bends inward towards the inside of the bumper. It hasn't been cut -- I can see the marks on the short end of the strip where it used to be held in its proper place. Should I take the whole strip off (I feel like this might create more of a PITA situation)? Use a heat gun, or boil it for 5 mins or so? My other thought was to unbolt the end pieces of the bumper, center the strip on the long straight piece of the bumper, start routing the strip on its tracks on the corner bumper pieces, then bolt up these corner pieces back up. I would appreciate any advice, tips, or if anyone has the official service manual procedure on how to do this. Thanks in advance!
__________________
----- 1980 240D 1993 300D 2.5 2002 Golf TDI 
|
|
#2
01-24-2012, 06:19 PM
|
||||
|
||||
|
Its going to be very hard to install a old piece, purchase a new one at the dealer, they are fairly cheap in my opinion. Very easy to roll them on when they are new, i got all new impact strips for my 3 piece euro bumpers.
__________________
1985 300TD Turbo Euro-wagon 1979 280CE 225,200 miles 1985 300D Turbo 264,000 miles 1976 240D 190,000 miles 1979 300TD 220,000 GONE but not forgotten 1976 300D 195,300 miles 1983 300D Turbo 175,000 miles http://i42.photobucket.com/albums/e3...e485-1-2-1.jpg
|
|
#3
01-24-2012, 09:37 PM
|
|||
|
|||
|
Thanks for that advice 79Mercy -- I'll give my parts guy a call tomorrow.
__________________
----- 1980 240D 1993 300D 2.5 2002 Golf TDI
|
|
#4
01-24-2012, 10:16 PM
|
||||
|
||||
|
The nice thing about the Euro bumpers is the impact strip is thinner and easier to manipulate than the large US DOT bumpers.
When you fold back the impact strips, the grooves inside open up. When you fold them back you create a "U" shape, oriented sideways. Depress one side of the "U" while pressing down the open grooves on the metal impact strip "T" brackets, then roll the "U" shaped impact strip along the length of the bumper. The ends of the impact strip will have to be forced into their slots on the corners of the Euro bumpers. Then with a THICK pair of pliers, you'll have to pull them from the inside surface of the corner pieces. A thin pair of pliers might just cut through the impact strip (like needle nose pliers). Do this first before the rest of the impact strip is fastened, the do the U shape process above, until you reach the other end. Leave a bit of the strip unfastened, then slot the end of the impact strip into the corner piece opening. Use a thin screw driver to access the grooves on the impact strip, and hook them over the "T" brackets on the corners. When I removed the Euro bumpers to clean them, I did not use any soap or water. However I did clean them up with some Quik Detailer solution. This might have helped, but is probably unnecessary (unless you're picky like me  ). ).The Euro bumpers disassemble with 13mm sockets, combination wrenches, and some pliers. BE CAREFUL with the two metal tabs that cover the corner bolts, on the outside. These metal tabs have smaller tabs that fasten inward and are held on also by the impact strip. If you move the small mounting tabs (4 per side) they might break. Use pliers protected under a thick towel so you do not scratch the chrome. See below for the 2-inch wide chrome covers with 4 mounting tabs per unit, where the impact strip goes over them:  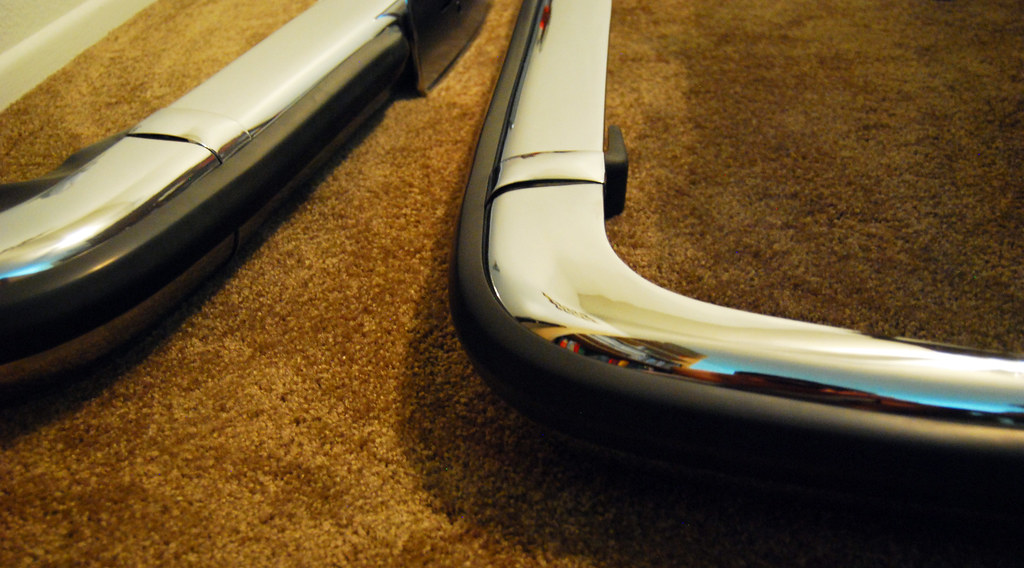
__________________
http://farm8.staticflickr.com/7271/7...144c3fc1dc.jpg
|
|
#5
01-25-2012, 12:23 PM
|
|||
|
|||
|
Thanks MBeige -- that's the type of info that I was looking for. Basically what you are telling me is to work from one corner to another? My understanding of the process is something like this:
1. Mount one end of the impact strip in the corner piece, on the inside surface. 2. "Roll" the impact strip going from that corner piece, along the straight piece, and then to the second corner piece. While doing this, press on the T grooves on the bumper to help the impact strip seat. 3. Leave a bit of the strip unfastened and force the end of the impact strip into the second corner piece opening. Use pliers to pull the impact strip and then pull it down over the groove to seat it. It looks like this had been done before on my bumper because the impact strip doesn't quite make it all the way around to the opening in the second corner piece. Thanks again for the info and pics. Hopefully I can snap some pics when I do this to illustrate what's supposed to be done.
__________________
----- 1980 240D 1993 300D 2.5 2002 Golf TDI
|
|
#6
01-25-2012, 03:02 PM
|
||||
|
||||
|
I forgot to mention, you might have to pull and stretch the impact strip a bit especially when you reach the other end. Once the other end is fastened securely, the elasticity of the rubber will position itself on the bumper evenly, over time. Or you can readjust as necessary.
__________________
http://farm8.staticflickr.com/7271/7...144c3fc1dc.jpg
|
 |
| Bookmarks |
|
|


 Linear Mode


