

|
|
|
|
|
|
#1
 07-24-2012, 07:15 PM
|
|||
|
|||
|
ASAP Valve Adjustment Problem
Hello,
I've got a valve on the 84 300SD that does not seem to want to lock via the bottom nut. I get the top one adjusted just right but then as much as I turn the bottom one left or right while holding the set top one still it doesn't seem to lock the top nut. Any thoughts would be appreciated. Which way should I turn the bottom nut to lock it against the top one? Counterclockwise? I've tried both ways though and nothing seems to be giving. Thanks
__________________
1984 300 SD 384,000 Miles 
|
|
#2
07-24-2012, 07:28 PM
|
|||
|
|||
|
Are you measuring the clearance in the correct spot? The reason I ask is this sounds as if they are adjusted way too loose. Here is a great post with thumbnails to illustrate the correct location for measurement: http://www.peachparts.com/shopforum/diesel-discussion/107729-valve-adjustment-om615-616-617-fyi.html
(Yes, counterclockwise on the lock nut should tighten it against the cap nut.)
__________________
Sam 84 300SD 350K+ miles ( Blue Belle ) Last edited by SD Blue; 07-24-2012 at 08:06 PM.
|
|
#3
07-24-2012, 07:34 PM
|
|||
|
|||
|
Thanks for your quick reply. I am measuring the adjustment between the "pad" and the lobe. I think that is the correct place.
__________________
1984 300 SD 384,000 Miles
|
|
#4
07-24-2012, 07:42 PM
|
|||
|
|||
|
So here is the thing... I think I stripped it. These GD manuals you get in the mail do not properly explain how to do this stuff. Never again...
When I was doing this valve I didn't understand the mechanism of these bolts. I loosened the bottom one. The valve was tight. So I turned the top one clockwise to loosen the valve. At a certain point it stopped loosening BECAUSE I DIDN'T LOOSEN THE BOTTOM NUT ENOUGH. So I think I must have muscled through it which was stupid. I think the bottom nut is stipped. How difficult is it to replace that nut? Crossing my fingers that I haven't caused myself a huge headache.
__________________
1984 300 SD 384,000 Miles
|
|
#5
07-24-2012, 08:14 PM
|
|||
|
|||
|
In such tight quarters to work, I'm not sure you could strip it without being aware of it. (I edited my first post to include the link.) This should explain how the cap nut and locking nut work.
It still sounds as if the cap nut is run down too far. Is the lock nut loose, as well?
__________________
Sam 84 300SD 350K+ miles ( Blue Belle )
|
|
#6
07-24-2012, 08:23 PM
|
|||
|
|||
|
I looked in my MB FSM for the 617.95 engine. didn`t find a section for just removing the adjusting nuts, but in the part on R&Ring the springs. It looks like you will have to:
Remove rocker arm with rocker arm bearing (05-235) Set piston of respective cylinder to ignition TDC. for this purpose, rotate crankshaft with tool combination. Place holding wrench on valve spring retainer. Unscrew cap nut by means of valve adjusting wrench. For this purpose, apply counterhold to counternut by means of second valve adjusting wrench. Unscrew counternut. Torque settings. Rocker arm bearing brackets to cylinder head...38 NM. Hope this helps. Charlie
__________________
there were three HP ratings on the OM616... 1) Not much power 2) Even less power 3) Not nearly enough power!! 240D w/auto Anyone that thinks a 240D is slow drives too fast. 80 240D Naturally Exasperated, 4-Spd 388k DD 150mph spedo 3:58 Diff We are advised to NOT judge ALL Muslims by the actions of a few lunatics, but we are encouraged to judge ALL gun owners by the actions of a few lunatics. Funny how that works
|
|
#7
07-24-2012, 08:30 PM
|
|||
|
|||
|
Yeah, I understand how it works now. 100% it is stripped. I can adjust the cap nut so that the valve is perfectly adjusted. Then I go to lock the bottom one and keep turning and turning and nothing happens...i.e. it will not lock against the top nut which is perfectly positioned.
When I began I didn't understand the mechanism of how the nuts work. I'm pretty disappointed that the kits online with instructions don't explain. Diesel Giant is better but even that is not great. The kit instructions basically say that it will all be intuitive. I've done an evaporator in this car and I didn't find this intuitive at first. Really a shame that there aren't better instructions out in the marketplace. Maybe a new business could be started on this premise. I also had a valve that wanted to turn. Had to borrow the correct wrench because the kit didn't come with it and said to jam a screwdriver in the assembly. I tried that over and over and came to the conclusion that I was going to damage something if I kept going at it. So I loosened the bottom nut but not enough. The valve was tight. So I turned the cap nut counterclockwise until it hit the bottom nut. The clearance was still too tight and instead of further loosening the bottom nut I "wrenched" through it because of a lack of understanding. Looks like a lot of work is ahead of me. Browsing the web it looks like I might consider replacing the valve stems by the time I get to these nuts. I wonder if it is worth trying that being that I had trouble with the valve adjustment...
__________________
1984 300 SD 384,000 Miles
|
|
#8
07-24-2012, 08:48 PM
|
|||
|
|||
|
One more question...
When I'm tightening the bottom "locking" nut, the valve should not be spinning, right? Also, to replace the nuts will I need to remove the camshaft? Charlie, you mentioned a holding wrench...are there any other special tools needed? When I do this should I replace the valve stems or will that add too much complexity?
__________________
1984 300 SD 384,000 Miles
|
|
#9
07-24-2012, 08:54 PM
|
|||
|
|||
|
Also, Charlie is there any way you could e-mail me the FSM instructions? I do not know how to remove the rocker arm, for example.
__________________
1984 300 SD 384,000 Miles
|
|
#10
07-24-2012, 10:36 PM
|
||||
|
||||
|
You have e-mail
Quote:
.
|
|
#11
07-25-2012, 09:51 AM
|
|||
|
|||
|
Thanks for all the help.
A few questions: (1) Is a special wrench required to torque the rocker assembly bolts so that I know the torque I tighten them to? If not, how will I know I've got it right? (2) Is there any chance of dropping a valve or damaging something serious in doing this work? It does make sense that I will have to get the rocker pads properly positioned. I guess my main concern is dropping a valve like I've read is possible when doing the valve stems. (3) I guess I do not need to remove the entire camshaft? (4) It looks like the spring cap will hold the spring in place. So there is no need for the holding wrench for the valve spring cap, right? This seems easier than what I was prepared for. Should be just a 15-20 minute job???
__________________
1984 300 SD 384,000 Miles
|
|
#13
07-25-2012, 01:01 PM
|
||||
|
||||
|
Quote:
Since it looks like you will be changing one of the Nut or Nuts take a look and make sure the Tab is still on the Valve Spring Retainer. In the pic is a special Wrench for holding the Valve Spring Retainer so that it does not rotate during the Valve Adjustment. The Tool is not absolutely needed as there is other ways to hold the Valve Spring Retainer and in My own experience once the Nuts are loose you no longer need it. Comment on your Frustration. Ever since I was a Teenager I have been fooling with mechanical stuff and uncountable times have paid for my own mistakes and ones that I felt where not my mistakes. It just goes with the territory. I have also worked with enough people to know that no one and I mean no one can write instructions that ever Person who reads them can understand; nor can that same person anticipate what the reader/viewer is actually going to do after the reading/viewing of the instructions. And, many times I have been the dummy. There is just always a learning curve. Look at it this way. If you had sent your Car to a Shop to have the Valves Adjusted and the Mechanic stripped a Nut. You would get a nice Phone call saying that they found the Nut was stripped (not saying who stripped it) and asking you to authorize (meaning your going to pay for it) the extra work to replace it.
__________________
84 300D, 82 Volvo 244Gl Diesel
|
|
#14
07-26-2012, 02:30 AM
|
|||
|
|||
|
The spring retainer pushes against the lock nut and the valve spring rests on a rotocap at the bottom. See the picture below:
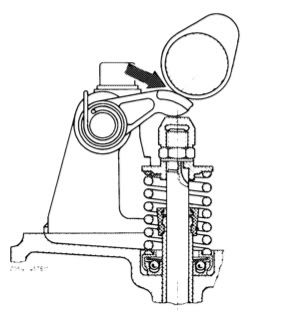 The spring retainer has a tab which fits into a groove on the valve stem: 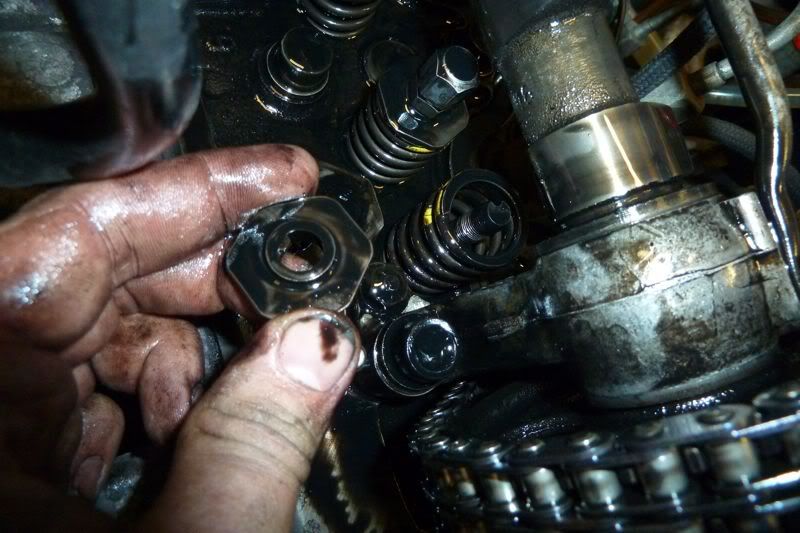 Under normal conditions, the rotocaps turns the valve spring everytime the valve opens and closes, and by the spring retainer, tab and groove the valve is also turned. Now if you don't use the third wrench on the valve spring retainer, turning the lock nut also can turn the valve, i.e. you turn the valve stem together with the lock nut, giving the impression that the nut is stripped.  If the nut is stripped, you do need something, preferably the third wrench, to hold the spring retainer so that you can remove the lock nut.
|
|
#15
07-26-2012, 05:39 AM
|
||||
|
||||
|
Thanks
Quote:
I deleted it. You made an excellent DIY. .
|
 |
| Bookmarks |
|
|


 Linear Mode


