

|
|
|
|
|
|
#1
 09-30-2012, 06:34 PM
|
||||
|
||||
|
Glow Plugs
Pelican has Bosch glow plugs #000-159-83-01-M14 for a little over $10 each, are these the right ones for my 87 with the 603 engine?
Also, is there an o ring where the air horn connects on the pass side near the egr or do I just need the gasket where the air horn connects to the manifold?
__________________
Brian 87 300Dturbo 180K #14 head still running R-12 SOLD 12/2017 02 F350 Powerstroke 180K 05 Chevy Express 1 ton w/Royal Utility box 120K 08 Infiniti FX-35 40K 15 Golf Sportwagen TDI 35K 10 Sprinter 3500 chassis with a Class A Winnebago on it. 56K 
|
|
#2
09-30-2012, 06:53 PM
|
||||
|
||||
|
I believe those are the correct glow plugs.
See attachment.
__________________
83 SD 84 CD
|
|
#3
09-30-2012, 07:28 PM
|
||||
|
||||
|
Air horn?
Quote:
Jeremy
__________________
 "Buster" in the '95 Our all-Diesel family 1996 E300D (W210) . .338,000 miles Wife's car 2005 E320 CDI . . 113,000 miles My car Santa Rosa population 176,762 (2022) Total. . . . . . . . . . . . 627,762 "Oh lord won't you buy me a Mercedes Benz." -- Janis Joplin, October 1, 1970
|
|
#4
09-30-2012, 08:03 PM
|
||||
|
||||
|
Hmmmm,
The first GP thread of the season!! Many more to come. Hope the Pelican has good stocks of them !! 
__________________
Grumpy Old Diesel Owners Club group I no longer question authority, I annoy authority. More effect, less effort....  1967 230-6 auto parts car. rust bucket. 1980 300D now parts car 800k miles 1984 300D 500k miles  1987 250td 160k miles English import  2001 jeep turbo diesel 130k miles  1998 jeep tdi ~ followed me home. Needs a turbo. 1968 Ford F750 truck. 6-354 diesel conversion. Other toys ~J.D.,Cat & GM ~ mainly earth moving
|
|
#5
09-30-2012, 10:30 PM
|
||||
|
||||
|
Quote:
__________________
Brian 87 300Dturbo 180K #14 head still running R-12 SOLD 12/2017 02 F350 Powerstroke 180K 05 Chevy Express 1 ton w/Royal Utility box 120K 08 Infiniti FX-35 40K 15 Golf Sportwagen TDI 35K 10 Sprinter 3500 chassis with a Class A Winnebago on it. 56K
|
|
#6
09-30-2012, 11:01 PM
|
||||
|
||||
|
I've serviced hundreds of these cars, and have yet to need to replace that o-ring. I usually replace the manifold side gasket, but it's often in perfectly serviceable condition...
__________________
John HAUL AWAY, OR CRUSHED CARS!!! HELP ME keep the cars out of the crusher! A/C Thread "as I ride with my a/c on... I have fond memories of sweaty oily saturdays and spewing R12 into the air. THANKS for all you do! My drivers: 1987 190D 2.5Turbo 1987 190D 2.5Turbo 1987 190D 2.5-5SPEED!!!  1987 300TD 1987 300TD 1994GMC 2500 6.5Turbo truck... I had to put the ladder somewhere!
|
|
#7
09-30-2012, 11:32 PM
|
||||
|
||||
|
I just started doing this on mine yesterday. It's a pretty big job.
You will need a LONG 6 mm hex wrench. Some of the 12 manifold to head bolts are child's play, others are nearly impossible. I would recommend a 6 mm with a solid (not a ball) end to break torque on the bolts, then you can switch to a ball end to ease the bolts out. The worst is the lower bolt on #6, it is up tight against the firewall. It was necessary to remove some of the secondary covers in this area below the wiper to allow enough access to get to the bolt. ---deleted, you don't need to break the hard lines to get the manifold off. ---- While you are in there, change all the injection hard line clips. It will cost around $70 for the parts. These are not there for cosmetic reasons, unsecured hard lines are bad and the vibrations will cause the lines to fail. Take lots of pictures (or have a friend take pictures, it's a dirty job) so you can see how all the bolts and brackets go back together. It's a huge Chinese puzzle. Once you get the manifold off, you can start on the glow plugs. Note that you have 6 open holes staring at you. There are obvious negative consequences if something goes into those holes so take precautions to prevent that from happening. While the manifold is off you also have the decision to make about cleaning the grunge from the inside. You can thank the wonderful EGR for dumping all that nasty sticky black crud in there. Many threads about what to do about it. I recommend cleaning it if at all possible. Search also for EGR delete so you can avoid this in the future. Now take loose the 6 harness nuts from the back of the glow plugs, then using a 12 mm deep socket work those babies out carefully. Slow and gentle are the key words here. Give the end of the ratchet handle a gentle hand blow or 2 to break torque. To ream or not to ream. That is the question. Your choice. Many threads on this subject. Coat the threads with anti-seize before reinstalling. Do not overtorque these, the plug body is stainless, and you are going into aluminum! Use a 1/4" drive socket wrench with a short handle, to help yourself avoid over torquing. Hook up the electrical connections, baby torque here, it just has to stay securely hooked up...very easy to overtorque and strip out the insides. Pay close attention to the angle of the connector, if it is clocked wrong it will short against the manifold. Once you have all the plugs in place go over to your GP relay and unplug the 6-pin plug and grab your meter and check resistance between the 6 pins and ground. Each pin should give you approximately 1 ohm to ground (this is the heater in each plug). Between any 2 pins you should have 2 ohms (2 heaters in series - out 1st wire, thru 1st plug, thru the head, back thru 2nd plug, back up 2nd wire). (I'm at the hold point waiting for hard line clips and the little gasket between the crossover pipe and the manifold, this is as far as I got in one day.) Now put your manifold back together. After getting everything back together, do a final check on your harness, make sure the terminals are not touching something they are not supposed to and another ohm check isn't a bad idea. Don't forget to plug it back in! ---deleted, referred to purging hard lines, not necessary---- Not trying to scare you off but just a reality check so you can be prepared. Before taking the manifold off you want to make sure you have the new hard line clips, the intake and cross over pipe gasket, and the o-ring for the supply end of the cross over pipe. And of course the glow plugs. On my 240D/OM616 it took me 30 minutes start to finish and it was super easy. Not so much on the 603.
__________________
The OM 642/722.9 powered family Still going strong 2014 ML350 Bluetec (wife's DD) 2013 E350 Bluetec (my DD) both my kids cars went to junkyard in 2023 2008 ML320 CDI (Older sons DD) fatal transmission failure, water soaked/fried rear SAM, numerous other issues, just too far gone to save (165k miles) 2008 E320 Bluetec (Younger son's DD) injector failed open and diluted oil with diesel, spun main bearings (240k miles) 1998 E300DT sold to TimFreeh 1987 300TD sold to vstech Last edited by jay_bob; 10-01-2012 at 12:26 PM. Reason: Deleted breaking injector hard lines, it is not necessary to pull manifold
|
|
#8
10-01-2012, 07:19 AM
|
||||
|
||||
|
... hard to believe some mechanics have successfully changed the plugs WITHOUT removing the manifold...
__________________
John HAUL AWAY, OR CRUSHED CARS!!! HELP ME keep the cars out of the crusher! A/C Thread "as I ride with my a/c on... I have fond memories of sweaty oily saturdays and spewing R12 into the air. THANKS for all you do! My drivers: 1987 190D 2.5Turbo 1987 190D 2.5Turbo 1987 190D 2.5-5SPEED!!! 1987 300TD 1987 300TD 1994GMC 2500 6.5Turbo truck... I had to put the ladder somewhere!
|
|
#9
10-01-2012, 11:11 AM
|
||||
|
||||
|
Glow plugs, intake manifold, etc.
Quote:
Personally, I found OM603 intake manifold removal to be not that bad after the first learning experience. Once everything had been loosened up and replaced (with anti-seize) it came apart much easier on subsequent occasions. Ditto all of the hard line clamps and clips. Once they have been replaced with fresh ones they are less likely to break. You can remove the manifold with all of the lines undisturbed, you just have to remove the bolts that hold the clamps to the manifold. I used biodiesel to clean the inside of the manifold and followed up with hot soapy water. Some folks send the manifold out to have it "hot tanked." As long as the solvent is safe for aluminum alloys that is OK. If the EGR valve is blocked or removed you'll have to do that job only once. Mother's Aluminum and Mag Wheel Cleaner (a white paste) works well for cleaning the outside of the manifold. The two big green o-rings on the connector between the crossover pipe and the EGR mount generally do not wear out but they can be pinched and damaged if you're not careful with reassembly. Jeremy 
__________________
"Buster" in the '95 Our all-Diesel family 1996 E300D (W210) . .338,000 miles Wife's car 2005 E320 CDI . . 113,000 miles My car Santa Rosa population 176,762 (2022) Total. . . . . . . . . . . . 627,762 "Oh lord won't you buy me a Mercedes Benz." -- Janis Joplin, October 1, 1970
|
|
#10
10-01-2012, 12:18 PM
|
||||
|
||||
|
Do the injector lines have to come off separately from the manifold? IIRC I loosen the injector lines at both end and leave them attached to the manifold. No guessing how it goes back together.
I find there's reasonable access if you remove the cruise actuator even with the manifold in place. Sixto 87 300D
|
|
#11
10-01-2012, 12:23 PM
|
||||
|
||||
|
That is one absolutely awesome looking engine, I hope I can get mine looking like that....
Anyway if you happen to have photos showing how the hard line clips are supposed to look, especially with the intake off, would you mind sharing? PO used zip ties and whatever else to hold the lines, I want to do it right. The exploded view in EPC helps but some details are lacking. Yes I see now that you don't have to pull the hard lines to remove the manifold. I think my problem is that the PO tied the hard lines off to the manifold so I thought it was needed. So I will go back and revise post above.
__________________
The OM 642/722.9 powered family Still going strong 2014 ML350 Bluetec (wife's DD) 2013 E350 Bluetec (my DD) both my kids cars went to junkyard in 2023 2008 ML320 CDI (Older sons DD) fatal transmission failure, water soaked/fried rear SAM, numerous other issues, just too far gone to save (165k miles) 2008 E320 Bluetec (Younger son's DD) injector failed open and diluted oil with diesel, spun main bearings (240k miles) 1998 E300DT sold to TimFreeh 1987 300TD sold to vstech
|
|
#12
10-01-2012, 12:35 PM
|
||||
|
||||
|
Quote:
With a twist socket and small hands it can be done. In fact I've replaced a number of glow plugs on my 603 and we have never taken anything out to do the job! (Having a 2nd person to hold open the throttle for clearance of the last two plugs helps.) For me its the 2nd and 3rd plug behind the IP that are the hardest to get to.
__________________
1982 300GD Carmine Red (DB3535) Cabriolet Parting Out 1990 300SEL Smoke Silver (Parting out) 1991 350SDL Blackberry Metallic (481)  "The thing is Bob, its not that I'm lazy...its that I just don't care."
|
|
#13
10-01-2012, 02:36 PM
|
||||
|
||||
|
Let's see how far I can push Jeremy. These are pictures from a working engine, not a cat's heating pad:
Clamps for lines 1-3 on a bracket attached to the top side of the manifold. There are two 3-line clamps and a 2-line clamp into the bracket with a rubber pad between the lines and bracket. The 2-line clamp is in the shadow of the crossover pipe in this view - 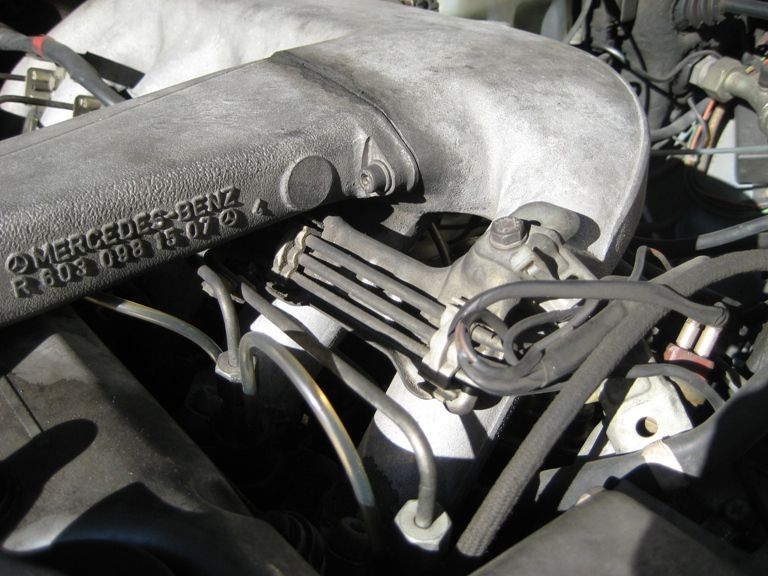 Individual 2-line clamps for lines 4 through 6 into individual brackets on the top side of the manifold. I don't think it matters whether the lines go through the top or bottom hoop. There's a rubber pad between the line and bracket - 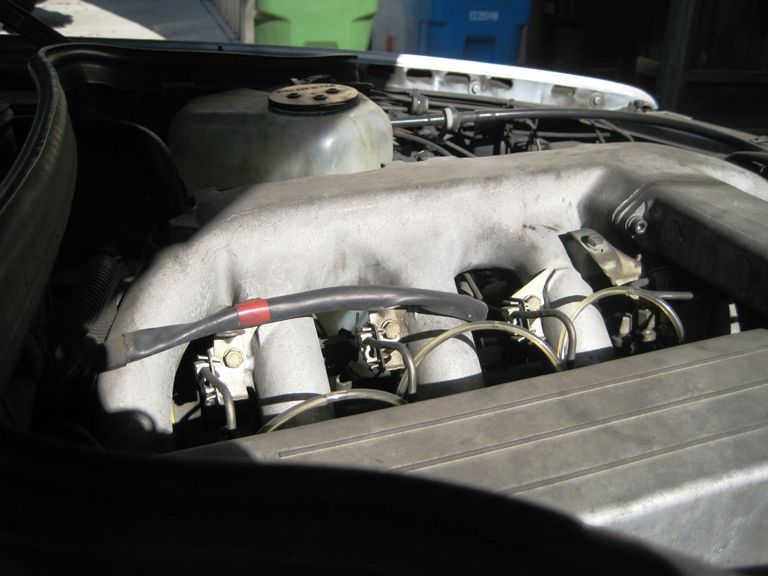 Standalone 3-line clamp where lines 1-3 come around the forward end of the intake manifold - 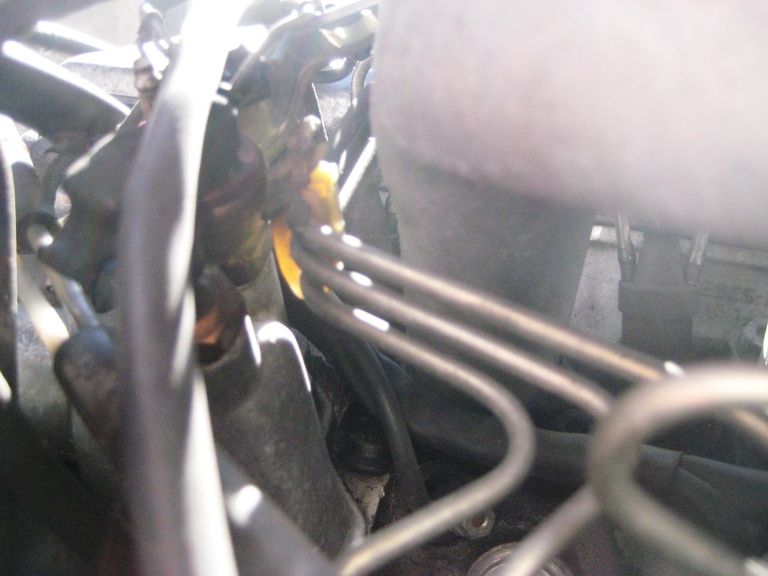 Standalone 2-line clamp for lines 4 and 5 over the IP and a 2-line clamp into a bracket (with rubber pad) also for lines 4 and 5 attached to the underside of the manifold - 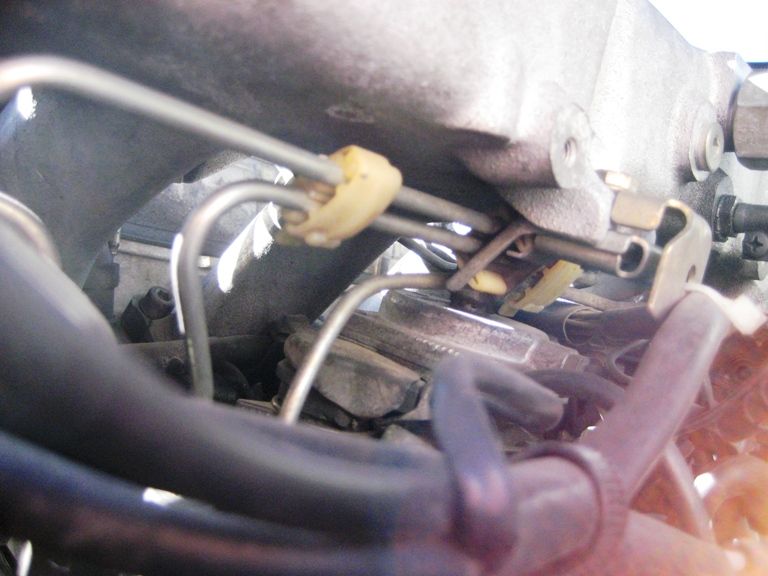 2-line clamp into a bracket (with rubber pad) for line 6 attached to the underside of the manifold. It looks like there's a standalone 3 line clamp over the ALDA for lines 4-6. I don't know if that's standard. I might have used an extra clamp from the cars gone by. 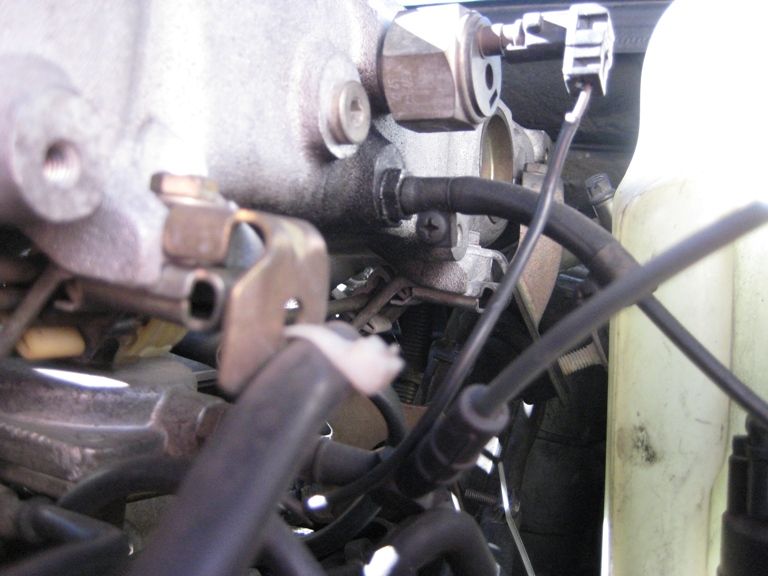 Here's the shopping list - 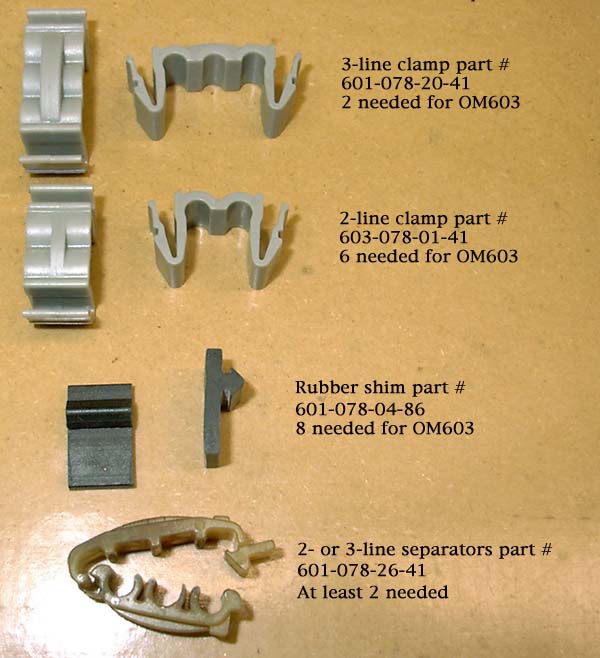 A final note - despite all the clamps, lines 2 and 3 sometimes come in contact where they bend forward towards their injectors. I cut a split into a length of common vacuum tubing and slipped it over one of the lines to prevent contact. I don't know if this car has that band-aid or a previos 603. It certainly wasn't Jeremy's cat's heating pad. Sixto 87 300D Last edited by sixto; 10-01-2012 at 02:51 PM.
|
|
#14
10-01-2012, 02:39 PM
|
||||
|
||||
|
Pictures
Quote:
http://www.peachparts.com/shopforum/diesel-discussion/258174-looking-mr-groundbar-w124.html Jeremy  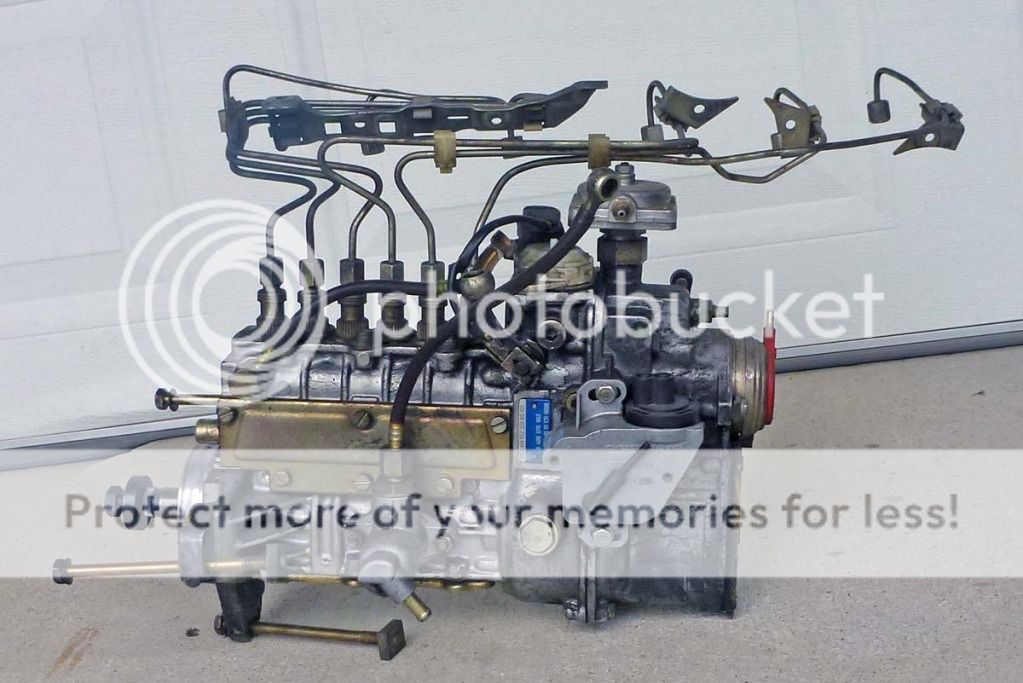
__________________
"Buster" in the '95 Our all-Diesel family 1996 E300D (W210) . .338,000 miles Wife's car 2005 E320 CDI . . 113,000 miles My car Santa Rosa population 176,762 (2022) Total. . . . . . . . . . . . 627,762 "Oh lord won't you buy me a Mercedes Benz." -- Janis Joplin, October 1, 1970 Last edited by Jeremy5848; 10-01-2012 at 02:45 PM. Reason: Add photos and comments thereabout
|
|
#15
10-01-2012, 11:48 PM
|
||||
|
||||
|
Wow thanks for all the detailed info! After 15 years GP#3 & 4 are failed. I had that intake off ten years ago but I don't remember why, could've been just to clean it, I remember I had it hot tanked at that time. The GPs were all ok at that time so I didn't mess with them.
This car is needing a lot of work and I am almost tempted to look for another one. The paint is the biggest issue, all the clear coat is flaking off. No dents or rust though. Also needs a rear window regulator, some upholstry work, IP re-seal, tires, and injector service. I put in a set of Bosch remans about 10 years ago and always had a slight miss at idle. They were not rebuilt by Bosch, I got them at a discount parts store for $50 ea. I am deciding whether to send them out to a local diesel shop or order Bosio tips and do it myself.
__________________
Brian 87 300Dturbo 180K #14 head still running R-12 SOLD 12/2017 02 F350 Powerstroke 180K 05 Chevy Express 1 ton w/Royal Utility box 120K 08 Infiniti FX-35 40K 15 Golf Sportwagen TDI 35K 10 Sprinter 3500 chassis with a Class A Winnebago on it. 56K
|
 |
| Bookmarks |
|
|


 Linear Mode


