

|
|
|
|
|
|
|||||||
 |
|
|
LinkBack | Thread Tools | Display Modes |
|
#31
 06-15-2013, 05:06 PM
|
||||
|
||||
|
Quote:
What's the issue you are having with the plate? Vibrations? Plate flexing? Does the Gen 1 have the same issue? .
__________________
1983 123.133 California - GreaseCar Veg System 

|
|
#32
06-15-2013, 06:06 PM
|
||||
|
||||
|
Quote:
__________________
 All Diesel Fleet 1985 R107 300SLD TURBODIESEL 2005 E320 CDI (daily) LOTS of parts for sale! EGR block kit http://www.peachparts.com/shopforum/diesel-discussion/355250-sale-egr-delete-block-off-plate-kit.html 1985 CA emissions 617 owners- You Need This! Sanden style A/C Compressor Mounting Kit for your 616/ 617 For Sale + Install Inst. Sanden Instalation Guide (post 11): http://www.peachparts.com/shopforum/diesel-discussion/367883-sanden-retrofit-installation-guide.html
|
|
#33
06-17-2013, 05:28 PM
|
|||
|
|||
|
Rich,
I really appreciate your being pro-active on all these issues. This new bracket concerns me if it could crack the upper oil pan, since steel often wins against cast aluminum. I know M-B hung other things off that lip, like the high-pressure AC hose (seems silly), but it would be a major pain to deal with a crack there (must remove engine). I haven't installed your compressor bracket yet since my son hasn't returned with the car. I may look into welding a stiffener down the front of the plate instead, or maybe adding a rubber snubber that presses against the block to damp vibrations. I would rather risk the compressor plate than my upper oil pan.
|
|
#34
06-17-2013, 05:55 PM
|
||||
|
||||
|
Quote:
__________________
All Diesel Fleet 1985 R107 300SLD TURBODIESEL 2005 E320 CDI (daily) LOTS of parts for sale! EGR block kit http://www.peachparts.com/shopforum/diesel-discussion/355250-sale-egr-delete-block-off-plate-kit.html 1985 CA emissions 617 owners- You Need This! Sanden style A/C Compressor Mounting Kit for your 616/ 617 For Sale + Install Inst. Sanden Instalation Guide (post 11): http://www.peachparts.com/shopforum/diesel-discussion/367883-sanden-retrofit-installation-guide.html
|
|
#35
06-17-2013, 06:00 PM
|
||||
|
||||
|
Quote:
As I analyzed the problem, I was very concerned about the amount of the bracket that was cantilevered and the amount of stress and vibration that was present. I don't have the capability to do finite element analysis or anything other than "back-of-the-napkin" engineering, so I can't speak definitively. I also had a problem in that, I couldn't use the bottom adjusting solution because of space so I had to develop a belt adjusting strategy that could be accomplished from above. In fact I had to cut the bottom two inches of the bracket off. (My 617 is in a 107 chassis, so I have extremely limited space to work with.) My solution is to tie the outboard ear on the Sanden to the lower P/S bolt like this: ( I apologize for the picture - it was taken during mock up with my junk compressor and temp rods for mounting )  The adjusting rod is a 1/2" tube with heim joints on either end. I used a long 1/2" bolt with sleeves to keep the lower heim joint at the proper 90 degree position relative to the compressor. I needed to use a longer bolt on the P/S pump due to the additional width of the heim joint. The adjuster nut in the middle makes adjusting a snap using a crows foot wrench. Also, using this strategy puts the adjustment components in tension rather than compression.  This provides a pretty substantial triangulation which is illustrated in the following  If I were using an unmodified GenII bracket, I'd supplement the support using this strategy. The adjustment procedure would be as follows - double-check the tension on the P/S belt; loosen the bottom adjuster on the GenII bracket; adjust the A/C belt tension with the adjuster rod; snug up the bottom adjuster as backup. I've got over 5k miles on the setup and the only problem has been keeping the belt in adjustment. (I think this is mainly due to belt stretch due to using a cheap belt - my bad!).
__________________
Current Stable
|
|
#36
06-17-2013, 08:01 PM
|
||||
|
||||
|
Quote:
__________________
All Diesel Fleet 1985 R107 300SLD TURBODIESEL 2005 E320 CDI (daily) LOTS of parts for sale! EGR block kit http://www.peachparts.com/shopforum/diesel-discussion/355250-sale-egr-delete-block-off-plate-kit.html 1985 CA emissions 617 owners- You Need This! Sanden style A/C Compressor Mounting Kit for your 616/ 617 For Sale + Install Inst. Sanden Instalation Guide (post 11): http://www.peachparts.com/shopforum/diesel-discussion/367883-sanden-retrofit-installation-guide.html
|
|
#37
06-17-2013, 10:03 PM
|
||||
|
||||
|
Quote:
  It's been so long since I did the oil cooler line mod, I forget how the original lines ran. And I should also state that I'm using an oil filter and lines off an SD (126) that may put the lines in a different relative position. I think the point I was trying to make is, that if someone wants to try to add some top support, the solution I found is one that works. And if they've got the fab skills to weld up an adjuster rod, moving the cooler lines an inch or two and modifying the support bracket should be within reach.
__________________
Current Stable
|
|
#38
06-23-2013, 03:51 AM
|
||||
|
||||
|
Can anyone tell me the correct belt size for a OM616? I asked Roll guy, but he has been out of pocket. Hoping to get the install finished tomorrow if I can get the right belt
__________________
 Current Mercedes 1979 maple yellow 240D 4-speed Gone and fondly remembered: 1980 orient red 240D 4-speed Gone and NOT fondly remembered: 1982 Chna Blue 300TD Other car in the stable: 2013 VW Jetta Sportwagen TDI / 6-speed MT
|
|
#39
06-23-2013, 10:54 AM
|
|||
|
|||
|
zeke: i cannot be sure, but here is what the pelican told me to order for a 617:
Belt - A/C - 13 X 925 Brand: Contitech (1985 Mercedes-Benz 300D Sedan)
__________________
'77 240D, 504H, OM617.952, etc.
|
|
#40
06-23-2013, 01:34 PM
|
||||
|
||||
|
Quote:
Quote:
__________________
1983 123.133 California - GreaseCar Veg System
|
|
#41
06-23-2013, 05:56 PM
|
||||
|
||||
|
Thanks, I missed that. I got the 15375 belt, but the suction hose seems too short to reach the compressor.....I guess I need to take it to a hydraulic shop and have them make it a little longer?
I have never had a hose fabricated before...do I take the hose and car in and they can measure and rebuild it?
__________________
Current Mercedes 1979 maple yellow 240D 4-speed Gone and fondly remembered: 1980 orient red 240D 4-speed Gone and NOT fondly remembered: 1982 Chna Blue 300TD Other car in the stable: 2013 VW Jetta Sportwagen TDI / 6-speed MT
|
|
#42
06-23-2013, 06:38 PM
|
||||
|
||||
|
Sorry all, I have been gone for the past few days. The belt in the kits I sell is for the 617, and for the Sanden compressor retrofit kit. Factory specs are no longer applicable. I put a used belt on my 616 when I installed the kit because I realized it needed to be shorter. The belt I put on was a 17375. It rides in the drive pulley groove just fine, but rides proud of the compressor pulley a little. I imagine that a 15370 would work, but I have not tried it. All this to say I really don't know the proper size belt for the 616. I have not had an order for a kit to be installed on a 616 before Charlie (Charmalu) bought one, but he has not installed it yet. Zeke seems to be the second (that I am aware of). PM on the way Zeke........Rich
__________________
All Diesel Fleet 1985 R107 300SLD TURBODIESEL 2005 E320 CDI (daily) LOTS of parts for sale! EGR block kit http://www.peachparts.com/shopforum/diesel-discussion/355250-sale-egr-delete-block-off-plate-kit.html 1985 CA emissions 617 owners- You Need This! Sanden style A/C Compressor Mounting Kit for your 616/ 617 For Sale + Install Inst. Sanden Instalation Guide (post 11): http://www.peachparts.com/shopforum/diesel-discussion/367883-sanden-retrofit-installation-guide.html
|
|
#43
06-23-2013, 09:06 PM
|
||||
|
||||
|
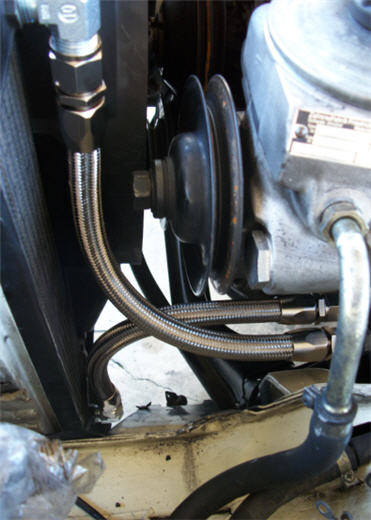
ROLLGUY: Here is the photo of the hard line and soft line junction. The hard line fits in the brackets perfectly (First MB I have had with BOTH brackets working)!
__________________
Current Mercedes 1979 maple yellow 240D 4-speed Gone and fondly remembered: 1980 orient red 240D 4-speed Gone and NOT fondly remembered: 1982 Chna Blue 300TD Other car in the stable: 2013 VW Jetta Sportwagen TDI / 6-speed MT Last edited by zeke; 06-24-2013 at 10:16 PM. Reason: Added picture with actual measurement
|
|
#44
06-24-2013, 12:27 AM
|
||||
|
||||
|
Quote:
__________________
All Diesel Fleet 1985 R107 300SLD TURBODIESEL 2005 E320 CDI (daily) LOTS of parts for sale! EGR block kit http://www.peachparts.com/shopforum/diesel-discussion/355250-sale-egr-delete-block-off-plate-kit.html 1985 CA emissions 617 owners- You Need This! Sanden style A/C Compressor Mounting Kit for your 616/ 617 For Sale + Install Inst. Sanden Instalation Guide (post 11): http://www.peachparts.com/shopforum/diesel-discussion/367883-sanden-retrofit-installation-guide.html
|
|
#45
06-24-2013, 01:22 AM
|
||||
|
||||
|
Quote:
.
__________________
1983 123.133 California - GreaseCar Veg System
|
|
| Bookmarks |
|
|


 Linear Mode


