

|
|
|
|
|
|
#1
 05-26-2014, 09:43 PM
|
||||
|
||||
|
Chain Replacement Tool
I'm starting to gear up to replace the timing chain on my 617. I decided to build a guide tool to facilitate threading in the new chain and removing the old one.
Here is the thought process and the fabrication steps in building the tool. I first fabbed up a base plate for the tool, tieing in to the bolt for the front lift point as well as an unused bolt hole lower and to the left. In addition I have a bolt in the pin for the upper chain guide to provide a third reference point. Next, I fabricated the front support piece. The center hole rides against the cam gear for support and centering. I also clearanced for the chain guide bolt to get the right alignment. I next cut and carefully bent the chain guide to fit closely against the chain. Then just welded things up and cut the hole for the chain access. Even though the rig is quite sturdy, I added a rear support member that ties into the valve cover bolt on the drivers side. Here's another view. The final step will be to powercoat the tool. This should make the job pretty quick and easy and I should be able to do it by myself.
__________________
Current Stable

|
|
#2
05-26-2014, 09:52 PM
|
||||
|
||||
|
Nice! What's the theory of operation? Keeps chain pressed against cam sprocket at all times?
__________________
85 300D turbo pristine w 157k when purchased 161K now 83 300 D turbo 297K runs great. SOLD! 83 240D 4 spd manual- parted out then junked
|
|
#3
05-26-2014, 10:03 PM
|
|||
|
|||
|
Very important to keep the chain against the cam gear. The jig really looks awesome, but to be quite honest; my daughter and I rolled one in 3 weeks ago on my 85 300d using zip ties. Real simple, add a zip tie, turn crank add zip tie, remove zip tie. Chain was rolled in and ready for crimp in about 15 minutes.
Do you have a crimp tool? Also very important to clean area where chain tensioner and thermostat housing will mount. I used a die grinder with a scotch brite wheel. When ordering gaskets, order 2 just in case there is a leak; better to have on hand than to have to wait a week for parts (ask how I know).
|
|
#4
05-26-2014, 10:08 PM
|
|||
|
|||
|
very kewl
Okay, I'm impressed! Looks like it'll beat my ol' tried 'n true "zip tie" method! So what are your thoughts here, make these, go into production, offer 'em up for sale, maybe per order basis? Or just tease all the rest of us, whetin' our appetites? Rent the 'one off'? Inquiring minds wanna know!
__________________
Dedicated to the preservation of antique Mercedes Benz's, one rusty ol' bucket of bolts at a time!
|
|
#5
05-26-2014, 10:10 PM
|
||||
|
||||
|
Quote:
Here's the one whunter made. I wanted to try a different design. 
__________________
Current Stable
|
|
#6
05-26-2014, 11:19 PM
|
||||
|
||||
|
Quote:
I learn so much from others that share their knowledge on the forum, just want to share what I'm learning/doing relative to keeping these old diesels on the road.
__________________
Current Stable
|
|
#7
05-26-2014, 11:43 PM
|
||||
|
||||
|
Very nice!
My mechanic used this tool when he replaced the chain in my 300D 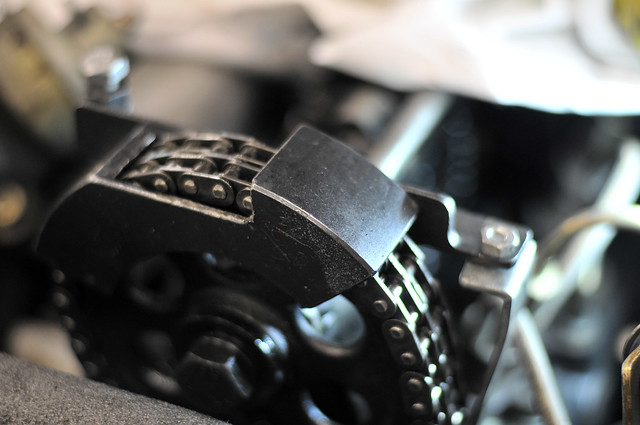 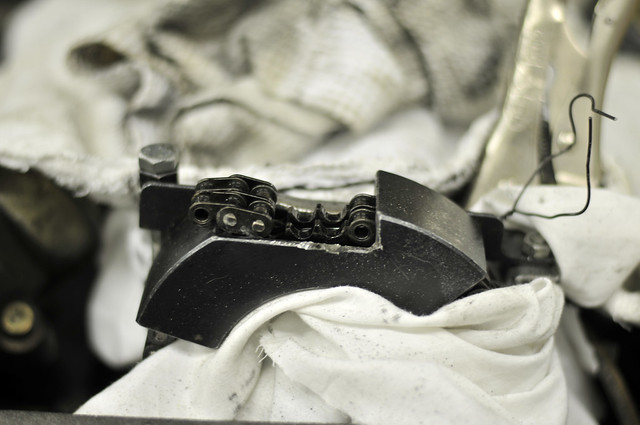 There is a provision to mount to one of the head bolt holes, but he opted not to remove it for obvious reasons. He simply used a vice (also visible in the images) to fasten this rear section. 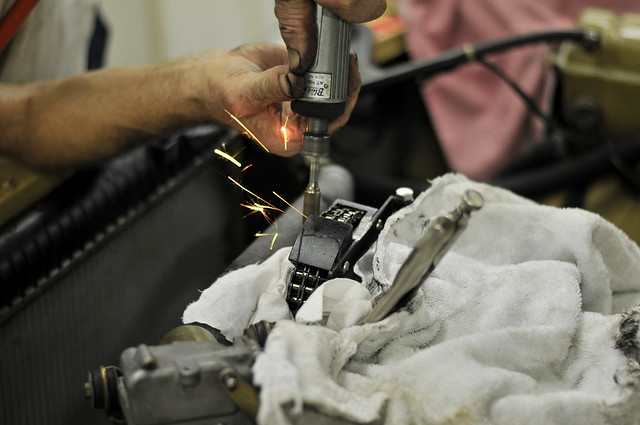
__________________
http://farm8.staticflickr.com/7271/7...144c3fc1dc.jpg
|
|
#8
05-26-2014, 11:55 PM
|
||||
|
||||
|
Quote:
__________________
Current Stable
|
|
#9
05-27-2014, 01:59 AM
|
||||
|
||||
|
Are you sure your chain guides are still good?
In preference to something like this I'd just remove the rocker arms cut the chain and fiddle about to my heart's content! It is nice to build tools but only if you have storage space for them or use them a lot
__________________
1992 W201 190E 1.8 171,000 km - Daily driver 1981 W123 300D ~ 100,000 miles / 160,000 km - project car stripped to the bone 1965 Land Rover Series 2a Station Wagon CIS recovery therapy! 1961 Volvo PV544 Bare metal rat rod-ish thing I'm here to chat about cars and to help others - I'm not here "to always be right" like an internet warrior  Don't leave that there - I'll take it to bits!
|
|
#10
05-27-2014, 01:12 PM
|
||||
|
||||
|
Patent Pending?
It also covers the problem of stuff dropping down the Timing Chain Tunnel and reduces the chance of particles from grinding or cutting off the Timing Chain from getting into the Engine.
__________________
84 300D, 82 Volvo 244Gl Diesel
|
|
#11
05-27-2014, 01:27 PM
|
||||
|
||||
|
Quote:
If it can be removed like that after you install the large Timign chain Tensioner Rail just don't put the Tensioner on till the New Chain is installed. Question for anyone about if it is really needed to replace the 2 lower Timing Chain Rails; see diagram?
__________________
84 300D, 82 Volvo 244Gl Diesel
|
|
#12
05-27-2014, 02:39 PM
|
|||
|
|||
|
I think your "window" for accessing the chain is too small.
I actually purchased the official MB tool for replacing the timing chains on OM60X engines. It bolts to the head using two of the 10mm bolts from the valve cover. It has a very wide "window" which really only holds the chain to the sprocket at two places about 180 degrees apart. Works just fine.
__________________
Respectfully, /s/ M. Dillon '87 124.193 (300TD) "White Whale", ~392k miles, 3.5l IP fitted '95 124.131 (E300) "Sapphire", 380k miles '73 Balboa 20 "Sanctification" Charleston SC
|
|
#13
05-27-2014, 03:12 PM
|
||||
|
||||
|
Quote:
If it needs to be a bit wider, a quick swipe with a cutting wheel on an angle grinder will do the job...except it will screw up the powdercoat. I'll know soon enough.
__________________
Current Stable
|
|
#14
05-27-2014, 03:52 PM
|
||||
|
||||
|
Here are the pieces coming out of my powercoating oven.
And here's the finished product. Before going to powercoat, I decided to add a stiffener to the vertical to provide some additional strength to the chain guide. I don't know how much pressure is being applied in the pulling direction on the chain, so this is just cheap insurance to make sure I've got enough stiffness to prevent the chain from jumping a tooth.
__________________
Current Stable
|
|
#15
05-27-2014, 05:25 PM
|
||||
|
||||
|
Quote:
__________________
1992 W201 190E 1.8 171,000 km - Daily driver 1981 W123 300D ~ 100,000 miles / 160,000 km - project car stripped to the bone 1965 Land Rover Series 2a Station Wagon CIS recovery therapy! 1961 Volvo PV544 Bare metal rat rod-ish thing I'm here to chat about cars and to help others - I'm not here "to always be right" like an internet warrior Don't leave that there - I'll take it to bits!
|
 |
| Bookmarks |
| Thread Tools | |
| Display Modes | |
|
|


 Linear Mode


