

|
|
|
|
|
|
#1
 12-04-2017, 09:06 PM
|
||||
|
||||
|
My Custom 1980 W116 300SD Project Part 2
This is a continuation of this thread: http://www.peachparts.com/shopforum/diesel-discussion/282304-my-custom-1980-w116-300sd-project.html which documents the refurbishment, maintenance, and mild customization of a daily driver 1980 Mercedes-Benz W116 300SD. I am resuming progress on the vehicle after taking a long pause during which I was working many hours while suffering from a life-long sleeping disorder that makes working full time impractical. I am once again unemployed and now have time to work on the car again. Despite a long period of no maintenance and a 2+ hour commute each day in brutal Arizona heat, it didn't let me down.
Since my last post, I attempted to seal up some leaks in the transmission. My 722.120 transmission had leaking piston cover O-rings, even though I have paperwork showing it was rebuilt in 1991. I read that while it is possible to replace the O-rings in the B2 and B3 piston covers simply by pressing in with your hands, the spring pressure in the B1 piston cover is too great. A special factory tool is recommended my Mercedes, but the transmission must be removed from the vehicle since it takes a lot of room, and there is only 70mm (3") of clearance between the transmission and the tunnel. I have heard that it may be possible to use this tool with the transmission still in place if the exhaust pipe and driveshaft are removed, and then the transmission is lowered down as far as it will go. This is a lot of work. I don't have a lift and doing the above would have been difficult. Feeling that I'd rather just pay someone else to do it, I called an independent Mercedes-Benz repair shop asking how much it would cost. The shop said that it would be too difficult for them to do, and they referred me to a place that specializes in German transmissions. I called the transmission shop, and the mechanic said that he wouldn't do the job without completely removing the transmission from the vehicle. This would have been expensive and would have put me without a car for a few days. So, I decided to make a tool that would allow me to replace all of the piston O-rings with the transmission still in place and without having to lower it or remove any other parts, because that is just too much work. CAUTION: If you make your tool any less stout than I have made mine, it will probably fail and you will not be able to finish the job. Use your ingenuity and good judgment.  I bought 3/4" hollow square steel tubing at my local hardware store. Solid aluminum bar would work as well, but it is harder to find. You need at least 14" of it--more if you make a mistake. I cut the long piece to the length of the transmission (235mm), and the short piece 120mm. I got some 30mm long bolts the same thread pitch as the ones for the transmission pan and drilled a couple holes for them in the tubing. The holes need to be offset all the way against the edge on one side. This is to clear the valve body, and you may still need to grind a little material away at one edge (it starts at about 80mm in from the right side to about 90mm in, if you look at the picture above). The center of the bolt hole on the left side is 12mm in front the end, and the center of the right bolt hole is 21mm from the end. The center point of each should be spaced 202mm from each other. I used a 4" long bolt (about 3/8" thick) with a thin locknut going through the center of the tubing. The center hole for it is 107mm from the right. The stronger the bolt, the better. Even this one started to bend under the spring pressure. I drilled a hole through the short tubing so it would go through the bolt. The tubing will crush during use and cause a big disaster if you do not reinforce the hole with round tubing. I had to buy a long piece of 3/8" ID round steel tubing, cut, and grind it just small enough to slide into the square tubing. It keeps the tubing from collapsing and from it catching the threads and binding. You must do this or just use solid bar stock for this piece.  Then I drilled a long, slotted hole at the other end of the short square tubing so I could attach a 23mm socket. I put a thick washer inside the socket and then used a bolt going through it, with a locknut on the inside of the tubing. I tightened it just enough for it to stay in place, while still being able to slide as needed.
__________________
Stop paying for animal enslavement, cruelty, and slaughter. Save your health and the planet. Go vegan! I did 18 years ago. https://challenge22.com/ DON'T MESS WITH MY MERCEDES!  1967 W110 Universal Wagon, Euro, Turbo Diesel, Tail Fins, 4 Speed Manual Column Shift, A/C 1980 W116 300SD Turbo Diesel, DB479 Walnut Brown, Sunroof, Highly Optioned, 350,000+ Miles 
|
|
#2
12-04-2017, 09:07 PM
|
||||
|
||||
|
The first step to the piston cover O-ring removal process is to put the transmission in park, set the parking brake, chock the wheels, lift the car as high as you need, then put a stand underneath.
Clean the transmission very well. Compressed air is useful. The slightest piece of dirt can cause mechanical problems if it gets inside, not to mention it can get caught in the sealing surfaces. The control pressure rod clamp will be in the way of the B1 piston, so completely remove the nut and bolt and then slide off the clamp and set it out of the way.  Loosen the bolt holding the dipstick tube to the intake manifold. Put a container underneath the transmission and remove the drain plug at the dipstick banjo bolt. Let the fluids drain out. Also remove the plug in the torque converter to let it drain (you'll have to turn the engine over until the plug is at the bottom, either by using a socket on the crank, or on the power steering pump pulley bolt [some advise against using the pulley bolt]). Once drained, remove the pan and continue to let the fluid drip out into the container.  The exhaust pipe clamp was in the way, so I loosened it and slid it out of the way.  Now the tool can be bolted to the transmission. Make sure to put the socket through the new O-ring before compressing the piston, otherwise you won't be able to get it in. 
__________________
Stop paying for animal enslavement, cruelty, and slaughter. Save your health and the planet. Go vegan! I did 18 years ago. https://challenge22.com/ DON'T MESS WITH MY MERCEDES! 1967 W110 Universal Wagon, Euro, Turbo Diesel, Tail Fins, 4 Speed Manual Column Shift, A/C 1980 W116 300SD Turbo Diesel, DB479 Walnut Brown, Sunroof, Highly Optioned, 350,000+ Miles
|
|
#3
12-04-2017, 09:10 PM
|
||||
|
||||
|
I started with the B1 piston (the trickiest one, for which this tool is required). The socket can be positioned to the ideal place.
 There is a washer and bolt on each side of the arm. Each one should be snug against the arm. The inner one is loosened, then the outer one is tightened. This helps keep the arm from tilting. Have patience and make sure that the piston is being compressed evenly on all sides. The socket can be repositioned with much care. Don't rush it and make a mistake! Once the piston is compressed just enough to remove the circlip, pry it off at the notch with a flatblade screwdriver.  Turn the arm nuts the other way, loosening the outer nuts while tightening the inner nuts. Be very careful to not let the tool go off center or slip off. This could very easily become a disaster if you are not patient and meticulous. Turn out the arm just far enough to reach the O-ring with a pick. If you go too far, the metal piston ring further in could pop out, and there is also a pushrod which could pop out of place. Fortunately, my tool stops against the tunnel before going too far. Remove the old O-ring and install the new one. Don't get them mixed up or let dirt get inside.  Before pushing the piston cover back in, take a look inside the transmission by the corner of the valve body to make sure the pushrod is still in the hole. You can't see it in the picture, but it's right where the 8 is. If it's popped out, you'll have to stick something up in there to push it back in.  Start turning the arm nuts inward to compress the piston cover, doing whatever is necessary to make sure it goes in straight. If it tilts, it will bind up and the O-ring can get cut on the sharp hole edges. Once it's in far enough, push the circlip back in place. I put the gap at the bottom, so it has a weep hole effect. Then slowly let the arm back out and make sure that the piston is rested back up against the circlip and not tilted. Congratulations, you have done the first one! The tool can also be used on the B2 piston, which is under much less tension. Same rules apply. 
__________________
Stop paying for animal enslavement, cruelty, and slaughter. Save your health and the planet. Go vegan! I did 18 years ago. https://challenge22.com/ DON'T MESS WITH MY MERCEDES! 1967 W110 Universal Wagon, Euro, Turbo Diesel, Tail Fins, 4 Speed Manual Column Shift, A/C 1980 W116 300SD Turbo Diesel, DB479 Walnut Brown, Sunroof, Highly Optioned, 350,000+ Miles
|
|
#4
12-04-2017, 09:12 PM
|
||||
|
||||
|
I did not use the tool for the B3 piston on the other side. I pushed in the piston cover with my hands, removed the circlip, then let it out to rest against the tunnel. It can easily fall out of place! Once again, make sure that the pushrod is still in the hole.
 Push the cover evenly back into the transmission being careful to not cut the O-ring on the sharp edges. It may require a helper to put the circlip in place while you hold the cover. Assemble the parts you removed with a new filter, pan gasket, and crush washers, then add transmission fluid, following the procedures in the manual. If all goes well, you won't have any more piston cover leaks.   Part numbers for piston cover O-rings: B1: 000 997 47 48 64 B2: 000 997 48 48 B3: 008 997 35 45
__________________
Stop paying for animal enslavement, cruelty, and slaughter. Save your health and the planet. Go vegan! I did 18 years ago. https://challenge22.com/ DON'T MESS WITH MY MERCEDES! 1967 W110 Universal Wagon, Euro, Turbo Diesel, Tail Fins, 4 Speed Manual Column Shift, A/C 1980 W116 300SD Turbo Diesel, DB479 Walnut Brown, Sunroof, Highly Optioned, 350,000+ Miles
|
|
#5
12-04-2017, 09:13 PM
|
||||
|
||||
|
It turns out the worst offender was the control pressure rod shaft seal. But, it didn't look like there was any seal visible from the outside.
 I purchased a service manual for the transmission (REVISED EDITION), and it seemed to completely omit the seal.  So, I opened up the original transmission that came from the car to get a better look. Sure enough, the shaft seal is placed on the INSIDE of the case and it cannot be replaced without the transmission being completely disassembled. I can't believe how stupid this is. The shop that rebuilt the transmission years ago probably didn't even replace it. On the next series of transmissions, they placed the seal on the OUTSIDE where it can be replaced without tearing the transmission apart. If I rebuild the original transmission, I want to have the outside of the case bored out to fit an external shaft seal.  Right now I have a transmission that's been completely resealed and doesn't leak EXCEPT for the control pressure rod shaft seal which leaks profusely. I have to keep a tray under my car because it leaks so much transmission fluid from it. I tried pushing an O-ring inside the shaft seal bore, but it didn't work. I might try a square-profile ring next because it may seal better. This transmission shaft seal leak is the only leak I have on my car and it is irritating me.
__________________
Stop paying for animal enslavement, cruelty, and slaughter. Save your health and the planet. Go vegan! I did 18 years ago. https://challenge22.com/ DON'T MESS WITH MY MERCEDES! 1967 W110 Universal Wagon, Euro, Turbo Diesel, Tail Fins, 4 Speed Manual Column Shift, A/C 1980 W116 300SD Turbo Diesel, DB479 Walnut Brown, Sunroof, Highly Optioned, 350,000+ Miles
|
|
#6
12-04-2017, 09:15 PM
|
||||
|
||||
|
I live in Arizona, home of 120 degree Fahrenheit summers, where it can be over 90 degrees even in winter, so I really, really need air conditioning already (I've suffered through 7 summers and was commuting 1-2 hours each way in heavy traffic at one point for over a year). And not just air conditioning, but GOOD air conditioning. I actually started on upgrading the air conditioning system over 2 years ago, but stopped working on it when I started my last job as I had no time.
I removed the Delco R4 compressor, which has a bad reputation and isn't very efficient. The pulley was seized and had a hole in it.  I bought a Sanden compressor adapter bracket from ROLLGUY on the PeachParts forum. It is very well-made and came with a bracket for supporting the oil cooler hoses.   
__________________
Stop paying for animal enslavement, cruelty, and slaughter. Save your health and the planet. Go vegan! I did 18 years ago. https://challenge22.com/ DON'T MESS WITH MY MERCEDES! 1967 W110 Universal Wagon, Euro, Turbo Diesel, Tail Fins, 4 Speed Manual Column Shift, A/C 1980 W116 300SD Turbo Diesel, DB479 Walnut Brown, Sunroof, Highly Optioned, 350,000+ Miles
|
|
#7
12-04-2017, 09:18 PM
|
||||
|
||||
|
My roommate surprised me with a new polished aluminum Sanden 508 compressor from SO-CAL Speed Shop AZ as a Christmas present.
 After some inspection, I decided that I might need a different head, so I exchanged it for a different style. I'm still not completely sure I have the ideal head style, but will figure it out later. If I need a different one, hopefully I can purchase a polished head separately.   For some reason, the compressor alignment was off by 1/4", so I bought some chrome spacers to fix it. This required getting longer bolts to compensate.  
__________________
Stop paying for animal enslavement, cruelty, and slaughter. Save your health and the planet. Go vegan! I did 18 years ago. https://challenge22.com/ DON'T MESS WITH MY MERCEDES! 1967 W110 Universal Wagon, Euro, Turbo Diesel, Tail Fins, 4 Speed Manual Column Shift, A/C 1980 W116 300SD Turbo Diesel, DB479 Walnut Brown, Sunroof, Highly Optioned, 350,000+ Miles
|
|
#8
12-04-2017, 09:19 PM
|
||||
|
||||
|
The adapter kit works pretty well. I must not have secured the long adjustment bolt as it fell off at some point, so I purchased another one to replace it. I had to reorient some of the nuts and bolts after I took the pictures so the compressor would have more range of travel. Even though people with W123 300Ds are using 11X940 (15370) belts, I found that it was not even close to long enough for my application. The proper belt size for my car was 13X990 (17390). I bought a Contitech belt only to find they are now made in China. The Classic Center doesn't seem to sell belts in that size. So, I bought a Duralast belt from AutoZone because they are at least made in the USA by Dayco.
   If you do get one of the Chinese Contitech belts, you can use brake cleaner on a cotton swab and wipe off the lettering. I don't think that will make the belt last any longer, though. 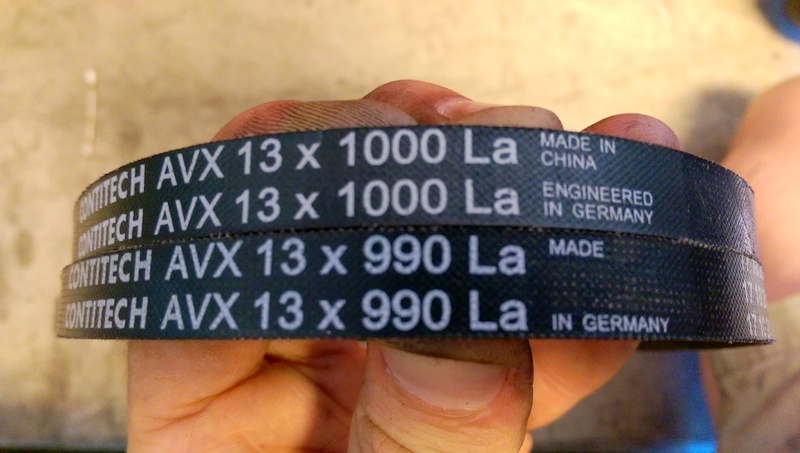
__________________
Stop paying for animal enslavement, cruelty, and slaughter. Save your health and the planet. Go vegan! I did 18 years ago. https://challenge22.com/ DON'T MESS WITH MY MERCEDES! 1967 W110 Universal Wagon, Euro, Turbo Diesel, Tail Fins, 4 Speed Manual Column Shift, A/C 1980 W116 300SD Turbo Diesel, DB479 Walnut Brown, Sunroof, Highly Optioned, 350,000+ Miles
|
|
#9
12-04-2017, 09:21 PM
|
||||
|
||||
|
The stock auxiliary fan is very small at only 12".
 I went to a wrecking yard and looked for a larger one. I found that a 16" one from a second generation W126 fit well and even had a 116 part number.  I bowed out the braces and made a bracket to support the bottom.  The bottom of the fan has a pin, so I drilled a hole in the bracket for the pin to slide into.  
__________________
Stop paying for animal enslavement, cruelty, and slaughter. Save your health and the planet. Go vegan! I did 18 years ago. https://challenge22.com/ DON'T MESS WITH MY MERCEDES! 1967 W110 Universal Wagon, Euro, Turbo Diesel, Tail Fins, 4 Speed Manual Column Shift, A/C 1980 W116 300SD Turbo Diesel, DB479 Walnut Brown, Sunroof, Highly Optioned, 350,000+ Miles
|
|
#10
12-04-2017, 09:23 PM
|
||||
|
||||
|
After confirming fitment of the fan, I ordered the largest universal parallel-flow condenser that would fit (16X22" from Nostalgic AC) and secured it with zip ties.
 I then started designing mounting brackets using cardboard patterns.  Once I was happy with the patterns, I cut brackets out of sheet metal using a rotary tool with a cutoff disc, and then bent them into shape.  I installed rubber grommets that were the same size as the originals, but the Ace Hardware ones have already dry-rotted, so I want to find the part number for them so I can get some from Mercedes.  I used the original mounting holes on the body. 
__________________
Stop paying for animal enslavement, cruelty, and slaughter. Save your health and the planet. Go vegan! I did 18 years ago. https://challenge22.com/ DON'T MESS WITH MY MERCEDES! 1967 W110 Universal Wagon, Euro, Turbo Diesel, Tail Fins, 4 Speed Manual Column Shift, A/C 1980 W116 300SD Turbo Diesel, DB479 Walnut Brown, Sunroof, Highly Optioned, 350,000+ Miles
|
|
#11
12-04-2017, 09:25 PM
|
||||
|
||||
|
I wanted to mount a stock style drier in the original location. I made a bracket to hold the drier to the condenser. I also used coathangers as a guide to have a hose and tubing shop make some pipes, which I secured with auxiliary fan mounting clamps that I cut down to size and redrilled.
    
__________________
Stop paying for animal enslavement, cruelty, and slaughter. Save your health and the planet. Go vegan! I did 18 years ago. https://challenge22.com/ DON'T MESS WITH MY MERCEDES! 1967 W110 Universal Wagon, Euro, Turbo Diesel, Tail Fins, 4 Speed Manual Column Shift, A/C 1980 W116 300SD Turbo Diesel, DB479 Walnut Brown, Sunroof, Highly Optioned, 350,000+ Miles
|
|
#12
12-04-2017, 09:26 PM
|
||||
|
||||
|
I decided to take apart and inspect the auxiliary fan. The plastic cover snaps off.
 A tab on the nose cone has to be lifted up before the nut can be loosened.  Once the blades are off, the motor can be detached from the frame.  Then the motor cover removed.  Then the armature slides out. 
__________________
Stop paying for animal enslavement, cruelty, and slaughter. Save your health and the planet. Go vegan! I did 18 years ago. https://challenge22.com/ DON'T MESS WITH MY MERCEDES! 1967 W110 Universal Wagon, Euro, Turbo Diesel, Tail Fins, 4 Speed Manual Column Shift, A/C 1980 W116 300SD Turbo Diesel, DB479 Walnut Brown, Sunroof, Highly Optioned, 350,000+ Miles
|
|
#13
12-04-2017, 09:27 PM
|
||||
|
||||
|
The bearings are a weak point on these motors, so I recommend always replacing them with sealed units. To remove the bearings, drill and punch out the rivets.
  You can use a socket to punch out the bearing.  You can take the bearing into a supplier and get it replaced with a sealed unit that will last much longer. The part number is 6001 2RS. The 2RS stands for two radial seals. It's a very common size and used in skateboards and such.  Install the bearing and cover, securing it with new pop rivets. 
__________________
Stop paying for animal enslavement, cruelty, and slaughter. Save your health and the planet. Go vegan! I did 18 years ago. https://challenge22.com/ DON'T MESS WITH MY MERCEDES! 1967 W110 Universal Wagon, Euro, Turbo Diesel, Tail Fins, 4 Speed Manual Column Shift, A/C 1980 W116 300SD Turbo Diesel, DB479 Walnut Brown, Sunroof, Highly Optioned, 350,000+ Miles
|
|
#14
12-04-2017, 09:29 PM
|
||||
|
||||
|
I lightly lubricated where the end of the shaft fits into the bushing. I cleaned the parts with electrical parts cleaner and would have replaced the brushes if they were worn down enough.
 Put it all back together and stake the nose cone nut.  I retaped and secured the wire harness.  I cleaned it up with 303 Aerospace Protectant.  
__________________
Stop paying for animal enslavement, cruelty, and slaughter. Save your health and the planet. Go vegan! I did 18 years ago. https://challenge22.com/ DON'T MESS WITH MY MERCEDES! 1967 W110 Universal Wagon, Euro, Turbo Diesel, Tail Fins, 4 Speed Manual Column Shift, A/C 1980 W116 300SD Turbo Diesel, DB479 Walnut Brown, Sunroof, Highly Optioned, 350,000+ Miles Last edited by Squiggle Dog; 12-04-2017 at 09:57 PM.
|
|
#15
12-04-2017, 09:40 PM
|
||||
|
||||
|
I cleaned the condenser, brackets, and pipes, and had them powder coated semi gloss black. The condenser came out surprisingly well. The only things I was disappointed with were the nuts and bolts. Usually they blast them and then mask the threads, but they didn't do either, so the threads were clogged up and it took a very long time to clean them up. then the powder chipped off of the heads because it was too thick and they didn't blast them first.
    
__________________
Stop paying for animal enslavement, cruelty, and slaughter. Save your health and the planet. Go vegan! I did 18 years ago. https://challenge22.com/ DON'T MESS WITH MY MERCEDES! 1967 W110 Universal Wagon, Euro, Turbo Diesel, Tail Fins, 4 Speed Manual Column Shift, A/C 1980 W116 300SD Turbo Diesel, DB479 Walnut Brown, Sunroof, Highly Optioned, 350,000+ Miles
|
 |
| Bookmarks |
|
|


 Linear Mode


