M116/117 Timing Chain Replacement
on the 1972 280SE 4.5
by Tomguy
Tools
You will need the following tools to do the job easily and efficiently. Please take note of everything listed!
- 10mm socket wrench, prefferably ¼" drive, with an extension, to remove the valve cover bolts
- 3 pairs of clamping pliers (Mini Vise-Wrenches) to hold the chain to the sprocket
- A hand tool with a small grinding wheel (Dremel) to cut a link on the old chain
- 8mm box/open end wrench to remove the fan bolts
- 27mm socket with 4-5" of extensions to turn the crank (I used a 2" and 3" together). NOTE that 6" is too long and 3" is too short!
- 13/16" socket with various extensions to remove the spark plugs
- Wire to hang the old chain's end from to keep it from falling (I used #14 copper wire, stripped)
- A slotted screwdriver and hammer to knock the old link out
Step 1
I removed the air filter assembly, right side (passenger's, for those of us in NA/Europe with LHD models) valve cover, and spark plugs. I then took the fan off, leaving 1 bolt in the pully to keep it from falling off the water pump (this is important!) I was able to get the fan out without removing the shroud or top radiator hose but it was a top squeeze - you may have to remove the top radiator hose on your vehicle.
Once these items are removed, and you are sure you have all the tools needed set aside, feel free to proceed to the next step.
Step 2
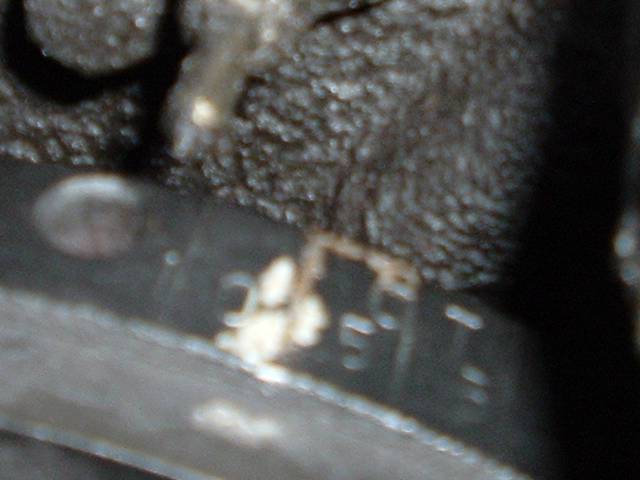
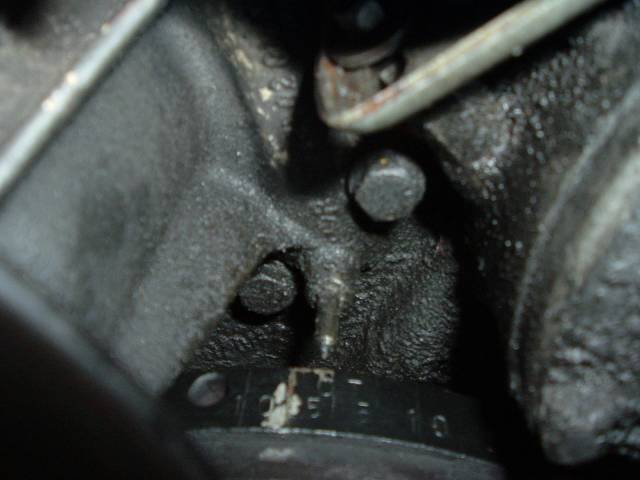
Measuring stretch
To properly measure timing chain stretch, using the 27mm socket and the 5" worth of extensions on a ½" drive socket, turn the engine over until the notch on the camshaft's indicator (blue) lines up with the marking on the tower (red).

Then, simply read the crankshaft timing indicator markings - the spot where it lines up with the pointer is approximatley how much stretch your chain has. However, this can be off by up to 3°. Therefore, if you are reading 5° of stretch, you may actually have up to 8° and you need to replace your chain! If you have 12° or so, as I did (pictured), you will notice DRASTIC fuel efficiency and power increases!
If you have determined you need to replace the chain, and you have all the tools listed (as well as the chain to do the job), proceed to the next page!
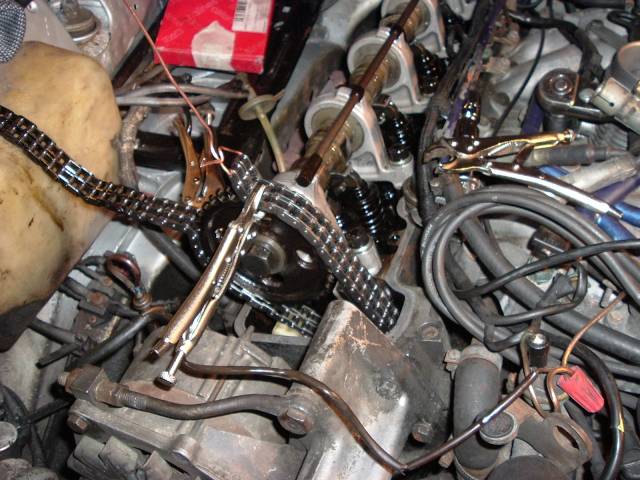
Step 3
The job itself
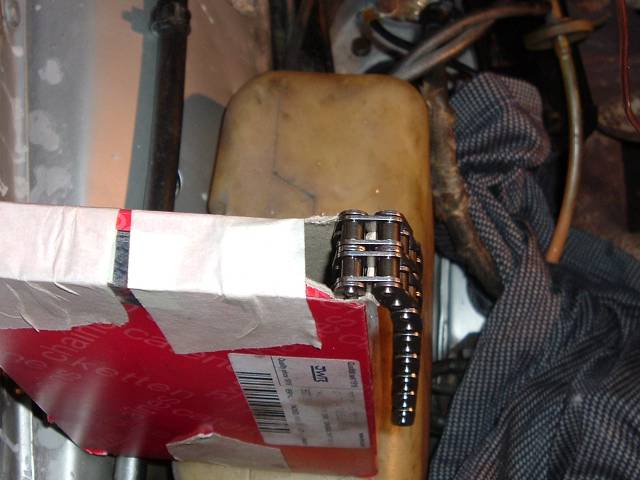
Once you're sure you're ready to do the job, the first step you want to take is to make a simple preparation what will make the job much easier: Make the chain's box into a dispenser. Cut or tear a small part of the box's end flap off, and pull the chain through it. Then tape up both ends of the box. This makes it so that the chain dispenses quite easily. Remember to take the master link parts bag out first! It should look like this:
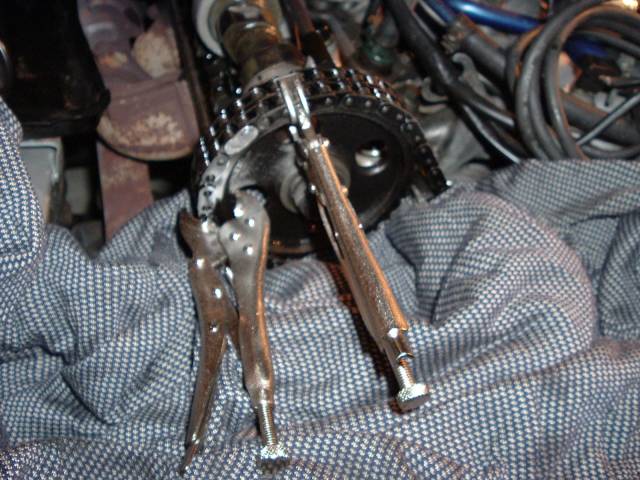
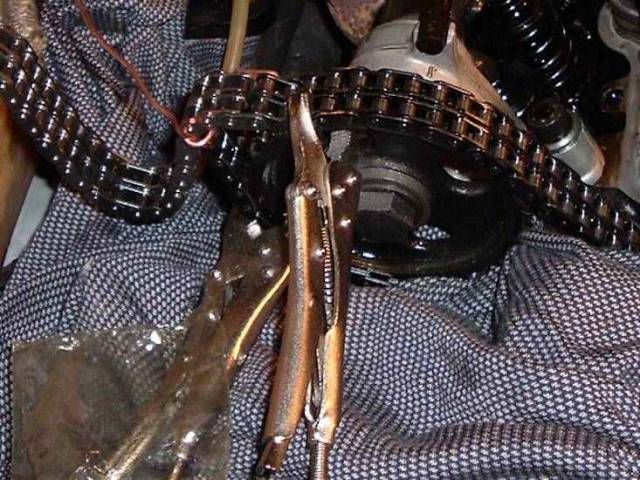
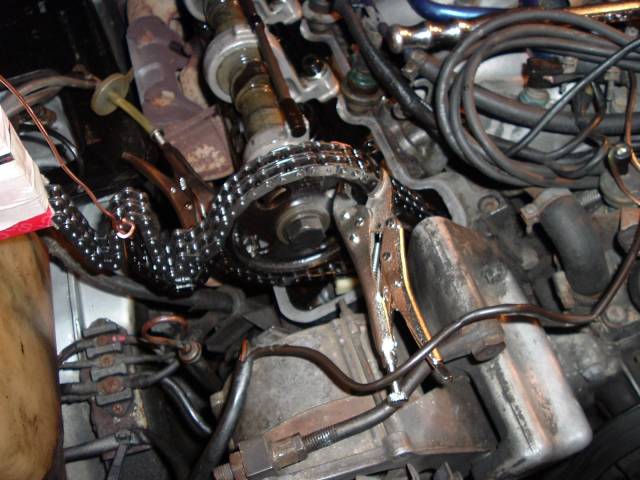
The next step you need to do is clamp the chain to the sprocket with two vice-grips. Place a rag down below the sprocket to avoid grindings from falling into the engine, then grind off one link's ends with a Dremel.
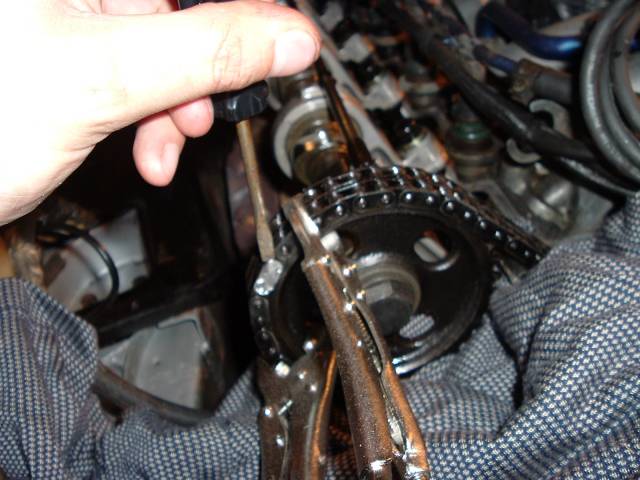
Once you have the link's ends ground off, place a slotted screwdriver behind the link's front plate. Then tap the end of it with a hammer and pry the plate off of the link.
Then, take the trailing end of the chain (the side closest to the tensioner) and tie it to the hood using a stiff wire (strong enough to support the weight of the chain). This will help prevent the chain from falling into the engine should your clamp come off in the process.
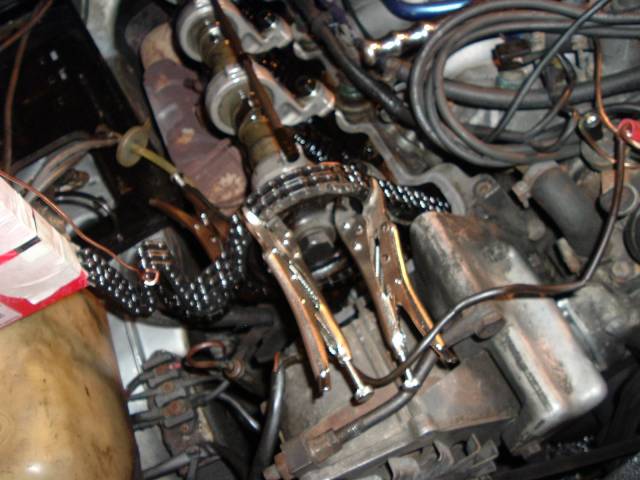
Once the chain is attatched to the hood, making sure the wire that attatches it is not in the way, use the new master link to attatch the new chain to the end of the old chain's leading end. Make sure to clip it on and attatch it properly, as you would connecting the chain to itself, to prevent it from coming apart when you're rolling the old chain out and new one in.
Now, after confirming that your two clamps are on firmly, slowly turn the engine in the direction of revolution (clockwise as viewed from the front, the ratchet wrench set to "Tighten" or "On"). Do not turn the engine too far, but only so that the cam sprocket rotates approximatley 90°.
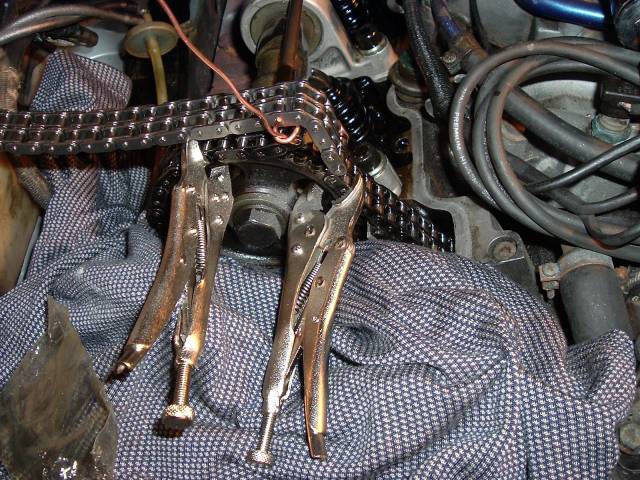
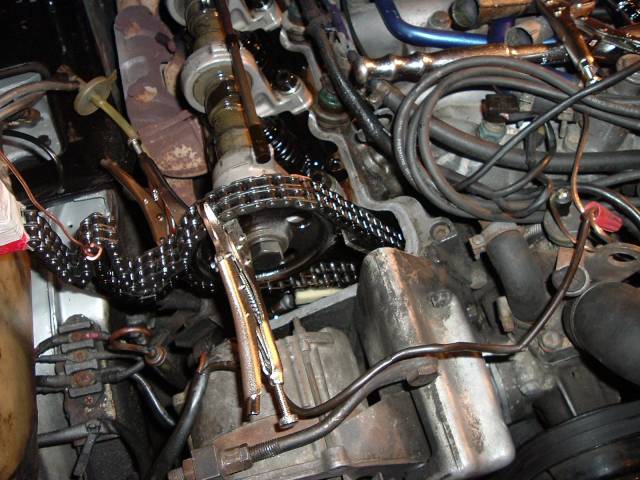
Now, attach the third clamp to the sprocket on the trailing end freshly exposed. Attach it on the back end of the sprocket as pictured.
Now, remove the top (middle) clamp.
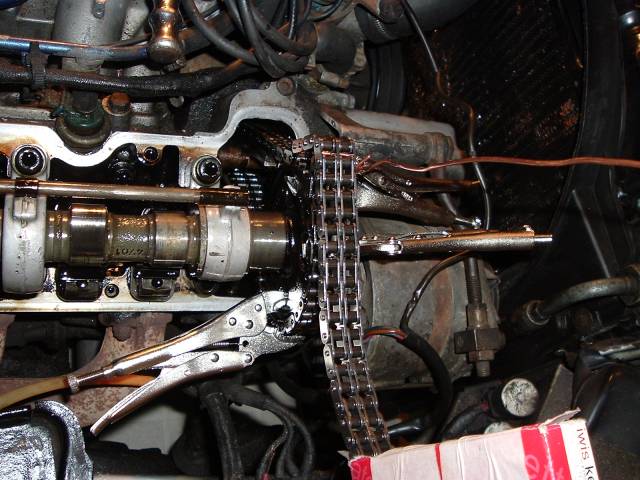
Take the old chain off the sprocket down to the clamp, then put the new chain on the sprocket in its place. Make sure you don't skip any links!
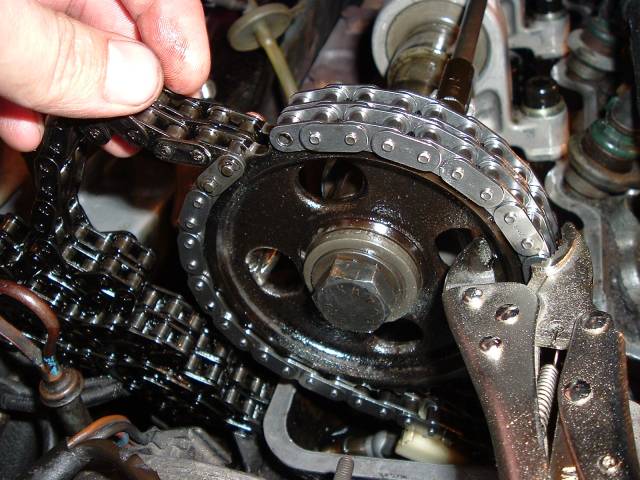
Now, you need to clamp on the new chain at the top middle - the same spot you removed the clamp from earlier. It should look something like this:
Now, remove the rightmost clamp from the leading end of the new chain. Your job should now look like this:
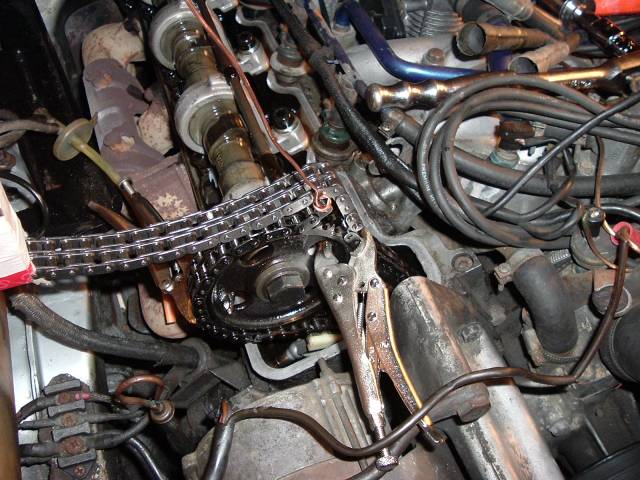
Making sure the clamps are on tightly, turn the engine clockwise again until the camshaft sprocket moves 90°. Your engine should look like it did in the previous picture, with more chain out than before.
The job becomes repetitive now: Add the clamp on to the back of the sprocket's left side (as pictured here). Then remove the top clamp (as done here), remove the old chain to the left clamp, and then put the clamp back on the top of the sprocket, to hold the new chain on (see here). Then remove the right side clamp (as shown on the picture above). Continue to roll the new chain in by rotating the engine so the camshaft moves 90°, adding the third clamp, removing the top clamp, pulling the old chain off the sprocket to that third clamp, putting the new chain on, reattatching the top clamp, removing the right clamp, and rotating the engine until you have reached the end of the old chain/beginning of the new one.
Step 4
Final steps
Once you have reached the end of the old chain, your chain ends should line up perfectly on the sprocket. However, it is very possible that if you were in a rush, you skipped a tooth on the camshaft. This also happens if one of your clamps slipped off. If you did skip a tooth, it will look like this:
To resolve this issue, you will need to do this: Remove the wire tying the old chain to the hood and attatch it to the leading end of the new chain, as shown:
Now, CAREFULLY rotate the camshaft CLOCKWISE until you move it forward the EXACT amount of teeth you need - if you were off by 1 tooth, move it just ONE. Now be warned - rotating the camshaft may also rotate the engine slightly as the new chain, being much tighter, will pull the crankshaft. Reclamp the chain to the sprocket, and check the chain to make sure that the two ends meet perfectly. If so, remove the old chain from the new chain. BE CAREFUL not to lose any of the pieces of the master link. Then, attatch the two ends of the new chain together with the master link. You're almost done!
Now, even if you are CERTAIN that you DIDN'T skip a tooth, you WILL want to check to make sure that your camshaft and crankshaft are properly aligned to prevent certian valvetrain damage. The camshaft gear has 36 teeth, ONE tooth on the camshaft - 10° - is 20° at the crankshaft! That's the same as 20° of chain stretch. It will almost certianly cause fatal valve-piston interference!
Turn the engine clockwise until the camshaft timing indicator lines up with the marking on the tower, as you did in step 2. If your markings are within 3° of TDC (top dead center) then you did the job well and you deserve a pat on the back. Now, it is important to note that the guide rails wear with age (especially the solid plastic ones) and can cause the chain to read more stretch. It is VITALLY IMPORTANT that you change your top 3 rails if they are of the plastic variety when you do the chain (2 large and 1 small on the m117, 3 small ones on the m116). I DID NOT replace my rails as they are the aluminum-backed rails AND my stretch, after the new chain was installed, measured only ~0.5-1.0°. I highly suggest you NOT replace your rails if they are the aluminum-backed variety with the new-style solid plastic rails. The plastic ones need to be replaced every 5-10 years to avoid SEVERE engine/valvetrain damage due to failure.
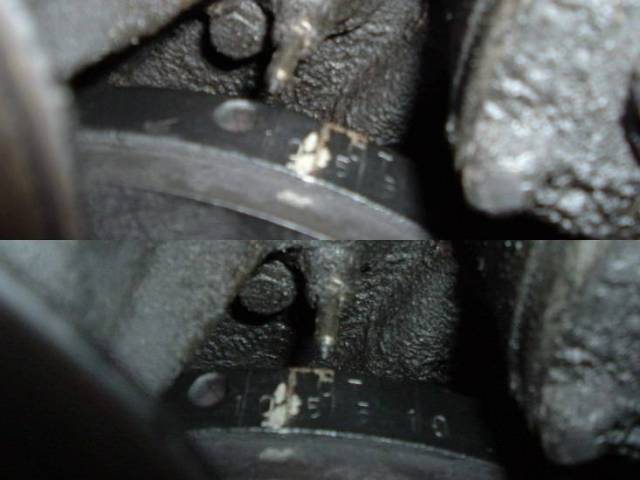
A shot of the stretch measured after the new chain was installed:
A comparison photo showing before and after pics together:
Thank you for reading this article and I hope you find it useful in installing your new chain!
- Tomguy
CategoryDiy