Instrument Cluster Removal
on the 1995 W124 E300D
by Chris W.
8/2/03
ALSO- See special section at the end regarding 1986-89 W124's. speedy300Dturbo shares with us his procedure to improve instrument panel illumination on the older W124's..
Let's Pull the Instrument Cluster!
Hi folks, I thought I would contribute a how-to segment. Here's how I pulled the cluster on my W124 E300D today to change the instrument panel lights. Actually I was hoping to fix the clock, but that didn't happen... Bear with me on this step by step procedure.
Step 1.
First you have to have the cluster removal tools. You can buy them from MB, or you can make your own from a coat hanger, like I did. Here's a pic of my tools. As I say in the photo, the length doesn't matter too much, but you don't want it real long because it will interfere with the steering wheel.
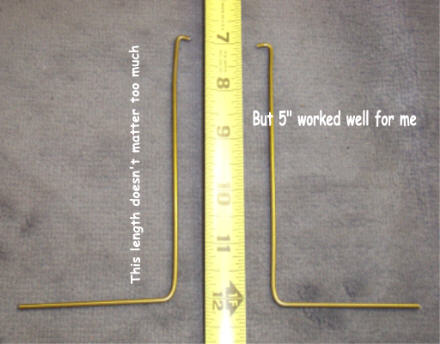
I have only seen pics of the factory tools, so I can't say how long they are. Took me about 10 minutes to make these with a heavy wire cutter, a bench vise, and an occasional tap from a hammer.
Step 2.
You will want to pull the speedo cable from a clip at the base of the steering column to give it some slack to allow the cluster to be pulled out.
You can see the clip and cable in this pic:
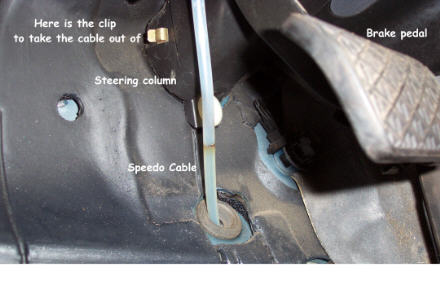
You have to pull your floor mat, and then the carpet mat section below it with the heavy foam blocks, exposing the floor pan. Then you can see the speedo cable and clip.
Step 3.
OK, here is the tool inserted on the left side of the cluster:
You want to insert it here or below, to catch a series of ridges which are molded into a lip on the edge of the cluster.
(you can see the ridges better below in another shot)
I made the mistake of trying to use the tool further up on the cluster, and it didn't hook on anything. I kept fiddling and eventually determined the right place to hook the tool.
Step 4.
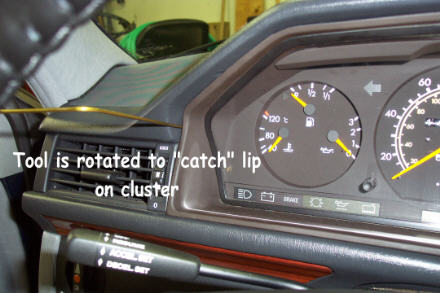
Here is the tool inserted on the right side:
You insert it and then rotate it to catch the lip on the cluster.
Step 5.
Here is the cluster as it is coming out. You may have to coax it a little with a putty knife or something similar. I think my cluster may have been removed previously, but I have read that if you are taking it out for the first time it can be a bit stubborn.

Mine needed a bit of coaxing with a putty knife on each side, while I had tension on the pulling tool on that side, but it started to come out fairly easily. Just work it a little on each side and when it starts to come out, you can pull evenly on both sides with your tools.
You can now see what you are hooking on to with the tool. You can hook anywhere along the ridged line.
Step 6.
OK, now I've pulled the cluster out further and we can take a look into the area behind it on the left side. You will see lots of wires and such to be disconnected, and you can see the speedo cable with the large brass knob on it which you will have to unscrew.
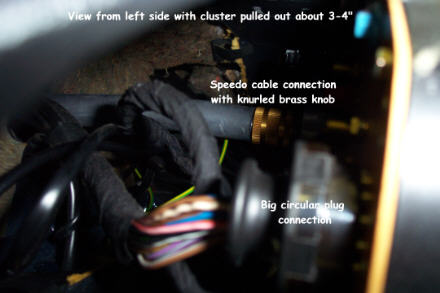
On my car, there was a big circular plug immediately in the way on the left side, which I had to disconnect so I could pull the cluster out a bit further and get my hand in there to disconnect the speedo cable.
Once you disconnect the speedo cable, you have more room to reach your hand in to pull various plugs and bulb connections out of the cluster.
Step 7.
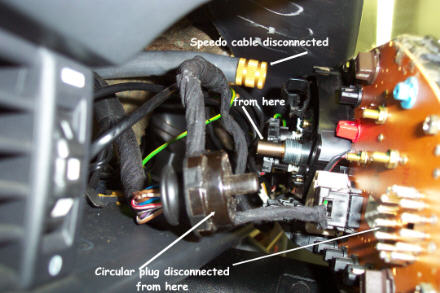
Here's another view with the speedo cable disconnected and you can see things a bit better. Take your time pulling the plugs - on my car none seemed to have clips - they all came free relatively easily by rocking the plug a bit and pulling.
On the right side are several sockets for the warning lamps and you should carefully note which wire colors go into which socket - mine had wire label numbers, but they were coming off!
(and I didn't realize that my lamps skipped socket #2 as there is no warning light for that socket on my car) So just jot the cable colors down and it will be no problem.
Step 8.
OK, now you're cooking. With the speedo disconnected, you can carefully maneuver the cluster out and set it face up on the steering wheel - at least I could on my car. The connection for the back of the speedo was actually supporting the cluster as it sat.
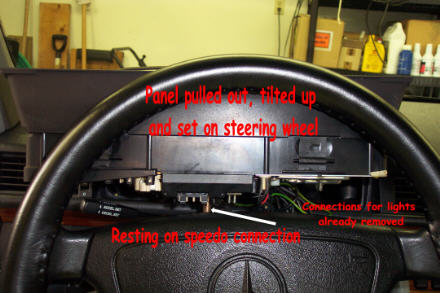
In this position you can disconnect the remaining wires on the right side, etc., especially the warning lamps I mentioned above.
Once you get everything disconnected, you're free! Take the cluster and maneuver it completely out, and put it on your bench or whatever.
My car does not have a telescoping wheel, but I had plenty of room to get the cluster out.
Last Step
And here is what the back of the cluster looks like. I was trying to fix my clock, so I disassembled the cluster quite a bit further, but in the end I stopped before getting the clock all the way out. (the instructions I had didn't match what I was looking at!)

So I put everything back together and decided to make a quick run to the auto parts store to replace the instrument panel lights, which seemed rather dim, so the whole exercise wasn't a total waste!
I've pointed out the cluster lights, which just rotate to remove. There are numerous other warning lamps with smaller bulbs which could be done at this time, if needed.
I used Sylvania 194 bulbs for the main cluster illumination lights.
Assembly is the reverse of installation, as they say! It all goes back together pretty easily. I put the cluster in the same position on top of the wheel to reattach all the plugs on the right side, then rotated it to get ready to insert and reconnected the speedo cable and big circular plug.
There is also a long horizontal plug with about 5 or 6 pins for the temperature display, which you have to reattach. Good to know that if your temperature display ever goes south, it is easily replaced.
Hope this procedure helps another DIY'er - now go have a beer and pat yourself on the back because you just saved yourself a heap o' labor charge at the shop!
- Chris W.
Special section for 1986-89 W124
Improving Instrument Cluster Illumination
by speedy300Dturbo
4/12/05
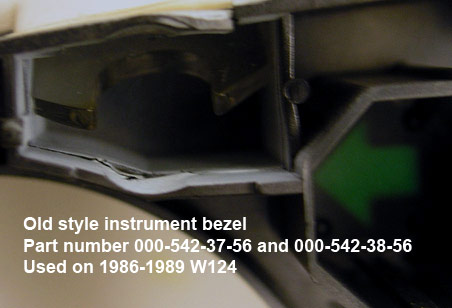
So your car has crappy instrument lighting at night? If you don't want to upgrade to LED's, you can start by replacing your instrument cluster bezel with that of a 1990-1995 W124. See the photos below for comparison of the illumination prisms:

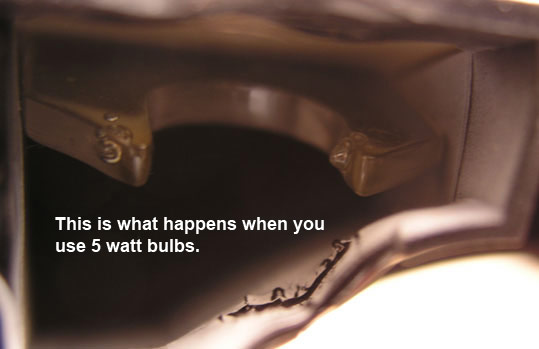
Even if your bulbs aren't burned out, replace them anyway. Mercedes Benz part number is: N072601-012240. You can also use Sylvania 2821 (W3W) bulbs. They're the same thing that Mercedes sells you, just cheaper and readily available at your local Kragen, Autozone, Napa, etc. And yes, they are actually made in Germany. DO NOT under ANY circumstances use a 5 watt 168 or 194 type bulb. They WILL melt the illumination prisms. Also, STAY AWAY from anyone selling a Mercedes "Xenon" dash light upgrade kit with those BS blue tinted "xenon" bulbs. Those are 5 watt and as mentioned above, will cause damage. Below is a photo of what happens when you use 5 watt bulbs. The lighting prism will also turn a funky brown color (a bit hard to see in the photo)
- speedy300Dturbo
CategoryDiy