Rear Wheel Carrier Removal (Rear Wheel Bearing Change)
on the 1994 E320 (W124)
by skiier3_9
4/26/07
Here is how I removed the rear wheel carrier on my 1994 E320. I removed this to have the rear wheel bearing changed by a machine shop.
I. Remove Wheel - Put the car on jack stands
II. Remove the brake caliper (2x 19mm bolts) - hang the caliper from the suspension or frame (I used a coat hanger cut up)
III. On the 30mm nut that is screwed to the axle shaft there is a tab that is bent in - bend this out so that you can remove the bolt. Put the parking brake on (firmly!) - use a 30mm 12-pointed socket and an extension to loosen this bolt. The manual says the tightening torque is 200+Nm (a lot!)
I used my 1/2" ratchet and a rubber mallet as a 'manual impact wrench' - after 5 - 10 good pounds with the hammer I had it loose. Others will recommend a torch - I didn't have one so I didn't use it.
IV. Remove the allen bolt that holds the brake disc on the wheel carrier. (Don't forget to remove the parking brake). I had to hit the disc with the rubber mallet to get it off because it was rusted on. If you are blessed without rust this would probably be easier.
Note - I was replacing my differential as well - so I left the parking brake/disc on to remove the axle bolts (10mm XZN bolts).
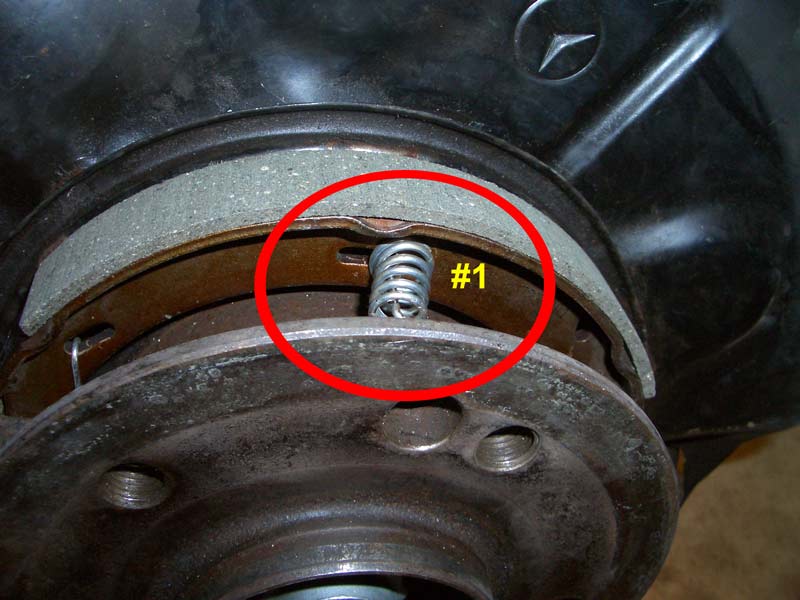
V. Now you've got the disc off you can remove the parking brake assembly. This is a bunch of springs that are a bit of a pain to get off. I used a variety of flat head screw drivers and needle nose pliers to remove them.
A. #1 spring should be pushed in then turned. It has a hook on the end that catches in the wheel carrier to secure the shoe against the inside of the wheel carrier space.
B. Once the springs are removed you'll need to get the cable assembly apart.
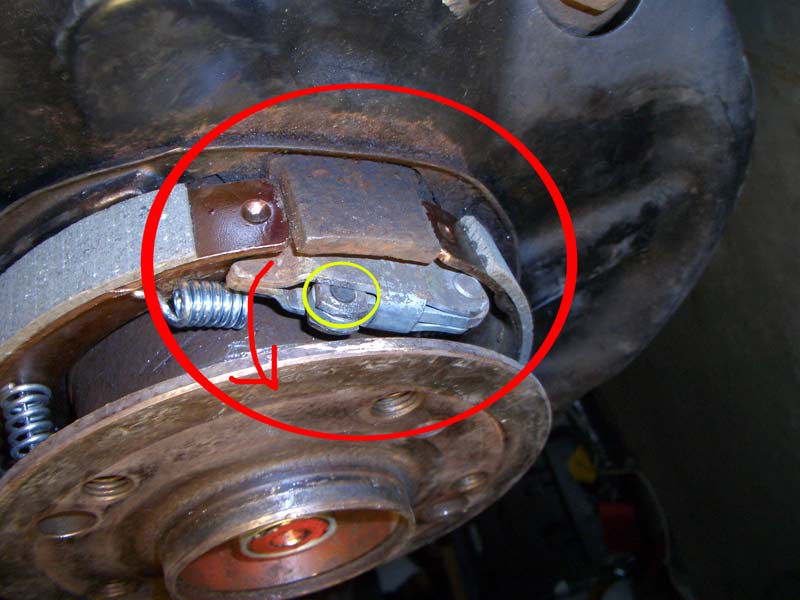
To aid in this give a good tug on the parking brake cable behind the wheel carrier. You'll need to open the assembly all the way by twisting it down below the metal protrusion so that you can remove the pin that holds the thing to the cable.
C. With all that stuff off remove the retaining bolt that holds the parking brake cable to the wheel carrier on the back.

This is a 13mm bolt.
VI. With the parking brake removed you can remove the 3 allen bolts/screws that secure the dust shield. You'll need the car in neutral so that you can twist the axle/spindle to align the holes in the wheel carrier with the screws.
VII. With the wheel carrier loose you'll be able to turn it to get the caliper side lined up with other things to give you room to loosen all the suspension bolts.
VIII. Most of the suspension bolts aren't too terrible you'll need a 17, 19, and 21mm ratchet and combination wrench (sometimes you can't get the box end in all of the spaces) to loosen everything.
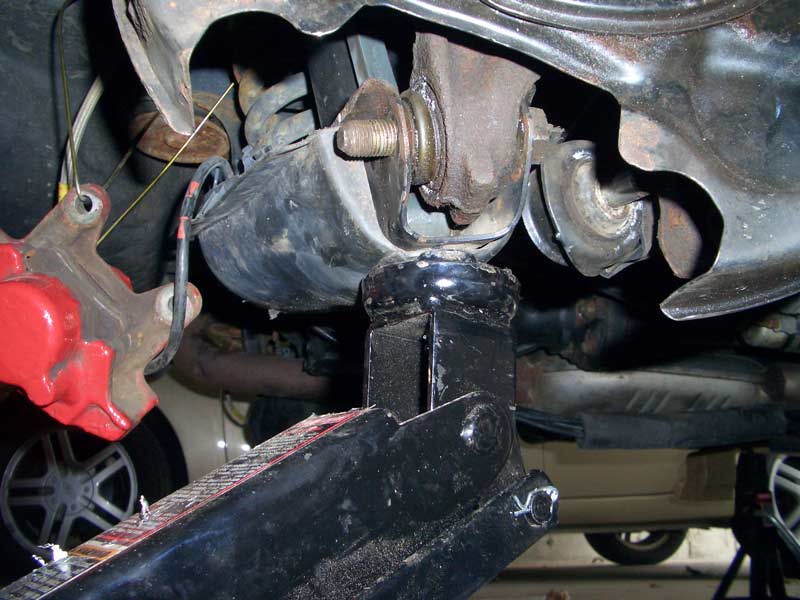
A. There are two tricky ones - the lower control arm bolt is the biggest and I had to use a punch (aka a 3/8ths drive extension) to pound it out all the way - even after I jacked the LCA up a bit to relieve the pressure on the bolt.
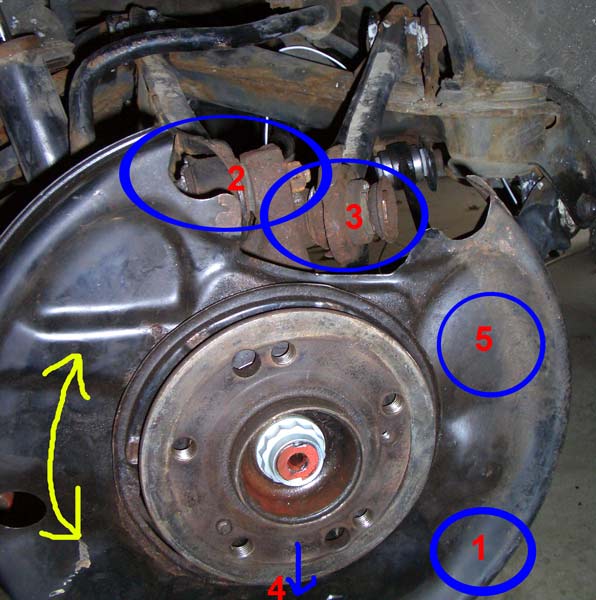
I labeled the order I took them off - but this isn't really important. Note that you have to rotate the dust shield.
B. The tie-rod or control arm stabilizer on the right gave me a little trouble - loosen the nut but leave this until the last thing so that you can maneuver the wheel carrier to get it off the bolt.
IX. With once you've got all the stuff off you just need to pull the wheel carrier off of the axle splined shaft. I removed the axle earlier because I was changing my differential at the same time - so I can't comment on any procedure here. To get the axle shaft out (with the diff end removed) I had an assistant tap the spline through the carrier (again with that cheap 3/8ths drive extension)
X. With the carrier removed you've got a big hunk of machined metal. I took it to an auto-parts store with a machine shop and they pressed the old bearing out and the new one in for ~$50.
Good luck - any tips/comments from the experienced techs? Did I forget anything important?
I'm sure this isn't the most efficient procedure - it took me maybe 4 - 5 hours with reassembly, learning as I went. The parking brake reassembly was a pain getting the springs back on and in the right place (BTW I also replaced the parking brake because I originally concluded that this was the source of my rear end noise).
Notes on Rust: I used "Liquid Wrench" to soak each nut, bolt, thread - then I scraped as much rust as I could off them with a flat head screw driver (including the threads of the bolts). I repeated this process, fitting my socket or wrench each time, until I got a satisfactory tight fit on the bolt and nut. By doing this I didn't have any trouble stripping bolts and was surprised by how easily things came apart.
Discussion of this DIY can be found here.
-skiier3_9
CategoryDiy