

|
|
|
|
|
|
#1
 07-18-2008, 02:59 AM
|
||||
|
||||
|
DIY 1996-97 W210 Ignition Switch R&R
This DIY was made during the replacement of the ignition switch in our 1996 E300D. It may also apply to the other 1996 and 1997 W210 cars. Parts of the procedure, specifically the removal of the driver's under-dash panel, may apply to the 1998-99 W210 cars. These later cars have a different form of ignition switch that is much harder for the individual to R&R due to the fact that they are electronic modules that must be programmed for the car into which they are being installed.
This is a rather long DIY owing to my love of reading my own writing. For those who lack the patience to tolerate my verbosity, just look at the pictures.  Part 1: Removing the driver's under-dash panel. This operation is necessary to R&R the ignition switch as well as the many other goodies that hide under the dash on the driver's side. Before I began this job, I searched this and other forums and asked for pictures and instructions. Several people were kind enough to share their cache of information with me. Although I learned quite a bit by reviewing these contributions, it soon became clear that much of the information was (at least) misleading or (worse) wrong. As I figured out what was really the correct procedure for my car, I took the notes and pictures that resulted in this DIY. To make as much room for yourself as possible, put the driver's seat as far back as it will go and extend the steering column all the way out and up. You can disconnect the battery at this point although it is not really necessary (do you know about the plastic panel, behind which is a negative cable connection, so you don't have to remove the rear seat?). The first picture shows the six fasteners that must be removed before the driver's under-dash panel will come out. The panel is reinforced with sharp-edged sheet metal. Later pictures will show what happens if you do not get all the fasteners out.  Fasteners #1 and #5 are simply screws. Fastener #3 is a plastic nut. Use a pry tool and a screwdriver as shown in the next photo to remove it.  Fastener #4 holds the under-dash heat vent. Turn it 90 degrees counter-clockwise and remove the vent by pulling it out at one end as the pictures show.  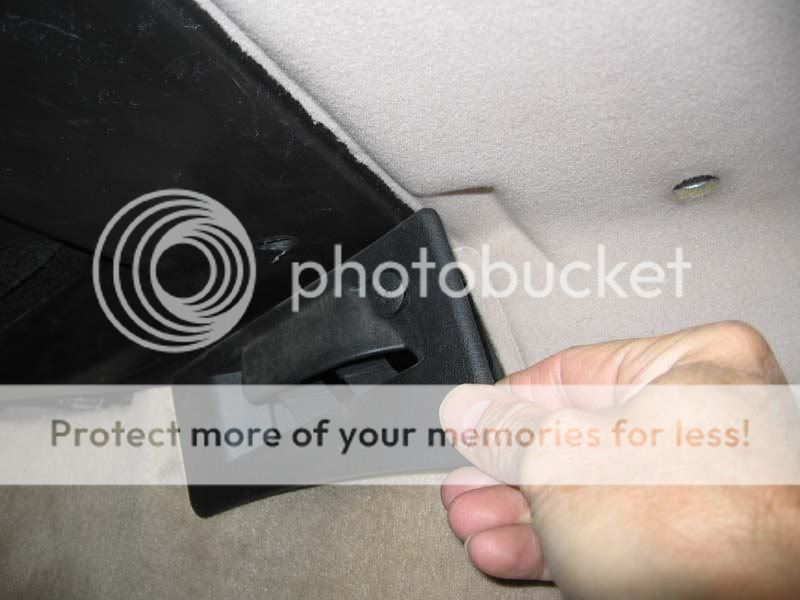 Fastener #2 holds the hood release and is hard to see -- it should have been designed to be on the other side of the lever. With the screw out, the hood release will pull down out of the panel. Using two hands, operate the lever to pop the hood open and leave the lever bent, so that you can remove the cable from the plastic parts. You will see how to do it once you get the lever into your hands. The cable can be left dangling through the hole in the panel. Don't try to remove the OBD-II connector at this time -- we'll get it after the panel comes loose.   Fastener #6 requires an 8mm socket on a fairly long extension. It is hidden up inside the panel and must be removed before the panel will come off. You must operate by feel. A magnetic socket would be nice.  The panel is reinforced with sharp-edged sheet metal. My failure to discover fastener #6 lead me to pull down hard on the front edges of the panel, trying to get it to come free. This resulted in two badly-cut finger tips. The pictures shows my left hand after several days of healing. Learn from my mistake, people!   With all of the fasteners out, removal of the panel is now simply a job of releasing all of the hidden clips, hooks, and hangers along the edges. The next four pictures show all of them.     Now the panel will drop down so you can get at the OBD-II connector. Leaving the plastic frame screwed to the panel, push the release clip shown in the next picture to the right (red arrow). Comment: I use a Red Arrow to honor my Canadian friends. This will release the cable and the connector, which will pop out of the frame. Leave the frame in the panel and the cable dangling (along with the hood release cable) and carefully remove the panel from the car. You are now ready to operate under the dash.  To re-install, simply reverse the removal procedure. Put the panel back in the footwell and replace the OBD-II cable, then thread the hood release cable through its hole. If you are concerned about it getting loose and going up through the hole, just put the lever back on the cable so it blocks any attempt of the cable to escape. It will take some wiggling to get all of the hooks and snaps that hold the panel to the frame of the dash to connect. Work gently and patiently until the panel is back in place, smacking the reluctant places with a fist (especially the plastic hooks under the steering column). [to be continued]
__________________
 "Buster" in the '95 Our all-Diesel family 1996 E300D (W210) . .338,000 miles Wife's car 2005 E320 CDI . . 113,000 miles My car Santa Rosa population 176,762 (2022) Total. . . . . . . . . . . . 627,762 "Oh lord won't you buy me a Mercedes Benz." -- Janis Joplin, October 1, 1970 
|
|
#2
07-18-2008, 08:23 PM
|
||||
|
||||
|
Great thread! I was always afraid to remove my bottom console as it's on there very solidly if you don't know how to properly get at it.
|
 |
| Bookmarks |
|
|


 Linear Mode


