

|
|
|
|
|
|
#46
 03-02-2015, 12:53 AM
|
||||
|
||||
|
Nice
Quote:
 .
__________________
ASE Master Mechanic asemastermechanic@juno.com Prototype R&D/testing: Thermal & Aerodynamic System Engineering (TASE) Senior vehicle instrumentation technician. Noise Vibration and Harshness (NVH). Dynamometer. Heat exchanger durability. HV-A/C Climate Control. Vehicle build. Fleet Durability Technical Quality Auditor. Automotive Technical Writer 1985 300SD 1983 300D 1984 190D 2003 Volvo V70 2002 Honda Civic https://www.boldegoist.com/ 
|
|
#47
03-02-2015, 07:32 AM
|
||||
|
||||
|
Quote:
__________________
John HAUL AWAY, OR CRUSHED CARS!!! HELP ME keep the cars out of the crusher! A/C Thread "as I ride with my a/c on... I have fond memories of sweaty oily saturdays and spewing R12 into the air. THANKS for all you do! My drivers: 1987 190D 2.5Turbo 1987 190D 2.5Turbo 1987 190D 2.5-5SPEED!!!  1987 300TD 1987 300TD 1994GMC 2500 6.5Turbo truck... I had to put the ladder somewhere!
|
|
#48
03-02-2015, 11:42 AM
|
|||
|
|||
|
I guess that's a NO NO and something I need to sand out easily. When taking it apart I couldn't tell for the bushing pockets where black from either the original bushing wear or sub frame paint. Let me know ?
Greg Last edited by steeleygreg; 03-02-2015 at 12:31 PM.
|
|
#49
03-02-2015, 01:44 PM
|
||||
|
||||
|
Answer
Quote:
.
__________________
ASE Master Mechanic asemastermechanic@juno.com Prototype R&D/testing: Thermal & Aerodynamic System Engineering (TASE) Senior vehicle instrumentation technician. Noise Vibration and Harshness (NVH). Dynamometer. Heat exchanger durability. HV-A/C Climate Control. Vehicle build. Fleet Durability Technical Quality Auditor. Automotive Technical Writer 1985 300SD 1983 300D 1984 190D 2003 Volvo V70 2002 Honda Civic https://www.boldegoist.com/
|
|
#50
03-30-2015, 08:17 AM
|
|||
|
|||
|
Ran into a difficulty and looking for advice! Installing the sub frame bushings went fine for the first one, but problems with the second.
The bushing goes in and stops approx 1/4 of an inch from bottoming out and becoming fully seated. What could be causing this ? Only idea I have is I painted the bushing cavity with to much paint which would restrict movement.  Any other ideas ? Any other ideas ?Greg
|
|
#51
03-30-2015, 10:49 AM
|
|||
|
|||
|
Did you lube the bushing before installation? It sounds like friction is keeping it from seating. The paint would have to be very thick to cause 1/4" clearance issue.
__________________
Sam 84 300SD 350K+ miles ( Blue Belle )
|
|
#52
03-30-2015, 11:02 AM
|
|||
|
|||
|
Yes, I used the slyd-glide product both in the bushing cavity as well as the bushing. Using a 4 1/2 PVC pipe coupler which fits the bushing edges perfectly. 5/8 althread rod with a board on top of the coupler so as to apply even pressure, while pulling down into the bushing cavity.
|
|
#53
01-11-2016, 06:16 PM
|
|||
|
|||
|
Ok, it's been awhile but I'm finally able to work on getting the rear end installed back into this car. Since this car has been drying out a figured it's time to address a few body issues. I'll do a separate write up on this in the body section, but here I've got a general question, ie before I go screwing something up.
In the below pic there is rust damage showing above this exterior body panel. I can address the rust, which will be in the other thread, but what is the best way to remove these panels ? Do they pop out like those on the 123's with one of those plastic body tools from HF ? Once popped off for repair will the fastener need to be replaced also.
|
|
#54
01-12-2016, 03:12 AM
|
||||
|
||||
|
Side cladding data
W126 exterior door cladding
(173) GARNISH MOULDING RIGHT MB# 1266980880 (173) GARNISH MOULDING LEFT MB# 1266980780 (167) PANELLING RIGHT BOTTOM REAR FENDER MB# 12669028407174 (167) PANELLING REAR FENDER LEFT BOTTOM MB# 12669027407174 (124) FASTENER BUTTON PANELLING TO REAR DOOR PLANKING x6 MB# 1269880181 (110) GARNISH MOULDING RIGHT MB# 1266980680 (110) GARNISH MOULDING LEFT MB# 1266980580 (104) PANELLING REAR DOOR RIGHT BOTTOM MB# 12669026407174 (104) PANELLING REAR DOOR LEFT BOTTOM MB# 12669025407174 (101) EDGING PANELLING TO FRONT DOOR PLANKING x2 MB# 1266980358 (95) EDGING PANELLING TO FRONT DOOR PLANKING x2 MB# 1266980558 (92) EDGING PANELLING TO FRONT DOOR PLANKING x4 MB# 1266980058 (89) NUT MB# 1239901750 x4 (86) FASTENER BUTTON PANELLING TO FRONT DOOR PLANKING x16 MB# 0019887681 (71) CLIP PANELLING TO FRONT DOOR PLANKING x4 MB# 1269885078 (50) SCREW PANELLING TO FRONT DOOR PLANKING x2 MB# 1269900033 (47) CLIP PANELLING TO FRONT DOOR PLANKING x4 MB# 1269880278 (44) GARNISH MOULDING RIGHT MB# 1266980480 (44) GARNISH MOULDING LEFT MB# 1266980380 (35) EDGING PANELLING TO FRONT FENDER x8 MB# 1266980158 (32) FASTENER BUTTON PANELLING TO FRONT FENDER x26 MB# 0019883481 (30) FASTENER BUTTON PANELLING TO FRONT FENDER x2 MB# 1269880581 (26) CLIP UPPER PART x20 MB# 0059889778 (17) CLIP PANELLING TO FRONT FENDER x8 MB# 1269880378 (11) GARNISH MOULDING RIGHT MB# 1266980280 (11) GARNISH MOULDING LEFT MB# 1266980180 (38) PANELLING FRONT DOOR RIGHT BOTTOM MB# 12669024407174 (38) PANELLING FRONT DOOR LEFT BOTTOM MB# 12669023407174 (5) PANELLING RIGHT BOTTOM FRONT FENDER MB# 12669022407174 (5) PANELLING FRONT FENDER LEFT BOTTOM MB# 12669021407174 . . 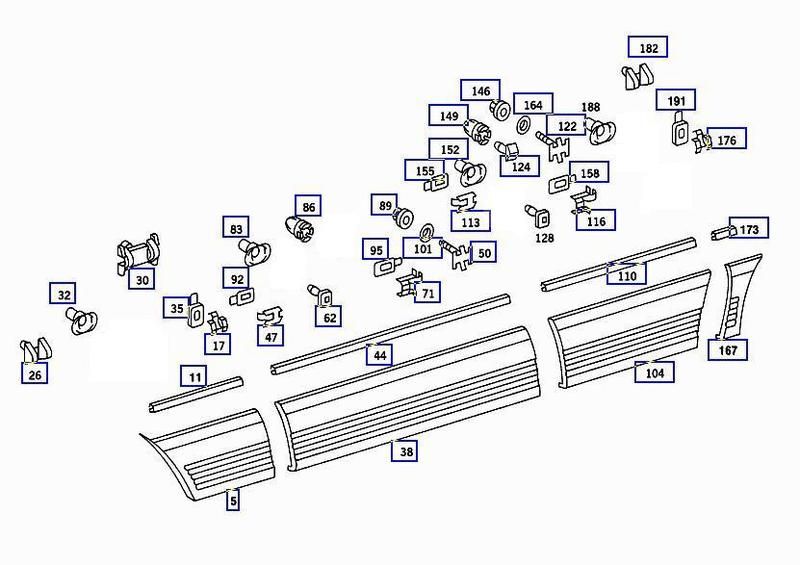 .
|
|
#55
05-08-2016, 11:17 AM
|
|||
|
|||
|
Ok, it has been awhile since I've been able to work on this project. Currently I have the differential mounted to the subframe and the axles are repaired and installed. Can someone supply me the torque spec's for the differential to the subframe and rear differential cover bolt spec's.
Thanks Greg
|
|
#56
05-08-2016, 12:36 PM
|
|||
|
|||
|
Greg,
Looks like you've been working on this for a while! It took me two months to do my rear end and I thought that was a long time. The diff mount to the back of the differential is 120Nm The diff mount to the subframe is 30Nm The back cover of the diff goes on at 45Nm. Jeff
__________________
1984 300SD 300,000 miles--two tank WVO setup 2.88 diff & 500SEL anti-squat rear end
|
 |
| Bookmarks |
|
|


 Linear Mode


