

|
|
|
|
|
|
#1
 10-19-2010, 10:21 AM
|
||||
|
||||
|
Rostra Cruise Wiring diagram
I finally decided to put the MB cruise to rest. It flaked out on me one to many times and after much testing (following GDL's site), I found that both my actuator was worn out and my amp was fried. To avoid the expense of replacing both, I picked up a Rostra electronic unit. I basically have the thing installed and ready to go and I have read several install threads here on the Audiovox Vacuum unit. BUT, the wiring for this one is a little different.
If anyone can point me in the right direction.... I would sincerely appreciate it. I do not want to screw up the wiring in the car or the new unit. The wiring diagram is below. The only wires I am having an issue with are the Red "Brake Hot", the Red/Brown and the Brown. Where am I putting these wires on the old cruise amp plug to utilize the factory stalk? Or do I need to wire the Red and Red/Brown directly into the 5 prong stalk plug. It looks to me like the Red "Brake Hot" wire needs to go directly to the brake switch that always has 12V. But then that wire needs to go to the somewhere? It looks like that maybe the Red is the for the "on" function and the Red/Brown is for the "off" function. The Brown is obviously the accessory wire. I'm not really sure where to put that wire either. I'm trying to utilize as much of the old cruise amp plug as possible. I understand this about the cruise amp plug (From GDL's site): Pin 8 gets the Violet wire (12 brake cold). Pin 11 gets the Grey wire (VSS). Pin 2 gets the Green wire (Set/Coast). Pin 4 gets the Yellow wire (Resume/Accel). Maybe the Red/Brown goes to pin 3? Maybe the Brown goes to pin 1? Red I'm not sure what to do with? 
__________________
AJ 1985 300D (SOLD) 

|
|
#2
10-19-2010, 12:13 PM
|
||||
|
||||
|
Ok guys... Thanks for the replys via PM. I got everything sorted except the Red, Red/Brown, Brown and how to wire them up.
Here is where I am at (below). The little white 4 prong plug on the harness contains 4 wires. Red, Red/Brown, Green and Yellow. This is the plug that would plug into the Rostra switch. But, I am using the MB stalk and trying to figure out how to wire it up. I have 2 wires left to deal with in order to get rid of that little plug. One is the Red and the other is the Red/Brown. I already have the Green and Yellow soldered in place along with the Grey VSS wire and the Purple brake wire. After looking at it more it looks like I am going to put the Brown (accessory power) on Pin #1 on the blue cruise amp. Does that look right? Here is the harness with the wires removed from the car. The small round 4 prong plugs to the left, plug into the cruise unit. The others are either soldered onto the Blue cruise amp plug or I am still dealing with them. As you can see, the Red and Red/Brown are still in the Rostra plug and I need to figure out where they will go. EDIT: Here is what I am thinking now. Take power from the "hot side" of the brake switch and run the Red wire to the MB stalk 5 pin connector and tie it into the Red/Yellow there. Then take the Red/Brown and put it on Pin #3 of the Cruise amp plug and leave the Brown on Pin #1 on the cruise amp plug. Still not sure...  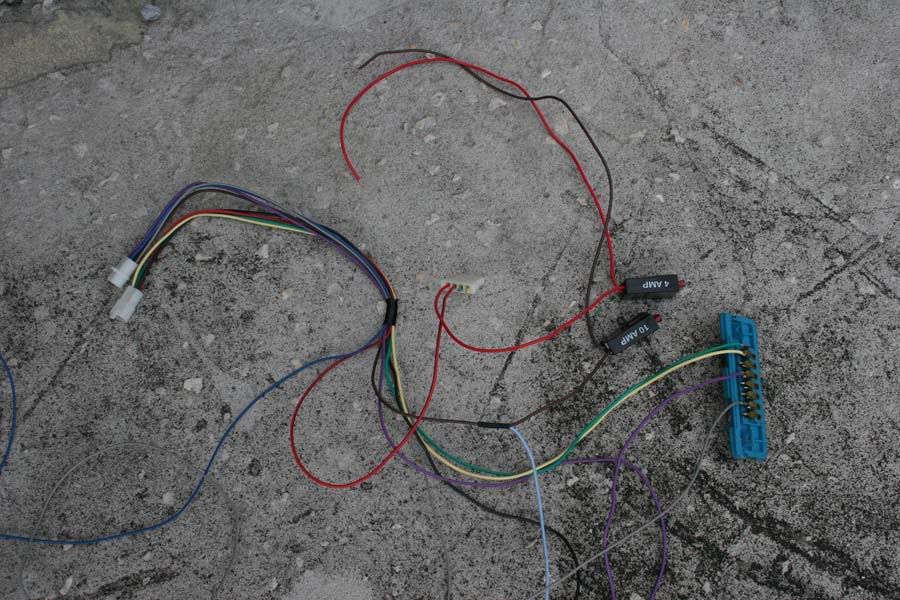 Here is what I have soldered up so far: 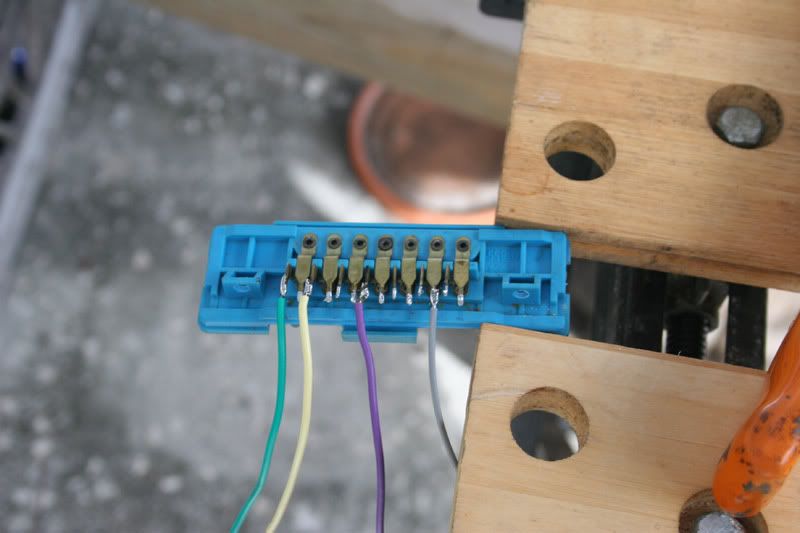 Here is the Rostra diagram again:
__________________
AJ 1985 300D (SOLD)
Last edited by snookwhaler; 10-19-2010 at 01:17 PM.
|
|
#3
10-19-2010, 06:08 PM
|
||||
|
||||
|
Well..... I got it done on my own.
 This thing works fantastic!! This thing works fantastic!!Many thanks to 81Wagon for his support. I was about ready to throw in the towel. But, between his PM's his threads and some others that have made the switch... It was not too bad. GDL's website came in handy for knowing exactly what all the pins do and where those wires go. I trashed the old cruise amp guts and used the plug for the wires listed below and then I used the housing as a place to store all the excess wire. It looks factory if you pull the drivers kick panel! Here is what I wound up doing on the Cruise amp plug "pin out". This is wired as an "Open Circuit". Again this is NOT a vacuum cruise control. This is an ELECTRONIC Rostra Global Cruise system. Rostra PN 250-1223. Pin #1 Brown wire (switched power) Pin #2 Green wire (on/set/coast) Pin #3 Red/Brown wire (off) Pin #4 Yellow wire (on/resume/accel) Pin #8 Violet wire (cold side of brakes +12 volts when brake pedal is pressed) Pin #11 Grey wire (VSS wire, set to 8,000 PPM) The only problem I had was the Red 4amp fused wire. The only way I could get the system to work was to take power from the hot side of the brake switch and run that directly to the stalk. I did this by removing female Pin #2 for the stalk and soldering the other end of the Red wire there. There are 2 wires that go to Pin #2 for the stalk and they must also stay together so that Pin #1 on the cruise amp plug still has switched power. We have to drive over 300 miles tomorrow. So, I will report back on the performance. I will probably need to adjust the gain for the hills and over passes too. But, on my little 20 minute drive it worked great!! Here is the under hood pic and the connection: 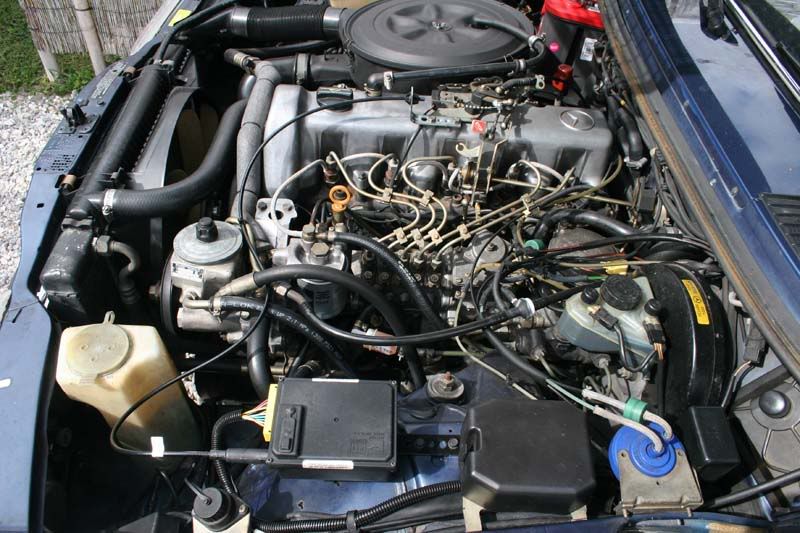 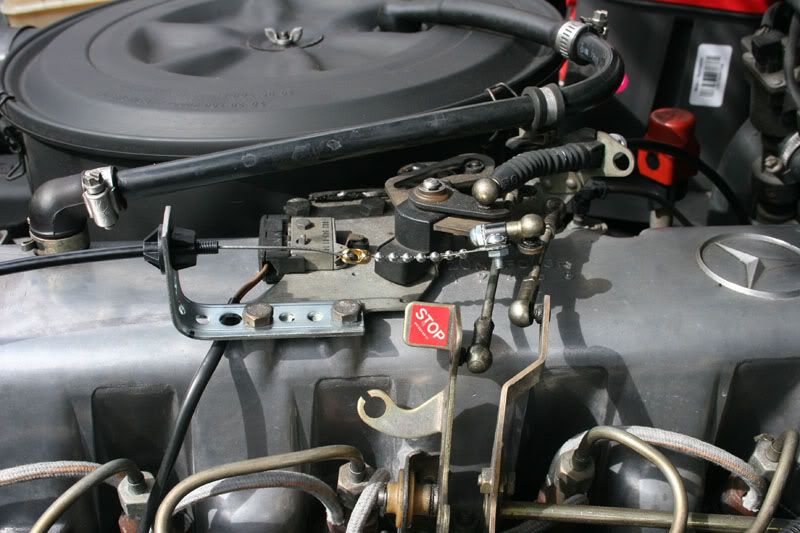
__________________
AJ 1985 300D (SOLD)
|
|
#4
10-19-2010, 09:09 PM
|
||||
|
||||
|
Not too long ago i did the Rostra electronic unit on my 87 wagon, i never did find a place for the red wire with the 4 amp fuse,left i off and the cruise works fine. used original stalk and the only difference i see is down to set rather than up.a little trial & error with the dip switches and its working good. i called them with a question on the dip switch settings as its not real clear in the manual and they were very helpful.
Don
__________________
Red Green "This is only temporary,Unless it works!" 97 E300D 157000 miles 87 300TD ?141k? miles
|
|
#5
10-20-2010, 07:50 PM
|
||||
|
||||
|
Quote:
I wired it up to the factory stalk and used as much of the factory harness as possible to include the cruise amp housing. It is a VERY clean install. BTW... We drove over 300 miles today all over central Florida. This thing works great!! Going up or down hills, bridges or over passes it never gained or lost more than 1 MPH. I am really shocked at the performance.  We were cruising between 68 and 72 MPH. We were cruising between 68 and 72 MPH.I'll post some more pics of the set up and the dip switch settings when I get the time. EDIT: One more thing about those 300+ miles. I usually get around 22-23 MPG on that trip with on a tank mixed with B99 and #2. With the same blend using the cruise the entire trip I got 26.5 MPG! It has been over a year since I have seen those kind of #'s. I rarely got over 25 MPG then and only saw 27 MPG occasionally but going much slower (less than 65 MPH).
__________________
AJ 1985 300D (SOLD)
Last edited by snookwhaler; 10-21-2010 at 03:07 PM.
|
|
#6
10-21-2010, 08:16 PM
|
||||
|
||||
|
Snookwhaler
Just curious what did you connect the red wire with the 4 amp fuse to? I dont remember fooling with the diagnostics but if i ever need to it would be nice to know what i need that red wire connected to. TIA Don
__________________
Red Green "This is only temporary,Unless it works!" 97 E300D 157000 miles 87 300TD ?141k? miles
|
|
#7
10-21-2010, 10:53 PM
|
||||
|
||||
|
I'm going to modify this thread and put up a lot more pictures. Hopefully on Saturday. I put another 200 miles on the car today. 150 more tomorrow and then 300 again on Sunday.
I want to drop the drivers kick panel again on Saturday. When I do, I will take pictures and post more info. to include the dip switch settings. On my car, the "bottom" Pin on the brake switch was the "HOT" side. I pulled the plug off, took the plug apart (it unsnaps) and soldered one end of the 4 amp fused Red wire to this Pin. I put this pin back in the plug, put the plug back together (it snaps back together) and plugged it back onto the brake switch. Then, I disconnected the the 6 pin plug (only 5 of the pins are used) from the Cruise Amp bracket (You slide the plug to get it out of the bracket). This plug has 2 sides, Male and Female. On the Female end of that plug I unsnapped the back of that plug and removed Pin #2. There are 2 wires that go to this Pin and form a loop. These are the Red/Yellow (12v power). I removed these wires from that Pin, soldered them together and taped them up. These wires provide power to Pin #1 on the Cruise Amp plug. If they are separated, you will not have power at Pin #1 on the Cruise Amp plug. Then I soldered that 4 amp fused Red wire from the brake switch to the back of Pin #2, put the Pin back in the plug, installed the Red/Yellow wires back in the plug (laid them in the middle of the plug), snapped the back of the plug back on, Plugged the "Plugs" back together and re-installed them back into the Cruise Amp Bracket.
__________________
AJ 1985 300D (SOLD)
Last edited by snookwhaler; 10-21-2010 at 11:04 PM.
|
|
#8
10-26-2010, 09:44 AM
|
||||
|
||||
|
Quote:
Rostra Global Cruise Install Thread I just checked my mileage again. 3rd tank since the install. 27.3 MPG on this tank. I parked in the same place and used the same pump, filling it slowly. 309 miles and 11.3 gal. to fill it. I'm going to take the GPS next time to make sure my odo is not slipping. It is amazing to me that the cruise would make this much difference!!
__________________
AJ 1985 300D (SOLD)
|
 |
| Bookmarks |
|
|


 Linear Mode


