

|
|
|
|
|
|
|
|
#1
 07-23-2006, 07:29 PM
|
|||
|
|||
|
124 chassis Idle Air Hose tricks Updated with pics!
Hi Everyone!
Well, I read with interest what fun it was to change the two hoses on the Idle Air Valve..... I approached it with trepidation... but it went pretty well. Here they are... all 4 "The Usual Suspects!" 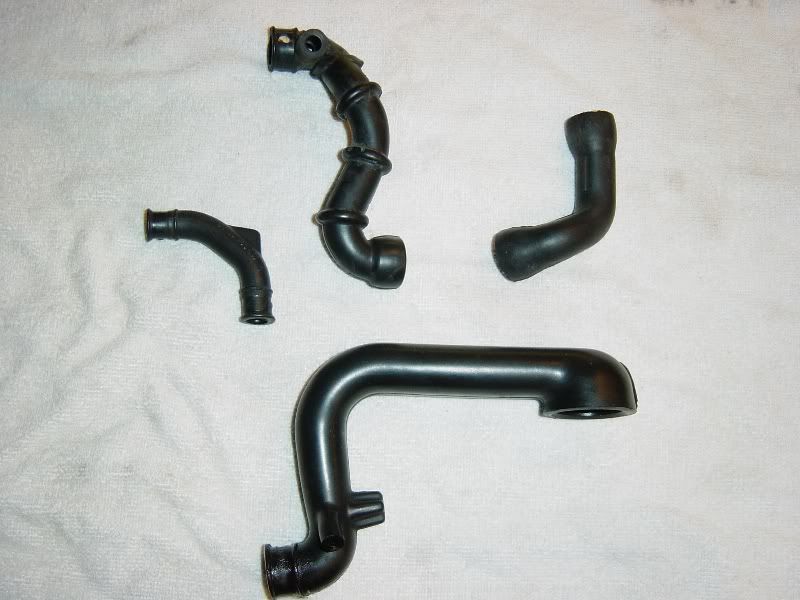 If I had know it would go so well I would have planned to do a better actual DIY write-up with pics instead of an afterthought! The small one on the left was cake.. as was the one on the lower of the pic... Here is what we did... son and I. 1/ Place new hoses in the sun, to warm and soften them.... those in colder climates... maybe a pan of hot water? 2/ Disconnect Battery. 3/ Take off the airfilter assembly. 4/ Remove Idle Air Valve electrical connection and remove the two 10mm bolts. 5/ Twist Valve to release the two hoses.... ours were stuck well... it took a few minutes to release them. Here they are... 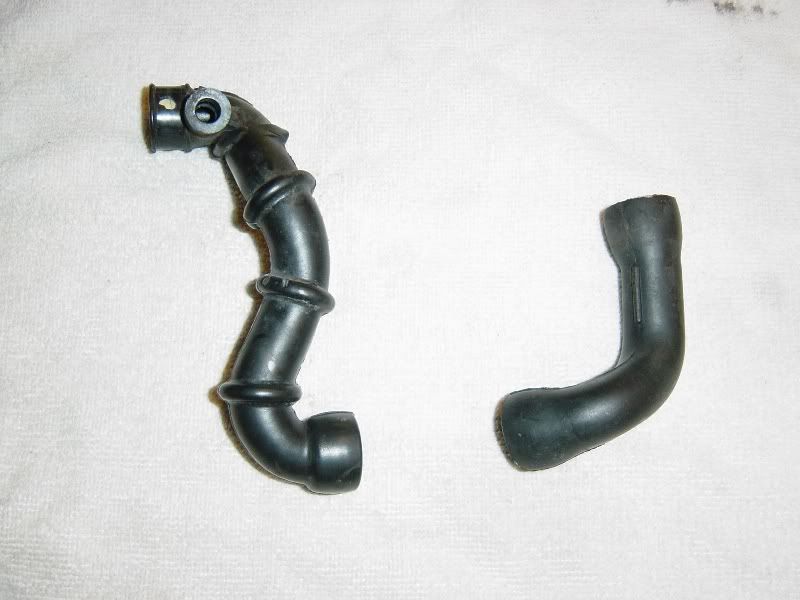 6/Remove right hand side hose by twisting... I had to get pliers on it to get it off! 7/ Remove the injector from above the other hose by removing the two Allen screws... careful that you dont drop them.... Dont ask... Then CAREFULLY bend the injector pipe and injector out of the way... Did I say BE GENTLE? 8/ Using a long flat screwdriver... pry the hose off its barb, I had to pry against the inlet manifold to push it off.... Ours was stuck good, even when it was off the barb, its so tight for space there, we had to push the hose DOWN into the area below the inlet manifold to get it out... the old pipe was very stiff tho, so maybe that was why. 9/ Here goes the tricky bit... First we sprayed the end of the new hose with Rubber protectorant, as a lube. Then we put on the original clamp with the tabs facing up.. 10/ Wiggle the new hose down into place... we had to use the flat screwdriver to push it down into the gap and in position... took us two attempts... first time the clamp came off and we lost it for 10 mins!  11/ Once the hose with clamp is in position... Insert a larger diameter blunt crosshead screwdriver into the injection valve hole. Like this.... 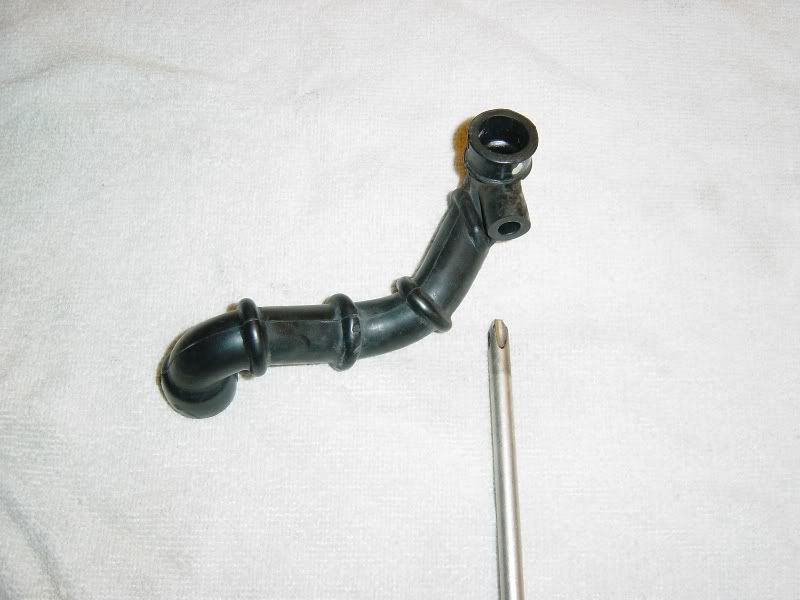 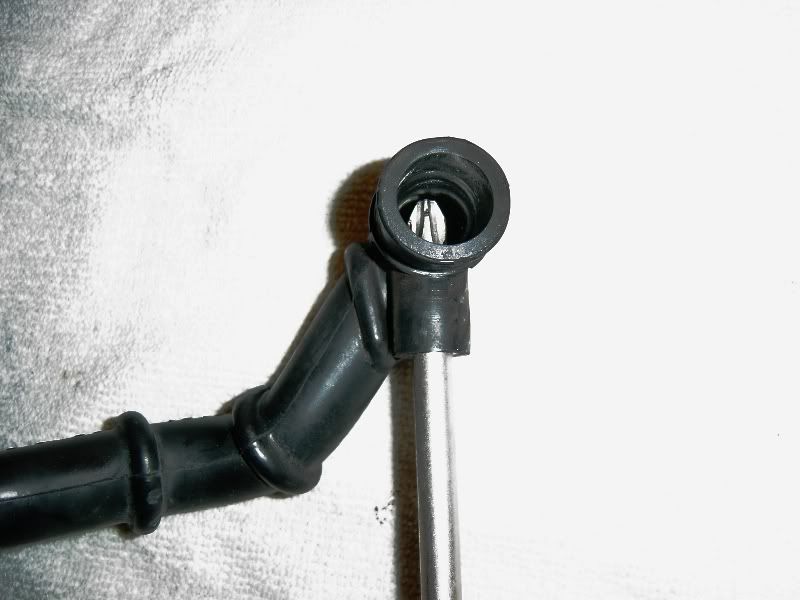 Then I used the screwdriver to apply sideways pressure to the hose... pushing it onto the barb, and it popped on, second attempt! We could not believe it! 11/ We did adjust the clamp and make sure it was good, by opening and releasing it, letting it find its own position again... The whole hose replacement took two of us about 30 mins... I think the fact that we lubed the hose plus the heated softed rubber made a big difference. Hope this helps someone!
__________________
2009 Mercedes ML320 Bluetec Last edited by Merkey; 07-24-2006 at 02:20 AM. 
|
|
#7
06-08-2007, 11:48 AM
|
|||
|
|||
|
I've read this thread with interest, having previously replaced the small ICV breather hose with some difficulty ( but I've been afraid to tackle the long one). Do either of you have any tricks for attaching the shorter hose? When I did mine the second time, when i pulled on the hose to remove it it came out attached to the plastic barb, and I discovered it was much easier to attach the hose to the barb outside the car and then put the barb, with hose attached, into its hole. Thanks.
__________________
87 300e (white/black; amg body kit) 88 300ce (red/cream; amg body kit) 93 300ce cabrio (white/blue/blue top) 93 300ce cabrio (black/grey/black top) 98 ml 320 (totaled @ 137,000 miles) 99 clk320 (black/grey/black top)
|
|
#8
06-08-2007, 09:25 PM
|
|||
|
|||
|
Richard,
I was worried about the long one too, and it was not that bad, tricky, but with patience and the trick I showed, it worked for us. I will be honest I dont remember the short one being any problem apart from removing it. Just old and firmly stuck to its barbs.
__________________
2009 Mercedes ML320 Bluetec
|
|
#9
06-09-2007, 02:11 PM
|
|||
|
|||
|
did you work only from above, or did you install the lower end from underneath? thanks.
__________________
87 300e (white/black; amg body kit) 88 300ce (red/cream; amg body kit) 93 300ce cabrio (white/blue/blue top) 93 300ce cabrio (black/grey/black top) 98 ml 320 (totaled @ 137,000 miles) 99 clk320 (black/grey/black top)
|
|
#10
06-13-2007, 05:47 PM
|
|||
|
|||
|
I made my second attempt at the hoses today. I was stymied by the allen screws holding the cold start injector, then the barb for the smaller of the two idle hoses chipped a piece. I gave up for today.
Is there any wisdom in tilting the fuel distributor up? It looks like it is held in by 3 nuts and a rubber fitting at the throttle plate (which I would love to replace anyway).
|
 |
| Bookmarks |
|
|


 Hybrid Mode


