Part 2 of 2 (split due to forum post length limit)
The giant nut from the top of the jack contains an o-ring that you should remove. Then you must somehow attach a threaded fitting to the top of the jack nut. I used a 1 NPT male to ¾ NPT female reducer and had it welded. You might be able to tap the top of the jack nut and thread in a fitting, but the metal isnt that thick and it could be tricky to get a tight seal. This joint is under a lot of pressure and needs to be secure; you will definitely need to either tap it and screw in a fitting or have it welded (real welding, not JB-Weld). Mine was welded on the outside, so just to be safe, I sealed it with a layer of JB weld on the inside (the welder warned me that sometimes tiny cracks in the weld may cause a leak so I thought the extra layer of JB weld couldnt hurt).
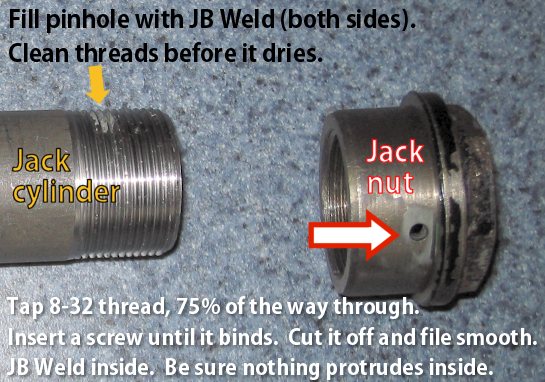
The jack nut also has a tiny hole on the side that you will need to plug. Drill the tiny hole out and tap it for 8-32 thread, but only tap it ¾ of the way through. Then, insert an 8-32 threaded screw until it binds. Cut it off and file it smooth. Seal it inside with JB Weld. Dont insert the screw so deep that it extends inside the nut, or you wont be able to reassemble the jack.
The jacks inner cylinder has a very very tiny pinhole hidden in the threads that you will need to plug. I super-cleaned it and sealed it with JB Weld inside and out. Be sure to clean up the threads before the JB Weld hardens.
Take the outer cylinder of the jack and attach some sort of supply line where you can add diesel fuel. It should have a hole in the side already, plugged with a rubber stopper. I JB-welded a PEX 90° copper plumbing fitting to the side (the fluid here is not under pressure so in this case JB weld alone is suitable).

To make a fluid reservoir, I took an old food can and JB welded another PEX fitting to the bottom. Inside the can, the PEX fitting extends up about 3/8 and I attached a piece of cloth to the top of it. This is important as it lets any debris settle to the bottom of the reservoir without risk of it being drawn into the tester. The inline fuel filter should be installed between the reservoir and the jack. Dirt is your enemy even the tiniest speck of dirt can cause the pintle in the injector to seize up.
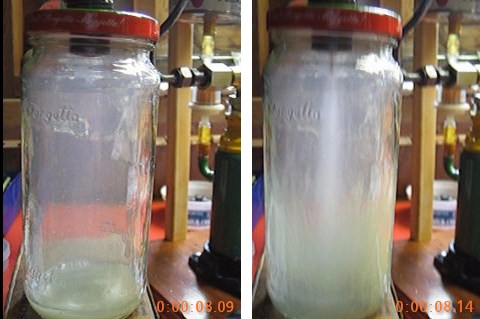
You should also prepare a jar into which the injectors can spray. I drilled out the lid of a tall glass food jar so that it would thread onto the injector. The fuel that sprays out of the tester is at extremely high pressure and can penetrate your skin and cause poisoning, so the use of the jar prevents accidental contact with the spray. In addition, the spray is so fine that you produce a fog of diesel that lingers for tens of minutes; the jar captures this so you dont inhale it. Plus, faulty injectors can spray at crazy angles, so keeping the nozzle down inside the jar makes sure you dont get an unexpected blast of diesel in your eye.
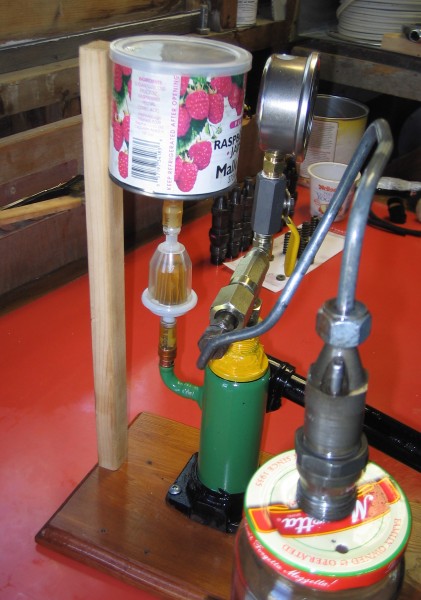
Clean everything, and put it all together as shown in the picture, using LOTS of teflon tape on every threaded fitting, particularly on the VW fitting where it connects to the #6 ORB fitting, and the top of the jack cylinder where the jack nut screws on.
Before you begin testing, fill the reservoir with diesel, and pump the jack handle. You should not have an injector installed at this time. Pump until ~1/2 cup of fuel has been run through the system, to ensure that any dirt has been flushed out.
I initially tried testing injectors with something other than diesel (e.g. canola oil), but the injectors respond much differently to vegetable oil they just spray a solid stream and dribble. Since the car runs on diesel, testing the injectors with diesel seemed to be the best way to simulate how they work when theyre in the car.
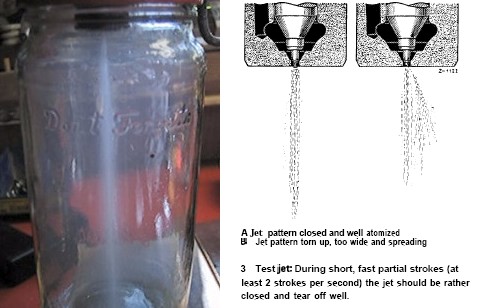
Note that the two pictures below are taken approximately 1/20th of a second apart.
If you have Bosch DN 0 SD 240 nozzles with the hole-type pintle, an initial jet sprays out the hole in the pintle prior to the actual spray if you have these nozzles and see this jet, it isnt a sign of a malfunctioning injector! This can sometimes be hard to test for; I found it worked well to build the pressure really slowly and carefully this lets you see the initial jet before the pressure gets high enough that the injector pops.
The valve on the tester was intended for disconnecting the gauge during rapid pumping so it doesnt get damaged by banging around with wild pressure changes. I put it in because the tester in the Mercedes factory service manual had one. But, after building the tester, I dont think it is really necessary (and at $17, the most expensive item in the parts list). The bottle jack tester holds pressure so well that the needle doesnt fly around even during rapid testing it just wiggles right near the injectors pop pressure. Once you stop pumping, the pressure holds just a hair below the injectors pop pressure (it gradually declines over a time period of a minute). If your tester is leakier then maybe you need the gauge
With the tester, I was able to get all of my injectors balanced to within 1.5 bar. They were 4.5 bar apart before adjustment.