In GIMP I started by cutting and pasting the aftermarket gauge face into the area where I wanted it. Then I did an elliptical select of the new gauge marking area. It's easiest if you have your selection start from the center (one of the options when you choose elliptical selection). I then rotated my selection until the "0" was where I wanted it, and anchored that back down to the main layer.
Next you'll do a magic wand selection and adjust the threshold until its clearly grabbing the meter markings and numbering. Then select all the tick marks and numbers by holding shift and magic wand clicking each color region. Don't forget the interiors of 0's and 4's and such. You can also use Ctrl to subtract selection to make things easier. Use the freehand selection (lasso) to correct any misselection automatically done by the magic wand. Again, Ctrl and Shift to subtract or add to selection.
Once you have all the white regions selected, I suggest airbrush white as your scanner will probably have imparted a not-so-white tint to them. You should still have just these regions selected, so you can freely airbrush all over the gauge face and only be airbrushing the white portions, much like masking tape with spray paint.
When you're done touching up the white, inverse your selection. This now gives you the black background area. Again, make sure you have the interior colors of numbers selected as well. I chose to use the cloning brush to copy from a region of the black background to the area of the new gauge face where the color was different and the branding and labeling was. I may try doing it again airbrushing straight black to see if the color is a better match.
For the numbers I did a simple copy and paste operation. The font I used for the lettering was a Sans bold variant. I feel the letters are not as wide as the font MB/VDO used on the OE cluster. If anyone can find a closer font, I'd love to have it.
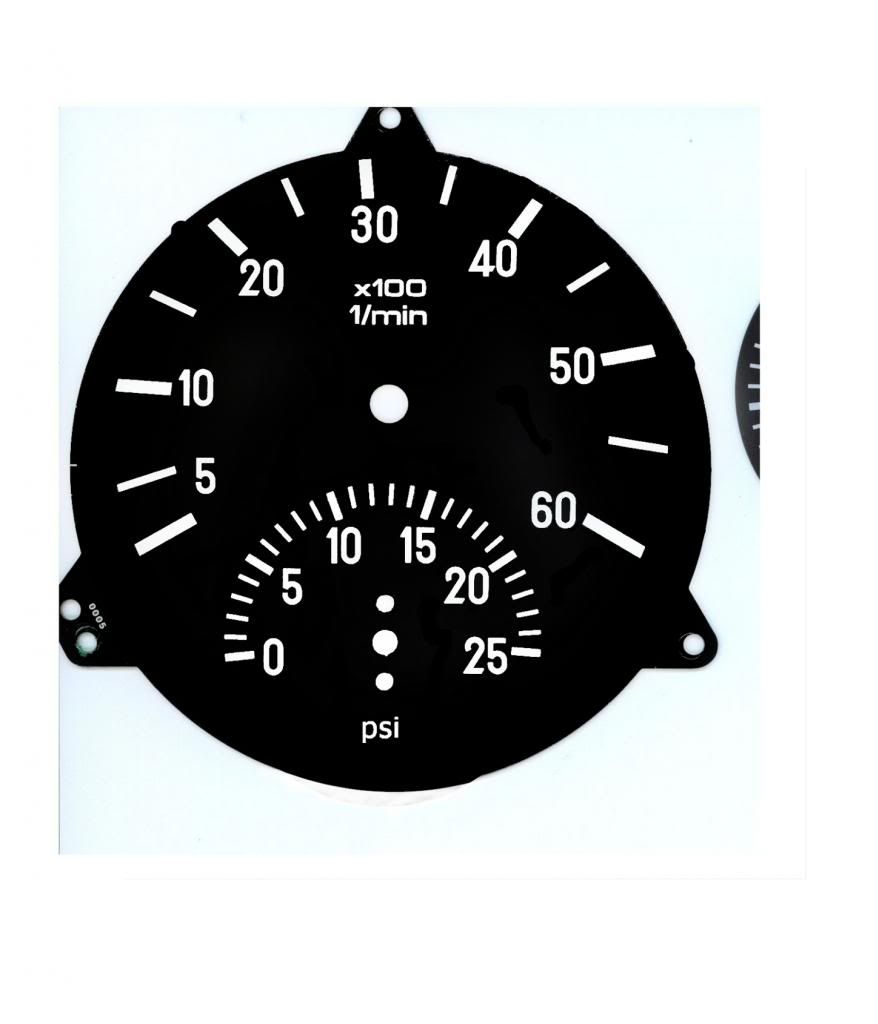
I used a Sunpro vac/boost pressure gauge that can be had at your typical auto parts store or some big box stores. IIRC it was around $30-40. I simply didn't use the vacuum section of the markings. It was a tad bit big, and I ended up bending the copper tube in the back of the gauge to get it to fit without hitting the tach's PCB thus affecting the reading. I'd recommend getting a slightly smaller gauge if anyone can find one.
Next time I have the cluster out I'll take measurements so we can determine what the biggest size is that will readily clear the tach hardware. I imagine it will be sometime this week. I want to touch up a screw head that I chipped during reassembly, and I'll probably reprint my mask and apply it again with a plastic spreader knife in order to get bubbles and wrinkles out, as well as clean the fingerprints and grease off with alcohol.
If anyone happens to use that same gauge, this same mask below ought to work for you. simply place your needle on the shaft such that it's pointing directly at 0. The white spots will tell you where to cut the paper with your razor knife for the tach needle shaft, boost needle shaft, and screw holes. The top screw will be partially going into the hole for the clock needle shaft, but it will do the job fine of keeping the gauge straight and calibrated if you use the back housing to actually do the heavy lifting as far as the mounting goes.
merge with a mod? do you mean start a thread in the mods section and merge this in? I'd be glad if you'd point me in the right direction, I haven't used this forum software much
