

|
|
|
|
|
|
#1
 10-07-2007, 06:18 PM
|
||||
|
||||
|
300TD Quarter Window Removal (w/pics)
Everywhere I found info about how to remove the quarter windows from a 300TD made it sound very hard to do. Everyone mentioned how the windows frequently break during removal unless you cut the seal.
After doing the job myself, I can say it is much easier. The windows didn't flex at all and came out very smoothly in about 10 minutes each. I think cutting the seals out would be harder to do than this way and you might cut into something you dont want to since the vacuum lines etc. run right next to the seal. They came out so easily that if I wasn't replacing the seals due to dryrot, I could have reused them. The hardest part of the job was removing the horizontal sill trim. Some of the clips pulled out due to rotted rivets. After that there were three screws that held the window trim in place. 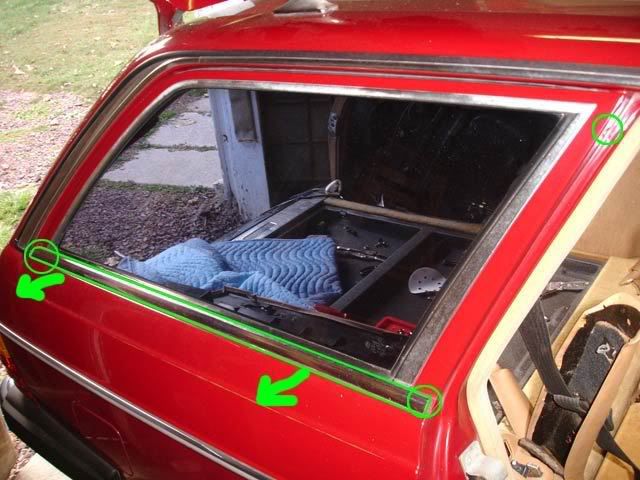 Here's a close-up of a trim clip so you can see you have to pull it straight away from the window to get it off. 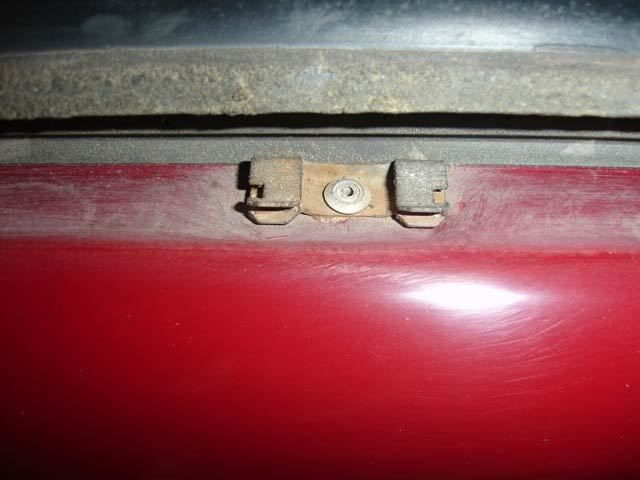 The pillar covers have to come off to access the window seal from the inside of the car. 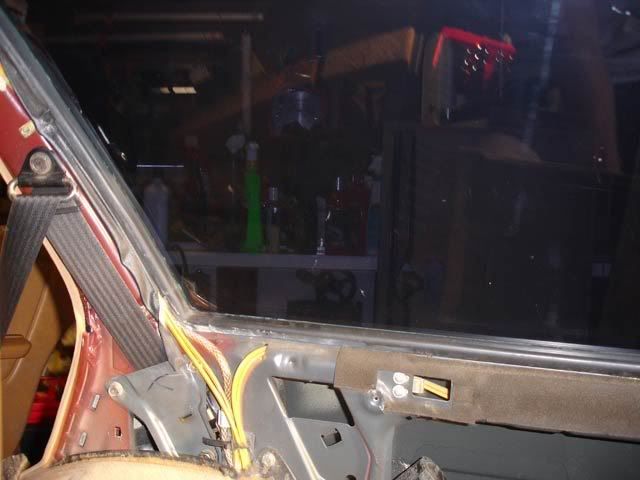 Then I used a wide scraper/pry tool and starting at the bottom began pushing the seal up and over the ridge of the window sill, reversing the action that the cord does when pulling the window into place. 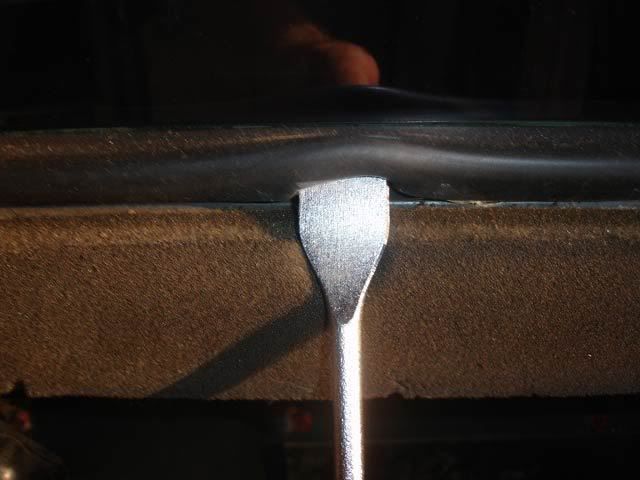 I used this tool to work the bottom edge of the seal to the corners and then finished with my hands.  After the bottom edge was rolled over the sill, I did the front vertical edge of the seal by pushing the it over the sill ridge by hand and the window was able to be pulled out and down to finish removal. 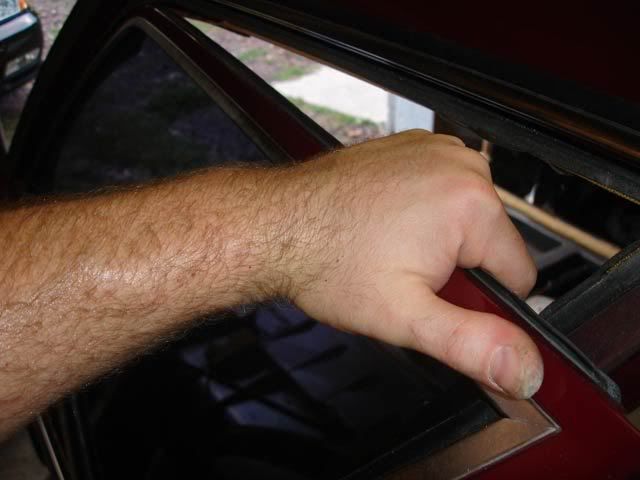 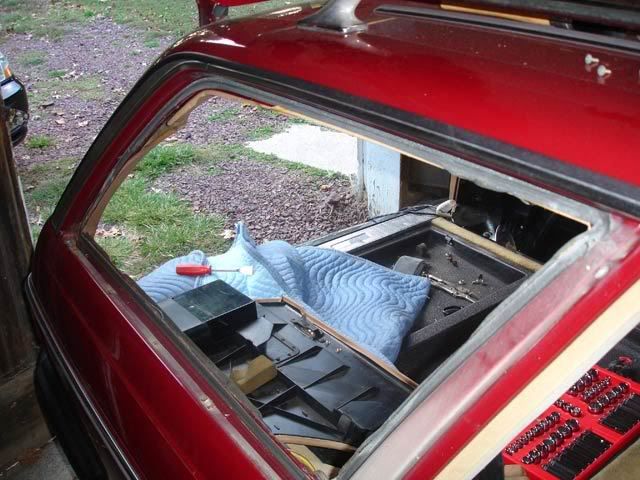 Here's where I'm keeping the windows until I'm ready to reinsert after rust repair.  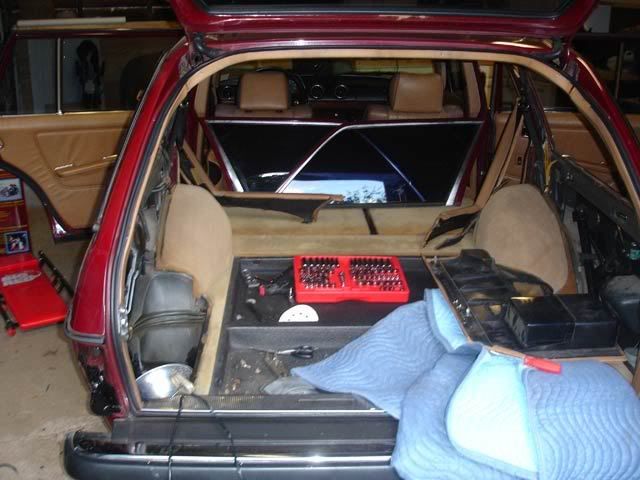
__________________
Chad 2013 Jeep Unlimited Rubicon OBK#44 "Pleasure in the job puts perfection in the work." - Aristotle (384-322 B.C.) SOLD 1985 300TD - Red Dragon 1986 300SDL - Coda 1991 - 300TE 1995 - E320 1985 300CD - Gladys 2006 Nissan Pathfinder LE 1998 Acura 3.0 CL 
|
|
#2
10-07-2007, 09:24 PM
|
|||
|
|||
|
Very nice! Thanks for the post with pics.
I need to get to that back corner rust before it becomes rot.
|
|
#3
08-13-2008, 09:00 AM
|
||||
|
||||
|
I wanted to add pics and info describing the removal of the old quarter window seal, replacement with the new seal and installing the window back in the car.
Here it is: Here is the window removed from the car and ready to begin:  The trim piece pulls off by hand like a zip lock closure. Take note of the ridge in the seal that the trim "clamps" to: 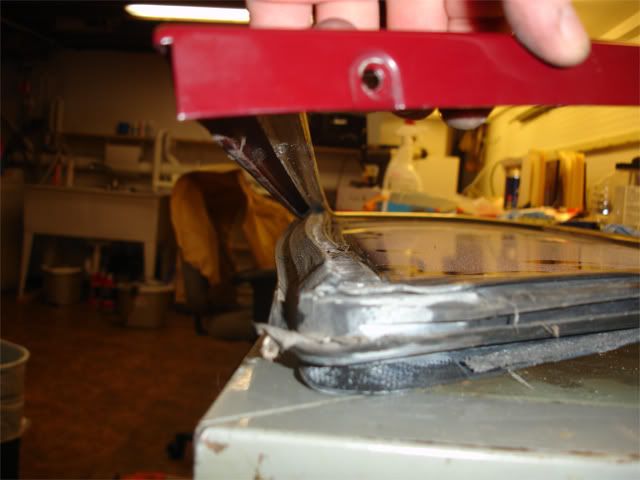 Once the trim is removed from the window, flip it over and using a pry tool, start to pry the aluminum away from the painted trim (start on the end, not the corner). You can see here where the seal gets clamped between the aluminum and painted trim pieces:  Once the aluminum starts to separate, you can pull it off by hand while assisting with some light prying on the back side where any pry marks will be hidden. I used rubber gloves to give me a better grip to pull them apart:  Here is the separated trim pieces. Don't take off the vertical aluminum strip.  Now you can take the old seal off the glass and clean the glass with denatured alcohol and a razor blade: 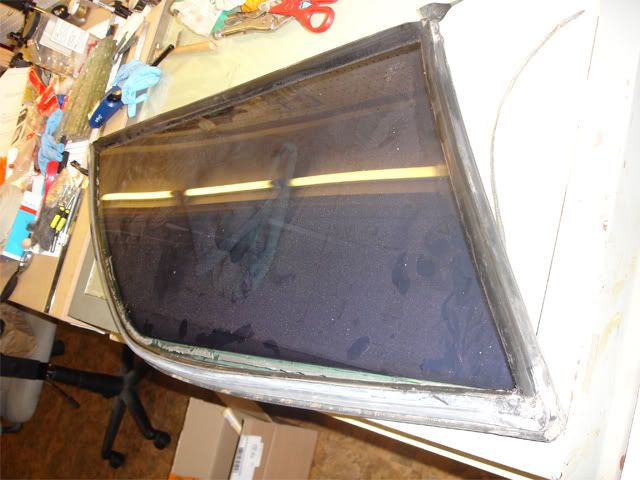 Clean glass:  I cleaned the new seal with 303 Aerospace Protectant and then put "glazing Rope" in the channel where the glass sits: 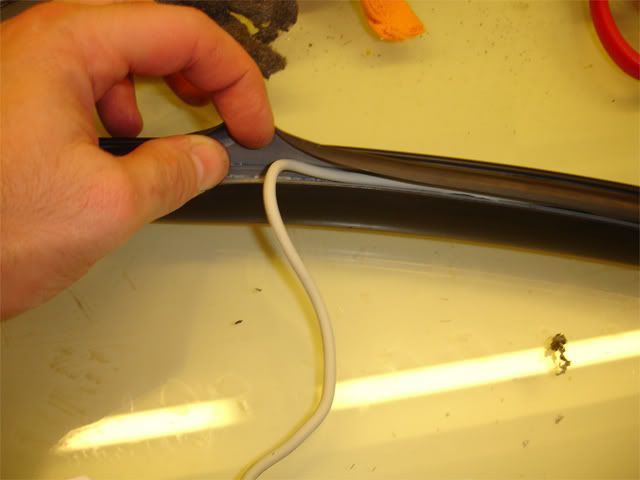 Put the glass in the seal first:  Here's a closeup of the ridge on the seal that you need to line the trim up on so it can clamp to it:  Put the painted trim in place first:  Start in the corner and begin pushing the aluminum trim back on: 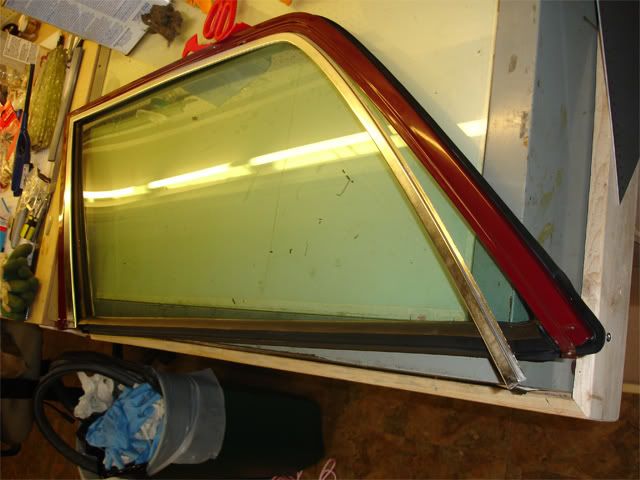 Using a hammer and block of wood, lightly tap the trim back in place so it fully clamps on the seal: 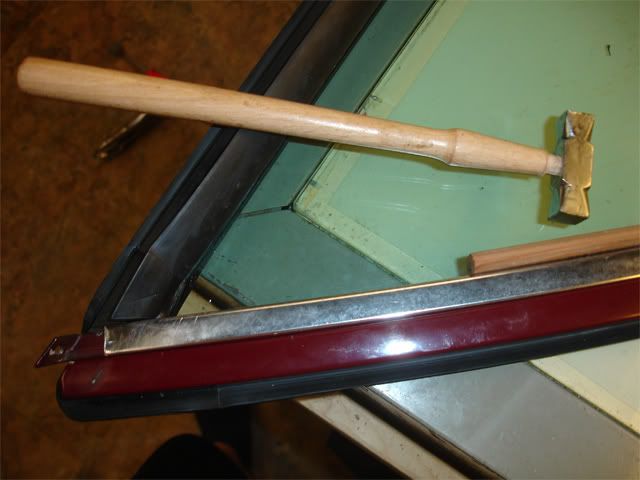 Finished window ready to reinstall in the car: 
__________________
Chad 2013 Jeep Unlimited Rubicon OBK#44 "Pleasure in the job puts perfection in the work." - Aristotle (384-322 B.C.) SOLD 1985 300TD - Red Dragon 1986 300SDL - Coda 1991 - 300TE 1995 - E320 1985 300CD - Gladys 2006 Nissan Pathfinder LE 1998 Acura 3.0 CL
|
|
#4
08-13-2008, 09:10 AM
|
||||
|
||||
|
Now flip the window over and thread a thin nylon rope into the channel in the seal. Overlap the ends a few inches:
 Spray everything thoroughly with windex and align the window in the car squarely. A helper would make this step easier, but I did it by myself. Hold the window with one hand on the outside against the car and begin pulling the rope out to roll the seal over the ridge in the window opening of the car.  It will take some patience at the corners and maybe a bit of assistance with your hands and a pry tool. Just keep things wet with windex so it stays slippery. If you can get the hatch trim pieces under the seal as you pull the window in, great. Don't worry if it doesn't happen though. You can work it under later without a problem. Once the window is pulled in completely, you can move the window around slightly to line up the three screw holes that hold the window in place. Then put in the screws. Take MB window sealing compound or Butyl Rubber Sealant and run a bead between the glass and seal all the way around as far as you can. The top edge isn't as important as the bottom and sides. Clean up the excess that is left and then snap the horizontal trim piece back in place and you're done.
__________________
Chad 2013 Jeep Unlimited Rubicon OBK#44 "Pleasure in the job puts perfection in the work." - Aristotle (384-322 B.C.) SOLD 1985 300TD - Red Dragon 1986 300SDL - Coda 1991 - 300TE 1995 - E320 1985 300CD - Gladys 2006 Nissan Pathfinder LE 1998 Acura 3.0 CL
|
|
#5
08-13-2008, 09:25 AM
|
||||
|
||||
|
Here's a link to why I removed the windows in the first place:
Remove the window seals to repair the rust
__________________
Chad 2013 Jeep Unlimited Rubicon OBK#44 "Pleasure in the job puts perfection in the work." - Aristotle (384-322 B.C.) SOLD 1985 300TD - Red Dragon 1986 300SDL - Coda 1991 - 300TE 1995 - E320 1985 300CD - Gladys 2006 Nissan Pathfinder LE 1998 Acura 3.0 CL
|
|
#6
08-13-2008, 10:15 AM
|
||||
|
||||
|
Thats useful info. I pulled one at the junkyard just incase I broke the one I had. Do you think that possibly just resealing with the glass seal will do the job? Thats not a cheap seal.
__________________
http://superturbodiesel.com/images/sig.04.10.jpg 1995 E420 Schwarz 1995 E300 Weiss #1987 300D Sturmmachine #1991 300D Nearly Perfect #1994 E320 Cabriolet #1995 E320 Touring #1985 300D Sedan OBK #42
|
|
#7
08-13-2008, 10:56 AM
|
||||
|
||||
|
Quote:
I would also put some 1/2 inch wide self adhesive weather stripping foam around the outside of the sill ridge in the window opening before pulling the window back in, so it helps seal between the gasket/seal and the sill ridge better. When the seals age, the channel that the sill fits into gets enlarged a bit. You can see in the pics of the first post that some of that weather stripping foam was used on my wagon at some point ... so I know the quarter windows had been out before I took them out. The removal and replacement of the trim that clamps the seal is kind of tough, so avoiding that step would be a good thing ... and saving the $175 per seal is also beneficial. 
__________________
Chad 2013 Jeep Unlimited Rubicon OBK#44 "Pleasure in the job puts perfection in the work." - Aristotle (384-322 B.C.) SOLD 1985 300TD - Red Dragon 1986 300SDL - Coda 1991 - 300TE 1995 - E320 1985 300CD - Gladys 2006 Nissan Pathfinder LE 1998 Acura 3.0 CL
|
|
#8
08-14-2008, 03:23 PM
|
|||
|
|||
|
Thanks for this tutorial. It will come in handy very shortly. Good Job.
I've replaced the cloth/piping rub strips that go around the door openings and taken good how-to pictures, I just need to compile them and do a write up. I now know that the cloth piping strips can be bought relatively cheap, but I did my own before I found the parts source. again, thanks. Jay
__________________
--------------------------------------------------- 1984 300D turbodiesel 1983 300TD
|
|
#9
08-14-2008, 04:57 PM
|
||||
|
||||
|
Thanks Jay. I look forward to seeing your write-up too. I believe the piping strips you're talking about are called "windlace". I'm very curious to see what you came up with to replace them.
 BTW, your wagon is looking very nice these days.
__________________
Chad 2013 Jeep Unlimited Rubicon OBK#44 "Pleasure in the job puts perfection in the work." - Aristotle (384-322 B.C.) SOLD 1985 300TD - Red Dragon 1986 300SDL - Coda 1991 - 300TE 1995 - E320 1985 300CD - Gladys 2006 Nissan Pathfinder LE 1998 Acura 3.0 CL
|
|
#10
08-15-2008, 01:44 PM
|
||||
|
||||
|
Chad, what is window glazing rope? Is that putty preformed into a rope? Is that used instead of the butyl rubber the MB shop manual tells you to use between glass and seal?
__________________
1984 300TD
|
|
#11
08-15-2008, 01:50 PM
|
||||
|
||||
|
Quote:
I used it in addition just for extra insurance in case the sealant ended up with a gap somewhere. Plus it's next to impossible to get any sealant under the seal at the top since the trim holds it pretty tight there.
__________________
Chad 2013 Jeep Unlimited Rubicon OBK#44 "Pleasure in the job puts perfection in the work." - Aristotle (384-322 B.C.) SOLD 1985 300TD - Red Dragon 1986 300SDL - Coda 1991 - 300TE 1995 - E320 1985 300CD - Gladys 2006 Nissan Pathfinder LE 1998 Acura 3.0 CL
|
|
#12
08-15-2008, 02:16 PM
|
||||
|
||||
|
Just curious: had you ever considered sylicone spray as opposed to windex for keeping the seal lubricated? And how long did windex keep the seal lubricated until you had to relubricate?
Nice job, by the way.
__________________
 Don't Chrome them; polish them
|
|
#13
08-15-2008, 02:29 PM
|
||||
|
||||
|
Quote:
I thought it would be better to use something that would evaporate/dry away and allow the seal to grip where it should ... at least that's how I imagined it. I did consider using 3M wet type spray silicone or the 303 protectant, but I discussed the techniques with the guy that replaced my windshield and he used a foaming glass cleaner as the lube which stayed wet longer than the Windex. The windex stayed wet and slippery for probably 2 minutes before needing another squirt. It was easy to clean everything up after installation too. Just another few squirts of Windex and wipe it up.
__________________
Chad 2013 Jeep Unlimited Rubicon OBK#44 "Pleasure in the job puts perfection in the work." - Aristotle (384-322 B.C.) SOLD 1985 300TD - Red Dragon 1986 300SDL - Coda 1991 - 300TE 1995 - E320 1985 300CD - Gladys 2006 Nissan Pathfinder LE 1998 Acura 3.0 CL
|
|
#14
11-08-2008, 06:09 AM
|
|||
|
|||
|
thanks!
Chad
Just did one leaky quarter glass last night, went without a hitch. Your write-up was half encouragement, and half handy guide. Had a bunch of hardened sealant that was allowing water in between glass and gasket. The pics were a big help. Not really interested in ice on the inside of my car this winter  Gonna finish the other window today. Gonna finish the other window today.
__________________
Peter 1985 300TD 4-speed 212K 1992 400E 343K 2001 E320 72K
|
|
#15
11-08-2008, 08:45 AM
|
||||
|
||||
|
Peter,
I'm glad the info was helpful and aided in preserving another wagon. It seems like water leaks leading to rust and rot are one of the main things that take the w123's out of commission. Good luck with finishing up the second window.
__________________
Chad 2013 Jeep Unlimited Rubicon OBK#44 "Pleasure in the job puts perfection in the work." - Aristotle (384-322 B.C.) SOLD 1985 300TD - Red Dragon 1986 300SDL - Coda 1991 - 300TE 1995 - E320 1985 300CD - Gladys 2006 Nissan Pathfinder LE 1998 Acura 3.0 CL
|
 |
| Bookmarks |
|
|


 Linear Mode


