

|
|
|
|
|
|
|
|
#1
 11-24-2008, 11:38 PM
|
||||
|
||||
|
124 carrier bushing R&R
Thanks to David Wilson and making his Baum carrier bushing tool (tool 40 in the rental list) available for rent the 87 300D has new carrier bushings.
Reference section 35-116, but here's how I did it - Set rear jack point on jackstand Set floor jack under lower control arm (hope plastic cover doesn't break) Remove wheel Remove caliper, set on top of hub carrier (2 bolts, 17mm wrench) Remove bolt holding rotor (1 bolt, 5mm hex key) Remove rotor Bend lower part of brake backing plate outward for access to carrier bushing nut Hang a wrench on the head of the carrier bushing bolt (22mm) Remove carrier bushing nut (22mm) Remove carrier bushing bolt Lower floor jack to lower lower control arm until hub carrier springs free of the control arm. The hub carrier will spring up, the lower control arm will lower until the shock is fully extended leaving sufficient working room. Set the small drift of the tool on the forward end of the old bushing, set the receiver (big hollow thing) over the aft end of the old bushing, put the lead screw through the deal with the nut end facing aft, finger tighten the nut on the lead screw, center the receiver by feel, tighten the nut (David Wilson's Baum tool takes a 27mm deep socket) until the old bushing pops out. If you have to apply more force than would loosen a lugnut, recenter the receiver. Clean carrier bushing bore I applied SilGlyd to the outer casing of the new carrier bushing. It was that or anti seize and SilGlyd won the coin toss  Set the new bushing against the aft end of the bore, set the drift with a conical face against the aft end of the bushing, set the drift with a hollow recess (but not as big as the receiver) against the forward end of the bore, put the lead screw through the deal with the nut end facing aft, tighten the nut. Tightening the nut until there was resistance set the bushing with more of the outer casing exposed on the forward end of the bore. I thought it should be centered so I used the tool in removal mode to nudge the bushing aft so it's centered in the bore. Raise the control arm to meet the hub carrier. I don't know if it's my floor jack or the tendency of the control arm but the control arm shifts forward as it's raised. I had to tug backwards on the jack and use other influence to get the bushing to slot into the control arm. It wasn't difficult to get the holes to align enough to use a rod to get hole alignment spot on so the bolt slid into place. Torque the nut to 120 Nm. The manual calls for a new nut. Maybe a new bolt. I'm happy with blue Loctite. Bend brake backing plate back into place Install rotor Tighten bolt holding rotor Install caliper Tighten bolts holding caliper Install wheel Repeat on the other side I know you expect pictures but my wife gets upset when I get greasy fingerprints on the camera Sixto 87 300D 
|
|
#2
11-24-2008, 11:44 PM
|
||||
|
||||
|
Thanks Sixto.
I can attest to the success of this method, I tried it last summer. Unfortunately the other side needed one also, and a wheel bearing, so the carrier came off and went to the local machine shop for press work. A pain disassembling the parking brake for this part, which makes Sixto's method that much more of a time-saver.
__________________
 Gone to the dark side - Jeff
|
|
#3
11-25-2008, 12:31 AM
|
||||
|
||||
|
I forgot to mention, the old bushings had nothing but dried mud between the inner and outer cylinders. They weren't doing much bushinging or whatever bushings do.
I forgot to listen for creaking as people get into and out of the car. More to come... Sixto 87 300D
|
|
#4
11-25-2008, 12:40 PM
|
||||
|
||||
|
Congrats on the success story, Sixto! Could you post post photos of the Baum tool, or a link to the post with the rental info? My sister's E320 needs this ASAP... it's making a horrid creaking noise with any rear suspension movement.

__________________
Check out my website photos, documents, and movies!
|
|
#5
11-25-2008, 12:51 PM
|
|||
|
|||
|
Quote:
The link I have on the rental tool list has a problem and it no longer works. Maybe Brian could replace it with a link to this thread.
|
|
#6
11-25-2008, 03:32 PM
|
||||
|
||||
|
Found it (see item #40) :
http://www.peachparts.com/shopforum/showthread.php?t=126728 I think this is the PDF mentioned, and the tool Sixto rented looks like #966-0043, although the description doesn't match: http://www.baumtools.com/pdf/MB_Rear_Axle.pdf The full Baum Mercedes catalog is at this URL, btw. David's tool looks almost exactly like the one shown in For reference, photos of the OE Mercedes tool are at this link. 
|
|
#7
11-25-2008, 05:26 PM
|
||||
|
||||
|
Good writeup, Sixto. For the ignorant among us (meaning me), what is a carrier bushing and why should I be concerned about it?
__________________
 "Buster" in the '95 Our all-Diesel family 1996 E300D (W210) . .338,000 miles Wife's car 2005 E320 CDI . . 113,000 miles My car Santa Rosa population 176,762 (2022) Total. . . . . . . . . . . . 627,762 "Oh lord won't you buy me a Mercedes Benz." -- Janis Joplin, October 1, 1970
|
|
#8
11-25-2008, 05:32 PM
|
||||
|
||||
|
It's the bushing at the bottom of the rear wheel carrier assembly. It's where the outside end of the rear lower control arm (spring link) bolts to the carrier. It's hidden inside the control arm and difficult to see, or inspect. But they're usually shot before 20 years or 200kmi. Photos below. New bushings are maybe $30 each, plus the tool rental, and a few hours labor to R&R.
 The bushing is callout #8 in the diagram below. The rear wheel carrier is callout #5:  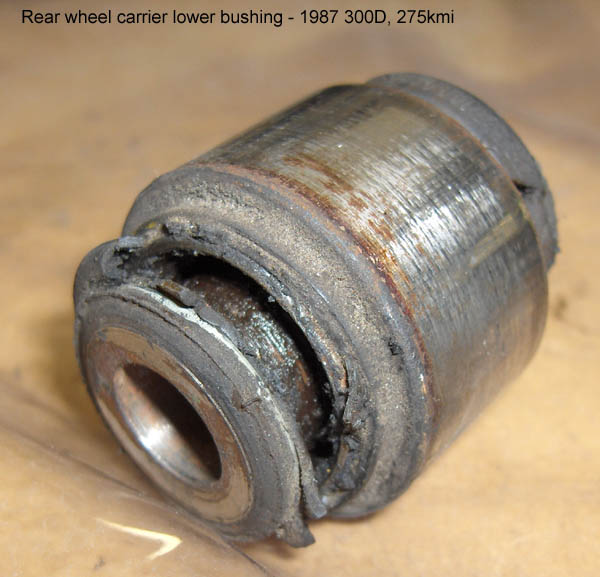 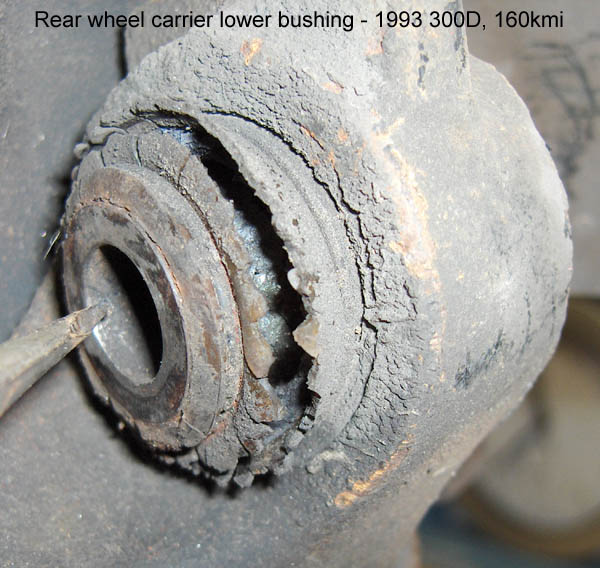
|
|
#9
11-25-2008, 05:43 PM
|
||||
|
||||
|
Thank you.
__________________
"Buster" in the '95 Our all-Diesel family 1996 E300D (W210) . .338,000 miles Wife's car 2005 E320 CDI . . 113,000 miles My car Santa Rosa population 176,762 (2022) Total. . . . . . . . . . . . 627,762 "Oh lord won't you buy me a Mercedes Benz." -- Janis Joplin, October 1, 1970
|
|
#10
11-25-2008, 05:45 PM
|
||||
|
||||
|
Yours are either bad or going bad, ... or new.
Causes a creak in the rear, if you can squirt oil there from under the car and the creak stops, you're probably one of the many. Fortunately, I haven't heard of a catastrophic failure of this joint, just sloppy and creaky until it is replaced. I believe that the dealer wants something like $400 for the job. A good time to check other bushings: the torque-link (I think it's called) bushings are common which is the whole link with the upgrade bolt set, it's the top arm facing forward and causes the car to steer when on/off the gas, and I'm told that the swaybar links are common failures (also creak). There are plenty of "while you're in there" things also, like new brakes or park-brakes, checking the outer park-brake cables, being sure there is a cap on the brake bleed fitting, and hitting everything in sight with protective oil (except rubber parts).
__________________
Gone to the dark side - Jeff
|
|
#11
11-25-2008, 08:50 PM
|
||||
|
||||
|
My indy did a thorough inspection after I bought the car and found (I think) the one you mentioned to have bushings that were going bad. All others were OK at that time (2 years ago). I replaced those struts earlier this year with the upgrade parts (210 350 33 06, ********AZ calls it "control arm camber strut") including the 12mm bolt kit, about $50 total. I need to rotate my tires and that will give me a good opportunity to re-check all of the bushings.
I also need to replace the two bushings at the rear of the differential. I bought the parts before I realized it took a special puller and now don't know whether to get that (hate to buy a tool for one time) or to let my indy do the job. Jeremy
__________________
"Buster" in the '95 Our all-Diesel family 1996 E300D (W210) . .338,000 miles Wife's car 2005 E320 CDI . . 113,000 miles My car Santa Rosa population 176,762 (2022) Total. . . . . . . . . . . . 627,762 "Oh lord won't you buy me a Mercedes Benz." -- Janis Joplin, October 1, 1970
|
|
#12
11-25-2008, 11:00 PM
|
||||
|
||||
|
The bushings I removed looked worse than gsxr's. When anyone got into or out of the car there was a sound like a submarine going too deep. Now there's just a clang like an exhaust pipe hitting something.
It feels like the rear sits higher by an inch. Ride is notably smoother. Bumps and road irregularities I'm very familiar with felt rounder today The only in-situ check I can imagine is to compress the spring, detatch the shock and see if the LCA wiggles relative to the hub carrier. A pair of those angled struts and a set of diff bushings went in sometime ago. I also freed up park brakes that looked like they hadn't been used in years. Everything else I checked looks serviceable. I've yet to check the subframe bushings. Sixto 87 300D
|
|
#13
11-30-2008, 03:16 AM
|
||||
|
||||
|
It's difficult to show how the tool is used in the car because there are no good photo angles. Heck, there are no good viewing angles either - I had my eyes on one end of the bushing with one hand working blindly on the other end. The best overall view is from directly below but who wants these chunky tools falling on their face? It was easy enough to work chest-to-rotor, as it were. Here's my attempt at describing the usage of Dave's tool set:
This is the tool set out of the case. I'll switch terminology from earlier posts to align with how each part is used in the job. Silver pieces from left to right are: removal receiver, removal drift, installation drift, installation receiver; dark piece is the screw with nut attached - 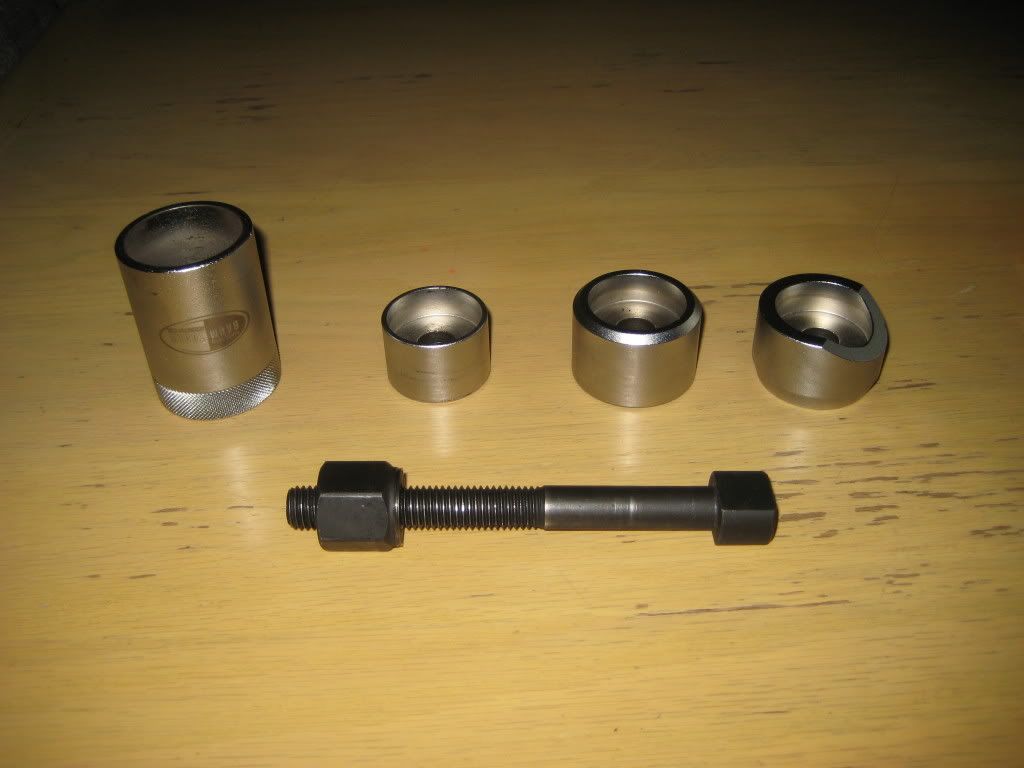 The silver pieces are in the same order but inverted. You can just see that the removal receiver and installation drift have bearings against which the tapered end of the nut pushes, while the the removal drift and installation receiver have slots into which the oblong head of the screw fits - 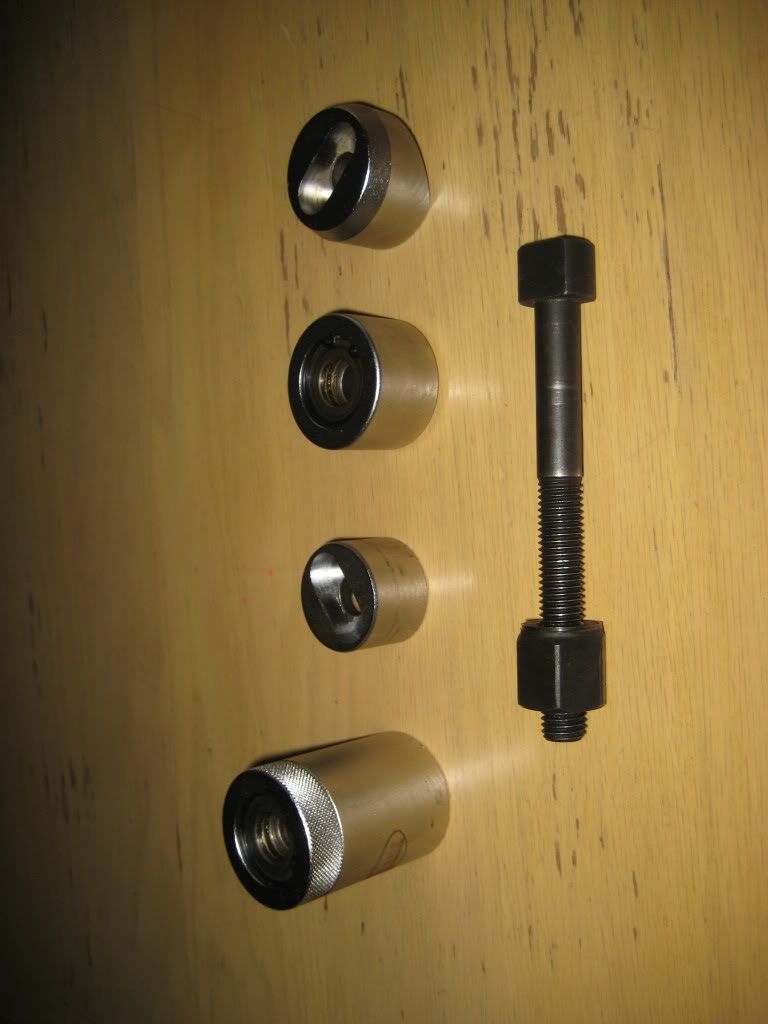 Removal mode viewed from the front. Note that the head of the screw always points to the front of the car and the nut always goes on from the rear of the car. The old bushing is removed by pushing it rearward and the new bushing is installed by pushing it forward. You'll have to use your imagination to envision the old bushing set in the hub carrier with the removal receiver to the rear and the removal drift to the front. The removal drift fits snugly over the exposed end of the old bushing and its overall diameter is smaller than the major diameter of the old bushing so you don't have to worry about centering the removal drift as you turn the nut. The removal drift will go right through the hub carrier as it pushes out the old bushing. At some point while turning the nut there will be no resistance and the tool set and bushing will fall off the hub carrier - 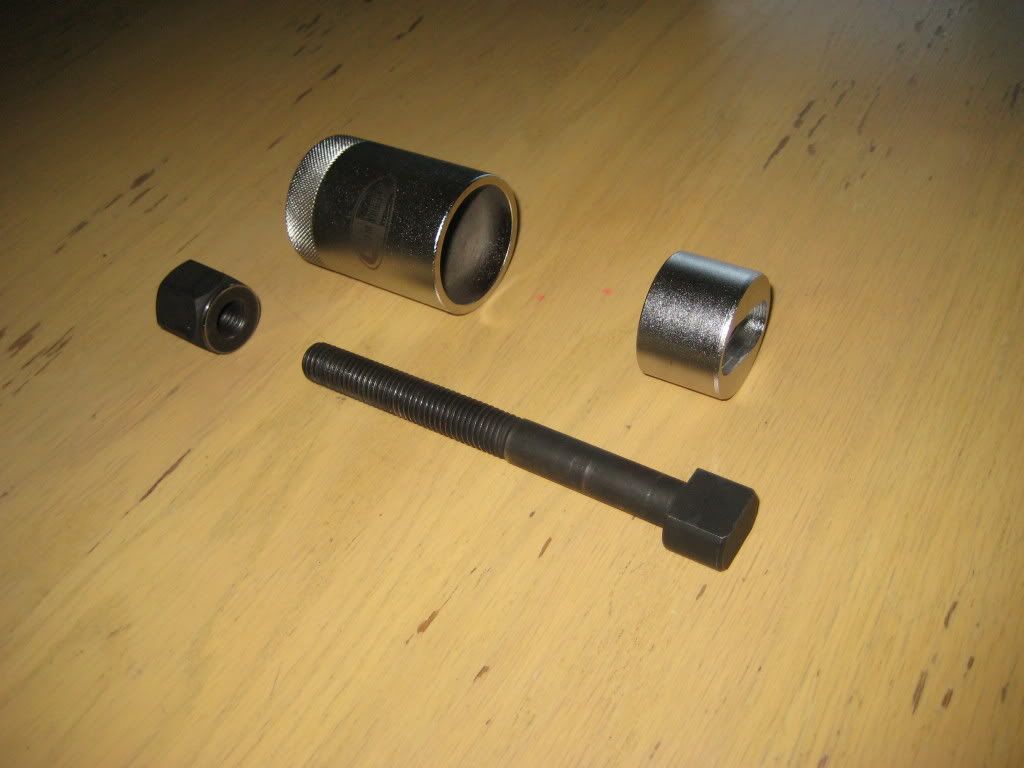 Removal mode viewed from the rear. The only difficulty with using this tool is the removal receiver can be positioned such that the outer annulus of the bushings hits the rim of the removal receiver. This results in the tool binding. I used moderate force on an 8" socket driver. There was uniform resistance until the bushing contacted the removal receiver. At that point I switched to an 18" breaker bar and applied about as much force as would release a wheel lug bolt. No joy. I undid the tool, studied the situation and came to the conclusion that the bushing contacted the removal receiver. In the second setup, I used the circumference of the hub carrier around the bushing hole as a guide to visually center removal receiver. Joy! I sensed the slightest bit of magnetic attraction between the nut and the removal receiver. It doesn't really matter since the tapered end of the nut is almost a precision fit against the bearing in the removal receiver - 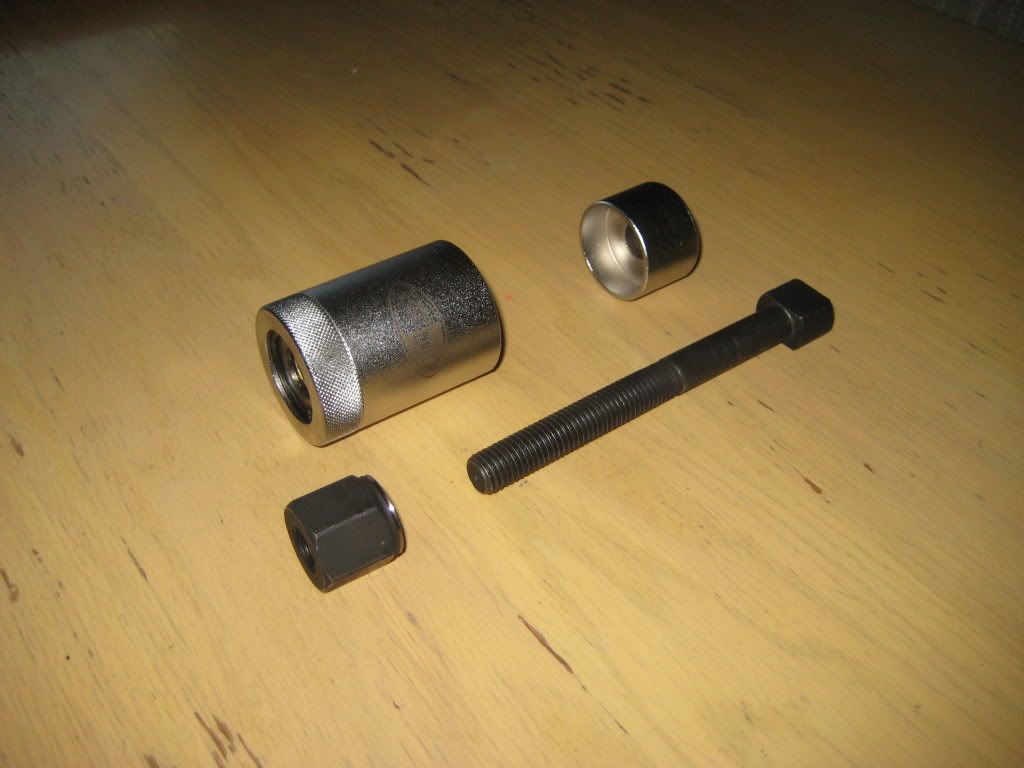 Installation mode viewed from the front. The slice removed from the mating end of the of the installation receiver allows the installation receiver to fit squarely against the hub carrier bushing hole. There is a section of the hub carrier that doesn't allow the installation receiver to have full circumference contact with the hub carrier. The exposed end of the bushing, either exposed end since the bushing is symmetrical (Dave, please confirm!), fits snugly in the installation drift. I found it easiest to set the installation receiver in place, then set the screw in place, then set the installation drift with new bushing onto the screw. This sets up alignment between the bushing and the hub carrier hole close enough that no further tweaking is necessary. No more force is needed to turn the nut to install the new bushing than is used to remove the old bushing. At the first hint of resistance, remove the tool to check progress. I found this tool set the bushing outer annulus flush with the hub carrier hole rear surface and extending something like 2mm from the forward surface. I didn't note how the old bushing was installed so I used the tool in removal mode to push the bushing back about 1mm so the there was as much exposed annulus on both surfaces of the hub carrier - 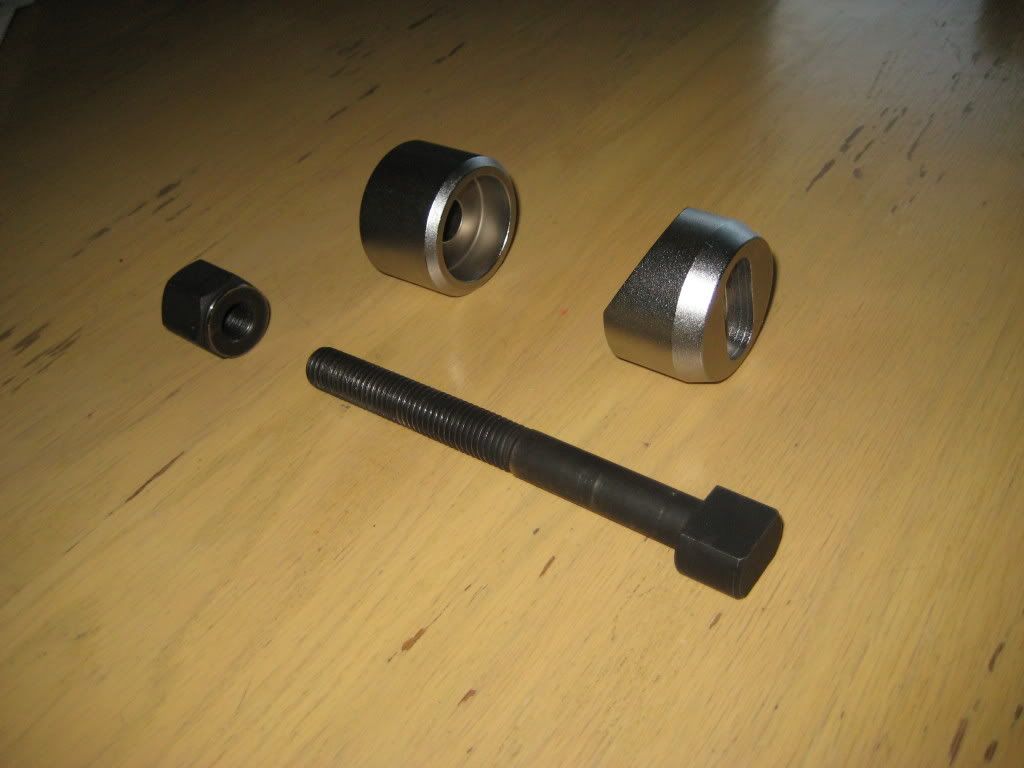 Installation mode viewed from the rear. The slice missing from the installation receiver actually goes towards the bottom when in use. Gravity caused the installation receiver to sit with the slice towards the top in these photos - 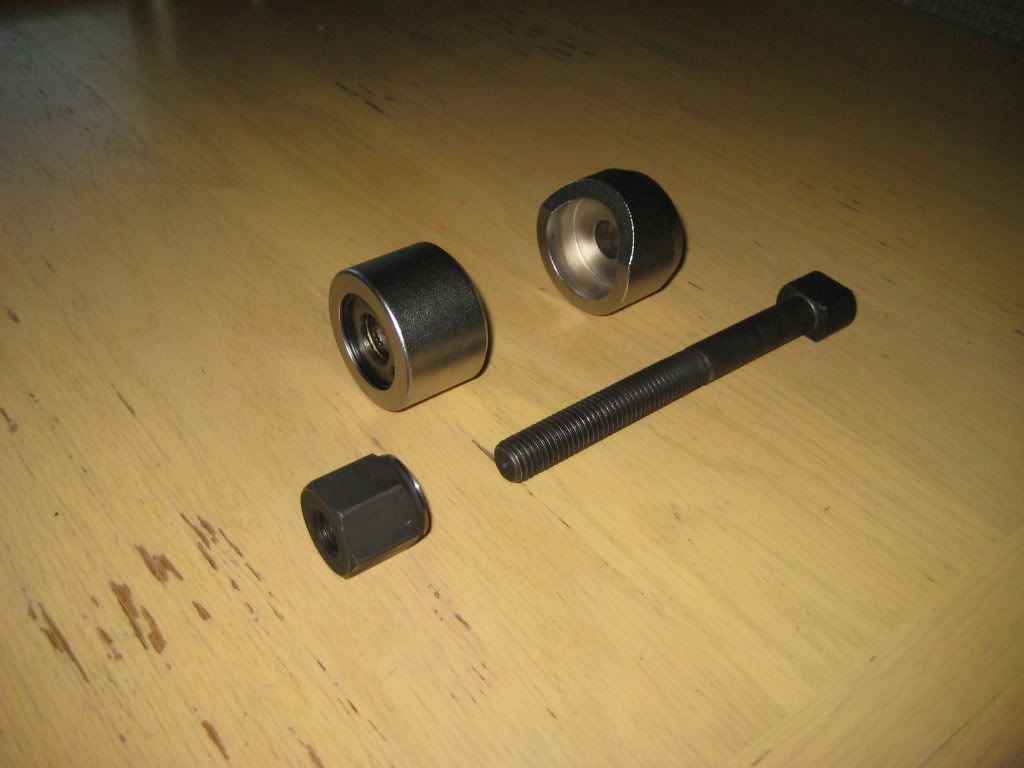 Sixto 87 300D Last edited by sixto; 11-30-2008 at 03:25 AM.
|
|
#15
11-30-2008, 06:56 PM
|
||||
|
||||
|
Update
Checked all of the bushings while rotating tires Friday. All appear to be in good condition; perhaps a PO replaced them.
Jeremy
__________________
"Buster" in the '95 Our all-Diesel family 1996 E300D (W210) . .338,000 miles Wife's car 2005 E320 CDI . . 113,000 miles My car Santa Rosa population 176,762 (2022) Total. . . . . . . . . . . . 627,762 "Oh lord won't you buy me a Mercedes Benz." -- Janis Joplin, October 1, 1970
|
 |
| Bookmarks |
|
|


 Hybrid Mode


