

|
|
|
|
|
|
#1
 10-23-2010, 03:37 PM
|
||||
|
||||
|
Rostra Global Cruise Install Thread
I'm putting this thread up for those that are willing to get rid of the original Cruise Control in favor of something that works just as good, is more reliable, easy to install, has a 3 year warranty and does not cost an arm and a leg.
This is a Rostra Electronic Global Cruise System, Part # 250-1223. I purchased this unit online for $169 from M&R Electronics. It comes with everything needed to install the complete system if you utilize the factory Cruise stalk and factory Vehicle Speed Sensor. Based on other threads using the Audiovox Vacuum cruise system, I also chose to use the old Cruise Amp Housing and Plug to wire the system up. I chose to use the VSS off the speedo instead of opting for the magnet kit. It makes for a cleaner install and it is already there. So, I used it. 1. Pop the hood and open it up to the "Vertical" position. Disconnect the negative side of the battery. Your battery and tray are probably different than mine. Just be sure it is disconnected before you continue.  Now, you need to find a place to mount the Servo/Unit. I followed "81Wagon"s lead and mounted it on the drivers fender well. This is about the only location that gives you decent cable routing over to the valve cover. Use the "Mounting Bracket" in the kit as a template for your holes.  Now, treat the holes with something to prevent rust in the future. I used an OSPHO based black spray paint. Once you have bolted the unit down spray the tips of the screws where they poke through the fender well to prevent rust inside the fender well.  Attach the bracket to the Servo/Unit in this manner using the supplied screws. These screws should be "just snug", do not over tighten. With the Servo/Unit attached in this manner it will clear the hood and hood/pad.  I found the best, close, suitable ground to be at the "diagnostic port" bracket. Use one of the cadmium plated screws beneath the bracket as a ground.  This is where I chose to go through the firewall. It is kind of a PITA on the 85. I had to remove the Vaccum Transducer and the KILMA relay to gain enough room to trim the grommet and shove the wires through the hole. I used a little bit of silicone grease so that the Wiring harness plugs went through the hole easier.  Here is the Servo/Unit installation complete (Note the color of the B99 in the Primary Fuel Filter!). 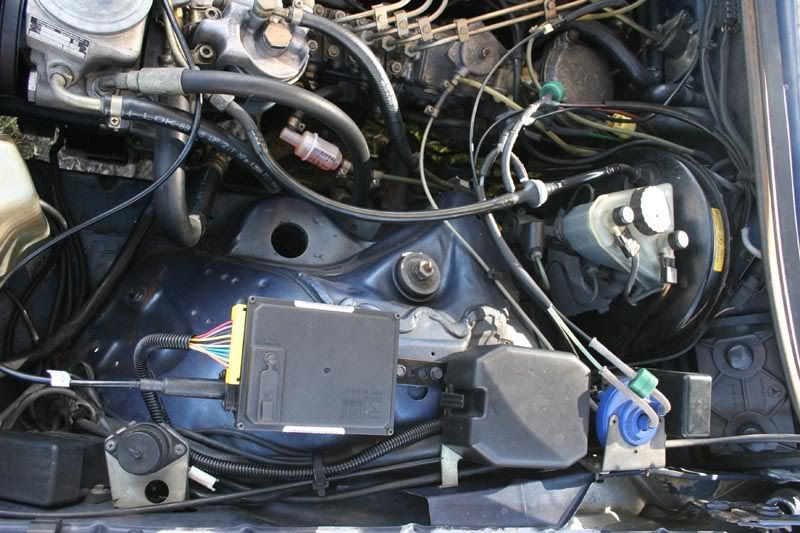 Now, time to route the cable. I attached it to the Main Vacuum Line with a couple wire ties. Be sure that you have a nice radius in the cable and that the tip of the cable moves in and out easily.  I used the supplied bracket to make my own as others have done. I had to cut it for length, bend it and drill the holes out to fit the size of the mounting bolts in the valve cover.  This is the cable attachment point. There are several ways to go about it. Just follow the instructions in the book for slack and measurement.  Ok, now it is time to set up the "dip switches" on the Servo/Unit. I studied the manual for quite a while before setting up the switches. Open the rubber plug on top of the Servo/Unit. Remember that if the switch is "Up" it is On and "Down" is Off. 1. Off (Gain, Med.) 2. On (Gain, Med.) 3. On (VSS, set a 8,000 PPM) 4. On (" " " " ") 5. Off (" " " " ") 6. Off (" " " " ") 7. On (Not used) 8. Off ( " " ) 9. Off ( " " ) 10. On (VSS Source) 11. On (Auto. Trans.) 12. Off (Circuit) Remove the Drivers Lower Dash Panel. Remove 3 covers and screws across the top and 2 screws across the bottom (one at each corner across the bottom).  Now, time to remove the Cruse Amp. It is the silver box with the 14 pin plug in the bottom and a 6 pin plug attached to a steel bracket on the side. The Cruise Amp is mounted Vertically in the car and I could not get a picture of the bolt. You need to remove the 10mm Bolt that secures the steel bracket to the brake pedal assembly.  Here, is the Cruise Amp is removed from the car and the new Wiring Harness for the new Servo/Unit laying on the floor. I will talk about the 4amp Fused Red Wire shortly.  My Cruise Amp was Fried. So, I chose to "gut it" and utilize on the existing 14 Pin Plug and housing. Once you have the circuit board removed and the plug cleaned up, here is what you want: Pin #1 Brown wire (switched power) Pin #2 Green wire (on/set/coast) Pin #3 Red/Brown wire (off) Pin #4 Yellow wire (resume/accel) Pin #8 Violet wire (cold side of brakes +12 volts when brake pedal is pressed) Pin #11 Grey wire (VSS wire, set to 8,000 PPM) Once you have the plug soldered up like this tape off any other loose wires to prevent them from shorting out. Then drill a large hole in the top of the Cruise Amp Housing. Run the Rostra Wiring Harness Plugs (2 plugs) into the housing and out the top. Shove all the extra wiring inside the housing and "crimp" the big 14 Pin Plug back into the bottom of the housing. Connect the 2 Rostra Plugs together and shove them and all the wire you can back into the Old Cruise Amp Housing. I used a good bit of electrical tape where the Rostra Wiring Harness exits the housing to prevent chafing. I plan to buy a grommet to fit the hole in the top of the housing next week. Solder connections from above.  Rostra Harness inside Cruise Amp Housing before installing the 14 Pin Plug.  14 Pin Plug Crimped back into the Old Cruise Amp Housing.  Here is how the top of the Cruise Amp should look after the wire is shoved back into the housing.   Ok.... Almost done. Remove the plug from the brake switch. The lower side of the switch had 12v power in my car. I temporarily re-connected the battery to verify this with a meter. This is where I soldered one end of that 4amp Fused Red wire.   Here is that plug soldered up and snapped back together. Be sure to plug this back onto the brake switch.  This is where the Cruise Stalk gets 12v Power from the "HOT" side of the brake switch. This is a 6 Pin Plug with only 5 of the 6 holes utilized. Female Pin #2 for the Cruise Stalk Plug needs to be removed so that the 4amp Fused Red Wire can be soldered on to that pin. Simply slide that Plug back to get it out of the Cruise Amp Bracket. Once it's out, the back of this plug unsnaps just like the other one. Remove Pin #2. This Pin should have 2 wires going to it (Red/Yellow) and they need to stay soldered together so that Pin #1 on the 14 Pin Cruise Amp Plug has 12v power. Once these wires have been removed and soldered together, tape them up really good and solder the 4amp Fused Red Wire to Female Pin #2 in the 6 pin Cruise Plug. Install the pin back into the plug along with the taped up wires. 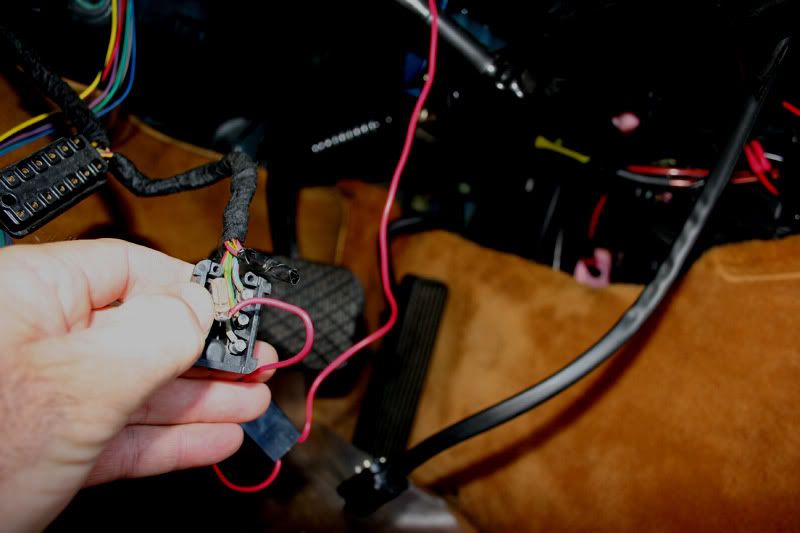  Now slide that 6 pin Cruise Stalk Plug back into the Cruise Amp Bracket, Plug those 6 Pin Cruise Stalk Plugs back together, Plug the 14 Pin Cruise Amp Plug back into the bottom of the Amp, bolt the amp back into the bracket and you are done.  All that is left at this point is to have someone help you with the diagnostics. These procedures are outlined in detail in the Rostra manual. Someone needs to sit inside the car and manipulate the switch while you watch the LED flash for each specified switch position. Once you are finished, Install the rubber plug back into the top of the new Servo/Unit and go for a test drive! Enjoy!! This cruise system works awesome. I have already logged over 400 miles on the car since the install and it has performed flawlessly. The gain works well on the medium setting. I like this setting because it does not race up and down the hills and over passes. It only loses and gains 1 MPH on the Florida hills and over passes.
__________________
AJ 1985 300D (SOLD) 
Last edited by snookwhaler; 10-23-2010 at 10:00 PM. 
|
|
#2
04-15-2011, 03:33 AM
|
||||
|
||||
|
Tag. Thanks for the pointer to your install. My work pc filtered the photos out. I can't wait to see your install from home.
__________________
'05 E320 CDI '20 GLE 450
|
|
#3
04-15-2011, 03:31 PM
|
|||
|
|||
|
Nice job. Looks nice.
A side note: all pins/connections are available at the cruise amp connector. No need for the 4 amp from the brake switch.
__________________
92 300D 2.5L OM602 OBK #59
|
|
#4
05-16-2011, 10:48 PM
|
|||
|
|||
|
Just completed Rostra cruise installation on my 300SD. That's the good news.
The bad news is after I installed it I realized the issue with the original cruise control is that the vehicle speed sensor came unplugged from the back of the instrument cluster (green/yellow wire). So I could have saved myself some money. Oh well... [S-T-U-P-I-D] me.  It was fun anyway... On a side note, it seems when I set the cruise, it drops 3-4mph before it kicks in to the set speed...anyone else have that issue?
__________________
dmcginn2 2014 E250 Bluetec 2015 Golf Sportwagen TDI
|
|
#5
05-17-2011, 07:39 AM
|
||||
|
||||
|
Quote:
__________________
AJ 1985 300D (SOLD)
|
|
#6
05-18-2011, 06:11 PM
|
|||
|
|||
|
After messing with it, I figured out that if I hold my foot on the gas pedal for a bit after I set the speed, it doesn't drop as much. Maybe 1 or 2 mph.
It seems like it takes a couple seconds to engage for some reason. I'll have to look at how I connected it to the throttle. I basically removed the EGR setup and connected it to the ball that the old cruise was attached to with the chain thing. Maybe if I used one of the other options it will not have as much slack when the throttle opens.
__________________
dmcginn2 2014 E250 Bluetec 2015 Golf Sportwagen TDI
|
|
#7
12-09-2011, 10:33 AM
|
|||
|
|||
|
Old Thread...but
I know this is from a while back. Would this setup work in a 1985 W123 300D?
Thanks,
__________________
1985 300D 197K - Semi-Daily Driver Diesel 1998 Volvo V70 AWD 226K - Daily Driver 2 1998 Volvo S70 140K - Wife's DD 2003 GMC Sonoma ZR2 Option - Rusty Truck THE BABY 1958 220S Sedan 66K All original, never restored and never will be. 
|
|
#8
12-09-2011, 10:59 AM
|
||||
|
||||
|
Quote:
Also, as a side note... I have since cranked the gain up all the way and the cruise now works like a modern car. FYI... This is worth doing. The old system works but is archaic in comparison. Too many components to fail. I have had ZERO problems with this setup and it is a VERY clean install.
__________________
AJ 1985 300D (SOLD)
|
|
#9
11-29-2012, 11:42 AM
|
||||
|
||||
|
I would like to have cruise control in my Euro 85 300TD. I pulled all the components and harnesses from a 81 240D that should be needed to swap in a OEM system but after some research this after marked Rosita unit looks like a better choice. My question is... the amp is the older 10 pin type and I'm wondering is there is a "work around" for this problem" since the Rostra harness doesn't need all the pins (14) of the later amp. I'm stumped as to which pins to use on my 10 pin amp plug.
__________________
 1985 Euro 240D 5 spd 140K 1979 240D 5 spd, 40K on engine rebuild 1994 Dodge/Cummins, 5 spd, 121K 1964 Allice Chalmers D15 tractor 2014 Kubota L3800 tractor 1964 VW bug "Lifes too short to drive a boring car"
|
|
#10
11-29-2012, 05:25 PM
|
||||
|
||||
|
That will work fine. The old cruise amp pins just act as a "bridge" between the old wiring in the car and the newer electronic cruise system. The reason I did it this way, is that you can utilize the factory wiring and use the factory stalk. It makes the installation much cleaner. All you need is a wiring diagram for that particular amp (so you know which pins to use) and wiring it up should be no problem at all.
__________________
AJ 1985 300D (SOLD)
|
|
#11
11-29-2012, 06:57 PM
|
||||
|
||||
|
Thank you, thats what I needed too know and thanks for the great post, nice work. It would be a Miracle if the parts car actuator and OEM amp are any good so I have an option now.
Now to find the wiring diagram for a 001 545 70 32, ten pin.
__________________
1985 Euro 240D 5 spd 140K 1979 240D 5 spd, 40K on engine rebuild 1994 Dodge/Cummins, 5 spd, 121K 1964 Allice Chalmers D15 tractor 2014 Kubota L3800 tractor 1964 VW bug "Lifes too short to drive a boring car"
|
|
#12
11-29-2012, 07:16 PM
|
||||
|
||||
|
I installed the Rostra unit in my 87 wagon a couple of years ago and it has been completely reliable.I too used the existing control handle and the only thing that is different from my original one on my 91 300D and the only functional difference is that to activate it i have to push down on the lever whereas the one on the 91 will activate it either up or down. Unfortunatly Rostra offers no support for instalations on European cars,but they will answer questions as far as settings on a unit you have installed that is working and just needs an adjustment such as adjusting the gain ect:
__________________
Red Green "This is only temporary,Unless it works!"  97 E300D 157000 miles 87 300TD ?141k? miles
|
|
#13
11-30-2012, 04:21 PM
|
||||
|
||||
|
Quote:
__________________
1985 Euro 240D 5 spd 140K 1979 240D 5 spd, 40K on engine rebuild 1994 Dodge/Cummins, 5 spd, 121K 1964 Allice Chalmers D15 tractor 2014 Kubota L3800 tractor 1964 VW bug "Lifes too short to drive a boring car"
|
 |
| Bookmarks |
|
|


 Linear Mode


