

|
|
|
|
|
|
|
|
#1
 03-18-2016, 10:55 AM
|
||||
|
||||
|
The W126 has returned
It has been awhile since I have been on the forum, glad to be back. Long story short, my old W126 came back to me after 3 owners and 10 years. Needless to say, had to take care of a few things to get it back into shape...
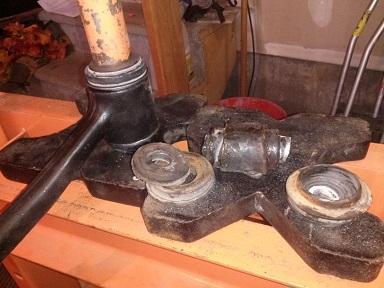
After driving the car for a couple of weeks, I decided it would make a fine daily driver. Even after 30+ cars these old Mercedes just had it right. I started by replacing all of the rubber items underneath. In the pictures, you will see a couple boxes of goodies, the car dusty from storage, and the original suspension.     Right off the bat I realized I would need to at least correct the patches of rust so I picked up a HF pot-feed sandblaster. It came in handy, especially for the front sway bar and jack holes.  Will continue on next post due to 5 attachment limit.
__________________
1983 Mercedes 300SD 1987 Mercedes 300SDL 2001 VW Passat 2.8 AWD 2007 OM642 Jeep WK 4x4 

|
|
#2
03-18-2016, 11:08 AM
|
||||
|
||||
|
Pressing in the lower control arm bushings took a few tries. The first one I thought I had bent the cap edges beyond use, but ended up being able to tap around the circumference of the cap with a flat punch and hammer. I later learned the trick, which is to set the caps on the center bushing metal piece before you set the outside edges, at least with the LEMFÖRDER bushings. If you don't do this they will not set in the control arm correctly.
  The guide rod mount bushings went together with little resistance: 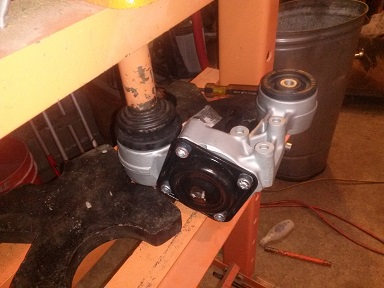 All other parts were sandblasted and painted: 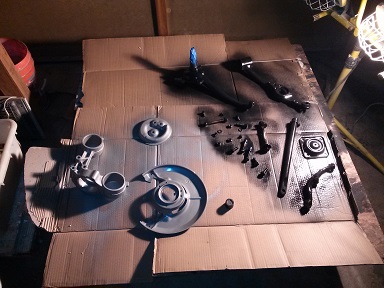 Looks pretty good all put back together, though not sure how long the rattle-can will hold up. One of these years I need to invest in a shop oven and powder coating setup...  There weren't really any other major hang-ups on the front besides the replacement guide rod mount body nuts releasing from their retainers, see this post for that issue: W126 guide rod bushing... need advice. The springs came out easily with the cheap version spring compressor, though you really have to compress them to get them out of there.
__________________
1983 Mercedes 300SD 1987 Mercedes 300SDL 2001 VW Passat 2.8 AWD 2007 OM642 Jeep WK 4x4
|
|
#3
03-18-2016, 11:22 AM
|
||||
|
||||
|
I did find a nice way to get the upper control arm nut back on without too much fussing around. I took a patch of tape and taped the nut on a closed end wrench before sticking it down by the fusebox, this prevented dropping the nut and getting it started with only the wrench in the hole.
 Next up was the engine and transmission mounts, though I didn't do the engine dampers this time around.   The rear subframe was removed completely, one flex disc and the center bushing were destroyed. 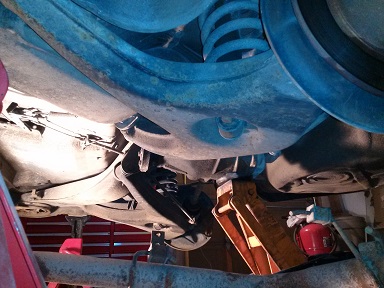 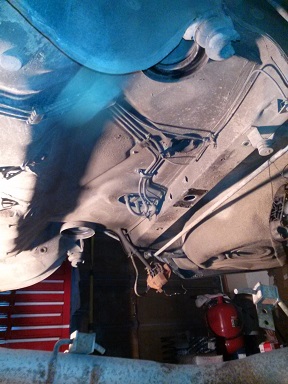 Taking the rear out wasn't too terrible. Remove the driveshaft, rear differential, and axles. Support center of subframe where the differential was. Support each trailing arm while removing shocks, sway-bar links, and calipers, when these are loose you can set the arm on the resting tab. Leave the front mounts on, and drop the rear of the subframe down until the springs fall out. Jack it back into 90 degree alignment for removal of the front bolts and you can work on the assembly much easier when it is out of the car.
__________________
1983 Mercedes 300SD 1987 Mercedes 300SDL 2001 VW Passat 2.8 AWD 2007 OM642 Jeep WK 4x4
|
|
#4
03-18-2016, 11:29 AM
|
||||
|
||||
|
I tried to make a hub socket out of a piece of pipe, but you really need the correct tool for this job. I ended up just buying the correct tool as setting the rear bearings took quite a lot of force.
 Pulling the hubs: DO NOT HIT THE ASSEMBLY FROM BACK WITH ANYTHING Use something on the front with a slide-hammer. Here I made one from an engine stand and old tire iron: 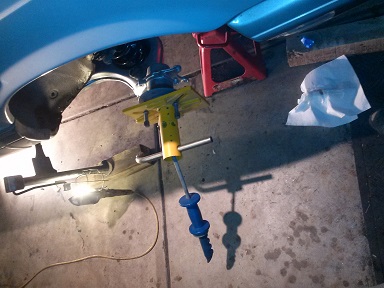 Hubs removed:  All components were sandblasted and painted:  
__________________
1983 Mercedes 300SD 1987 Mercedes 300SDL 2001 VW Passat 2.8 AWD 2007 OM642 Jeep WK 4x4
|
|
#5
03-18-2016, 11:35 AM
|
||||
|
||||
|
Pulling bearings from rear hub:
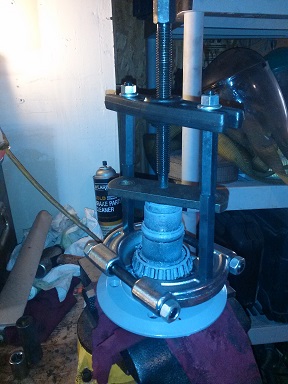 New races pressed in the trailing arm:  Here is where that pipe actually came in handy:   Setting the runout, 1 mark on this gauge is .001 which is the lower limit of the spec. 
__________________
1983 Mercedes 300SD 1987 Mercedes 300SDL 2001 VW Passat 2.8 AWD 2007 OM642 Jeep WK 4x4
|
|
#6
03-18-2016, 11:48 AM
|
||||
|
||||
|
One of the worst things about the rear was the parking brake. Normally, this should be the easy part of the job, right? This attitude is likely why I had to remove the rear brakes four different times.
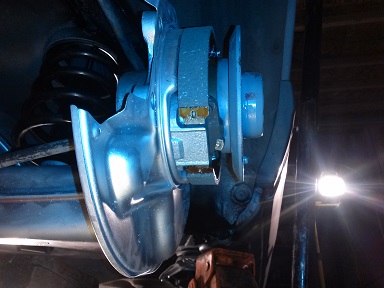 The Meyle parking brake kit was of good fit and quality, though I was surprised to see it made in China. I would buy it again, the springs are good quality and it fit without issue. I must have totally forgot how to install Bendix style shoe brakes, as it took me quite awhile to remember you put the top spring on, then attach the shoes to the back plate, then set bottom spring. After this was settled, I put the discs back on and attended to some other bolts underneath. First mistake. The cables are actually slightly different in size. I noticed this, and guessed which side to put them on. Wrong. The passenger side is the slightly longer one. 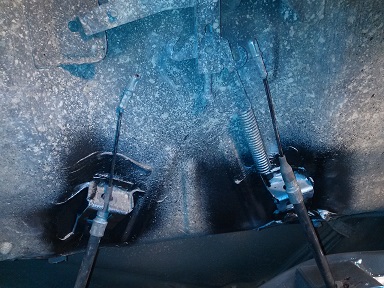 The other issues I had were related to springs rubbing, back plates rubbing, and setting the brakes too tight on initial adjustment. Of course after I went through the final pulling of the rotor for adjustment I found out you can just use a screwdriver through the bolt hole to adjust the parking brake. The underside of the car took quite a beating when I owned it in my youth. This car has been off-road more than most of the Jeeps you see at your local mall. Here you can see some of the damage from rolling over logs and rocks. The undercoat and rusted areas had to be removed until fresh metal was showing, then new primer and undercoat applied. 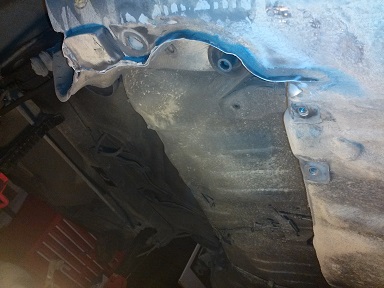 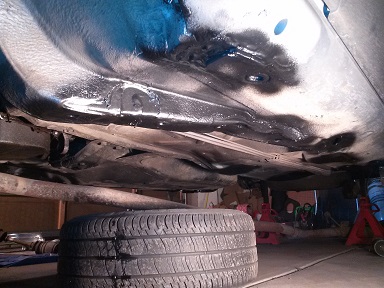 The reason I used silver paint on those rear subframe parts is I had quite a few cans of the "aluminum" left over from another project. I was hopeful it wouldn't be too obvious from the road, it seems to be OK. I'm not sure how well it will hold up, someday in the future I would like to swap the early subframe for late, so time will tell. 
__________________
1983 Mercedes 300SD 1987 Mercedes 300SDL 2001 VW Passat 2.8 AWD 2007 OM642 Jeep WK 4x4
|
|
#8
03-18-2016, 11:41 AM
|
||||
|
||||
|
Looking good! Which sandblaster did you end up getting? Any chance of a picture of it?
__________________
2004 F150 4.6L -My Daily 2007 Volvo XC70 -Wife's Daily 1998 Ford F150 -Rear ended 1989 J-spec 420SEL -passed onto its new keeper 1982 BMW 733i -fixed and traded for the 420SEL 2003 Volvo V70 5 Speed -scrapped 1997 E290 Turbo Diesel Wagon -traded for above 1992 BMW 525i -traded in 1990 Silver 300TE -hated the M103 1985 Grey 380SE Diesel Conversion, 2.47 rear end, ABS -Sold, really should have kept this one 1979 Silver 300D "The Silver Slug" -Sold
|
|
#9
03-18-2016, 12:25 PM
|
|||
|
|||
|
You say the Myle part was made in China. I recently opened some Febi & Mylee parts where the package listed China and the part itself said Germany. One looked like the Mercedes star was ground off. There is a lot of variation in quality and brand apparently does not denote quality.
Everything Lemforder has been fine except that the captured nut that holds the guide rod mount to the body came apart. I'll buy a wrench and modify it to get the nut out and begin again.
__________________
85SD 240K & stopped counting painted, putting bac together. 84SD 180,000. sold to a neighbor and member here but I forget his handle. The 84 is much improved from when I had it. 85TD beginning to repair to DD status. Lots of stuff to do.
|
 |
| Bookmarks |
|
|


 Hybrid Mode


