 |
 |
 |
 |

|


|
|
|
|
|
|
#1
|
|||
|
|||
|
Second Set of Brake or Tail Lights to a W123 DIY
I know I have seen this done before but I have not seen a complete DIY with pictures. This is my first one so here goes.
Supplies: Working Taillights (this is an addition, not a repair) Set of bulb holders (I scavenged mine for the Junk Yard, cost -$2?) Solder and Soldering Iron Heat shrink or Electrical tape Possibly short piece of automotive style wiring Razor or wire stripper A couple of 10W or 25W bulbs depending on if you want Running or Brake lights So here is the story, I have seen the empty spot on the W123 Taillights. There is a space in the plastic and in the lens but no bulb back there, What Gives!! I wanted to up the rear visibility without being obnoxious and my car (euro 300d) came to me with a hat rack mounted third brake light, So I decided to add running lights. Steps followed by pics. 1. Remove bulb holder from the trunk, unplug the electrical connector, spin off the plastic knobs and carefully back out the bulb holder/backing plate deal. Take it inside or to a comfortable work area with power for soldering. 2. Get together all the other materials including the spare bulb holders. 2.A Do the above steps at the junkyard and pull two of the holders out, take the ones you want to use and keep the bulbs, you wont pay more and it is good for testing! just squeeze GenTLy on the two white tabs and jiggle it out. then cut the wire leaving as much as is possible for your new splice. see steps below for help removing the backing from the bulb holder. 3. You are going to remove the metal bulb holder bracket from the plastic black backing, there are two large clips at each end, they gently but firmly press inwards (towards each other, in pairs) then just barely lift the metal plate away, go to the other side and do the same. 4. Not So Fast! The clip for the electrical connection is still attached and if you like you can remove it also. Two longer single tabs just hook over the back of the plug and they just bend out of the way to allow the plug to slide up and out. This makes the wire ends a little loose so watch out, take pictures along the way to keep everything straight if you like. 5. Now the fun part, the bulb holders just line up and click right into the metal holder, note the little stub that helps direct the lead wire and use it before clicking in the bulb. 6. Is up to you, if you want to join up with the brake/running light at the metal nubbin (the wire end, where the plugs join) you can just solder right to it. You can also cut the power line and go wire to wire inline, or if you want you can desolder the new bulb wire and run a new wire all the way to the lead at the plug. the options are many, basically you want the same signal to the same function. So note which bulb does what (I took pictures on my phone and counted over) and just connect them. Just be sure to insulate all connections and route the wire ends so they don't pinch or rub or touch bare metal or each other. 7. Now run outside quick and excited and make sure that the new bulb functions the way you like, it works when it should and doesn't when it shouldn't. Once you are satisfied, 8. {I always wanted to say this} Assembly is the reverse of removal......HAH but seriously just tuck in all the wires neatly, clip the plug back to the backing, the holder to the backing, and replace the whole deal in the car. PICTURES Before 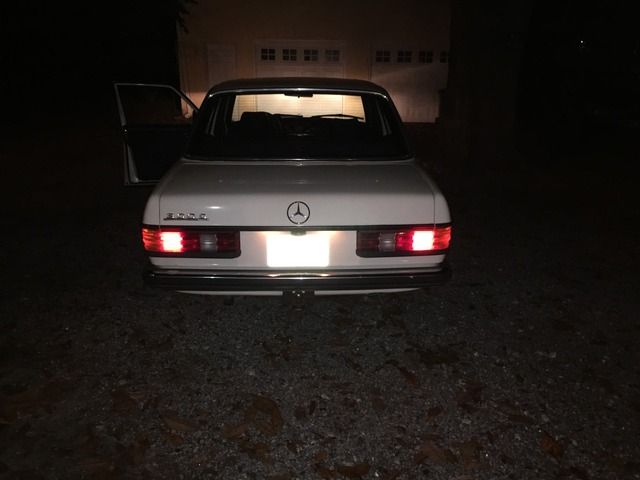 Here is what you have when removed, see the empty hole on the right?? also see the bulb holder loose from the JunkYard 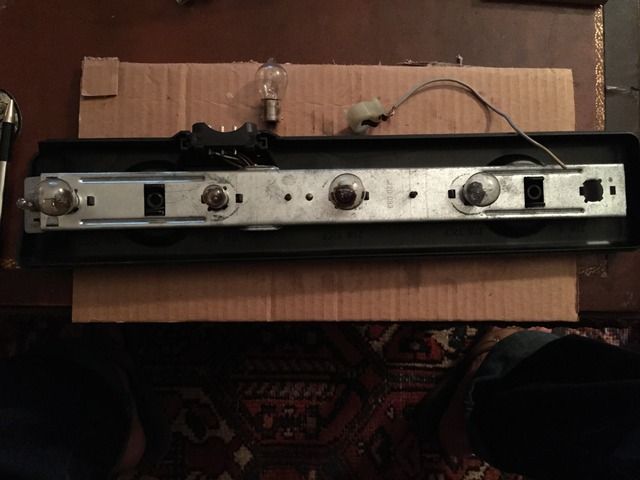 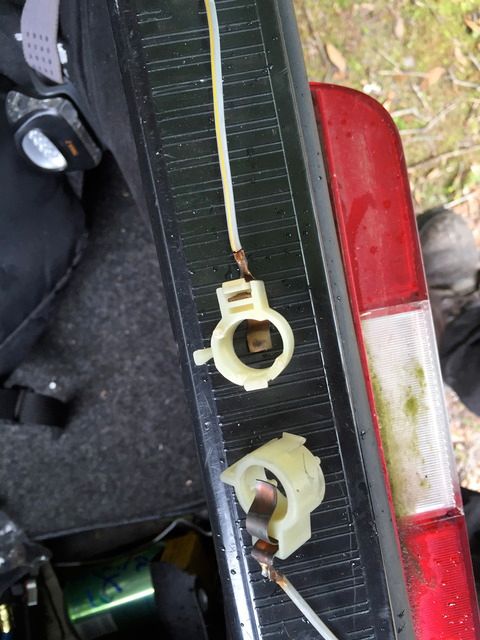 Pinch these in on one side, lift, then the other side, lift, and the whole thing comes away 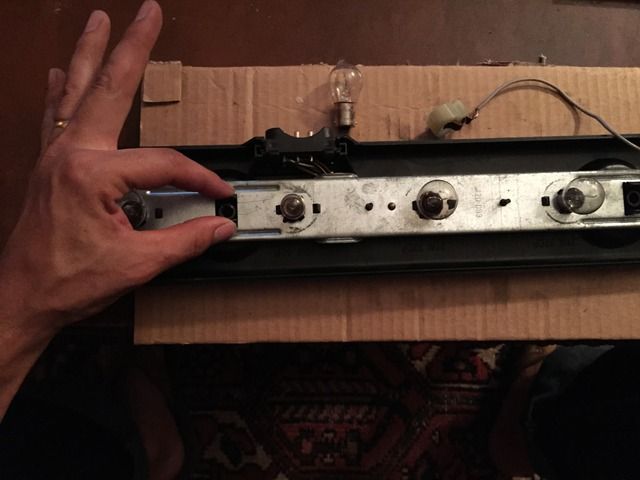 Dont forget to detach the plug for ease of maneuvering, leave it attached if you want but it is easier out of the way lift these and slide it up and out 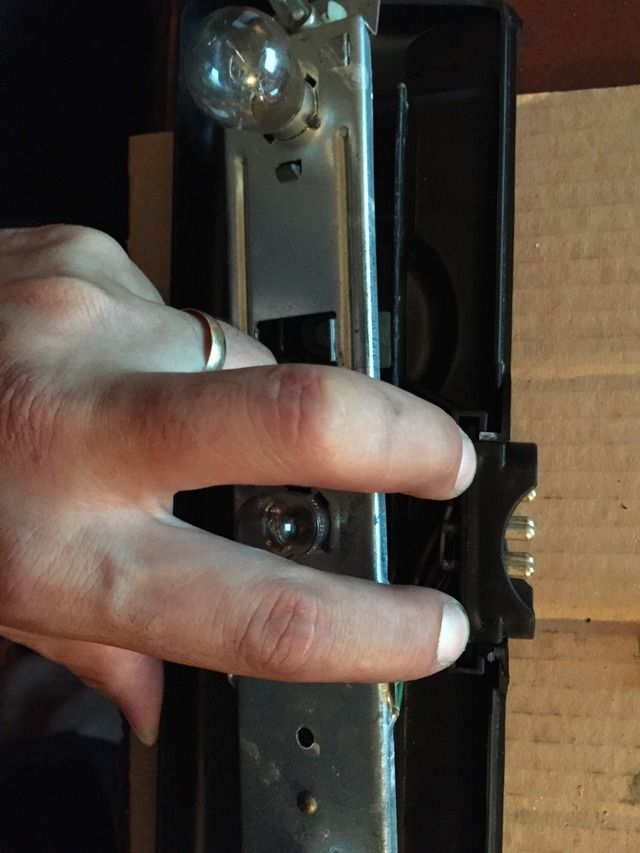 Here is what they look like behind there  I had jumpers already (I geuss Euros dont come with running lights?) I used this feed as my supply, and put in a small jumper to power the corner running light, You will very Likely not see this in yours 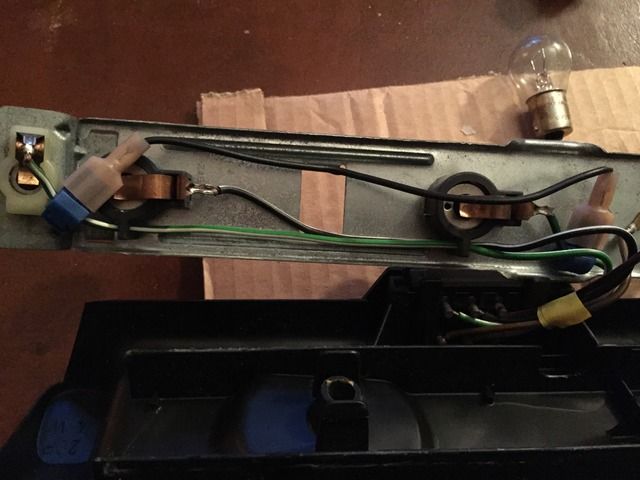 There is the connection and the holder in place (I had a spliced wire, and another connection, again if you have more wire available or whatever, you can avoid having two connections. 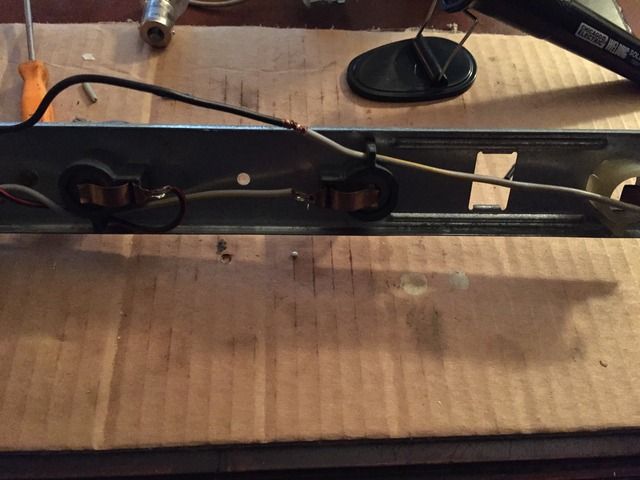 Here they all are in the new home 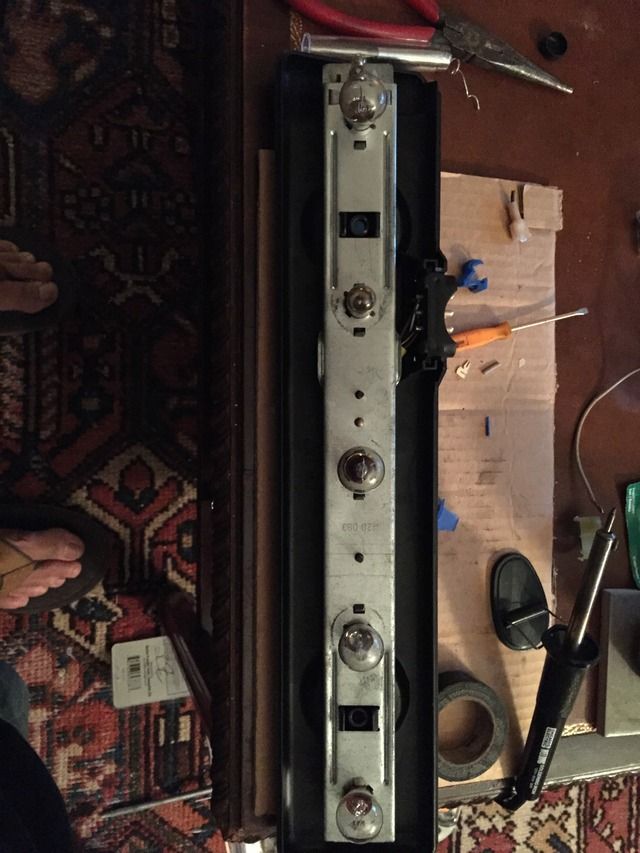 I used a brake light bulb at first, I was worried that high wattage would melt my lens if left on continuously, gives you an idea of the brightness, imagine if I used my actual brake-lights at the same time!! 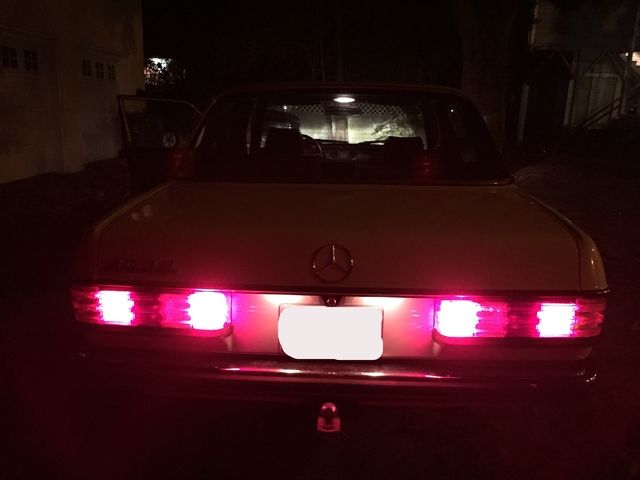 Here they are with lower wattage bulbs, I am going to replace all four at some time so they match exactly and it doesn't look like i am maybe braking, looks boss right?!? Flash 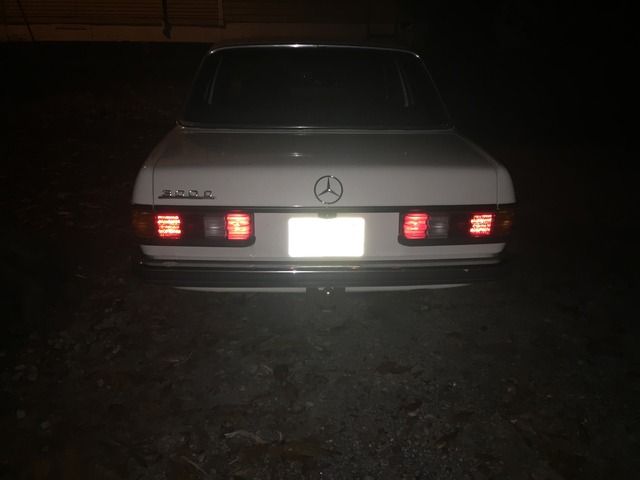 No FLash 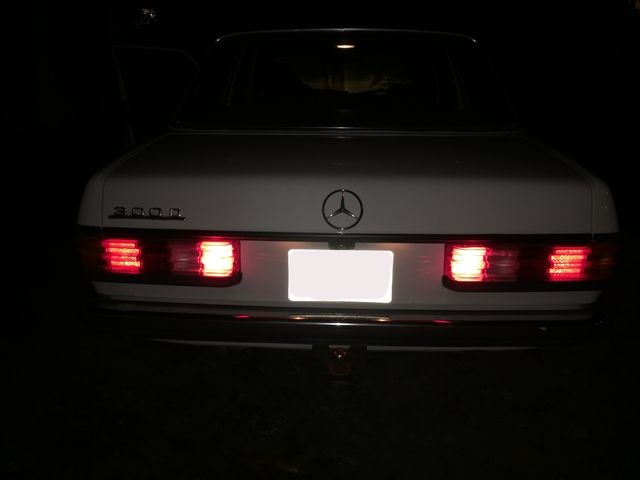 There you have it, As always be careful as this plastic is real old by now, and it does take a little force to detach some of the clips. Do any mods at your own risk and be sure to check and recheck that they work properly and haven't shorted out, it would be bad to have no lights on the back and not know it......
__________________
1983 240d 5Sp SOLD 1986 300D(LUCO) SOLD 1983 300TD(dreamboat)SOLD 1984 240d (Executive)SOLD 1984 240d (Euripides) SOLD 1982 300sd SOLD 1982 300sd (Ambas)SOLD Last edited by rjz5400; 06-22-2015 at 08:59 PM. |
|
#2
|
||||
|
||||
|
The inboard lenses are designed for rear fog lights, and the reflector and lens design allows for a "brighter" image. That's why they look like you are braking, even with the lower wattage bulbs. Look at how the lenses are different between the park light lens, and rear fog light lens (two inboard lenses).
 The tail lights should have 10W bulbs only, and 21W for brake lights. The reflector inside the inboard lights/rear fogs also contribute to a brighter light. Here's mine with 4 brake lights instead. They appear "normal" when not braking. When I brake, the two inboard lights also illuminate. 
__________________
http://farm8.staticflickr.com/7271/7...144c3fc1dc.jpg |
|
#3
|
|||
|
|||
|
you can use a quick splice if you don't want to cut any wires or do any soldering

__________________
1981 NA 300D 310k miles |
|
#4
|
|||
|
|||
|
I have done this light up grade on several cars now. Really does make a difference.
I wire it in for the Break Light, when suddenly two additional lights jump out at the idiot behind you, it wakes them up. Great write up. When Iam in the yards, I grab some of these Sockets off the w123 and W126 cars. Here was another upgrade to the Brake Lights for additional brightness. http://www.peachparts.com/shopforum/diesel-discussion/297456-$6-brighter-w126-brake-lights.html Charlie
__________________
there were three HP ratings on the OM616... 1) Not much power 2) Even less power 3) Not nearly enough power!! 240D w/auto Anyone that thinks a 240D is slow drives too fast. 80 240D Naturally Exasperated, 4-Spd 388k DD 150mph spedo 3:58 Diff We are advised to NOT judge ALL Muslims by the actions of a few lunatics, but we are encouraged to judge ALL gun owners by the actions of a few lunatics. Funny how that works |
|
#5
|
|||
|
|||
|
Thanks for all the helpful comments and yes I used the existing clips to solder in my new wire.
The last two pics are with the correct 10w running light bulbs. I guess I won't replace them to match, as apparently the fog spaces are designed brighter. I am happy with the end result, next up for appearance mods is re-sealing, cleaning and repairing vacuum adjustors on euro lights. |
|
#6
|
|||
|
|||
|
Yup. I've done this mod on my W123 as well. Makes me feel a bit safer and confident that the folks behind me can tell I'm breaking. Rather than soldering I used those plastic quick-splice thingies as well.
Works like a charm, and took 5 minutes per light to get it all hooked up. Bonus: It looks factory. Can't believe Mercedes didn't sell them like this in the USA to begin with...  Why would you use 10watt bulbs for your brake lights? I have 21watt bulbs in all four sockets. Fog lights in europe are as bright as brake lights....Nothing should melt in your rear light cluster, it should be able to easily handle 21watt bulbs.
__________________
"The MB W123 is so bulletproof, you can drive them forever. Which is a good thing as it takes that long to get anywhere." Betsie: 1984 W123 300D (hobby, 280k miles) Myrla: 2001 Mazda Protege 2.0 ES 5spd (daily driver, 130k miles) The Turd: 2007 Toyota Camry (wife's car, 118k miles) Last edited by Ceristimo; 06-23-2015 at 08:10 PM. |
|
#7
|
|||
|
|||
|
I am glad and thanks for the vote of worth and ease!
Again I wanted and used the extra space for running lights. The 10w bulb is appropriate for RUNNING LIGHTS as I already have a rear deck(hatrack) mounted brake light. I find the brake light sufficient on my particular car. The procedure is the same for brake lights, much more popular apparently, with a different splice point and the higher wattage bulbs |
|
#8
|
|||
|
|||
|
Ah, I see!
You used the fog lights as extra rear lights. I used the fog lights as extra brake lights. I guess you could do either, indeed  Makes total sense now!
__________________
"The MB W123 is so bulletproof, you can drive them forever. Which is a good thing as it takes that long to get anywhere." Betsie: 1984 W123 300D (hobby, 280k miles) Myrla: 2001 Mazda Protege 2.0 ES 5spd (daily driver, 130k miles) The Turd: 2007 Toyota Camry (wife's car, 118k miles) |
|
#9
|
||||
|
||||
|
Here is my setup I did a while back. I have the brake light mod because I didn't want the third middle brake light addition. Keeping a stock look.
I soldered my wiring at the pins, instead of spicing, for a factory look. (not that anyone would notice, but me)  I do like the idea of the running tail lights and have been thinking of getting dual running tail/brake light sockets. When I switch over to those, I'll probably run LED's. Thanks for posting this right up.
__________________
1983 123.133 California - GreaseCar Veg System |
|
#10
|
|||
|
|||
|
Very well done, DV, looks factory. In hindsight I would have gotten enough wire to go from the base to the pin, and not had any wire connections. But I figured no-one would ever see/care.
Plus with the conversion of this car from euro to US spec as far as lighting and power stuff goes it could take a LLLLOOOONG time, aftermarket AC, Aftermarket CC, and so on all with those blasted click splice taps, terrible.
__________________
1983 240d 5Sp SOLD 1986 300D(LUCO) SOLD 1983 300TD(dreamboat)SOLD 1984 240d (Executive)SOLD 1984 240d (Euripides) SOLD 1982 300sd SOLD 1982 300sd (Ambas)SOLD |
|
#11
|
||||
|
||||
|
Quote:
Haha that was a slip! "right up" = "write up". Which goes with the multiple slips in this thread of "break" = "brake" !
__________________
1983 123.133 California - GreaseCar Veg System |
|
#12
|
|||
|
|||
|
DV are you picking on me again? Break = Brake. Can`t believe I spelt it both ways in the same post.
 No one commented on the link I posted on the brighter bulbs. I found some at PNP and installed them, they are brighter. When Iam following my Wife, I have to wear my Welding goggles. LOL  Charlie
__________________
there were three HP ratings on the OM616... 1) Not much power 2) Even less power 3) Not nearly enough power!! 240D w/auto Anyone that thinks a 240D is slow drives too fast. 80 240D Naturally Exasperated, 4-Spd 388k DD 150mph spedo 3:58 Diff We are advised to NOT judge ALL Muslims by the actions of a few lunatics, but we are encouraged to judge ALL gun owners by the actions of a few lunatics. Funny how that works |
|
#13
|
|||
|
|||
|
Thanks for the tip! I'll have to look for those for the Wife's, TD. the wagon has terribly inadequate rear lighting.
Also nice plate......
__________________
1983 240d 5Sp SOLD 1986 300D(LUCO) SOLD 1983 300TD(dreamboat)SOLD 1984 240d (Executive)SOLD 1984 240d (Euripides) SOLD 1982 300sd SOLD 1982 300sd (Ambas)SOLD |
|
#14
|
||||
|
||||
|
These should be illegal
__________________
$60 OM617 Blank Exhaust Flanges $110 OM606 Blank Exhaust Flanges No merc at the moment |
|
#15
|
||||
|
||||
|
Extra tail lights are a great idea. I did this mod 9 years ago to a 123 (1985 300D-T) and have since done it to my 124 (1995 E300D).
Jeremy
__________________
"Buster" in the '95 Our all-Diesel family 1996 E300D (W210) . .338,000 miles Wife's car 2005 E320 CDI . . 113,000 miles My car Santa Rosa population 176,762 (2022) Total. . . . . . . . . . . . 627,762 "Oh lord won't you buy me a Mercedes Benz." -- Janis Joplin, October 1, 1970 |
 |
| Bookmarks |
|
|