Parts Catalog Accessories Catalog How To Articles Tech Forums
Call Pelican Parts at 888-280-7799
Shopping Cart Cart | Project List | Order Status | Help


Go Back   PeachParts Mercedes-Benz Forum > Mercedes-Benz Tech Information and Support > Diesel Discussion

Reply
 
LinkBack Thread Tools Display Modes
  #1  
Old 09-05-2013, 03:44 PM
Chad300tdt's Avatar
Benzless Scoutmaster
 
Join Date: May 2007
Location: North Wales, PA
Posts: 4,001
w123 Wagon - Adding Rear Headrests - DIY

I added head rests to the rear (60/40) seat backs on my friend's 1984 300TD.

I purchased the complete seat backs with head rests from another car but they weren't perfect. The covers on the seats had a double stitch on the seat ribs and the carpet on the backs was dark brown. I disassembled both sets of seat backs so I could take the head rest receiving hardware from the one set of seats and swap them into the car's current seats. This way I keep the original look and just add the head rests.

First I removed all the hardware from each seat back.
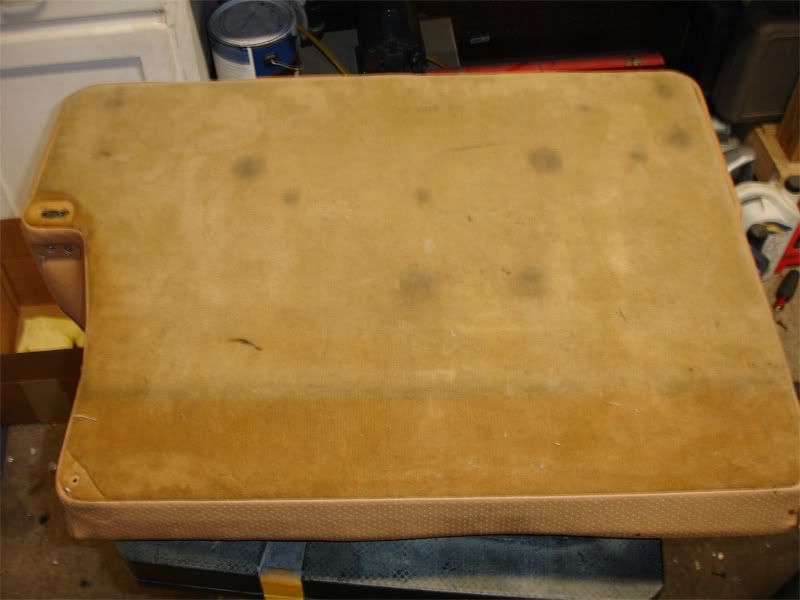

It's easiest to start in this corner to begin pulling the seat cover off.
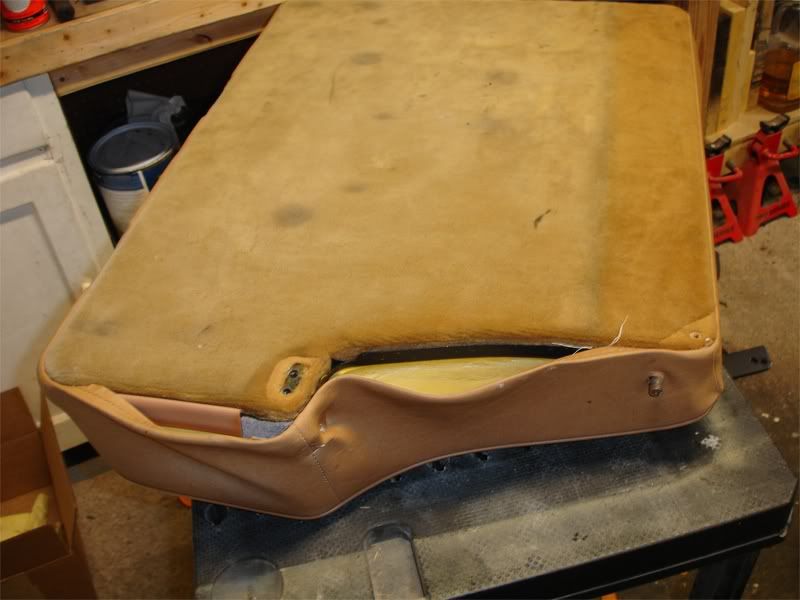

The edge is folded over and stitched to a plastic band. That band and the edge need to be pulled out of the lip on the seat back. You need to compress the seat foam to give enough slack in the cover to remove it all the way around.
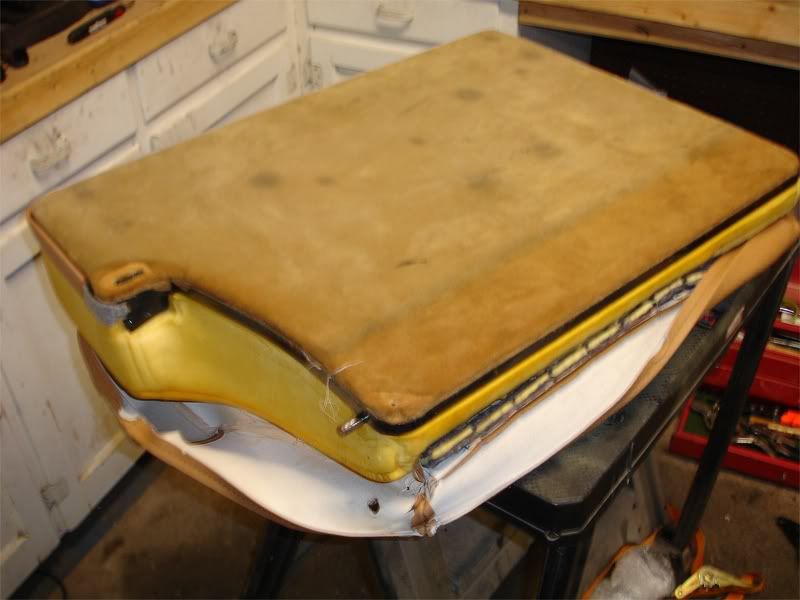

Once the edge of the cover is released completely, you can lift the cover off enough to see a metal rod in the seat cover clipped to a metal rod in the seat foam. The clips need to be pushed down and pried to the side with a screwdriver to release the cover from the foam.
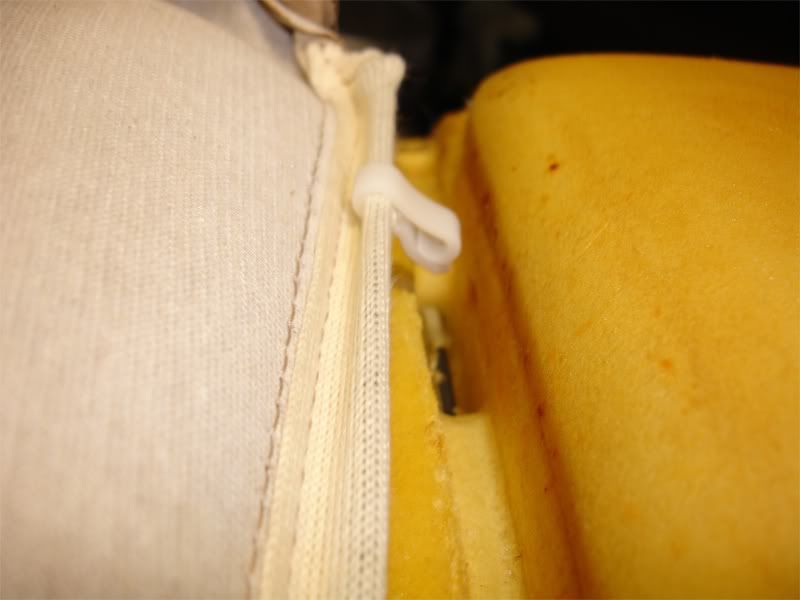

Now that the cover is off, you need to push the seat belt retaining bands through the foam so you don't rip them off.
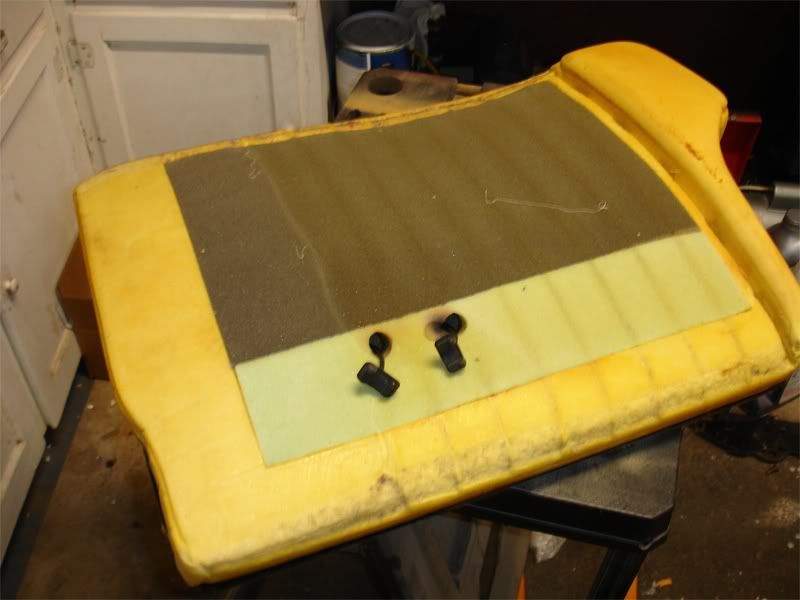

Then you can lift off the foam.
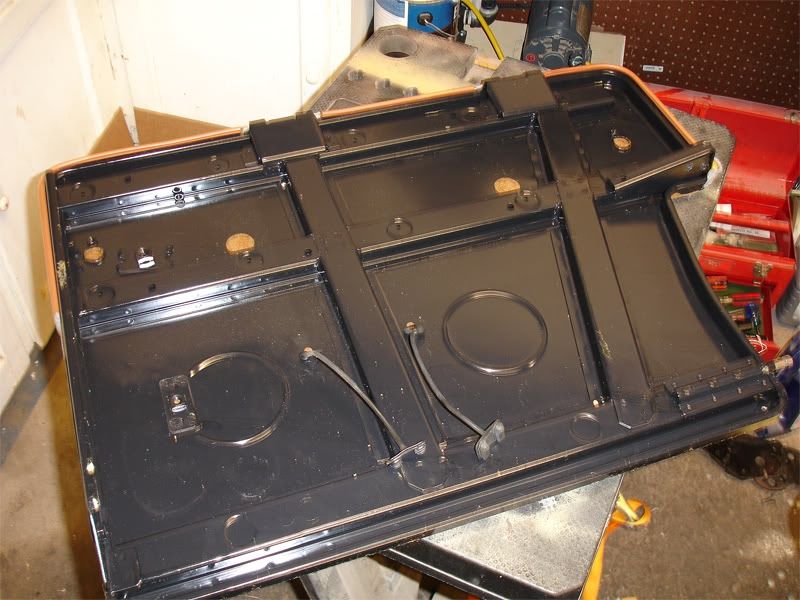

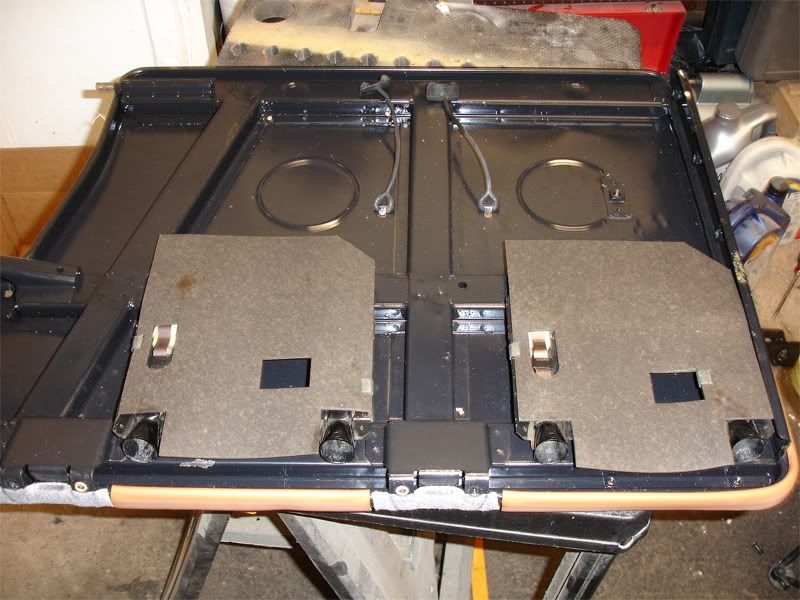
Here's the bracket in the donor seat. Each head rest has a set of brackets like this. The two silver clips need to be pushed off so the chipboard cover can be removed.
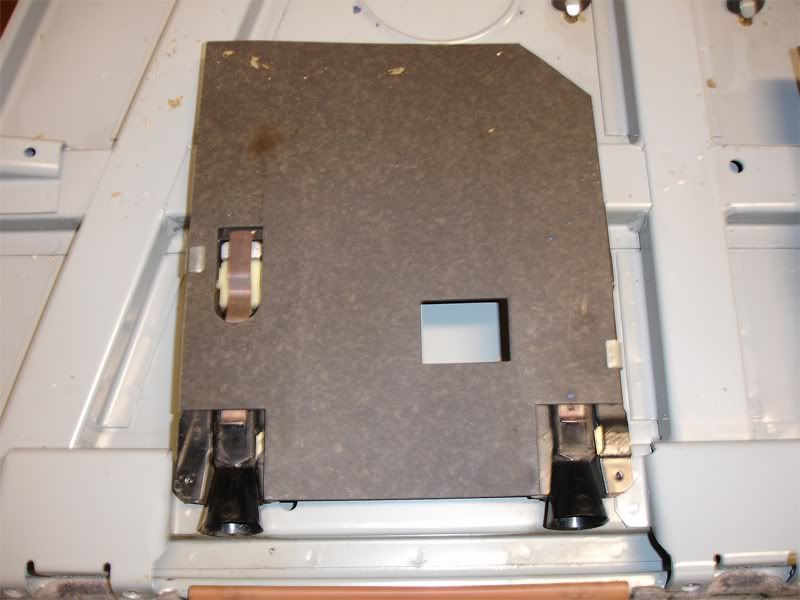

The two flat springs hold the post cups and the white nylon post bushings in place. On the left side it also holds the post lock button down.
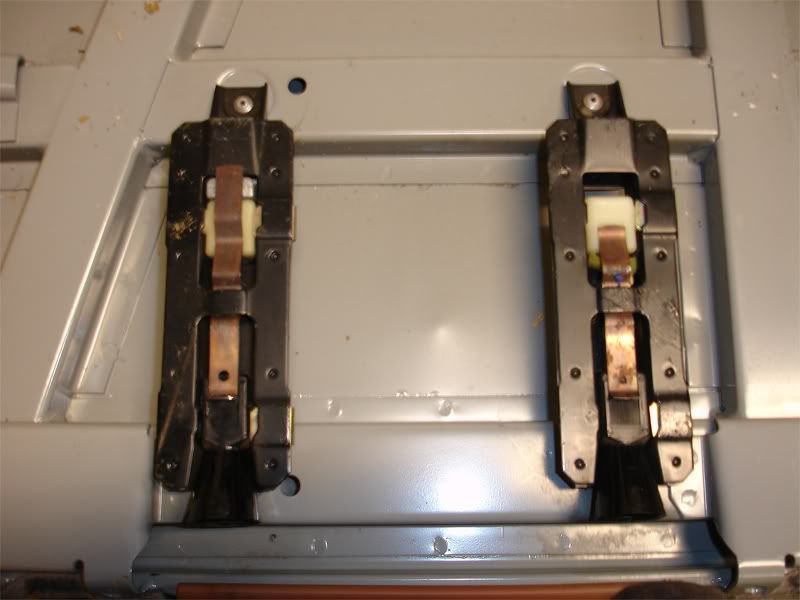

Remove both of the flat springs by pulling them through so you can remove the post cups and expose the pop rivets.
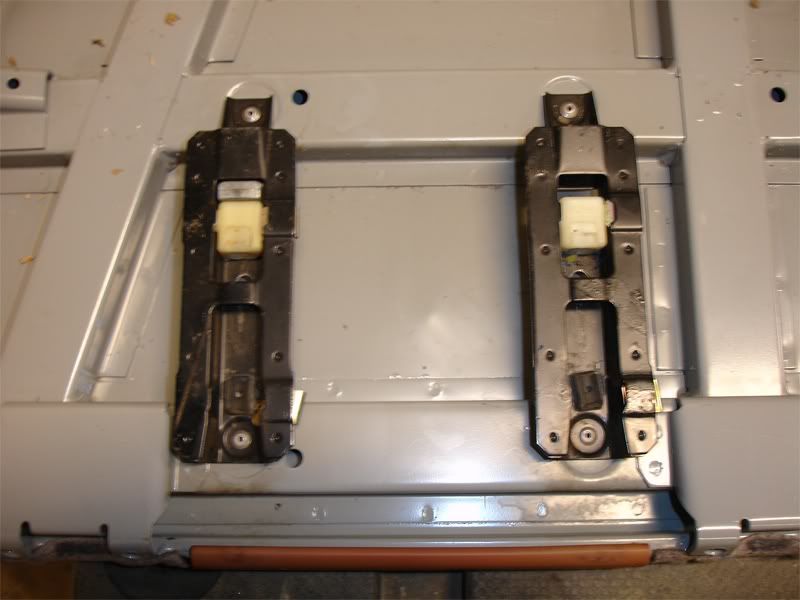

I drilled out the rivets and removed all the brackets. Here is the car's seat waiting for the brackets. All the holes are already there.
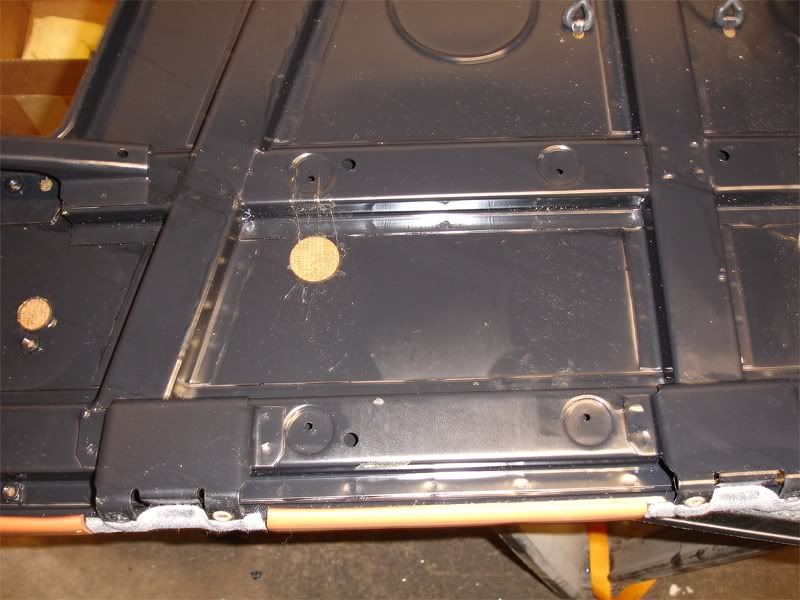

I pop riveted the brackets into the car's seats.
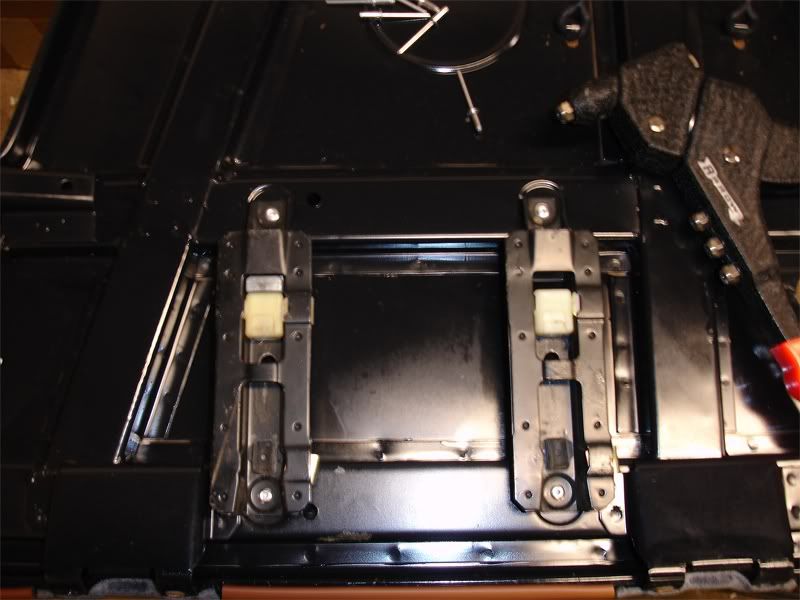

Then I replaced the post cups and flat springs.
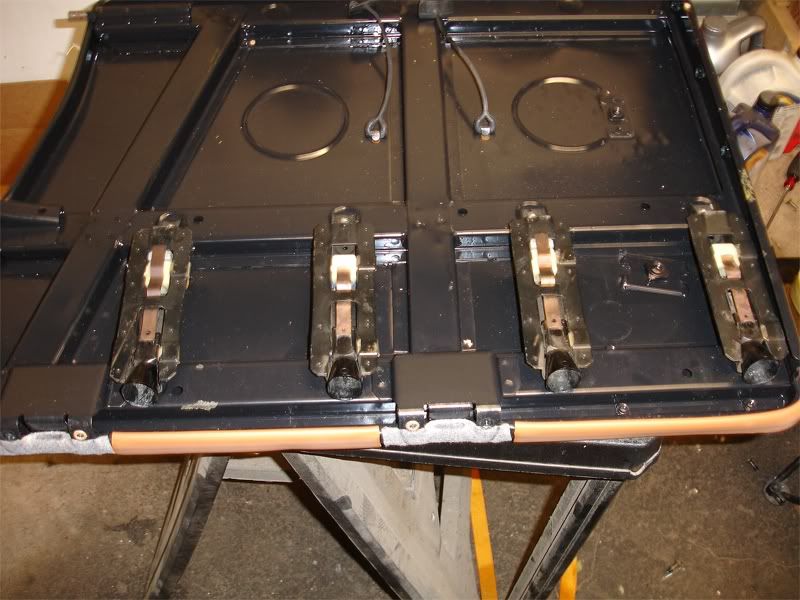

The chipboard covers got clipped back on.

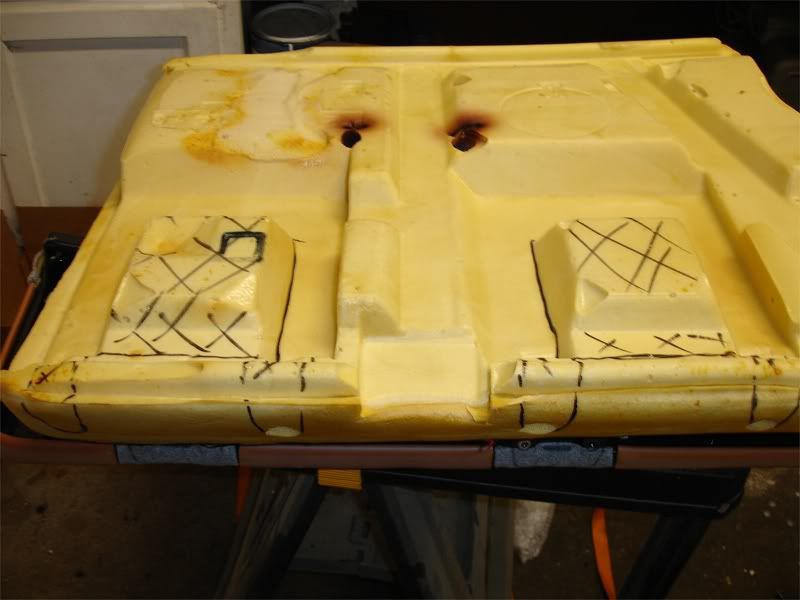
I needed to trim the seat's foam to allow for the new hardware in the seats. Here's all that needs to be removed.

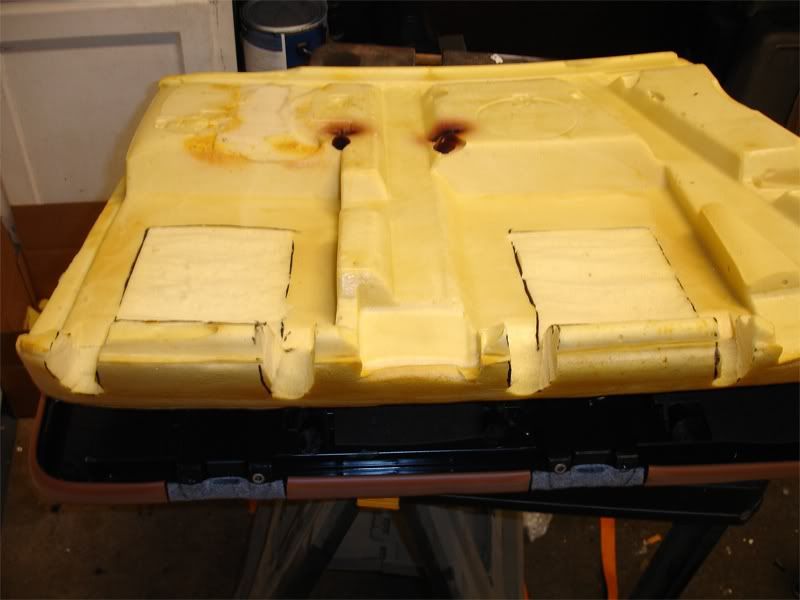
Here is the foam all trimmed and ready.

I lined up the covers from both seats to transcribe the location for the post hole trim rings and installed them on the car's seat covers before doing the reverse of the above steps and putting the seats back together.

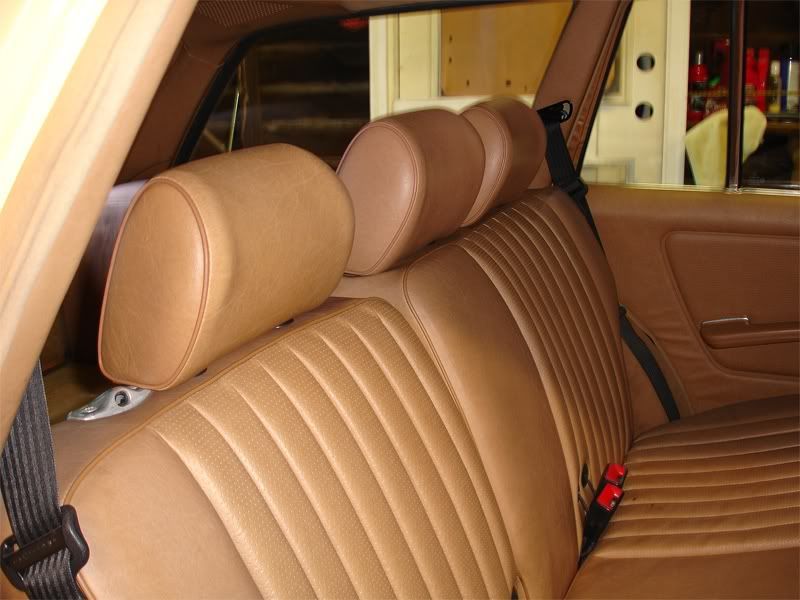
Here's the car with the rear head rests complete.

__________________
Chad
2006 Nissan Pathfinder LE
1998 Acura 3.0 CL
OBK#44
"Pleasure in the job puts perfection in the work." - Aristotle (384-322 B.C.)

SOLD
1985 300TD - Red Dragon
1986 300SDL - Coda
1991 - 300TE
1995 - E320
1985 300CD - Gladys
Reply With Quote
  #2  
Old 09-05-2013, 04:22 PM
JB3 JB3 is offline
Registered User
 
Join Date: Jan 2010
Location: RI
Posts: 7,246
great pictorial Chad! thanks for posting it

did you use the original non headrest seat skins? Maybe im misreading, but im not sure if you used the donor seat skin with the double stitch, or the ones that came of the non headrest seats.

If you used the ones original to the car, did you have to poke holes in the vinyl?
__________________
This post brought to you by Carl's Jr.
Reply With Quote
  #3  
Old 09-05-2013, 04:28 PM
Chad300tdt's Avatar
Benzless Scoutmaster
 
Join Date: May 2007
Location: North Wales, PA
Posts: 4,001
Quote:
Originally Posted by JB3 View Post
great pictorial Chad! thanks for posting it

did you use the original non headrest seat skins? Maybe im misreading, but im not sure if you used the donor seat skin with the double stitch, or the ones that came of the non headrest seats.

If you used the ones original to the car, did you have to poke holes in the vinyl?
I used the original skins and lined them up with the donor seat skins to transcribe the hole locations. Then I slit an "asterisk" in the skins and snapped the plastic grommets on.
__________________
Chad
2006 Nissan Pathfinder LE
1998 Acura 3.0 CL
OBK#44
"Pleasure in the job puts perfection in the work." - Aristotle (384-322 B.C.)

SOLD
1985 300TD - Red Dragon
1986 300SDL - Coda
1991 - 300TE
1995 - E320
1985 300CD - Gladys
Reply With Quote
  #4  
Old 03-03-2014, 01:56 PM
crazy4diesel's Avatar
Registered User
 
Join Date: Aug 2013
Location: Los Angeles area
Posts: 627
Quote:
Originally Posted by Chad300tdt View Post
I used the original skins and lined them up with the donor seat skins to transcribe the hole locations. Then I slit an "asterisk" in the skins and snapped the plastic grommets on.
Very cool, I'll have to do this. Given Mercedes obsession with safety I'm really surprised they ever sold cars in the 80's without rear seat headrests.
__________________
1983 W123 300TD US spec Turbo engine, with Euro bumpers and manual climate control, and manual transmission.
Reply With Quote
  #5  
Old 03-03-2014, 02:23 PM
Mölyapina's Avatar
User title not in use
 
Join Date: Oct 2012
Location: Chelmsford, Massachusetts
Posts: 4,373
I'm going to try this in my 'SD this spring.
__________________
"Senior Luna, your sense of humor is still loco... but we love it, anyway." -rickymay ____ "Your sense of humor is still loco... " -MBeige ____ "Señor Luna, your sense of humor is quite järjetön" -Delibes

1982 300SD -- 211k, Texas car, tranny issues ____ 1979 240D 4-speed 234k -- turbo and tuned IP, third world taxi hot rod

2 Samuel 12:13: "David said to Nathan, “I have sinned against the Lord.” And Nathan said to David, “The Lord also has put away your sin; you shall not die."
Reply With Quote
  #6  
Old 03-03-2014, 02:52 PM
pwogaman's Avatar
Senior Member
 
Join Date: May 2003
Location: Northern, Virginia
Posts: 2,034
Great job Chad!
__________________
http://i284.photobucket.com/albums/l...aman/Fleet.jpg

Peach Parts W124.128 User Group.

80 280SL
85 300SD
87 300TD
92 300D 2.5 Turbo
92 300TE 4Matic
Reply With Quote
  #7  
Old 03-03-2014, 02:55 PM
crazy4diesel's Avatar
Registered User
 
Join Date: Aug 2013
Location: Los Angeles area
Posts: 627
Another thing: How do you get the head rests out?
__________________
1983 W123 300TD US spec Turbo engine, with Euro bumpers and manual climate control, and manual transmission.
Reply With Quote
  #8  
Old 10-26-2016, 08:52 AM
Registered User
 
Join Date: Mar 2012
Location: Brooklyn, NY
Posts: 50
Chad:

Can you tell me how you managed to get the seat backs out of the car in the first place? There is conflicting information on the internet. Do I need to remove the plastic covers on the inside sides of the seat backs and then remove the three big phillips head screws? It looks like there is also a small bracket on the outside of each seatback.

You probably don't have pictures of the removal, but if you can tell me how it's done I'd greatly appreciate it.

Thanks,

Jeffrey
Reply With Quote
  #9  
Old 10-26-2016, 09:16 AM
Chad300tdt's Avatar
Benzless Scoutmaster
 
Join Date: May 2007
Location: North Wales, PA
Posts: 4,001
Quote:
Originally Posted by jjtaras View Post
Chad:

Can you tell me how you managed to get the seat backs out of the car in the first place? There is conflicting information on the internet. Do I need to remove the plastic covers on the inside sides of the seat backs and then remove the three big phillips head screws? It looks like there is also a small bracket on the outside of each seatback.

You probably don't have pictures of the removal, but if you can tell me how it's done I'd greatly appreciate it.

Thanks,

Jeffrey
If I'm remembering correctly, I believe I had to use two wrenches to remove a bolt holding the center of the seats to a bracket on the floor. Then there are snap rings holding the outer sides of the seat in the brackets there. Once the rings are removed the seats can slide side to side a bit to get them out of the brackets and out of the car.
__________________
Chad
2006 Nissan Pathfinder LE
1998 Acura 3.0 CL
OBK#44
"Pleasure in the job puts perfection in the work." - Aristotle (384-322 B.C.)

SOLD
1985 300TD - Red Dragon
1986 300SDL - Coda
1991 - 300TE
1995 - E320
1985 300CD - Gladys
Reply With Quote
  #10  
Old 10-26-2016, 09:23 AM
Chad300tdt's Avatar
Benzless Scoutmaster
 
Join Date: May 2007
Location: North Wales, PA
Posts: 4,001
Quote:
Originally Posted by crazy4diesel View Post
Another thing: How do you get the head rests out?
There is a release button that needs to be depressed as the head rest is at its highest position. The ends of the head rest posts/rods have a recessed ring that gets grabbed unless the button is depressed.
__________________
Chad
2006 Nissan Pathfinder LE
1998 Acura 3.0 CL
OBK#44
"Pleasure in the job puts perfection in the work." - Aristotle (384-322 B.C.)

SOLD
1985 300TD - Red Dragon
1986 300SDL - Coda
1991 - 300TE
1995 - E320
1985 300CD - Gladys
Reply With Quote
  #11  
Old 10-26-2016, 03:24 PM
Rogviler's Avatar
Unpurist
 
Join Date: Apr 2011
Location: Colorado
Posts: 904
Specifically, the button to release the headrests is on the back of the seat, disguised by the carpet. You'd never think to look there if you're used to the kind that's up on the top right by the headrest itself.

-Rog
Reply With Quote
  #12  
Old 10-26-2016, 05:16 PM
Registered User
 
Join Date: Nov 2012
Location: Mesa, Arizona
Posts: 1,763
Quote:
Originally Posted by jjtaras View Post
Chad:

Can you tell me how you managed to get the seat backs out of the car in the first place? There is conflicting information on the internet. Do I need to remove the plastic covers on the inside sides of the seat backs and then remove the three big phillips head screws? It looks like there is also a small bracket on the outside of each seatback.

You probably don't have pictures of the removal, but if you can tell me how it's done I'd greatly appreciate it.

Thanks,

Jeffrey
Jeffrey, if need pictures, the '79 is apart.

Chad, don't remember a snap ring, but the rest is familiar.
__________________
Current fleet:

1985 Mercedes-Benz 280TE - Waiting for heart surgery.

1985 Mercedes-Benz 300TDT - Rear ended 23 September 2016 and now looking for a new home.

1979 Mercedes-Benz 300TD - Parted out.

1964 Volkswgen Beetle - Vater's since September 1968 and undergoing a restoration.

1971 Volkswagen Sunroof Squareback with F.I. - in need of full restoration.

1971 Volkswagen Squareback automatic with F.I. - Vacationing with her caretaker until he is in better health.
Reply With Quote
  #13  
Old 11-08-2016, 07:15 PM
Administrator
 
Join Date: Mar 2016
Location: Los Angeles, CA
Posts: 1,984
If anyone has more DIY tech articles, check out the below link - we will review the submission and if published on our site, we will give you 10% off and a credit. Please let me know if you have any questions!

DIY PROJECT EXPERT SUBMISSIONS


-Dmitry
Reply With Quote
  #14  
Old 11-10-2016, 11:39 AM
Zacharias's Avatar
Not so amused
 
Join Date: Apr 2010
Location: West Quebec
Posts: 4,025
I have a set (3) of dark blue wagon headrests for sale

Sadly no inside seat hardware.

Just three dark blue headrests, in excellent condition. From an Ohio -> eastern Canada car with tinted windows.

PM me if interested.

__________________


Mac
2002 e320 4matic estate│1985 300d│1980 300td
Previous: 1979 & 1982 & 1983 300sd │ 1982 240d

“Let's take a drive into the middle of nowhere with a packet of Marlboro lights and talk about our lives.” ― Joseph Heller, Catch-22
Reply With Quote
Reply

Bookmarks

Thread Tools
Display Modes

Posting Rules
You may not post new threads
You may not post replies
You may not post attachments
You may not edit your posts

BB code is On
Smilies are On
[IMG] code is On
HTML code is On
Trackbacks are On
Pingbacks are On
Refbacks are On


All times are GMT -4. The time now is 03:10 AM.


Powered by vBulletin® Version 3.8.7
Copyright ©2000 - 2024, vBulletin Solutions, Inc.
Search Engine Optimization by vBSEO 3.6.0
Copyright 2018 Pelican Parts, LLC - Posts may be archived for display on the Peach Parts or Pelican Parts Website -    DMCA Registered Agent Contact Page