Parts Catalog Accessories Catalog How To Articles Tech Forums
Call Pelican Parts at 888-280-7799
Shopping Cart Cart | Project List | Order Status | Help


Go Back   PeachParts Mercedes-Benz Forum > Mercedes-Benz Tech Information and Support > Diesel Discussion

Reply
 
LinkBack Thread Tools Display Modes
  #1  
Old 02-05-2012, 02:55 AM
sixto's Avatar
smoke gets in your eyes
 
Join Date: Jun 2000
Location: Eastern TN
Posts: 20,841
DIY - 1987 300D serpentine belt tensioner replacement

This procedure should apply to any OM601, OM602 or OM603 engine.

Parts replaced: tensioner arm, tensioner pulley, tensioner damper. Those who know say MB brand dampers last considerably longer than other brands so there is an economy to the cost premium. Consider upgrading to a two-piece fan shroud if available for your car.

Tools used in order of appearance: 13mm wrench, MB lug wrench, flathead screwdriver, 8mm hex key, 3/8" breaker bar, 10mm deep socket, pulley holder, 8mm wrench, 6mm hex bit, 12mm hex bit, 1/2" breaker bar, 1/2" torque wrench.

What prompted me to replace the tensioner in my car is the damper ends had been rattling for a couple of months then finally the damper gave up and spewed fluid on the tensioner mechanism. More critically, the tensioner arm bearing was worn out allowing the tensioner arm to wobble. Others note the tensioner pulley axis isn't parallel with the crank axis, a belt that jumps off the pulleys and/or a tensioner arm that clicks as it pivots (by hand, you wouldn't hear it click with the engine running).

We'll ignore the leaky head gasket and front crank seal for now. We'll also ignore the used tensioner hardware I'm installing. It was six months new when the 93 SD was totalled and it's greasy because I didn't use any sealer or thread lock when installing it in the SD. And the wire to the temp sensor (mine's a sensor, not a switch) at the thermostat needs to be tied to its clamps. Let's get started...

Yuck! What a mess.


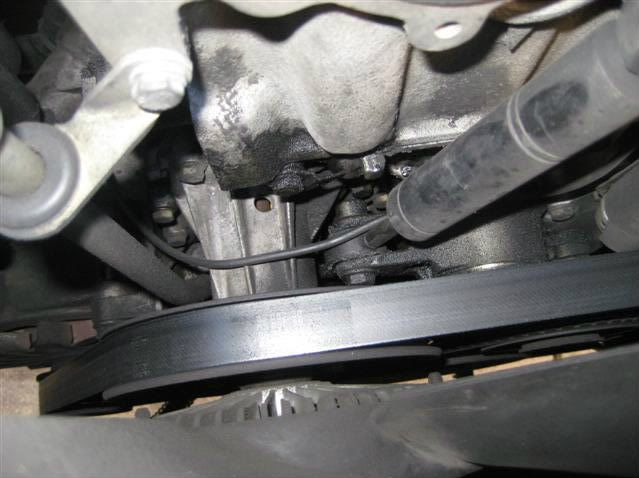
This is the upper attachment of the tensioner mechanism. First thing to do is release the upper spring perch.


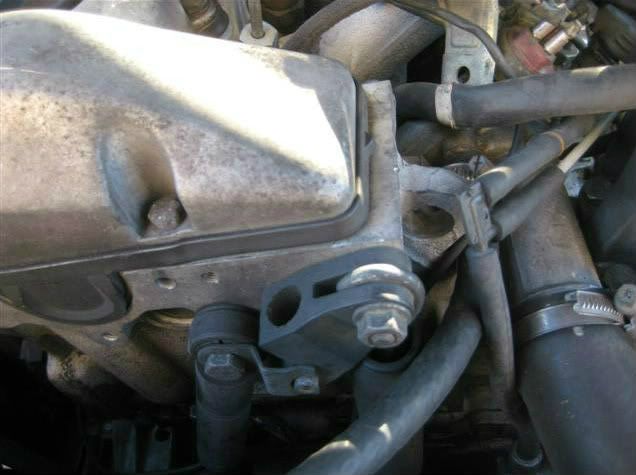
A long bolt through the head holds the spring in tension. The bolt goes in from the back so it cannot be fully removed. It only has to slide back an inch or so and there's plenty room for that. If someone forgot to put the bolt in place while the upper radiator hose fitting was off the head, they probably installed the bolt from the front and it will have to come off completely. Remove the nut.


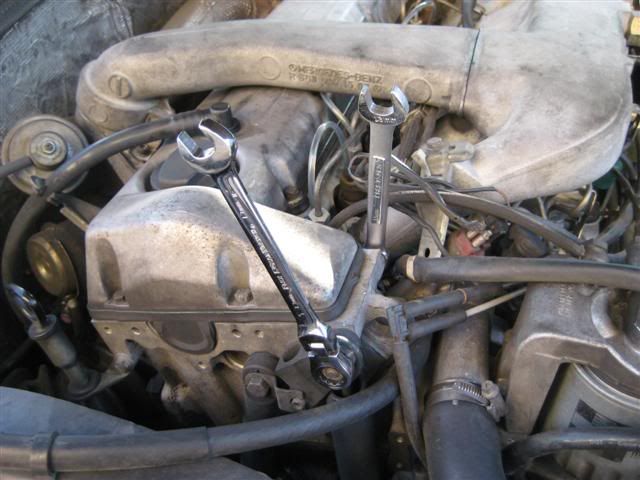
The upper spring perch has a slot for the MB lug wrench to use as a lever. I used a big screwdriver. Set the lever in the slot and pull towards the passenger side just enough to take the shear off the long bolt then pull back the bolt (or remove it from the front) until the upper spring perch is free of the bolt.


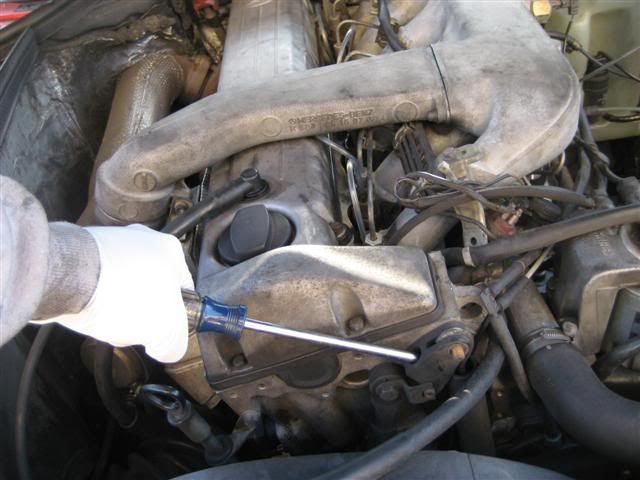
Slowly release the force you apply to the lever.


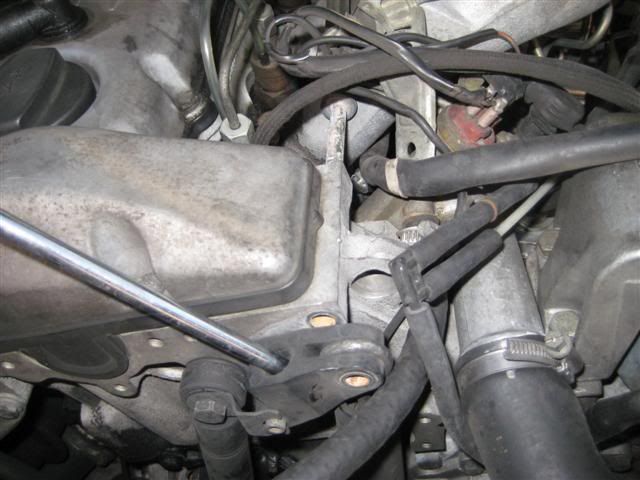
NOTE: this procedure assumes a single piece fan shroud. Some cars have a two-piece fan shroud that can be removed independently of the fan. If you're so lucky, you may laugh at the rest of us. The forward half of the fan shroud is likely held to the radiator the same way as a single piece fan shroud.

There are two clips holding the fan shroud to the radiator. Note the alignment of the shroud tabs and the radiator upper frame, scribe witness marks if necessary, then pry off the clips. I used a screwdriver.


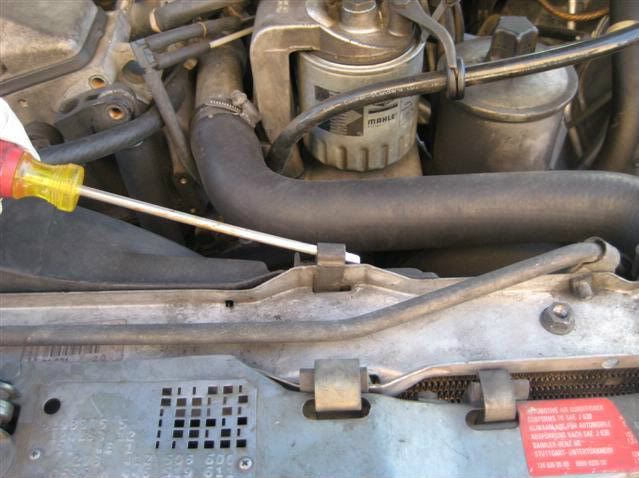
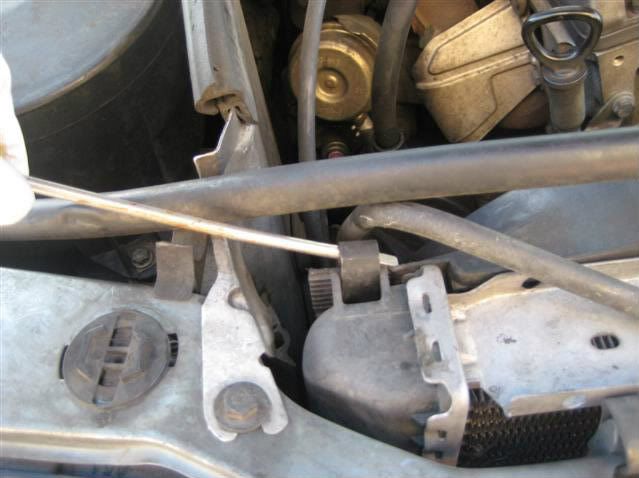
The upper coolant hose between the radiator and the reservoir might be clipped to the radiator shroud. If so, pry off the clip. It'll probably break. I get replacements when I'm at the wrecking yard.


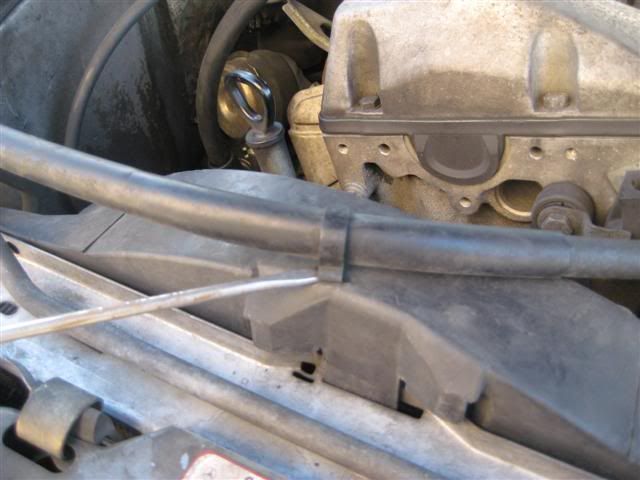
The shroud is held against the radiator by a tab at the top and two tabs below, and the two clips just removed. Lift the shroud to disengage the upper tab. Set the shroud over the fan to give yourself as much room as possible to work between the fan and the radiator.


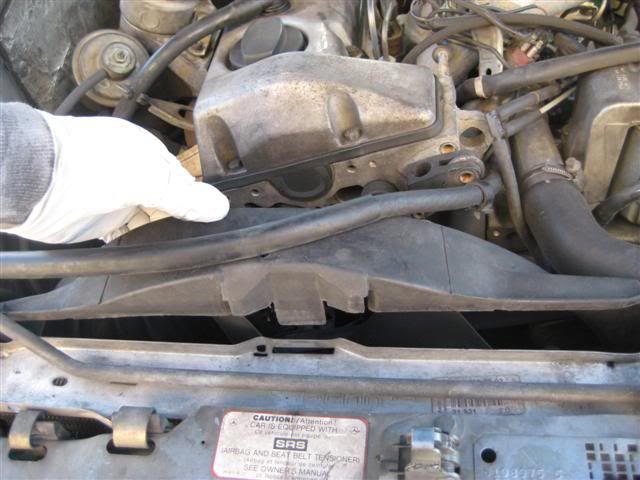
The 300D is as tight as it gets in this regard so you S-classers and 2.5ers should have it better. A prudent person would slip in a board to protect the radiator fins. I am not a prudent person.


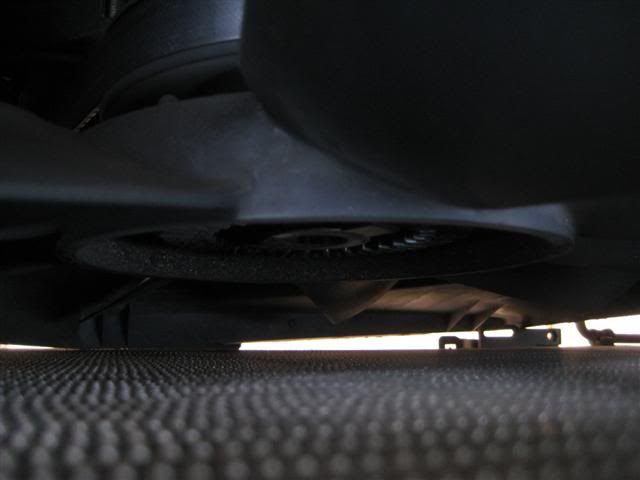
This is the tool I use to release the fan from the water pump pulley. It's composed of an 8mm hex key, a 3/8" breaker bar and a 10mm deep socket. You can buy a obtain 8mm hex bit but if I'm to spend any money on it I'd have the square tip of a ratchet reworked into an 8mm hex. I'll put my money towards a W140 Diesel with more room to work on the fan.


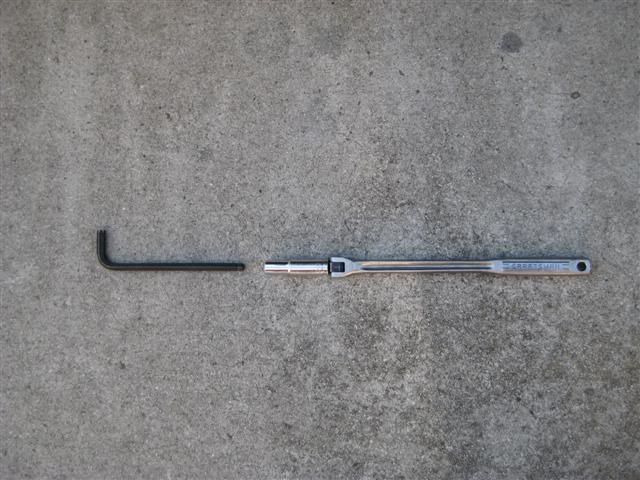
It takes a bit of doing to hook the hex key on the fan bolt mostly because you can't see what you're doing.


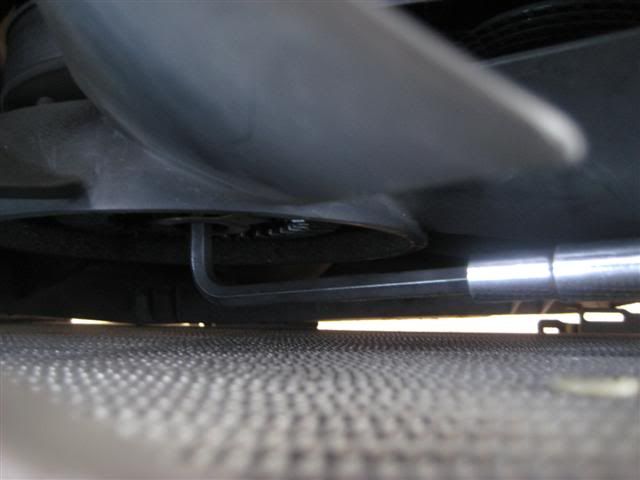
This is the pulley tool that costs $10 or so at Harbor Freight.


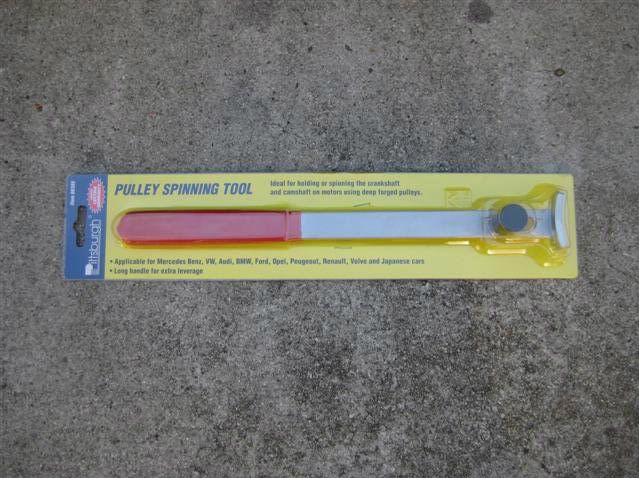
This is the pulley tool in place gripping the water pump pulley between the dipstick tube and belt tensioner damper. I don't bother adjusting the pulley tool roller. It seems to set itself.


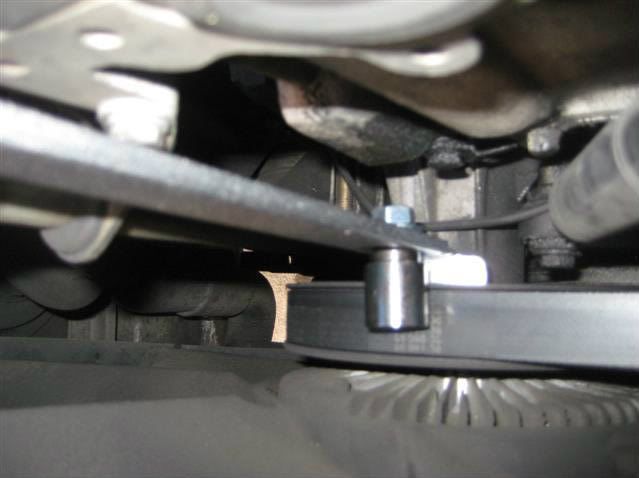
Break loose the fan bolt. Regardless of what tool you use, you'll probably run into the puzzle of backing out the bolt beyond the point that you can remove the tool to get the bolt out completely. Once the torque is broken, I use the tool below, comprised of a hex key and an 8mm wrench as a T-handle to back out the bolt to the point that it can be turned by hand. Then I turn it by hand.


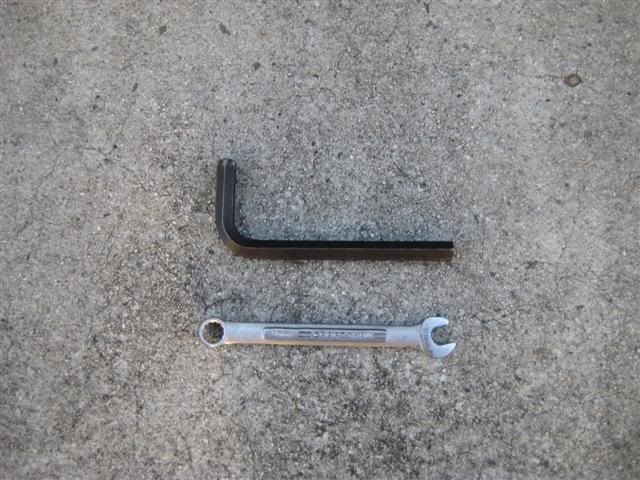
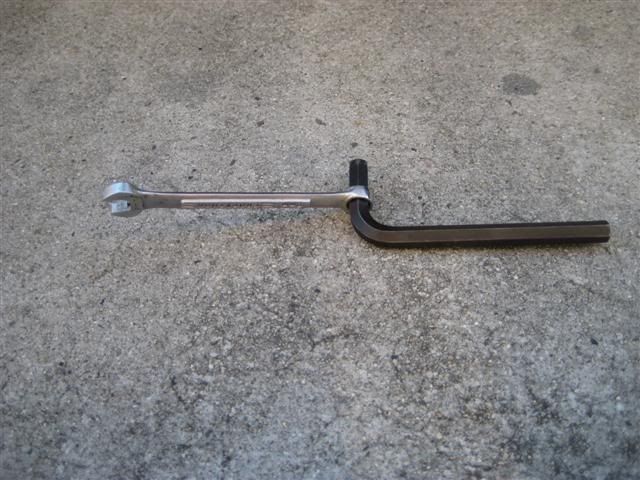
Wiggle the fan shroud and fan out of the engine bay. The main snag is between the upper passenger side corner of the shroud and the radiator cooler line. In this picture I rotated the shroud 45-degrees clockwise then lifted up and out.


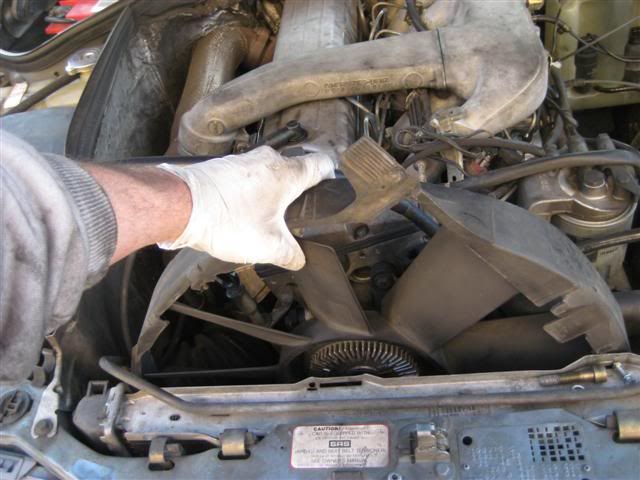
Here's as unobstructed a view of my Gatorback belt as you're going to see. As an aside, this belt has been on my 87 SDL, 93 SD 3.0 and now the 87 300D. Tough belt!


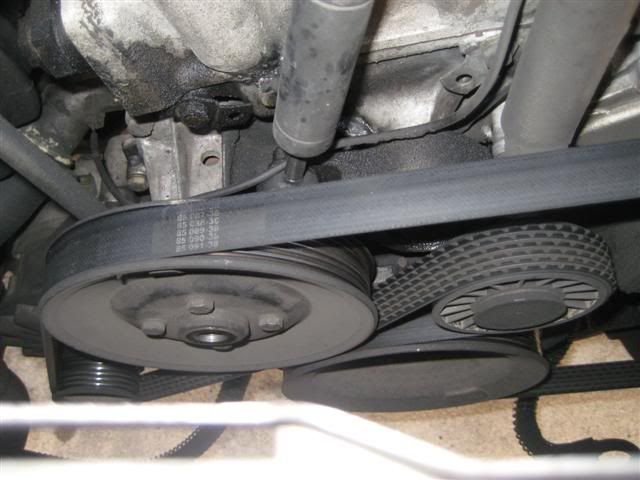
Pull on the belt to release tension.


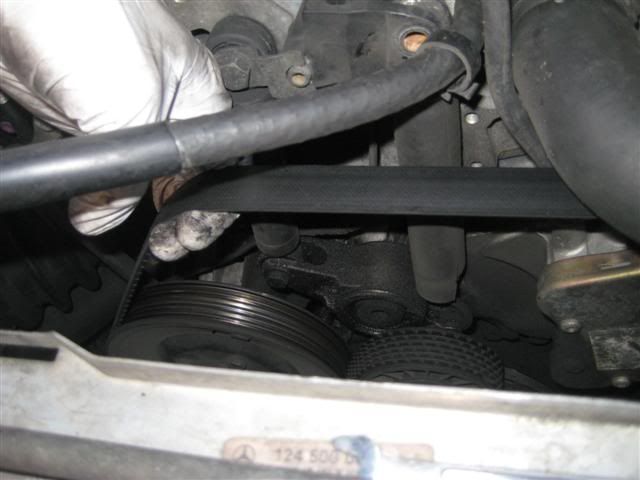
Move the belt away. It doesn't have to come off completely, just off the tensioner pulley.


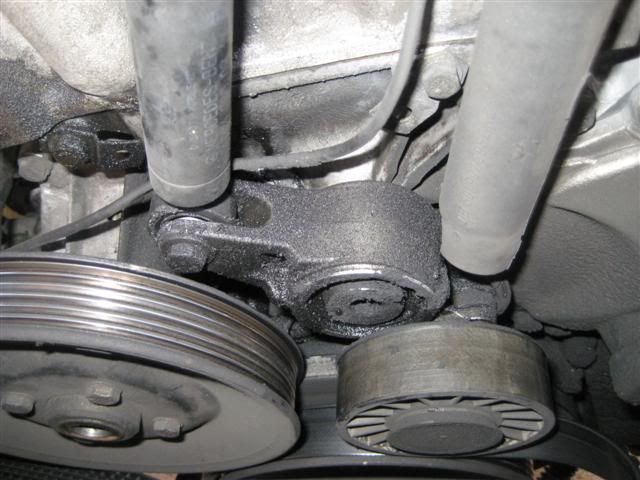
Remove the upper attachment of the tensioner damper with a 13mm wrench. There's a clip that serves as both a washer for the bolt and a retainer for the upper spring perch. Keep track of the clip although it'll probably have made friends with the upper chain guide rail pin extension that serves as the upper spring perch pivot.


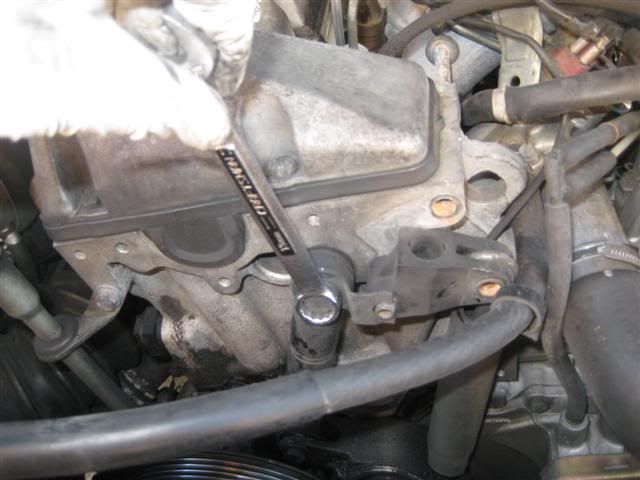
Pull the upper spring perch off its pivot. Unhook the spring from the upper spring perch. You can unhook the spring from its lower perch on the tensioner arm but there's no real need to.


Pry the plastic covers off the tensioner arm and tensioner pulley. There is no cover over the tensioner arm bolt in this sequence. When prying, catch the edge of the cover closest to the pulley (detail in second picture). Don't pry on the lip of the cover. Ignore the hex bit already on the tensioner arm bolt.


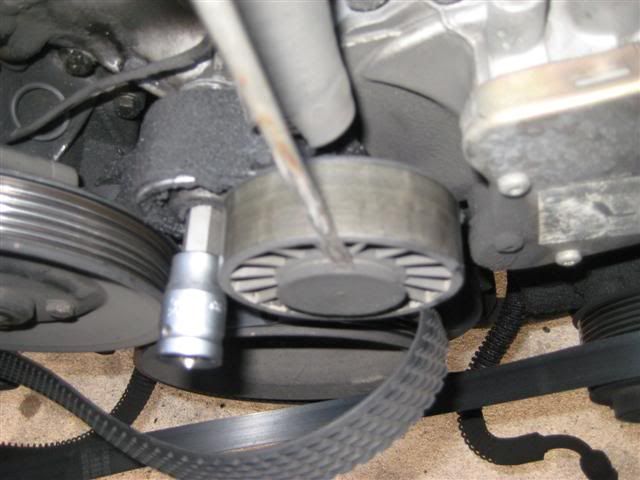
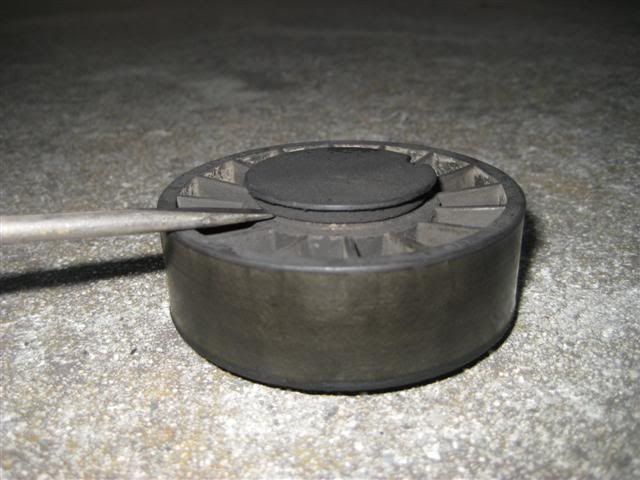
Remove the tensioner pulley bolt with a 6mm hex bit on a breaker bar then remove the pulley.


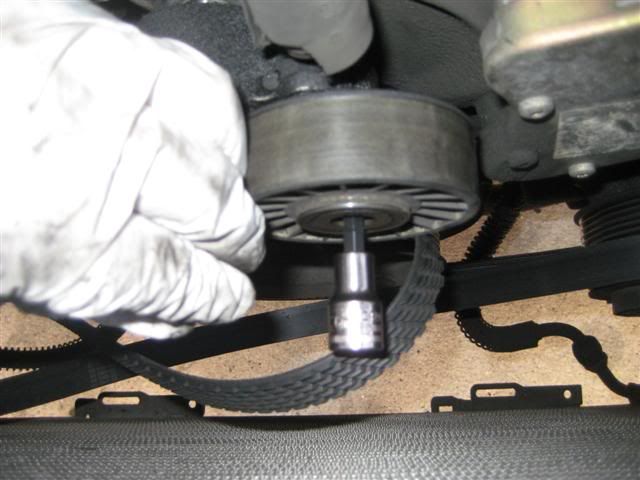
Set the tensioner arm in this orientation then remove the tensioner arm bolt with a 12mm hex bit on a breaker bar. If the tensioner arm is too far CCW, the lower attachment of the damper will catch on the water pump pulley. If the tensioner is too far CW, the lower spring perch will catch on the crank damper. The tensioner arm bolt is captive and the tensioner arm will back out with the bolt so watch that nothing catches.


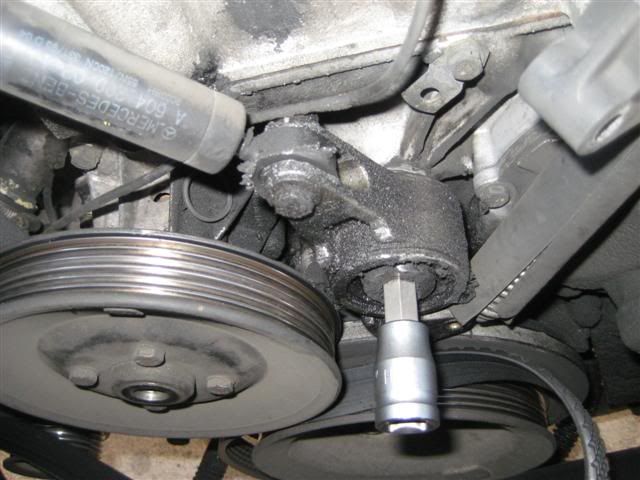
Here's the old tensioner arm with the damper still attached.


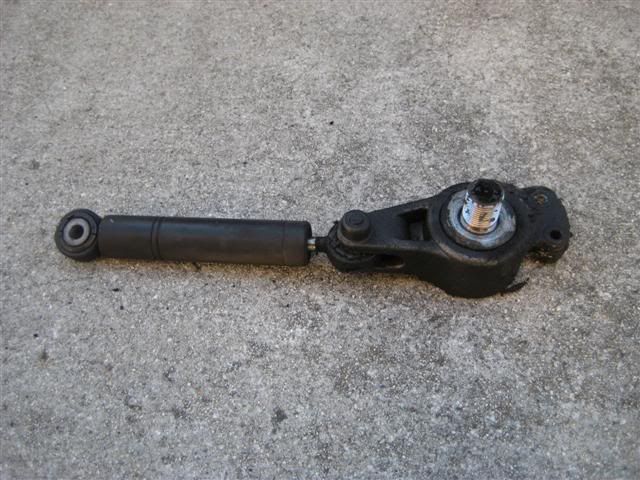
Here are the old tensioner arm and new old replacement. Note that the all important thick washer is still on the old tensioner arm. To remove the washer, tap (or bang) the tensioner arm on a solid surface. The washer should fall out.


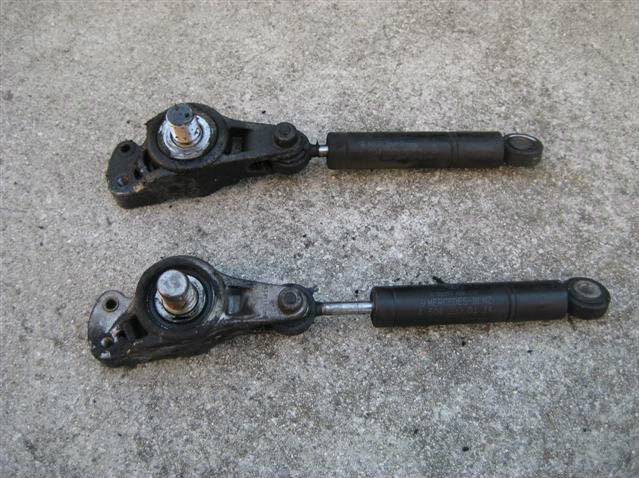
Installation is the reverse of removal and IMO no more difficult. The FSM calls for Omnifit 100m orange sealant on the tensioner arm bolt threads. I don't know what that is or where to get it but I heard folks use Loktite 271 (red) with no leaks or loosening.

There isn't much to say about attaching the damper to the new tensioner arm. The shiny rod end attaches to the tensioner arm. You can install the damper after torquing the tensioner arm to the engine.

Torque specs are 100Nm for the tensioner arm bolt, 25Nm for the tensioner pulley and damper bolts and 10Nm for the upper spring perch long bolt. The exception is the 603.971 (W140 SD) which takes 30Nm for the tensioner pulley.

Note the two tabs at the bottom of the fan shroud that fit into corresponding slots in the bottom frame of the radiator. If the encapsulation panel is off or you don't have one, peek from below to ensure the tabs engage properly. Re-establish shroud alignment using your memory or witness marks to ensure the fan doesn't hit the shroud.
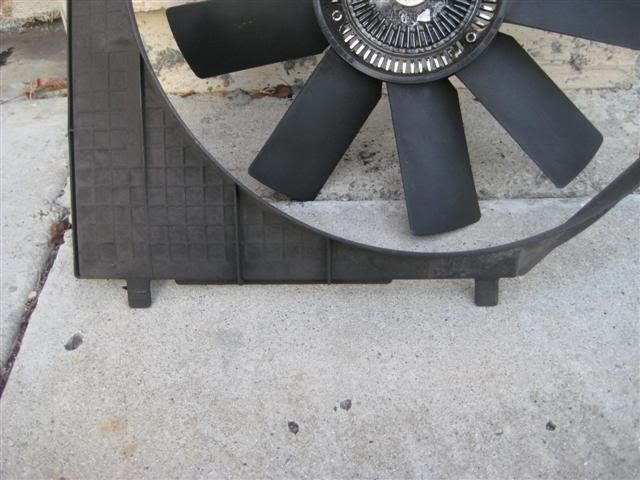
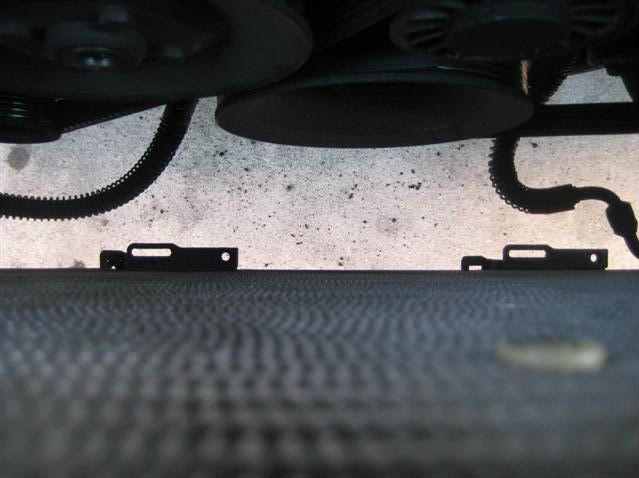


Sixto
87 300D

Reply With Quote
  #2  
Old 02-05-2012, 05:49 AM
locry's Avatar
I love this place!!! :)
 
Join Date: Nov 2003
Location: Philippines, ...recently submerged, AGAIN
Posts: 1,020
I do not have that "thick washer" you mentioned... I asked the parts dept and they too do not have that washer. I do not know if it was updated or what. But I do know that nothing binds when I have everything bolted up. So was the tensioner arm updated negating the need for the washer? Or is the washer just a spacer so the belt sits squarely on the pulley? because as I look at mine... the belt is slightly off-center. It's been that way since I got the car. And I have changed that dang tensioner about 4 times already. 3times because I hadn't bothered reinstalling the damper... (chewed up the tensioner in less than 6 months...long story...stuck/broken bolt)

Had the bolt extracted, BIG difference with the damper on that's for sure!
__________________

85 190E 2.3(SOLD)
86 230E (-->300D) sold
87 300D (-->300TD) sold
68 250S w/ a 615 and manual tranny (RIP)
87 300TD (SOLD)
95 S280 "The KRAKEN" (Turbo 2.9 602 transplant) traded
86 190E 2.3... current project
Reply With Quote
  #3  
Old 02-05-2012, 12:07 PM
Jeremy5848's Avatar
Registered Biodiesel User
 
Join Date: Mar 2006
Location: Sonoma Wine Country
Posts: 8,402
Nice work, Sixto.

Jeremy
__________________

"Buster" in the '95

Our all-Diesel family
1996 E300D (W210) . .338,000 miles Wife's car
2005 E320 CDI . . 113,000 miles My car
Santa Rosa population 176,762 (2022)
Total. . . . . . . . . . . . 627,762
"Oh lord won't you buy me a Mercedes Benz."
-- Janis Joplin, October 1, 1970
Reply With Quote
  #4  
Old 02-05-2012, 01:11 PM
sixto's Avatar
smoke gets in your eyes
 
Join Date: Jun 2000
Location: Eastern TN
Posts: 20,841
Washer is 601 990 17 40.

Sixto
87 300D
Reply With Quote
  #5  
Old 02-05-2012, 02:40 PM
retmil46's Avatar
Registered User
 
Join Date: Jun 2006
Location: Mooresville, NC
Posts: 344
When I did the same job on my first 87 about 4 or 5 years ago, there is a breakpoint in production, for either the engine or the tensioner, that deletes the thick washer. Been so long ago I can't remember the details. I believe GSXR was my go-to guy at that time for advice on whether or not the washer was needed.

Just looked at the Fastlane parts description. There is a production break at engine serial # 49508 - but after that, it's a completely different looking tensioner. Mine uses the same "old" style tensioner as in the pics above - so I believe it was the tensioner itself that was updated. When I did mine, I used a new tensioner, and with the thick washer, the pulley was almost 1/8" off center in relation to the belt - I removed the thick washer from the "new" tensioner, and the pulley centered up perfectly with the belt.

If you use a new tensioner arm, might want to fit everything up finger tight at first and see where the belt is going to ride on the pulley, before torquing everything down, to determine if you need the washer or not.
__________________
Just say "NO" to Ethanol - Drive Diesel

Mitchell Oates
Mooresville, NC
'87 300D 212K miles
'87 300D 151K miles - R.I.P. 12/08
'05 Jeep Liberty CRD 67K miles
Grumpy Old Diesel Owners Club

Last edited by retmil46; 02-05-2012 at 02:59 PM. Reason: Additional Info
Reply With Quote
  #6  
Old 02-05-2012, 06:34 PM
Registered User
 
Join Date: Jul 2003
Location: Northern Virginia
Posts: 1,078
Nice job

Not dissimilar to procedure for the 606 except for wrench sizes.
__________________
2009 E320 Bluetec 117,000
1995 E300D 306,000 Sold
1996 Ford Taurus LX 130,000 Sold
1985 300TD Still 225,000 Sold
2016 Ford Fusion 24,900
Reply With Quote
  #7  
Old 02-05-2012, 08:08 PM
TheDon's Avatar
Ghost of Diesels Past
 
Join Date: Oct 2005
Posts: 13,285
I wouldnt use a screw driver as a pry bar. Never ends well.
Reply With Quote
  #8  
Old 02-06-2012, 12:20 AM
Mechanical Hyphochondriac
 
Join Date: Sep 2009
Location: Ocala, FL
Posts: 539
I have done this twice now. It is very difficult, but possible to remove the lowest bolt connecting the damper to the arm WITHOUT removal of fan and shroud. Lots of prying, though I did not feel like risked any damge to other compents. I wound up replacing that lower bolt with a slighter shorter one because the stock bolt is JUST slightly to long to come out without the pulley blocking it. It unthreads completely but wont make the angle. With the shorter bolt, I can now do this job easier next time it comes around!

I will try to get some more data on that soon. Great writeup!
__________________
1987 300TDT - 195,000 (Original #14 head)
1993 190E 2.3 - 105,000
1981 300D - 250,000
Reply With Quote
  #9  
Old 02-06-2012, 01:52 AM
general nuisance
 
Join Date: Dec 2009
Location: des moines, ia
Posts: 442
Quote:
Originally Posted by locry View Post
I do not have that "thick washer" you mentioned... I asked the parts dept and they too do not have that washer. I do not know if it was updated or what. But I do know that nothing binds when I have everything bolted up. So was the tensioner arm updated negating the need for the washer? Or is the washer just a spacer so the belt sits squarely on the pulley? because as I look at mine... the belt is slightly off-center. It's been that way since I got the car. And I have changed that dang tensioner about 4 times already. 3times because I hadn't bothered reinstalling the damper... (chewed up the tensioner in less than 6 months...long story...stuck/broken bolt)

Had the bolt extracted, BIG difference with the damper on that's for sure!
The washer is a must, otherwise too much torque is put on the bearing, the washer insures that the bearing unit it bound to the engine front and not just the center part. Also, the belt will not align properly on the tensioner pulley without it, at least it didn't on my W140. my .02 steve
__________________
Steve A
92 W140 OM603
97 VW Jetta TDI
90 Passat variant TDI 6 speed MT
94 Chevy K1500 6.5TD
05 E320 CDI
+ others
Reply With Quote
  #10  
Old 02-06-2012, 03:55 AM
locry's Avatar
I love this place!!! :)
 
Join Date: Nov 2003
Location: Philippines, ...recently submerged, AGAIN
Posts: 1,020
Quote:
Originally Posted by glenlloyd View Post
The washer is a must, otherwise too much torque is put on the bearing, the washer insures that the bearing unit it bound to the engine front and not just the center part. Also, the belt will not align properly on the tensioner pulley without it, at least it didn't on my W140. my .02 steve
That makes sense... damn...
__________________

85 190E 2.3(SOLD)
86 230E (-->300D) sold
87 300D (-->300TD) sold
68 250S w/ a 615 and manual tranny (RIP)
87 300TD (SOLD)
95 S280 "The KRAKEN" (Turbo 2.9 602 transplant) traded
86 190E 2.3... current project
Reply With Quote
  #11  
Old 02-06-2012, 09:43 AM
TheDon's Avatar
Ghost of Diesels Past
 
Join Date: Oct 2005
Posts: 13,285
good DIY article, wish it was here months ago!
Reply With Quote
  #12  
Old 10-07-2012, 08:22 AM
Registered User
 
Join Date: Aug 2011
Posts: 5
upper perch pin

The plastic upper 'spring perch' has hole in the end opposite to the spring hook, and in the photo there is a tube projecting from the head, that this plastic 'spring perch' mounts on.

I replaced the tensioner, shock, pulley and air con compressor 2 days ago, and the 'tube' was not there. Never has been. The metal slotted plate looked like it should line up with the hole in the plastic perch, and seemed like there should be a bolt, but no evidence of any thread in the head...

Could someone explain what this tube is, or what it is called, and a part number?

The PN on the plastic block (perch) is 601 203 03 28 2 ( yes the last 2 is cast on the part)

I had been scratching my head as to the function of the 'perch', as it had been mounted upside down by prior owner, and with the missing tube/mount...
Attached Thumbnails
DIY - 1987 300D serpentine belt tensioner replacement-img_3989small.jpg  
Reply With Quote
  #13  
Old 10-07-2012, 10:12 AM
sixto's Avatar
smoke gets in your eyes
 
Join Date: Jun 2000
Location: Eastern TN
Posts: 20,841
Looks like everything's there. The perch slides over the nub extending from the head, which BTW is also the timing chain upper guide retention pin. The bigger hole in the perch lines up with the hole just above and a long bolt that takes a 13mm wrench comes through from the fitting the holds the upper radiator hose fitting to the head. The spring provides tension when the bolt goes through the perch. The threaded hole beside the nub is for the tensioner damper. Some models have a bracket that ties the damper upper mount to the perch mount so the perch can't slip off the nub. The perch isn't going anywhere with that big bolt in place.

Sixto
87 300D
Reply With Quote
  #14  
Old 10-07-2012, 02:26 PM
sixto's Avatar
smoke gets in your eyes
 
Join Date: Jun 2000
Location: Eastern TN
Posts: 20,841
Too early on a Sunday for me. You referenced the picture I posted earlier. I thought that was your engine.

There are two lengths of upper chain guide retention pin - the long one goes as shows in the picture with about an inch protruding to serve as a pivot, the short one goes about 5" southwest and is flush with the head surface when installed. If your chain guide is secure, maybe someone got the pins backwards or used two short pins.

So in your car the spring is held by the long bolt? That would work. The pivot is only used for spring r&r. It serves no purpose once the spring is tensioned. How do you relieve spring tension to remove the long bolt?

Sixto
87 300D
Reply With Quote
  #15  
Old 10-07-2012, 03:08 PM
Registered User
 
Join Date: May 2009
Location: The slums of Beverly Hills
Posts: 8,065
I was able to break open the 8mm allen screw without a counter hold. Simply jerk the breaker bar and it popped. Once the head of the screw was showing and the space was too tight for the allen tool, I used channel locks to turn the screw bit by bit.

Is this fan supposed to be plastic or metal? I have a cast iron or aluminum fan (very heavy) made in germany and a made in china clutch. I guess I'll keep it in the trunk for a while.

__________________
CENSORED due to not family friendly words
Reply With Quote
Reply

Bookmarks


Posting Rules
You may not post new threads
You may not post replies
You may not post attachments
You may not edit your posts

BB code is On
Smilies are On
[IMG] code is On
HTML code is On
Trackbacks are On
Pingbacks are On
Refbacks are On


All times are GMT -4. The time now is 10:15 AM.


Powered by vBulletin® Version 3.8.7
Copyright ©2000 - 2024, vBulletin Solutions, Inc.
Search Engine Optimization by vBSEO 3.6.0
Copyright 2024 Pelican Parts, LLC - Posts may be archived for display on the Peach Parts or Pelican Parts Website -    DMCA Registered Agent Contact Page