

|
|
|
|
|
|
#31
 12-02-2016, 05:28 PM
|
||||
|
||||
|
Quote:
__________________
1983 123.133 California - GreaseCar Veg System 

|
|
#32
12-05-2016, 11:56 AM
|
|||
|
|||
|
Here's the plan.
I've already wire-brushed the area around the rust-through with my dremel and a steel brush. There's about a 1/4" area of surface rust that will be visible after the seal is installed, and I think I will need to cut out a 1-2" area of bad metal to get back to nice solid metal. I can get to the back of the area, and there is some loose seam sealer I'll remove. I'll prep and por-15 both sides of the metal, then use No Weld Hole Repair Kit to repair the hole. Follow that up with body filler, and por putty to replace the old seam sealer. I'll also por-15 the entire window seal area while I have access, even though there's no other rust visible. I'm planning on sourcing some color matched paint, I need to find my paint code and order that. I'll do the painting myself. I found an online store that sells the glass (ppg or another quality brand, apparently) for $125 - with local pickup available to me. I'm going to order the OE seal from Pelican. Do I need to order anything else for this job, such as Adhesive Pad for Windshield Installation 2106710397 - Genuine Mercedes-Benz - 210-671-03-97 | Pelican Parts or Windshield Adhesive Kit 2216708101 - Genuine Mercedes-Benz - 221-670-81-01 | Pelican Parts ? Or should I use plumbers putty? I've installed glass before, I was concerned that the chrome would make it more difficult, but I found a youtube video of the job being done on a slightly earlier MB and it appears to be a similar process to my '74 VW. So I'm planning on doing the installation myself. Total cost should be around $400-$500, which includes the OE weatherstrip that I wouldn't have got from safelite. Can anyone offer any advice or corrections to my plan? Thanks.
__________________
'85 300D - federal spec, built in late 84. 85 300D Complete AC System Rebuild
|
|
#33
12-05-2016, 12:31 PM
|
||||
|
||||
|
POR 15 dries to s slick surface and I am not sure if that hole repair kit will stick to it. I'd consult with maker of the kit of correct sequence for best outcome. POR 15 also make a kit to patch holes. Their website explains how and when to to use which product. I'd get the POR 15 hole patch kit and follow their recommended procedure when using it in conjunction with POR-15. Maybe easier to call them up and speak to a live person instead of wading through their site.
A 74 VW may be very different than a W123 windshield install. I'd seriously recommend you read over the FSM procedure first instead of relying on experience with a VW windshield.
__________________
85 300D turbo pristine w 157k when purchased 167,870 July 2025 83 300 D turbo 297K runs great. SOLD! 83 240D 4 spd manual- parted out then junked
|
|
#34
12-05-2016, 02:16 PM
|
|||
|
|||
|
Quote:
I was also concerned about the adhesion between the Eastwood urethane and POR-15. I was planning on just roughing up the surface for a good mechanical bond, but I think you're right that trying to bond between those two products might not be wise. What POR-15 hole patching kit are you talking about? POR-15® Floor Pan & Trunk Kit? This relies on fiberglass patches using their special fiberglass mat for larger holes, with POR-15 as the resin. I've done that type of repair before on rust under my battery tray, and was very happy with the results - but I'm not sure it's suitable for this repair. My concern is that I won't be able to get the mesh behind the hole and in place long enough for it to cure. Maybe I'm overthinking this, but I was afraid that doing a patch from the top side would build up too much material in the window channel and cause a leak later on down the road, or a problem installing the glass. That's why I liked the Eastwood kit, the backer is installed underneath the repair. I guess I could use that kit with POR-15 as a glue (it's a fiberglass sheet, rather than fabric/mesh). I've also used the POR-15 2 part epoxy putty (also in the battery tray repair). I guess I could apply that to the back side of the repair and use it as a backer. As far as calling POR-15, I have pretty severe anxiety when talking on the phone. I struggle enough to make sense via text, but people really have a hard time understanding what I mean when I talk over the phone. I know it sounds silly. Good point about the FSM - I seem to always forget that the FSM actually contains useful information for our cars. I'll read up.
__________________
'85 300D - federal spec, built in late 84. 85 300D Complete AC System Rebuild
|
|
#35
12-05-2016, 02:27 PM
|
||||
|
||||
|
Quote:
https://www.youtube.com/watch?v=v4hAT0aSIyM His w116 process is pretty similar to the w123, except you don't really need to rope in the outer molding because the w123's seal does not have a lip that the w116 seal has. He installed the windshield dry. But the w123 FSM states you use a non-harding sealant on the pinch weld. Part number: 001 989 31 20 I've read plumbers putty works fine and that is what I used with no leaks. On the window to seal side, I installed it dry. If you don't have any gaps between the seal and glass, for added insurance you can always later squeeze in Permatex's Flowable Silicone Windshield and Glass sealer part number 81730. I am not sure about the other part numbers you found above. But if it's urethane, I'd rather not use it. In the w116 video during installation, he had the upper valance and pillar covers off. I had also my dash out, so it was pretty easy to rope the seal in there. But I did had a similar issue of the windshield being too high up during installation. I think I remember the exterior side pillar moldings got in the way somehow. Anyways, try to get it as low as possible. In the end, I did exactly what he did, pulled the rope and it dropped down. I do like the idea of using a thin rope along the bottom and side edge to finish off the seal. I had to use a pick and pull my edges out to finish it. That rope trick would of been easier. BTW - what's the website you are going to use to order the glass? .
__________________
1983 123.133 California - GreaseCar Veg System
|
|
#36
12-05-2016, 02:38 PM
|
|||
|
|||
|
DeliveryValve,
Yeah that's the video - my windshield side mouldings were pulled loose by the guy that did the glass removal, so hopefully that won't be a problem. Thanks for the part number for the sealant.
__________________
'85 300D - federal spec, built in late 84. 85 300D Complete AC System Rebuild
|
|
#37
12-05-2016, 06:04 PM
|
|||
|
|||
|
You might want to consider using black butyl rubber for the glass-to-seal caulk. It's certainly cheaper and I would expect the cleanup to be easier.
I used a plastic trim tool to lift the rubber and worked it around ahead of the caulk tube. Resulted in a clean, leak-free job. I, as well, used plumber's putty for the seal-to-pinchweld. If you have to remove the seal during installation for some reason, it won't make a horrible mess like some other products.
__________________
1981 300TD 310k miles 1970 280sel 172k miles 1966 230 Fintail 162k miles "Where are we going? And why am I in this hand basket?"
|
|
#38
12-05-2016, 08:47 PM
|
||||
|
||||
|
Quote:
__________________
85 300D turbo pristine w 157k when purchased 167,870 July 2025 83 300 D turbo 297K runs great. SOLD! 83 240D 4 spd manual- parted out then junked
|
|
#39
12-05-2016, 08:53 PM
|
||||
|
||||
|
Quote:
__________________
85 300D turbo pristine w 157k when purchased 167,870 July 2025 83 300 D turbo 297K runs great. SOLD! 83 240D 4 spd manual- parted out then junked
|
|
#40
12-05-2016, 09:21 PM
|
|||
|
|||
|
Quote:
"Between glass and sealing frame and in between body and seaing frame seal with MB sealing compound" step 19 on 67-100 R&R of windshield. I had assumed that the sealant was applied before installation, but it seems to be that you should apply it to the vertical sections only at first, then come back and seal everything after? Does that seem right or am I misreading the FSM?
__________________
'85 300D - federal spec, built in late 84. 85 300D Complete AC System Rebuild
|
|
#41
12-06-2016, 11:28 AM
|
||||
|
||||
|
Quote:
Make sure you have a fresh tube of the correct sealant and keep it in a warm place before use. It is real thick and difficult/slow to squeeze out. I don't know what was wrong with the tube I bought but it blew at the bottom (maybe due to viscosity/pressure or defect?) and I lost a lot of sealant, filling up the plunger area of the gun. Due to the blowout, I did not have enough sealant to finish the job and had to buy another tube.
__________________
85 300D turbo pristine w 157k when purchased 167,870 July 2025 83 300 D turbo 297K runs great. SOLD! 83 240D 4 spd manual- parted out then junked
|
|
#42
12-06-2016, 01:15 PM
|
||||
|
||||
|
Quote:
I skipped the caulking gun window to sealing frame sealant step since I used plumber's putty. I have no sealant in there and it has been water tight so far. I think it also helps to have the sun heat the seal to set it further while everything is installed. My seal looked more seated after a week sitting in the sun. But in the winter time, you might want to lightly use a heat gun to set it further since everything would be so stiff. . .
__________________
1983 123.133 California - GreaseCar Veg System
|
|
#43
12-06-2016, 01:28 PM
|
||||
|
||||
|
Quote:
.
__________________
1983 123.133 California - GreaseCar Veg System
|
|
#44
12-06-2016, 02:12 PM
|
|||
|
|||
|
DeliveryValve - how did you use the plumbers putty exactly? I'm guessing you rolled it into a thin rope then pressed it all the way around the pinch-weld?
Thanks for all the advice everyone. I'm working on ordering what I need to continue. I did take a few minutes to clean up the rust hole. Here's the before and after results: Before I started:  After cleanup with a wire brush on the Dremel: 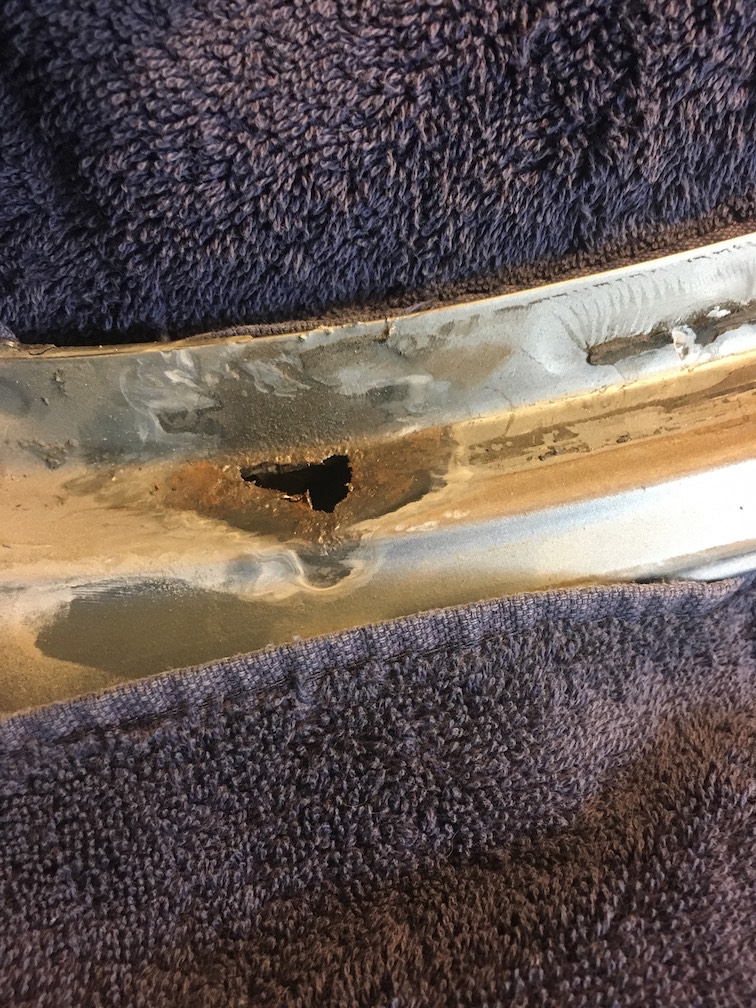 After some cleanup with a cutoff wheel and files (Needs more work still):  I trimmed back to solid metal, though there is some surface rust and light pitting present. I also dug out some brittle seam sealer and rubberized sealant from behind the hole. I've still got a bit more filing to do to clean up the jagged corner of the hole, plus I need to spend some time wire brushing the back side of the metal. Then I'm planning on POR-15'ing the top and bottom of the area. I'll then either use fiberglass mat/sheet as a backer with POR Putty as an adhesive, or fill the area with POR-15's 2 part epoxy (or a combination of both). Next I'll use POR-Putty as a seam sealer, then finish with body filler, paint, etc.
__________________
'85 300D - federal spec, built in late 84. 85 300D Complete AC System Rebuild
|
|
#45
12-06-2016, 07:11 PM
|
||||
|
||||
|
Looks like you can reach the bottom of the hole with your fingers via the cowling opening. If so, you do not need to buy a hole patch kit. Just take a small piece of aluminum flashing, mix up some 5 min JB Weld and glue it to to the bottom of the hole, let it dry 1/2 hour then fill from above with JB Weld till level. POR 15 the whole thing, let dry and you are ready to rope in. As long as you have a smooth patch surface for the windshield gasket and putty to lay against, it should seal well.
__________________
85 300D turbo pristine w 157k when purchased 167,870 July 2025 83 300 D turbo 297K runs great. SOLD! 83 240D 4 spd manual- parted out then junked
|
 |
| Bookmarks |
|
|


 Linear Mode


