

|
|
|
|
|
|
#1
 10-31-2007, 10:42 AM
|
||||
|
||||
|
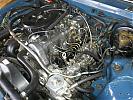
Replaced Valve Stem Seals - My experience
I decided to do a number of repairs on the wagon, starting with the engine which has less power (than our SD), smokes on start-up and uses about 2 qts of oil between changes. Valve stem seals, turbo rebuild and a look inside the ALDA is what I have planned.
Replacing the valve stem seals was not hard nor scary. I didn't need the car for transportation and so I started out with the idea I would do the amount of work I felt like over a number of days. Because the valve springs were so inexpensive (about $5.00 each for genuine parts) I felt it made sense to change them at the same time. Removed the following to prepare 1. Pulled Air Cleaner assembly 2. Disconnected throttle linkage 3. Removed glow plugs (planned to replace them) 4. Removed injector fuel lines and injectors (wanted to check things out) 5. Pulled valve cover 6. Removed rocker arms Replacing the valve stems 1. By having my injectors and glow plugs out, rotating the engine was not an issue. 2. That with the piston positioned properly (you rotate it for each pair of valves per cylinder) , the valve can only drop about 1/4" before making contact with the piston. I confirmed the proper location of the piston by applying reasonable pressure to the top of the valve to feel for contact with the piston. It is simple and obvious. I followed the firing order and used my mental picture of cam lobe locations for intake and exhaust from #1 for all cylinders. In my case I had more than one torn up seal with parts at varying locations on the valve stem. 3. loosening the adjusting nut, the valve spring in almost all cases is easy to lift off. Those that might have been trapped, either were wiggled around or I rotated them until they were free. Once the spring was off, I lifted the valve to a fully closed position, to see if the seal was snug. (for the ones that were not torn) and almost all of them allowed the valve to slide back to the point that the valve was resting on the piston. 4. Using a large flat blade screwdriver I worked the old seals off. 5. Cleaned up the area. 6. Lubed the new seal (Green for Exhaust and Black for intake which is counter intuitive at least to me). 7. Pushed them on with finger pressure. For the following I used a 2" wide, 1/8" thick, pry-bar/nail puller with a rag wrapped around it, a thick washer with a hole large enough to slide over the valve stem (without slop) and a 1/2" drive socket. 8. I slid the washer over the stem and let it rest on the seal. 9. Slid the socket over the stem to rest on the washer, 10. Wiggled pry-bar between the socket and the camshaft, using the camshaft to "pry against". 11. Gently apply pressure while watching the seal to insure there was movement. The seal will bottom out in the intended position and if continue to increase the pressure you can force it past the intended stop point. 12. Replace spring by pressing down with a no marring tool and hand spin on the nut. 13. Replace rocker arms, adjust valves and re-assemble 1 through 6 above. 14. Breath and take your time. Don
__________________
 1980 300TD-T (82 Turbo and Trans) 159,000 Miles "Jackie-O" 1980 300TD-T (82 Turbo and Trans) 159,000 Miles "Jackie-O"1983 300SD 272,000 Miles "Aristotle" 1987 Jeep Wagoneer Limited - keeps the MB's off the ice and out of the snow 1994 BMW 530it 
|
| Bookmarks |
|
|


 Threaded Mode


