

|
|
|
|
|
|
#1
 05-20-2024, 11:00 PM
|
|||
|
|||
|
OM617 Diesel Convertible - 380SL to 300SLD Conversion
User @mach4 / @idahobenz breathed life into my love of the OM617 and convertibles by documenting the conversion of an '85 380SL to OM617 diesel power. All my work that follows is based on his intense research, trial & error, guts to act, and discipline to document. Here's his AMAZING thread:
380SL Diesel Conversion Project I am following in mach4's footsteps too. I have most of the parts ready to go, and only one more project to complete before I begin in earnest. Donor Engine: OM617a from my second 300SD (an '85) Recipient R107: A pristine '85 380SL (127K miles) with a beautiful color, nearly flawless interior, and nearly new ragtop. Just doesn't run. The rarest parts have been located and purchased: The '75-76 300D engine mounts. That was a 6-month search. One came from Germany and the other from Portugal. The engine will get a complete rebuild with head studs, an upgraded turbo, and intercooler. I have several other powertrain modifications already purchased, and the rest planned and vetted. The goal is a classy, vintage, surprisingly peppy, high-mpg, road trip car that my wife and I can see the US in, while enjoying my favorite engine, not being normal, and annoying the purists. God willing, work commences later this summer. I am grateful to mach4 and all those who contributed to the linked thread above for leading the way. 
|
|
#2
10-06-2024, 03:25 AM
|
|||
|
|||
|
A grandmother was making several batches of home made biscuits as her grandson watched. Most batches rose to glorious fluffiness, except one batch. The grandson asked, why those didn't rise like the others. The grandmother sweetly replied, "They were getting ready to rise, but they got baked in the squat".
After having done tons of reading, researching, watching YT videos, buying manuals, rebuild kits, specialty tools, various sealants, chemicals, and parts, I realized that the design and vision were MORE than adequately complete, and that I was "BAKED IN THE SQUAT" by fear of the growing scope of this project. Well, admitting I had a problem was the first step, so I took one of the easier tasks required and tackled it: The fuel modifications to the tank. It's late. More coming. But here is the ceremonial (but real) picture of the first tool on the first bolt on 9/21/24. Last edited by lakesurfer; 10-06-2024 at 03:34 AM. Reason: Not sure I added the picture correctly
|
|
#3
10-06-2024, 03:24 PM
|
||||
|
||||
|
I have driven mach4’s converted car. Lovely ride.
It is good you are upgrading the motor before the swap. My 87 560SL is a beast on the road, and I would hate to see one not have the peppy beast I drive. The 617 turbo has strong pulling power, but not the neck snapping power of the V8. If you don’t already have the 617, maybe you might look into the 602Turbo for a diesel powerplant? I think the combination of smaller more modern engine, automatically adjusting valves, and aluminum head could translate into a slightly better ride. Of course,ALL the build tips would be thrown out the window, and require you to start from scratch on it.
__________________
John HAUL AWAY, OR CRUSHED CARS!!! HELP ME keep the cars out of the crusher! A/C Thread "as I ride with my a/c on... I have fond memories of sweaty oily saturdays and spewing R12 into the air. THANKS for all you do! My drivers: 1987 190D 2.5Turbo 1987 560SL convertible 1987 190D 2.5-5SPEED!!!  1987 300TD 2005 Dodge Sprinter 2500 158"WB 1994GMC 2500 6.5Turbo truck... I had to put the ladder somewhere!
|
|
#4
10-06-2024, 10:38 PM
|
||||
|
||||
|
Quote:
Quote:
Quote:
I recently received my 7.5mm "M" style custom built injection pump. I chose the "M" instead of "MW" style because is easy to user-adjust. As this group knows, the orifice size is *the* limiting factor of these injection pumps. I am not a fluid dynamics expert, nor completely sure of the shape of the orifice, but assuming it is a circle, the area of a 7.5mm diameter circle is approximately 86% larger than a 5.5mm circle. The engine will get a Holset T3 HE221 7cm² turbo and a Saab Blackstone intercooler running through a non-EGR intake to burn all that extra fuel. Per the testing, and the experience of the OM617 swap groups I follow, that turbo allegedly spins up early enough to start boosting at 1200 RPM (vs 1800 RPM for the MB factory turbo). Those two previous items are why I purchased ARP head studs, as researched and developed by Michael Anderson. While the head is off, I take it and the specs to a competent machine shop and get the intake valve seats modded for a bit more flow. Someday, I will attempt porting & polishing, but that will be later, (and probably on a spare head). The stock 380SL (and stock 560SL) comes with a 2.47:1 differential. This project is getting a 3.46:1 diffferential I acquired from a gently used 300SL. That should make the "seat of pants dyno" readings better off the line. It will be interesting to see and feel what that combination of incremental improvements add up to in real life. If I can give a ride to a 560SL owner, and show them performance that at least generates the "RCA Dog" look of surprise, I'll call that a win, lol. Quote:
Last edited by lakesurfer; 10-06-2024 at 11:57 PM. Reason: Rules compliance. Deleted specific references to other suppliers, even though I doubt they are PP competitors.
|
|
#5
10-06-2024, 10:52 PM
|
|||
|
|||
|
Before anyone asks, yes, with mods like that, a pyrometer to keep an eye on EGTs will be mandatory. The purists will hate this, but I found the perfect place for this gauge: My 380 comes with the optional exterior temperature gauge, which is located almost dead center at the top of the dash between two HVAC vents. This location will also allow my wife to help keep an eye on it if we are climing a steep grade.
Honestly, with the intercooler, I don't expect any trouble, but this is how to make *sure* there's no trouble. I will be shopping for an EGT gauge that looks like it belongs. So I when the time comes I'll start the shopping with VDO....
|
|
#6
10-08-2024, 08:23 AM
|
|||
|
|||
|
Quote:
__________________
1982 240d RHD OM605 & 5spd swap 1982 240D LHD/RHD & 300TD LHD / 1983 300SD LHD / 1986 300SDL LHD / 1992 300TD RHD / 1998 C250 TD RHD www.repaircafeglasgow.org
|
|
#7
10-08-2024, 11:29 AM
|
|||
|
|||
|
@indybenz , Thank you!
|
|
#8
10-09-2024, 01:19 AM
|
|||
|
|||
|
Much of my guidance for this project came from @Idahobenz 's thread previously referenced. After his project was a success, he maintained his own website dedicated to how he did it. The website is no longer online officially, but it is mostly archived at the Wayback Machine here:
https://web.archive.org/web/20160712214847/http://www.sldiesel.com/ For detailed how-tos related to the R107 series of cars, I rely heavily on the YouTube channel "Mike's Mercs and other cars" found here: https://www.youtube.com/@MikesMercsandothercars Thanks to Mike's excellent videos, I have new UK words in my vocabulary like "knackered" and "tickety-boo". Another important resource has been the Facebook group "OM617/OM6XX Swaps". Now, on with it: To get started, I started with the fuel system modifications as described by Idahobenz at the old website: https://web.archive.org/web/20160731234425/http://www.sldiesel.com/hook-up/fuel The tank was empty, so I did not have to use the fuel pump to empty it. I removed the fuel pump, resonator, fuel filter, and shield, then used a 3/4" crows foot on a long extension to unscrew the fuel down pipe (wrong name) from the strainer.   The strainer must be replaced with a diesel model. The picture illustrates how much larger the mesh for the diesel strainer is, and how the gas strainer might leave one stranded if used with diesel. But there's almost no point trying get the strainer out from the bottom with the tank still installed. Even though a 1 13/16" socket fits it just fine, chances are EXCELLENT that it is off center of the hole such that there is no clearance to get the socket on. It really IS better to just take the tank out. Once out, an impact wrench and the 1 13/16" socket made quick work of removing the strainer.   I used a bore scope to inspect the inside of the tank and found the tank and swirl pot to apparently be in good condition. The vapor tank on top serves no purpose so I removed it, and rerouted the short hoses on the tank to close the vapor tank ports off.  The center port on top, I repurposed into a vent, and ran it below the car using a hard plastic tube that was already there. I disconnected this tube and attached a MB primary fuel filter that I modified. The purpose of this is to allow air to pass in and out, but to make it difficult for a mud dauber or other pest to clog it up.  I learned that the tank is supposed to have foam strips underneath for some purpose. I could not find these so fabbed some from window seal and backer rod.    I also learned that the tank mounting points are supposed to have insulating rubber washers. I improvised these with some 1/8" thick cork gasket material I had on hand. While the tank was out, I replaced drain and pass through gaskets. I also replaced the fuel filler neck gasket with a new MB original that was supple. I removed the nozzle restrictor from the filler neck. Unfortunately, mine was not plastic and easy to drill out, but rather steel and spot welded in place! THE FOLLOWING IS WHAT I DID BUT CANNOT RECOMMEND ANYONE DO IT BECAUSE SOMETIMES DOING WHAT DO IS IDIOTIC: I connected shop vac to the fuel outlet at the bottom of the tank (where the new strainer is not yet installed) and ran it on vacuum. This pulled the remaining fumes out, and kept any new fumes away from the stupid on the other end. I then attached a wire to the restrictor plate so it did not fall into the tank, and proceeded to drill out the spot welds. Once out, I cleaned the area on both sides, and repaired the holes with JBWeld SteelStik, sanded, and painted.  Someday, I might want to replace the strainer without pulling the tank, so I enlarged the hole so it would no longer interfere with a socket.  Once the tank was back in, I improvised a direct connection from the strainer to the fuel line.  In the fuel fill area, behind the door, I discovered the drain hole was clogged, so I reamed and flushed it out. This must have been clogged a while because there was a tiny rust hole where water would have pooled with a clogged drain. This hole would have dripped fuel into the trunk right next to the battery! I repaired this with SteelStik and painted over it. Last edited by lakesurfer; 10-09-2024 at 09:31 PM. Reason: Repair photo links.
|
|
#9
10-17-2024, 12:43 PM
|
|||
|
|||
|
Made progress past weekend. Repaired some rust holes in the trunk. Fabbed and installed a replacement rear tow loop (since mine broke off). And, by the Grace of God, I removed the entire exhaust system in one piece without using a sawsall, a torch, or even any heat! Some segments will be reusable, but my intent is to use the 300SD muffler.
The design intent for the exhaust system is for it to allow the enhanced diesel to breathe easily, but keep the noise down as much as possible. The idea is to be surprisingly quiet. (I will become an expert on sound deadening material before this is over.). Am open to exhaust system suggestions, other than the obvious, "Then don't put an diesel in a convertible, doofus!" type comment, haha!
|
|
#10
01-03-2025, 10:37 AM
|
|||
|
|||
|
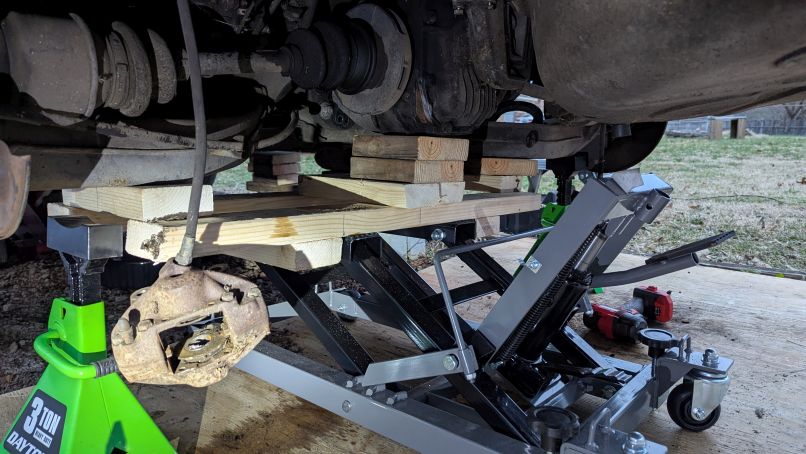
After a couple of months diverted by life, I am back at it, renewing the rear suspension etc. Shocks and springs are out, and the brake components are starting to be removed. On advice from another place, I bought a HF motorcycle/ATV lift to assist with lowering the rear subframe, trailing arms, diff, and axles as a unit.
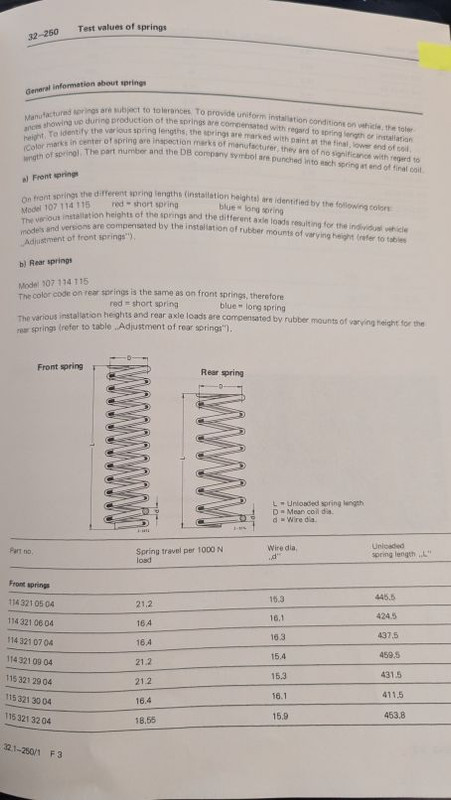
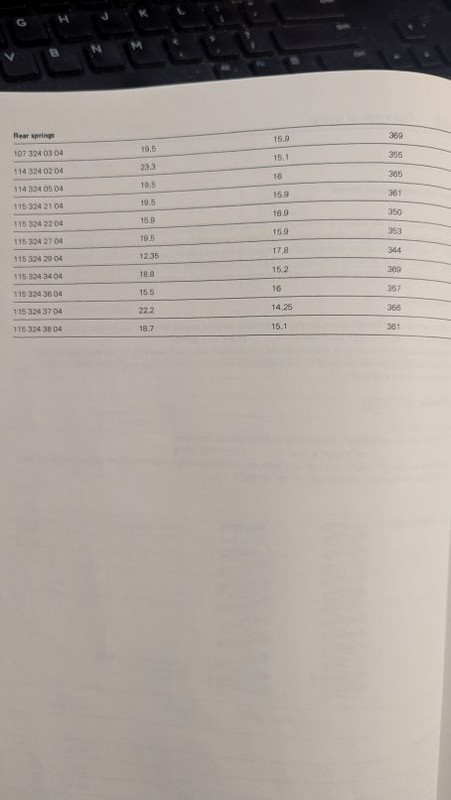
Speaking of springs, does anyone know of a measurement to determine if the springs are still in spec?
|
|
#11
02-16-2025, 07:45 PM
|
|||
|
|||
|
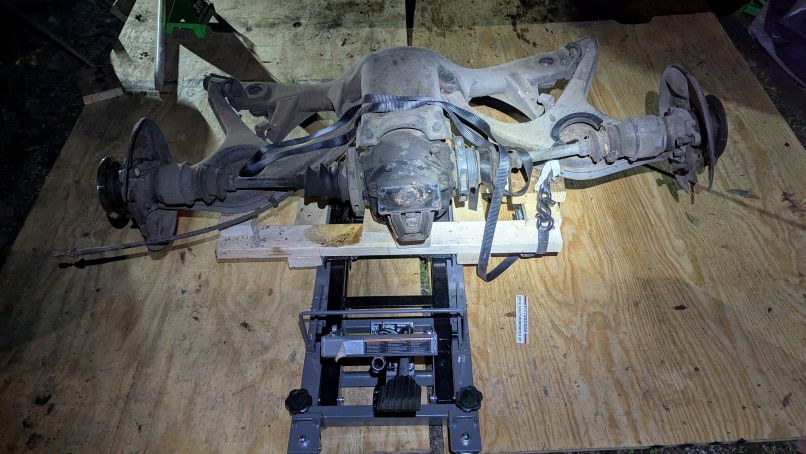
Well, life got in the way again, but I have been back at it as I can. Got the whole rear end out. Using the ATV jack with a wood frame to support the axles was super helpful.
Last edited by lakesurfer; 02-16-2025 at 09:02 PM.
|
|
#12
02-16-2025, 08:28 PM
|
|||
|
|||
|
Found the pages in the manual about springs. Evidently there were several over the years. I was able to locate the part number embossed on my springs, match it to the table in the manual, and verify that at 35cm high unloaded, they were good as new.
  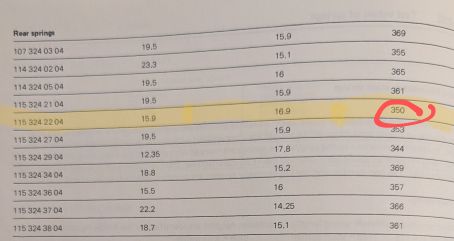 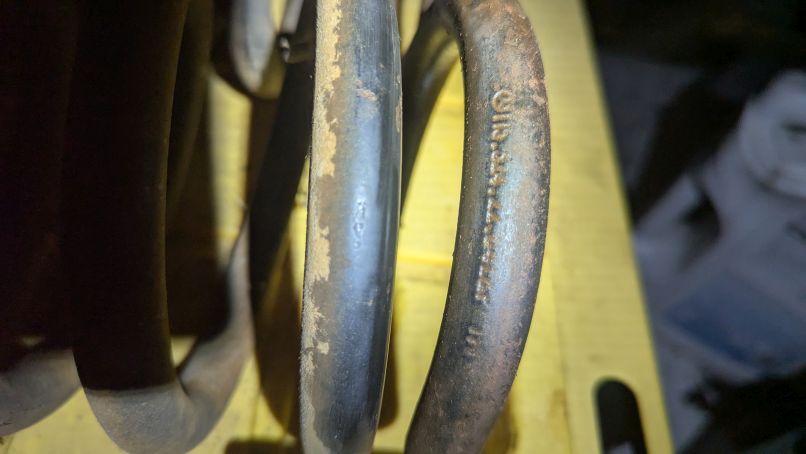
Last edited by lakesurfer; 02-16-2025 at 08:55 PM.
|
|
#13
02-16-2025, 08:50 PM
|
|||
|
|||
|
Instead of leaving it to phase 3 or 4, I decided to go ahead and purchase Quaife ATB torsen gear "limited slip" internals for my 3.46:1 differential. They had me remove my open differential, and perform an extensive series of measurements to not only "triple" verify compatibility, but so they would know if I needed any shims for the crown gear. As it turns out, the measurments were an exact match, so no shim should be needed. I will be doing a lot of checking just in case though.
Here's a link to the Quaife part , and some related pictures. Some of those measurements needed a flat reference, so a spare piece of granite in our kitchen served well. Yes, my marriage survived. No, I will not be washing parts in the dishwasher. 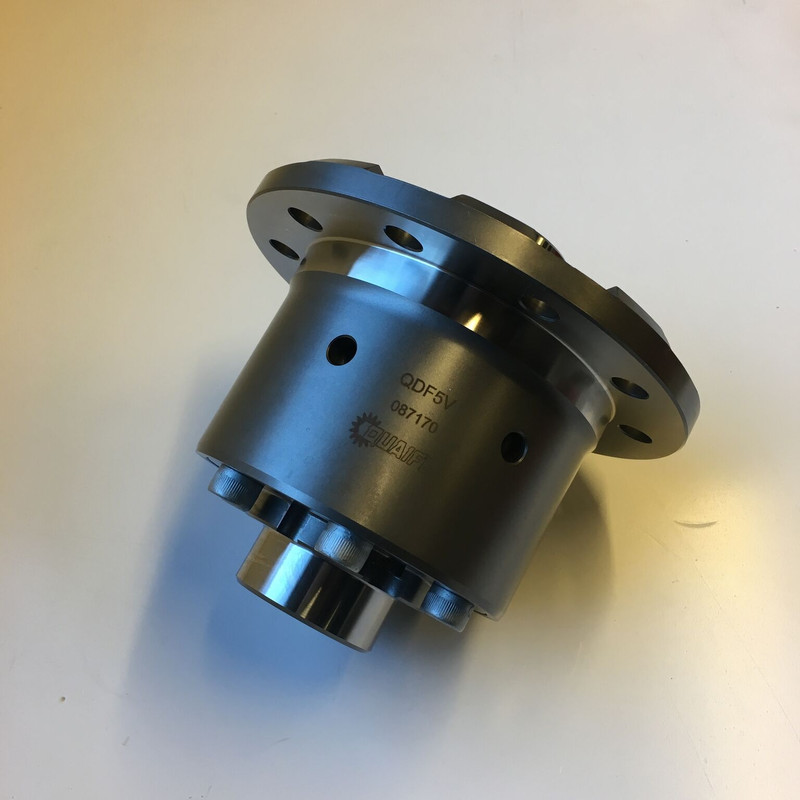 I am really happy with the apparent condition of the crown gear in the 3.46:1 diff. 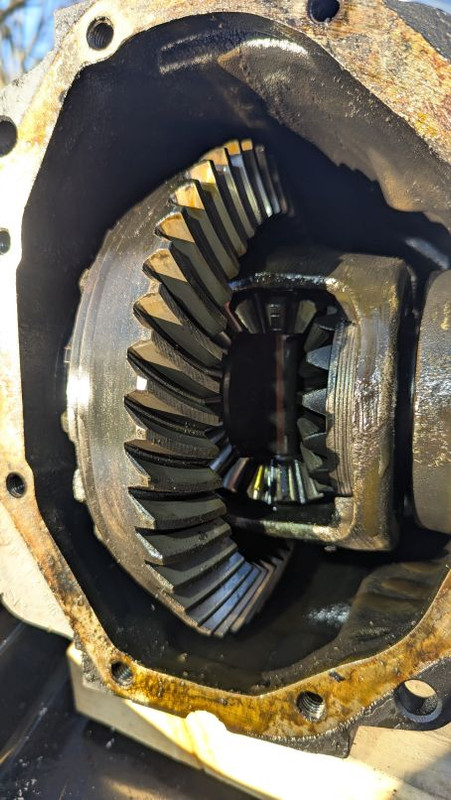 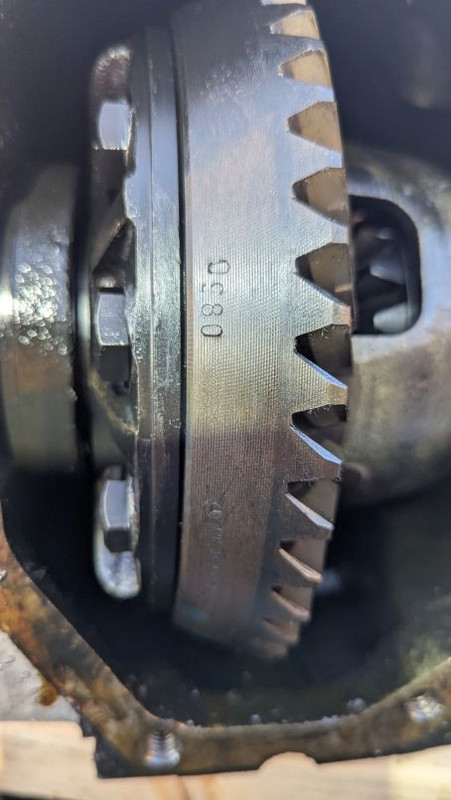 Granite makes a good flat reference!! 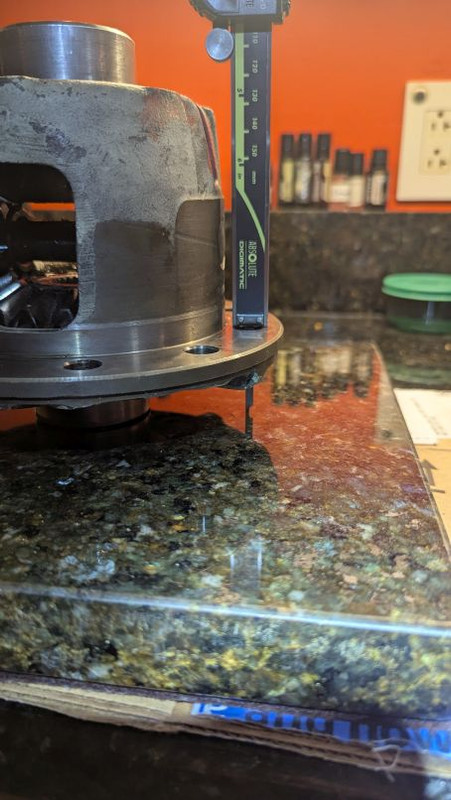
|
|
#14
02-16-2025, 09:28 PM
|
|||
|
|||
|
The half-shaft axles on my Mercedes typically secure inside the open differential by means of c-clips. The Quaife unit is completely closed, allowing no access to where the circlips would go, so the Quaife unit requires the half shaft axles to be modified to accommodate their retention system. Quaife requires the axles have a groove cut in the axles so they will "snap" into a circlip in their unit. James at Quaife wrote, "the guys here essentially replicated what Mercedes did with the SL55 AMG flanges, where they use a snap ring to secure instead of the older style 'c-clips'. Many of the older BMWs use this method too."
Here are the modifications needed: 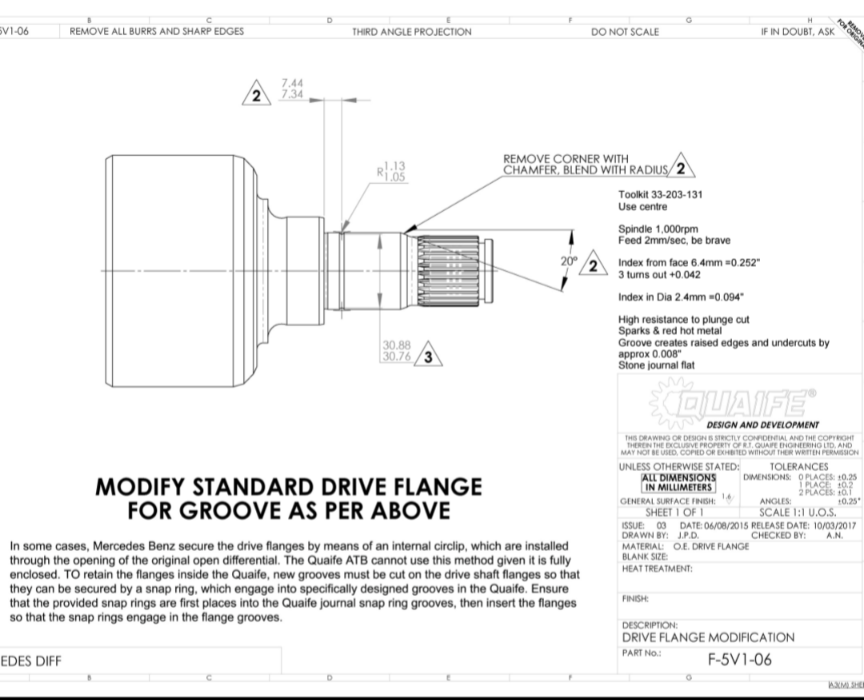 Here's what the differential end of my factory, homokinetic axle looks like.  I plan to have the axles rebuilt at CVSource in Buford, GA, b/c it is w/in driving distance to me, and they got the blessing of Woods & Barclay. I am hoping they know a machine shop that will do this for them while they have my axles apart. If not, I have a local machine shop that will do the work if I disassemble them myself. However: If anyone knows a shop that already has experience with this modification, I am all ears!
|
|
#15
02-16-2025, 09:54 PM
|
|||
|
|||
|
Research indicates that MUCH torque is required to crush the crush sleeve in the pinion and set the pinion preload. The MB tool to hold the pinion flange in place appeared to be north of $450, and the eBay/Amazon offerings did not appear to be compatible. So I inquired how to make one on BW, and got some great advice that led to this tool:
I used a canned, template design at sendcutsend dot com and they shipped a quarter inch thick plate, pre-drilled, in a week for about $40. Here are the settings I used for my 110mm diameter flange pattern: Flange Diameter: 160mm Inner Hole: 68mm HOLES: Hole Circle Diameter: 110mm Hole Diameter: 12.9mm Hole Count: 12 MATERIAL: HRPO A36/1008 Mild Steel, 0.25" This is what they sent!: 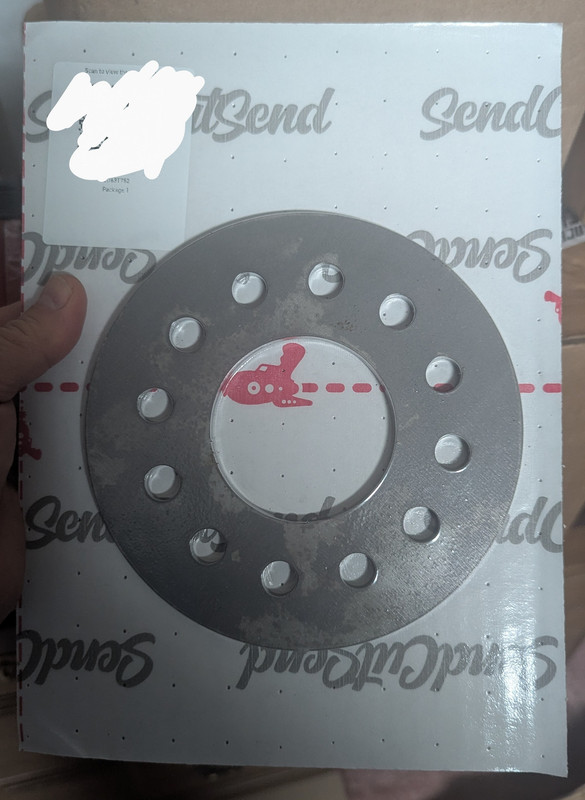 My welding friend fabbed an adapter that bolted to the ring, and slides easily on and off a cheater bar. This allows the adapter, if not secured with nuts, to come off the ring easily to allow pinion bearing pre-load measurements. The "new" flange is in one of the pictures. 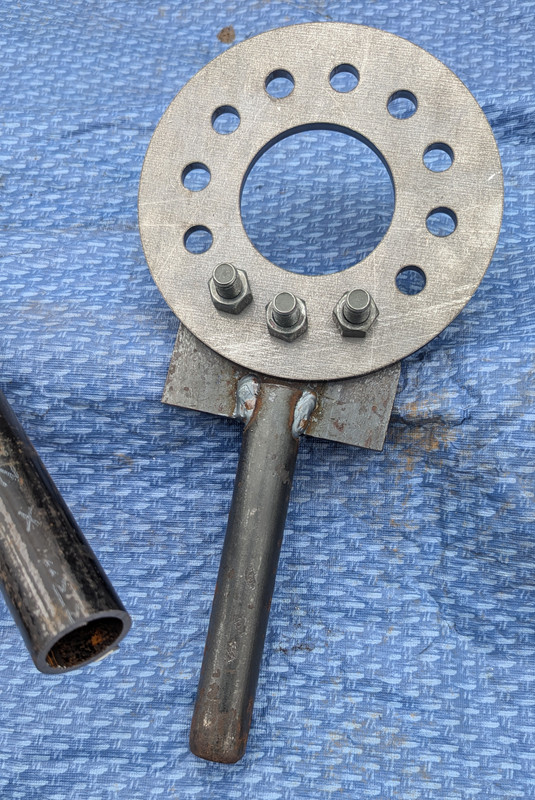 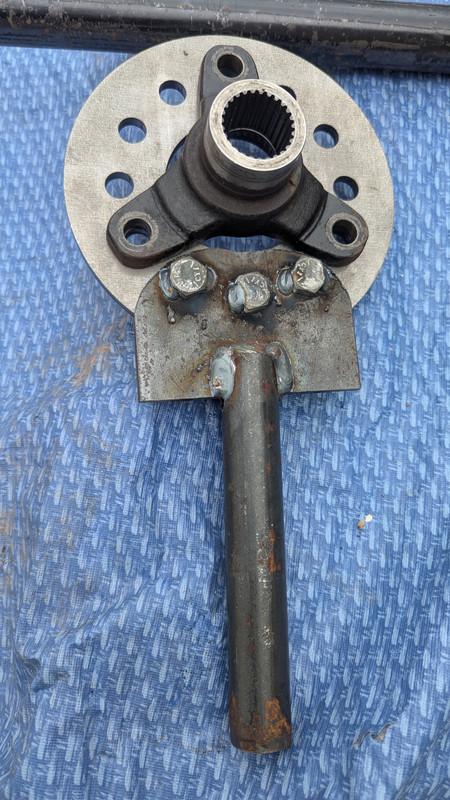 This is what it looks like on the cheater bar: 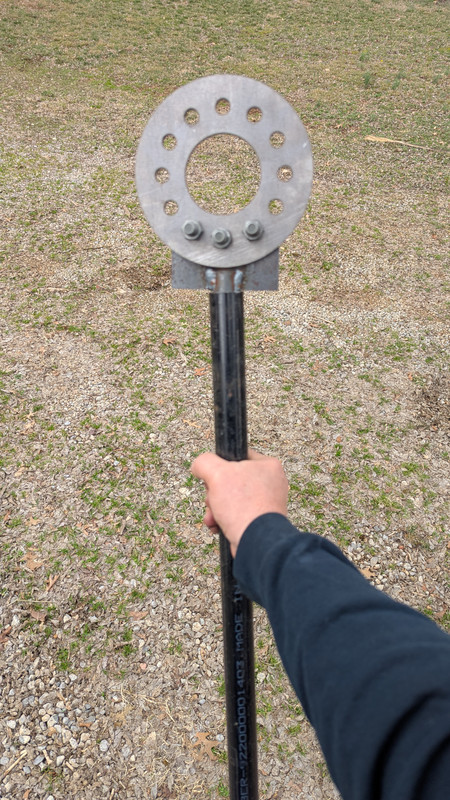 I call it the Headpiece to the Staff of Ra!!
|
 |
| Bookmarks |
|
|


 Linear Mode


