

|
|
|
|
|
|
#31
 10-06-2007, 06:29 PM
|
|||
|
|||
|
i went the cheaper route and got a 85 300D ccu for about $50 in a junkyard, that also did the same meaningless tasks of making a couple noises when a button is pushed. the one i repaired was the stock 81 280CE ccu. not sure if im ready to shell out that much
__________________
http://i12.photobucket.com/albums/a2...CZoMZDPM-1.jpg
Daily driver: 80 EURO 280CE, english red My car domain Parts car: 81 US 280CE, metallic anthracite grey 
|
|
#32
10-06-2007, 10:23 PM
|
||||
|
||||
|
Quote:
Disassemble the unit and check for cracked joints. There are two "wing" boards that contain the cable plug pins and are soldered to a mainboard forming a shallow 'U' shape. Then, there's another daughter board stacked with the main board -- so there's really four boards in all. I recently did mine and found that the solder joints to one of the wing boards were broken clean through. Incidently I did a bit of root cause analysis on my CCUs solder joint failure (not that I'm necessarily qualified) and concluded that the wing board in question was soldered on at an angle, and then flexed to make the connections meet at the far end. A poor design (solder as mechanical attachment) aggravated by poor manufacturing (a flexed wing board adding additional stress). The CCU unit plastic case provides the gross mechanical strain relief for the wings, but this kind of stress didn't wasn't something it could provide the strain relief for. This might explain why these things fail if others were manufactured incorrectly like mine was. Others have reported the switch solder joints to have failed, but mine were fine. All the cracked solder joints of interest are inside the plastic case, and there's a couple of stacked boards, so just getting to the bottom of one of the boards isn't enough. I took copious pictures of the CCU disassembly procedure, problem, what cracked solder joints look like, etc., but I don't have time to upload them tonight (sorry), I'll try to get to them tomorrow.
__________________
'83 300DTurbo http://badges.fuelly.com/images/smallsig-us/318559.png Broadband: more lies faster.
|
|
#33
10-07-2007, 02:27 AM
|
||||
|
||||
|
This might be your pet peeve
Check this out....You just never know!
|
|
#34
10-07-2007, 11:10 AM
|
|||
|
|||
|
pictures? i like pictures
 i just disassembled it and got to every connection except the actual external pins cause that looked like alot of work. i just disassembled it and got to every connection except the actual external pins cause that looked like alot of work.that is a strange find bens lover, that should be in the climate control diy section. if i figure out how to get the cover of that harness off i will take a look. edit: i just tried looking for the wire in the picture, i didnt have it, and the covers were a real mess to get off.... actually two on that harness were not used
__________________
http://i12.photobucket.com/albums/a2...CZoMZDPM-1.jpg
Daily driver: 80 EURO 280CE, english red My car domain Parts car: 81 US 280CE, metallic anthracite grey Last edited by vipercrazy; 10-08-2007 at 05:20 PM.
|
|
#35
10-09-2007, 04:33 PM
|
|||
|
|||
|
Quote:
i didnt see any shallow u-shape joints on the inside, i fixed all joints, in and out, plus the fan speed controller and temp wheel(just figured it out after some looking). but the plug pins i left alone because they didnt seem to be under stress, burnt or cracked. but are these what your saying will fail? mine still will not work any differently so im thinking i should try those...
__________________
http://i12.photobucket.com/albums/a2...CZoMZDPM-1.jpg
Daily driver: 80 EURO 280CE, english red My car domain Parts car: 81 US 280CE, metallic anthracite grey
|
|
#36
10-11-2007, 01:01 AM
|
||||
|
||||
|
pics on how to disassemble the ACC unit
Here's the pictures I promised on how to disassemble the ACC unit...
 remove the temperature unit and the cover off the fan buttons so can remove the buttons by psuhing from behind. Plastic tabs are delicate after 20 years, so careful not to break. Use penknife to slip between plastic tabs so they can be gently popped apart (ie. don't cut the plastic with it). With fan button unit cover removed, pop three fan buttons off from behind.   Pop front loose. One tab on top, two on bottom (circled in blue in previous two pictures). The front can't come off because the buttons hold it on. I couldn't figure out how to pull them off, so I did this in order to...  Reach in behind the front with a penknife so can et behind each button and pop it forward off its switch.
__________________
'83 300DTurbo http://badges.fuelly.com/images/smallsig-us/318559.png Broadband: more lies faster.
|
|
#37
10-11-2007, 01:28 AM
|
||||
|
||||
|
and on...
 remove bottom cover. Three tabs (yellow circles) and then it hinges off.  With the front finally off, the fan switch unit can be removed -- squeeze tabs together gently jsut until they clear and the unit can be removed. It unplugs from the side of the ACC like the temp wheel did.  Phew. Now the cover hinges up and off from the guts. The black plastic side pieces that fit over the pins slide off over the pins. Leaving you with... 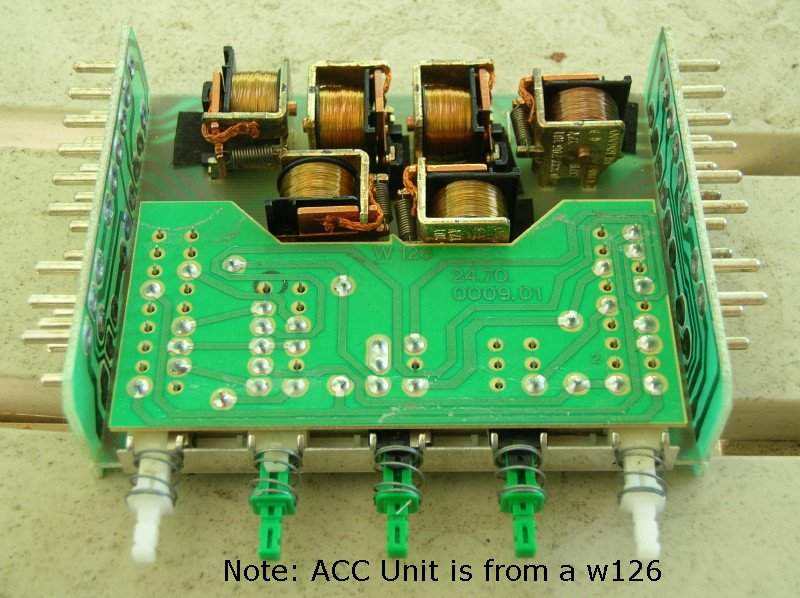 ..this. Well, not exactly this, I forgot to take pictures of the inside of the w123 ACC unit when I got this far, so here's a picture of my w126 practice unit. The w123 ACC has only four relays and the circuit traces are different, but otherwise it looks the same. In this picture you can see the four circuit boards that make up the unit -- the main board on the bottom, the daughter board above it, sandwiching the button switches, and the two side wing boards. 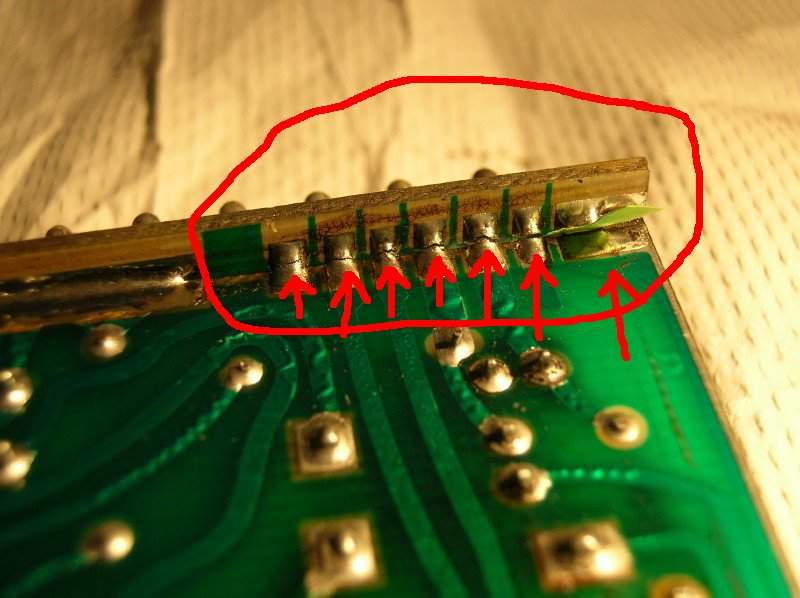 And here's what a cracked solder joint looks like. All of these are cracked. I even slipped a piece of paper in between one to demonstrate. For me, these were visible with only the bottom removed, but others have reported that the button switch solder joints on the daugher board sometimes break, and you can't get to them without a full disassembly. I did a detailed writeup of this over on a blog (http://w123maintenance.blogspot.com/) in case anyone is interested. Nobody reads my blog, I'm just using as a convenient place to document stuff for myself. hope this helps 
__________________
'83 300DTurbo http://badges.fuelly.com/images/smallsig-us/318559.png Broadband: more lies faster.
|
|
#38
10-11-2007, 01:44 AM
|
|||
|
|||
|
PatBob,
I appreciate your documentation of the process of getting inside the CCU and the re-soldering work necessary to bring some of these units back to life. I am interested in going a bit further as my CCU runs very hot in the vicinity of one of the relays. So, I would like to know what item in the hvac system each of the relays services. Once that is known maybe I can work back up to the offending item and see why it is causing such an overload. Can you or anyone here on the forum help me with this info?? Thanks in advance.
__________________
1961 190Db retired 1968 220D/8 325,000 1983 300D 164,150
|
|
#39
10-11-2007, 01:18 PM
|
||||
|
||||
|
Quote:
BTW, one of the common failure modes of the ACC system that I've read about is that the aux coolant pump under the hood binds and stalls. When that happens, it draws enough current that it burns traces on the ACC circuit cards. As a complete jump-to-conclusion stab-in-the-dark, you might check if that pump is the problem -- disconnect it and see if the ACC gets the same kind of hot.
__________________
'83 300DTurbo http://badges.fuelly.com/images/smallsig-us/318559.png Broadband: more lies faster.
|
|
#40
10-11-2007, 04:07 PM
|
|||
|
|||
|
thanks for the effort but its not my problem AGAIN, so i must be onto the next diagnosis...

__________________
http://i12.photobucket.com/albums/a2...CZoMZDPM-1.jpg
Daily driver: 80 EURO 280CE, english red My car domain Parts car: 81 US 280CE, metallic anthracite grey
|
|
#41
10-11-2007, 10:07 PM
|
||||
|
||||
|
Careful...
Quote:
I'm currently trying to figure out how to put LED's in place of those little buggers. Need a 12v source to hook them up (that won't toast them also) to and I'll be set.
__________________
Gil 2004 ML350 1984 300CD; Ivory (sold)
|
|
#42
11-15-2007, 07:43 PM
|
||||
|
||||
|
Hey everyone, I thought I would add something to this thread I recently "resoldered" my one climate control in my one w126..
I resoldered the joints that connect the 3 PCBs... I also retouched the solder on the thermostat knob, dragged some down the lines that connect the knob to the pins..as well as the stuff on the fan switching side.. I also completely removed the switches PCB, checked for anything broken on it. Apparently the resistors/diode was replaced at one point in time.. I saw a couple traces that looked like they had veins running throu them or something. I decided to grab a screwdriver scrape off the material and lay down some solder in place of it. I tell you what, I've never seen one of these control things work and change settings and whatnot this fast before. I rolled the temp wheel from cold to hot and as soon as I hit the red relays were clickin and the fan was motorin.. impressive.
__________________
Cruise Control not working? Send me PM or email (jamesdean59@gmail.com). I might be able to help out. Check here for compatibility, diagnostics, and availability! (4/11/2020: Hi Everyone! I am still taking orders and replying to emails/PMs/etc, I appreciate your patience in these crazy times. Stay safe and healthy!) 82 300SD 145k 89 420SEL 210k 89 560SEL 118k 90 300SE 262k RIP 5/25/2010 90 560SEL 154k 91 300D 2.5 Turbo. 241k 93 190E 3.0 235k 93 300E 195k
|
|
#43
01-25-2008, 12:02 AM
|
|||
|
|||
|
Greetings:
My Little Old Lady, a 1987 300 SDL, is servicing all my needs, except the climate control. She will start up dutifully on any Morning, however, the climate control will not start. No blower motor, no air-flow, no nothing. As the motor will warm up, HOT air will flow under the windshield, even though the blower motor is not running. You can push any of the climate control buttons, nothing will change. The HOT air will flow at the windshield, but nowhere else. You pull over the road, because you are frying, turn off the motor. Then, you start her again. LO AND BEHOLD, the climate control system is working as it was designed to work!!! What do you think??? Of another note: where can I buy repalcement seat cushions for the 1987 300 SDL? OR: what alternatives are there to get the firm cushion back? After all, she is 20-years old, 189,000 miles, IN PERFECT condition!!! I would like to re-inforce the seat cushions. Thank you for any and all advice, marozsanjanos@hotmail.com J.M. Last edited by marozsan; 01-25-2008 at 12:13 AM.
|
|
#44
02-05-2008, 09:02 PM
|
|||
|
|||
|
New to this forum
Ok, after several hours of surfing I found this site and registered. I now know I need to replace my blower brushes, rekit the mono valve, and resolder the CCU. I understand there is a resistor in the blower circuit that could also be part of my problems. Where is it and how do you diagnose, repair, replace, or ?
There haven't been any recent posts to this thread, I hope it's still found. Charles
|
|
#45
02-05-2008, 09:33 PM
|
||||
|
||||
|
The "resistor" is a metal box with wire coils; it sits on the passenger (right) side inner fender. Although anything can break, I've not heard of any actually doing so. The climate control problems that get the most play here are
(a) resoldering or replacing the pushbutton control unit, (b) rebuilding or replacing the monovalve, (c) rebuilding or replacing the auxiliary water pump (remember to add a fuse), (d) replacing the brushes in the fan motor or replacing the entire motor (my brushes had worn into the commutator so much that I had to replace the motor), (e) replacing the disintegrated foam tube that connects the interior temp sensor to the blower intake, and (f) rebuilding, replacing, or working around failed vacuum pods (that move the doors to direct air here and there). This does not count repairs to the refrigeration system, which can be a whole set of problems by itself, nor does it cover bad thermostats, clogged radiators and heater cores, and other parts of the engine coolant plumbing. Mercedes designed the climate control system to default to "hot air to the windshield" as a safety measure, so you could always get your windshield clear of moisture, ice, etc. If you have a problem where that occurs sometimes but not always, the electronics are probably getting flakey. Someone here probably has had that exact problem and can tell you what to do. Jeremy
__________________
 "Buster" in the '95 Our all-Diesel family 1996 E300D (W210) . .338,000 miles Wife's car 2005 E320 CDI . . 113,000 miles My car Santa Rosa population 176,762 (2022) Total. . . . . . . . . . . . 627,762 "Oh lord won't you buy me a Mercedes Benz." -- Janis Joplin, October 1, 1970
|
 |
| Bookmarks |
|
|


 Linear Mode


