

|
|
|
|
|
|
#1
 09-13-2010, 09:18 PM
|
|||
|
|||
|
Checking ball joints - 560SL
I am not exactly sure how to best check the lower ball joints on my SL...I have had for some time an intermittent clunking noise (nothing real serious sounding) and I noticed a few days ago that both of the boots are torn on my lower ball joints (uppers look fine), and so I jacked up the car tonight to take a better look. A friend told me to take a good size pair of channel locks and squeeze the ball joint and control arm - looking for any movement. I definitely have up and down movement - took a pry bar and wedged in and noticed definite movement in the ball joint - maybe 1/8 in, or more??? But very noticeable....
What's acceptable movement? None? ryan
__________________
RG Newell 1984 300D 1972 250 1986 560SL 1991 300CE 
|
|
#2
09-14-2010, 12:40 AM
|
||||
|
||||
|
Quote:
__________________
RM Smith 1988 560SL "Where is it again that we are going, and why are we in this handbasket"?
|
|
#3
09-14-2010, 06:23 AM
|
|||
|
|||
|
torn boots
My recommendation is to change the joints if you found torn boots. You probably don't know how long they have been torn. If the joints have not already been worn by road grit, they soon will be.
|
|
#4
09-14-2010, 12:44 PM
|
||||
|
||||
|
should be little if any
__________________
Ron 2015 Porsche Cayman - Elizabeth 2011 Porsche Cayman - Bond,James Bond Sadly MERCEDESLESS - ALways LOOKING ! 99 E320 THE Queen Mary - SOLD 62 220b - Dolly - Finally my Finny! Sadly SOLD 72 450SL, Pearl-SOLD  16 F350 6.7 Diesel -THOR 19 BMW X5 - Heaven on Wheels 14 38HP John Deere 3038E Tractor -Mean Green 84 300SD, Benjamin -SOLD 71 220 - W115-Libby ( my first love) -SOLD 73 280 - W114 "Organspende" Rest in Peace 81 380 SL - Rest in Peace
|
|
#5
09-20-2010, 05:37 PM
|
|||
|
|||
|
Quote:
Just replaced one lower joint on mine due to a clunk when backing up. Jack the wheel up and pull the wheel back and forth at the bottom (not up and down) in different directions. If there is any movement between the ball and receptacle, the joint is loose.
|
|
#6
09-20-2010, 09:54 PM
|
|||
|
|||
|
Yea, I've already bought new ball joints (Lemforder's), and am just trying to find time to replace them - along with motor mounts, subframe bushings, and lower control arm bushings...
Can you be a little more specific with how you replaced your lower ball joints? ryan
__________________
RG Newell 1984 300D 1972 250 1986 560SL 1991 300CE
|
|
#7
09-21-2010, 08:40 AM
|
||||
|
||||
|
You will need a ball joint splitter and a press. Although your 560 arms are slightly different than the one on the pics the process is the same.
You will also need a 14 ¾ all threaded rod, 30mm nuts and a spring compressor plate to secure the mighty front spring to the arm before you remove the steering knuckle. 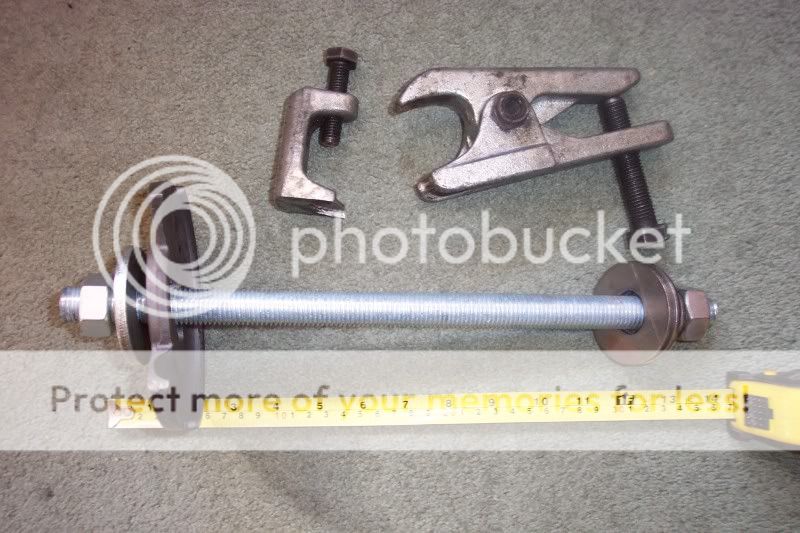 Internal rod ¾ and compressor plate  30mm nuts and washers  Secure spring 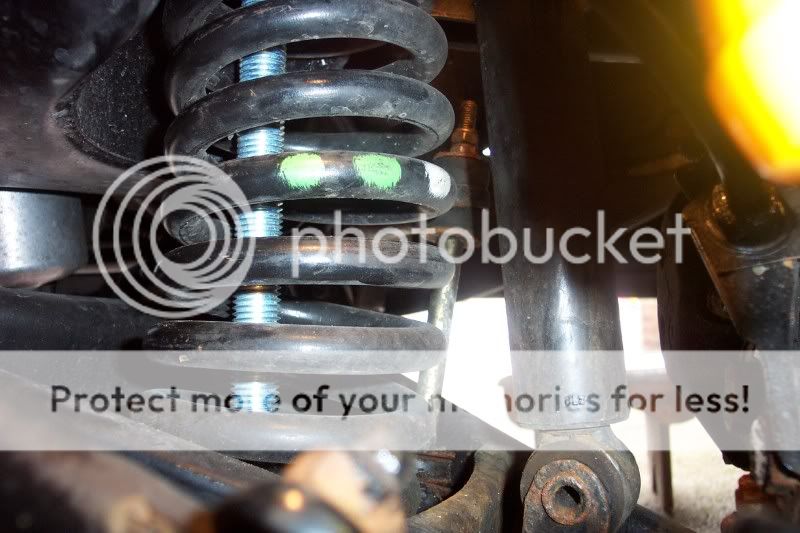 Use ball joint press 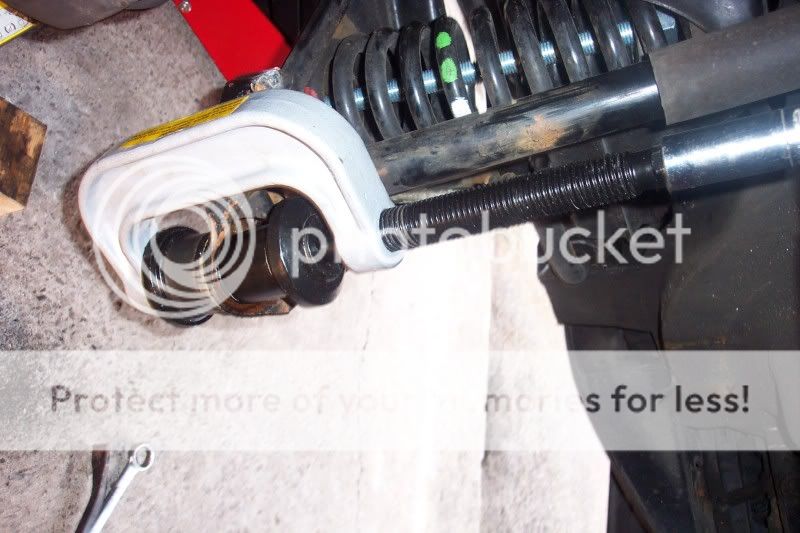 Shallow receiver tube 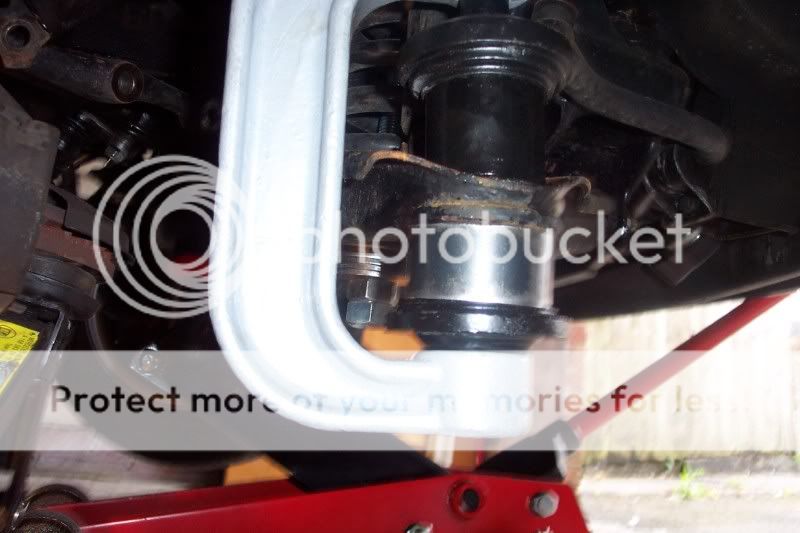 Ball joint out 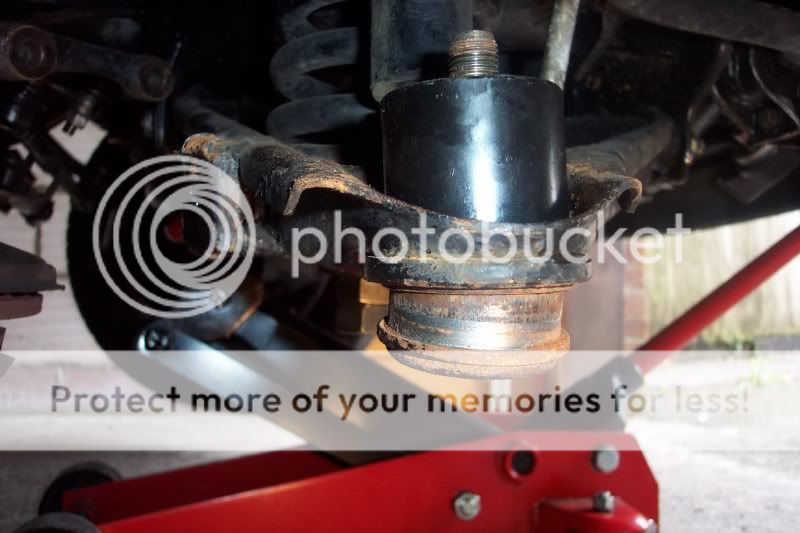 Pressing in new ball joint 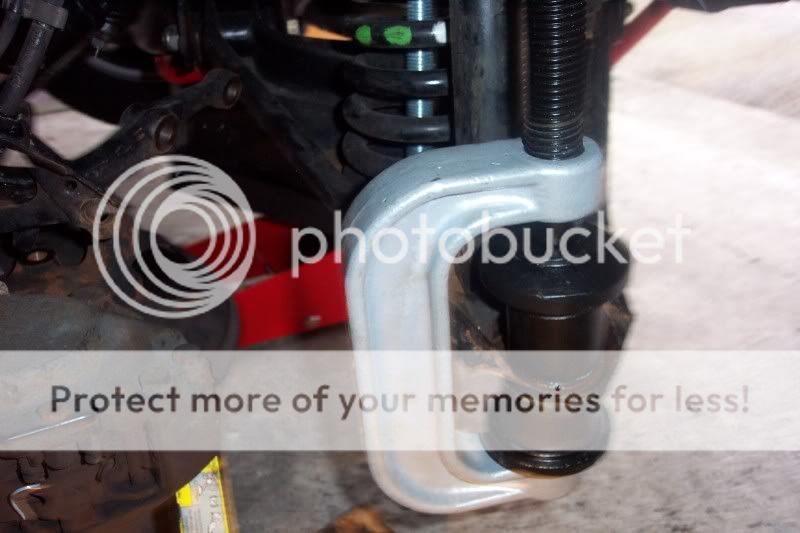 Warning: On no account the bottom nuts of the shock absorber should be removed while the steering knuckle is removed. Your life depends on this!!.
__________________
 Deltacom ~ Absit Iniuria Verbis ~ Deltacom ~ Absit Iniuria Verbis ~
|
|
#8
09-23-2010, 01:58 PM
|
|||
|
|||
|
Thanks for the reply - especially the pics and the detailed instructions. In reading through the FSM, little is mentioned of needing any type of spring compressor to remove the springs - the FSM describes an attachment to your jack that keeps it in place on the lower control arm. You jack up the LCA some, remove the lower control arm bushing bolts, slowly lower the LCA and remove the spring. I followed this procedure on my '72 250 (W114 chassis) w/o any problems...
Anyone followed this procedure on the 107? ryan
__________________
RG Newell 1984 300D 1972 250 1986 560SL 1991 300CE
|
|
#9
09-23-2010, 10:26 PM
|
||||
|
||||
|
Don't mess with springs without a compresor. If one gets away it can cause serious injury/death. I am sure there are shortcuts,but not sure they are wise
__________________
Ron 2015 Porsche Cayman - Elizabeth 2011 Porsche Cayman - Bond,James Bond Sadly MERCEDESLESS - ALways LOOKING ! 99 E320 THE Queen Mary - SOLD 62 220b - Dolly - Finally my Finny! Sadly SOLD 72 450SL, Pearl-SOLD 16 F350 6.7 Diesel -THOR 19 BMW X5 - Heaven on Wheels 14 38HP John Deere 3038E Tractor -Mean Green 84 300SD, Benjamin -SOLD 71 220 - W115-Libby ( my first love) -SOLD 73 280 - W114 "Organspende" Rest in Peace 81 380 SL - Rest in Peace
|
|
#11
09-24-2010, 11:23 AM
|
|||
|
|||
|
Quote:
I think do it the way the manual says without the proper special tools would be a pain in the butt and a lot less safe. The way I did it wasn't that bad at all.
|
|
#12
09-24-2010, 03:11 PM
|
|||
|
|||
|
KCM,
Let me make sure I got this right...the manual says to remove the lower control arm bushing bolts - leaving the ball joint intact. You then lower then arm slowly using the ball joint as the "hinge" until you can remove the spring... You did it the opposite way - loosened the LCA bushing bolts and remove the ball joint and used the LCA bushings bolts as the "hinge" - is that correct? BTW, I am planning on removing the lower control arm and replacing both the ball joint and the LCA bushings - so do you think it really matters which way I do this?? On my W114 250, I did not remove the ball joints - just the eccentric bushing bolts... ryan
__________________
RG Newell 1984 300D 1972 250 1986 560SL 1991 300CE
|
|
#13
09-27-2010, 07:05 PM
|
|||
|
|||
|
Hi Ryan,
When you supported the LCA to take out the bolts, did you having anything on the jack to stabilize or otherwise control it? Where did you position the jack? I need to do this on three W115/107 cars and am nervous of the spring getting out of control... D. Quote:
__________________
David Bruckmann, Oakland, CA Current: 66 Citroën DS21 72 MB 280SEL 4.5 73 MB 450SLC 76 Citroën 2CV6 76 MB 300D 79 MB 300SD Past: 70 Citroën DS21 (170kkm)/71 Citroën DS21 (137kkm)/72 Citroën DS21 (502kkm)/78 MB 300D (1,200,000 km-ish)/79 MB 300D (425kkm)/79 MB 300TD (260kkm)/81 Citroën 2CV6 (120kkm)/88 Merkur XR4Ti (209kkm)/81 Peugeot 505 GRD (350kkm)/84 MB 300TD (385kkm)/85 Toyota Camry (330kkm)/86 Renault 9 1.7L (155kkm)/02 Golf TDI (74kkm)
|
|
#14
09-27-2010, 07:19 PM
|
||||
|
||||
|
spring outa control = serious injury, be careful, why not just get a spring compressor?
__________________
Ron 2015 Porsche Cayman - Elizabeth 2011 Porsche Cayman - Bond,James Bond Sadly MERCEDESLESS - ALways LOOKING ! 99 E320 THE Queen Mary - SOLD 62 220b - Dolly - Finally my Finny! Sadly SOLD 72 450SL, Pearl-SOLD 16 F350 6.7 Diesel -THOR 19 BMW X5 - Heaven on Wheels 14 38HP John Deere 3038E Tractor -Mean Green 84 300SD, Benjamin -SOLD 71 220 - W115-Libby ( my first love) -SOLD 73 280 - W114 "Organspende" Rest in Peace 81 380 SL - Rest in Peace
|
|
#15
09-27-2010, 08:23 PM
|
|||
|
|||
|
I have done one side as of today - taking my time!
Did not use a spring compressor...I attached some of that carpet pad stuff - folded up - to the jack, just to keep the jack from slipping as I was trying to avoid metal to metal contact (jack to LCA)...I'm sure anything like leather or a piece of carpet, etc. would work... The trick is to make sure the jack won't slide - not just the jack to LCA, but also the wheels of the jack on our garage floor! Again, I have studied the FSM numerous times and did this earlier on my W114 without incident. The FSM does NOT call for a spring compressor...but I'm sure you could probably figure out a way to better attach the jack to the LCA if you are nervous. I jacked up the control arm some and removed the LCA bushing eccentric bolts (I had already removed the lower shock absorber nuts and the sway bar bushing). I positioned the jack directly underneath the hole in the LCA and with the jack lever pointing just to the rear of the front wheel - and I actually reinstalled the tire and lowered the jack from behind the tire. No real problems - lowered the jack slowly, making sure nothing was sliding around, and removed the spring. You might hear a noise when the LCA bushings break loose and the arm starts to lower... and I would mark the position of the spring with some spray paint to get it reinstalled in the same place... Removing the spring was actually the easiest part of the job - I had all kinds of trouble getting enough clearance to remove the ball joint from around the dust shield! Had to remove the steering knuckle and take everything off and to my bench...On the driver's side, I am going to try and figure out another way to get the ball joint enough clearance - probably will just try and bend the dust shield enough. I'm not "recommending" this procedure - just describing how I did it. I have also discussed this procedure with several local Mercedes mechanics and none indicated that a spring compressor was necessary either - and one gave me the carpet pad/leather/vinyl idea... I'll post again once I'm done - also replacing the subframe and motor mounts at the same time. ryan
__________________
RG Newell 1984 300D 1972 250 1986 560SL 1991 300CE
|
 |
| Bookmarks |
|
|


 Linear Mode


