 |
 |
 |
 |

|


|
|
|
|
|
|
#1
|
||||
|
||||
|
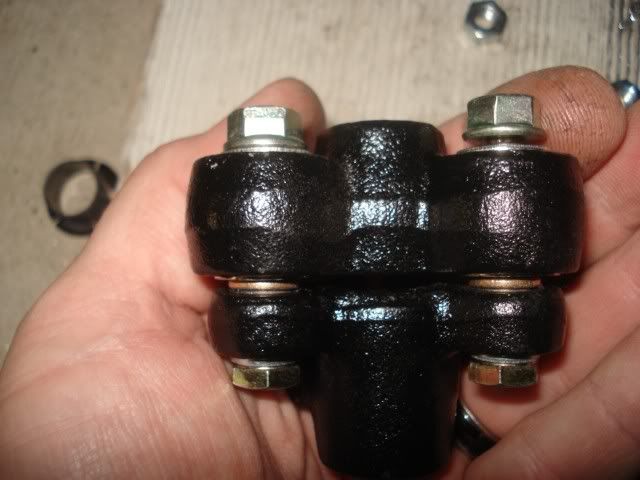
Replaced the Steering Coupler on my R107
There was a ton of play in the steering wheel and the main cause was the steering coupler.
The coupler was completely shot.  That was all that was left of the rubber bushing in the coupler.  Rather than get a new one, I decided to see if it were possible to rebuild the coupler. To separate the pieces, just drill out the rivet.  After cleaning up the pieces and painting them with wheel paint, I poured some urethane to make a bushing. After the urethane was completely set (4 hours at 165 degrees sped up the process) I was able to drill a 3/8" hole in the urethane. Urethane machines very nicely.  I decided to use 3/8" Grade 8 bolts to replace the riveted piece of the original. In addition to using Nylock bolts, I also hit them with the welder just to ensure that there was no way that the bolts would come loose. I really think that the Nylock would be just fine, but this is a steering component, and no place to skimp. Here's the finished product.  I think that this strategy works fine, but it is not a functional equivalent of the original units. I'm not even sure if the urethane is providing any real cushioning or misalignment functionality. It's probably pretty close in function to the solid mounts that Doktor Bert did on his - http://www.peachparts.com/shopforum/diesel-discussion/289876-116-steering-coupler-$6-00-upgrade.html (see image below) 
__________________
Current Stable
|
|
#2
|
||||
|
||||
|
To replace the coupler, I followed the very nice howto thread here - Steering coupler replacement 380sl without removing steering gear - Benzworld.org - Mercedes-Benz Discussion Forum
I was able to get the bolts undone without any real hassle, unlike so many who have broken theirs getting them apart. And getting a hex wrench on the bolts was actually pretty easy. I used a long 3/8" drive hex wrench and a woggle extender. I would have sworn that it wouldn't go in properly, but as you can see it did.  The only thing I would add to the how to, is that it is not necessary to remove the snap ring, nor is it necessary to pull the entire steering shaft. I also believe that it is possible and maybe even preferable to not take the boot off the bottom of the steering shaft. The car steers 110% better with the rebuilt steering coupler.
__________________
Current Stable
|
|
#3
|
||||
|
||||
|
Well done. Thanks for posting.
|
|
#4
|
||||
|
||||
|
wow, nice work. Great repair for those that choose not to buy "new" With so many knock off part makers these days, this may be the way to go to "trust" the R/R
__________________
Ron 2015 Porsche Cayman - Elizabeth 2011 Porsche Cayman - Bond,James Bond Sadly MERCEDESLESS - ALways LOOKING ! 99 E320 THE Queen Mary - SOLD 62 220b - Dolly - Finally my Finny! Sadly SOLD 72 450SL, Pearl-SOLD  16 F350 6.7 Diesel -THOR 19 BMW X5 - Heaven on Wheels 14 38HP John Deere 3038E Tractor -Mean Green 84 300SD, Benjamin -SOLD 71 220 - W115-Libby ( my first love) -SOLD 73 280 - W114 "Organspende" Rest in Peace 81 380 SL - Rest in Peace |
|
#5
|
|||
|
|||
|
Very nice idea!
Where did you source the urethane?
__________________
Bryan Harter 1992 500E Smoke Silver 2002 CLK55 AMG Cab Silver/Black 2001 Harley Fatboy - Pearl White 2004 F150 FX4 Silver/Grey 1969 GTO Liberty Blue 1956 F100 Black |
|
#6
|
||||
|
||||
|
AeroMarine Products AeroMarine Products - Epoxy Resin, Urethane Foam, Silicone Mold Making Rubber They are local here in San Diego so it is very convenient for me to just stop by and pick some up. They also ship. Any good quality urethane resin with a Shore rating of around 75 should be fine. I've also used their epoxy products with success (no relationship other than a satisfied customer)
 Urethane is one of those products that are absolutely indispensible to the DIYer, along with duct tape, epoxy, JB Weld, super glue, locktite and RTV. I've used it to fill my motor, subframe and transmission mounts, and mods to the NSS and glow plug relay housing. By the way, if anyone has a bad steering coupler they would like to donate for a test, I now believe that I could completely replicate the stock one with cast urethane without disassembling the unit. I'd like to give it a shot. PM me if you've got one laying around.
__________________
Current Stable
|
|
#7
|
|||
|
|||
|
I rebushed mine with some fuel hose bits. I was wondering if it would be possible to rebush the thing in place by inserting something like a bunch of cable ties...
__________________
80 300SD (129k mi) 82 240D stick (193k mi)77 240D auto - stick to be (153k mi) 85 380SL (145k mi) 89 BMW 535i 82 Diesel Rabbit Pickup (374k mi) 91 Jetta IDI Diesel (155k mi) 81 VW Rabbit Convertible Diesel 70 Triumph Spitfire Mk III (63kmi)66 Triumph TR4a IRS (90k mi)67 Ford F-100 (??) |
|
#8
|
||||
|
||||
|
Quote:
Having removed the coupler once, I wouldn't hesitate to do it again. Like most DIY projects, it's a little intimidating the first time, but overall not that bad. Now that I understand the coupler design, I really want to try pouring urethane with the rivet in place. Getting the bolts loose is the scariest part of the process and dealing with the horn wires is the most irritating.
__________________
Current Stable
|
 |
| Bookmarks |
|
|