

|
|
|
|
|
|
#16
 10-15-2012, 07:38 PM
|
||||
|
||||
|
Which tool?

|
|
#17
10-15-2012, 09:21 PM
|
||||
|
||||
|
The tool that helps out during removal/installation of the spring. You will have to look through to find your particular application.
tools for Chebbies
__________________
Jim
|
|
#18
10-15-2012, 10:11 PM
|
||||
|
||||
|
it looks like the only thing holding the spring in place is that one bolt and then it should just come out.
I found this on an AR15 forum of all things? 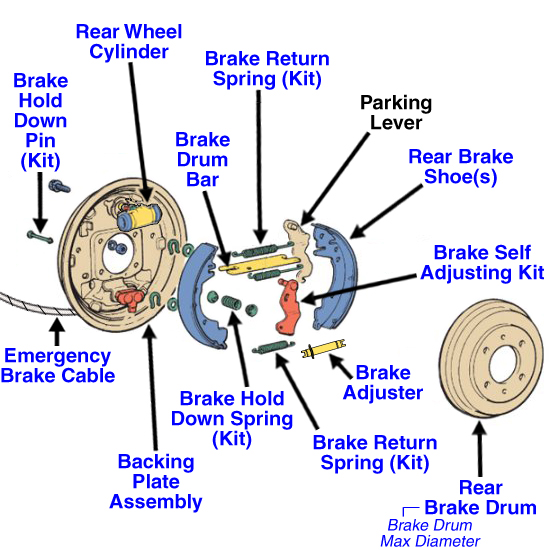 http://www.youtube.com/watch?v=rooDs_KyLUk&playnext=1&list=PLACB00D5A5940D65B&feature=results_video ding, chevy venture van uses the same rear drums. This should be very helpful Last edited by TheDon; 10-15-2012 at 10:28 PM.
|
|
#19
10-15-2012, 10:29 PM
|
|||
|
|||
|
Quote:
|
|
#20
10-15-2012, 11:54 PM
|
||||
|
||||
|
Turn the adjuster all the way in or you will never get the drum over the new shoes.
I have done a few drum brake jobs, not really that hard. Most Mercedes have them for the parking brake...
__________________
2016 Corvette Stingray 2LT 1969 280SE 2023 Ram 1500 2007 Tiara 3200
|
|
#21
10-16-2012, 12:06 AM
|
||||
|
||||
|
Quote:

__________________
-Justin 91 560 SEC AMG - other dogs dd 01 Honda S2000 - dogs dd 07 MB ML320 CDI - dd 16 Lexus IS250 - wifes dd it's automatic.
|
|
#22
10-16-2012, 04:03 AM
|
||||
|
||||
|
Quote:
The tool:  This spring holds the shoes firm against the back stop steel, whatever that's called.
__________________
Te futueo et caballum tuum 1986 300SDL, 362K 1984 300D, 138K
|
|
#23
10-16-2012, 08:08 AM
|
||||
|
||||
|
Darn, I returned that tool because it looked like it wasn't going to be needed.
|
|
#24
10-16-2012, 08:17 AM
|
||||
|
||||
|
Remember, "Short shoe forward"
Also remember that each side is a mirror image of the other --emergency brake hardware always pulls the same way. Pay attention to the direction of the E. Brake connecting link ( if there is one)-the slots are different. Don't mix adjusters--one side has left hand threads---if you reverse them ( side to side) the automatic adjusters will loosen them rather than tighten them. Another reason to do only one side at a time.
__________________
1982 300SD " Wotan" ..On the road as of Jan 8, 2007 with Historic Tags
|
|
#25
10-16-2012, 09:00 AM
|
||||
|
||||
|
The pad with the e brake bracket is held on with a non regular cotter pin. So I think I will just re use the pads since they are fine.
I am a bit hung up on removing the wheel hub. I removed the 4 bolts and hoped it would just pull off but nope its on their tight. Its FWD so there are no axles or anything to have to use a hub puller on to pop it off. ... hammer solved that issue. now having a fun time getting the adjuster back on (I have the parts laid out and put together how they should be so to not screw it up. one side at a time) Last edited by TheDon; 10-16-2012 at 09:35 AM.
|
|
#26
10-16-2012, 10:31 AM
|
|||
|
|||
|
A vice grip can be used in place of the pictured tool. Hold the pin from behind with one hand compress the spring with the washer gripped at the end of the vice grip and once thru the slot, turn it.
__________________
1977 300d 70k--sold 08 1985 300TD 185k+ 1984 307d 126k--sold 8/03 1985 409d 65k--sold 06 1984 300SD 315k--daughter's car 1979 300SD 122k--sold 2/11 1999 Fuso FG Expedition Camper 1993 GMC Sierra 6.5 TD 4x4 1982 Bluebird Wanderlodge CAT 3208--Sold 2/13
|
|
#27
10-16-2012, 10:57 AM
|
|||
|
|||
|
drums are pretty easy - I did them quite a no. of times, getting the parking brake cable clipped is an upward battle sometimes and so is the retainng pins system.
Otherwise its pretty simple, be sure to use some sealant on the back of the cylinder before mounting to the backing plate so it becomes moisture tight, you dont want it corroding off from salt, dirt and other nasties. And as the saying goes - one wheel at a time and be sure the auto adjuster is correctly installed and working.
__________________
2012 BMW X5 (Beef + Granite suspension model) 1995 E300D - The original humming machine (consumed by Flood 2017) 2000 E320 - The evolution (consumed by flood 2017)
|
|
#28
10-16-2012, 11:01 AM
|
||||
|
||||
|
Go to YOUTUBE.COM
Search for -> EricThe CarGuy He has a good video on rear drum brakes. http://www.youtube.com/watch?v=MCpCkun2qxA
__________________
'91 300-SEL
|
|
#29
10-16-2012, 11:15 AM
|
||||
|
||||
|
I actually found a video by 1aauto.com that covered the shoes for a chevy venture van and the brakes were exactly the same as the malibu. Good job chevy! It's actually the 3rd or 4th video from 1aauto.com I've used, very useful place for domestic stuff.
Anyways it took me about an hour to figure out the passenger side and then 15 minutes for the driver side. The shoes are adjusted so that the drum doesn't have play and spins with some resistance. Brake lines are reattached and now I just need to bleed the brake system. I wish I had a power bleeder at this point but my room mate is home to do it the old school way.
|
|
#30
10-16-2012, 11:21 AM
|
|||
|
|||
|
Fill the master, loosen the cap, crack the bleeder screws and let gravity bleed the system for you. God didn't give us gravity for nothing.
__________________
1977 300d 70k--sold 08 1985 300TD 185k+ 1984 307d 126k--sold 8/03 1985 409d 65k--sold 06 1984 300SD 315k--daughter's car 1979 300SD 122k--sold 2/11 1999 Fuso FG Expedition Camper 1993 GMC Sierra 6.5 TD 4x4 1982 Bluebird Wanderlodge CAT 3208--Sold 2/13
|
 |
| Bookmarks |
|
|


 Linear Mode


