Parts Catalog Accessories Catalog How To Articles Tech Forums
Call Pelican Parts at 888-280-7799
Shopping Cart Cart | Project List | Order Status | Help


Go Back   PeachParts Mercedes-Benz Forum > Mercedes-Benz Tech Information and Support > Tech Help

Reply
 
LinkBack Thread Tools Display Modes
  #1  
Old 07-10-2009, 03:11 AM
iwrock's Avatar
roflmonster
 
Join Date: Nov 2003
Location: Hella NorCal
Posts: 3,313
I broke my belt Tensioner...

Well not the whole thing, just this:


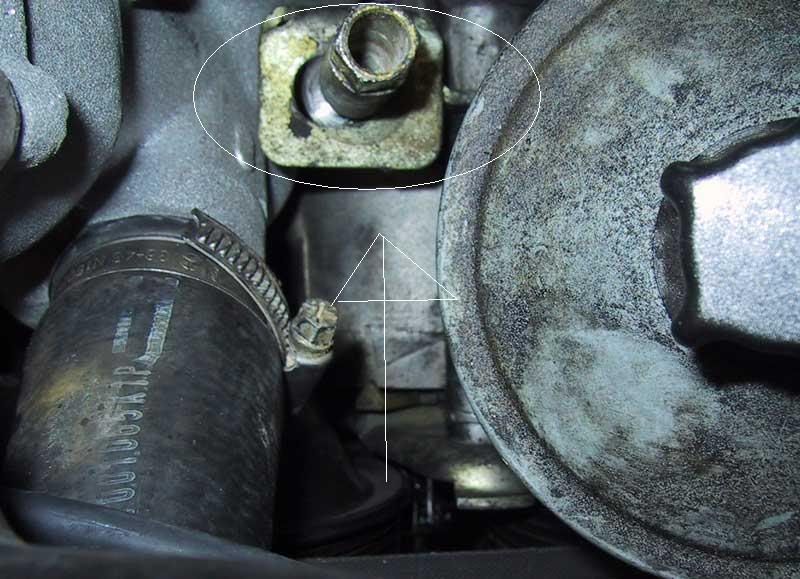
Kris sent me the FSM pages, and it looks like its somewhat easy to replace, maybe 2 hours (dont have to pull any pumps or accessories. The part looks to be $25 too, so that gives me hope.


Anyone ever replace this, and can you give me pointers?

__________________
-Justin

91 560 SEC AMG - other dogs dd
01 Honda S2000 - dogs dd
07 MB ML320 CDI - dd
16 Lexus IS250 - wifes dd

it's automatic.
Reply With Quote
  #2  
Old 07-10-2009, 03:13 AM
iwrock's Avatar
roflmonster
 
Join Date: Nov 2003
Location: Hella NorCal
Posts: 3,313
Oh also - The belt has tension, and the tensioner bolts are tightened.


Think I have anything to worry about? I drove it about 10 miles with it broken, so I am thinking I have some time before I can replace it....


I may wind up making a DIY out of this.
__________________
-Justin

91 560 SEC AMG - other dogs dd
01 Honda S2000 - dogs dd
07 MB ML320 CDI - dd
16 Lexus IS250 - wifes dd

it's automatic.

Last edited by iwrock; 07-10-2009 at 04:30 AM.
Reply With Quote
  #3  
Old 07-10-2009, 06:29 AM
Registered User
 
Join Date: Jan 2008
Location: Melbourne Australia
Posts: 844
Once the tightener has done it's job the 19mm bolt that locks the tensioner in its place will hold the tension.

Bad luck. quite a job to replace it. Did the same thing myself

You will be able to use the car until next time you want to retension the belt or change it.

You actually need to loosen the 19mm bolt to operate the tightener. If you don't...... damage to the tightener.
Reply With Quote
  #4  
Old 07-11-2009, 07:50 AM
Registered User
 
Join Date: Nov 2007
Posts: 54
This helped me when I changed out mine...

And I ended replacing my shot tensioner ALONG with the adjuster you have circled in the pic. I stripped the threads when I was puting the new tensioner in.

Here's the wisdom that was passed on to me...


"I just changed a belt tensioner this weekend on a friend's 300E. It was a "training job" for when the time comes that I have to do mine, and I sure learned a few lessons.

I suggest you use anti-seize compound on bolt threads that engage aluminum. This would include the (19 mm hex) tensioner lock bolt and at least one of the Y-bracket bolts. Two of these bolts engage in threaded castings and one has a nut on the backside, which is tough to reach, but you should be able to get a 13 mm combination wrench on it to hold while you unthread the bolt. Once the bolt was free I used my free hand to stick a magnetic finger down there and withdrew the wrench, nut, and magnetic finger together with everything stuck together.

The service procedure (13-345 in the M103 engine manual) torque spec for the mounting bolts on all three pulleys is 10 Nm - 7.2 lb-ft. This seems about right for the fan pulley bolts which are 6 mm pitch diameter (10 mm hex), but seems low for the water pump and PS pulley bolts, which have larger pitch diameter - I think 8 mm. In any event, that's the "book spec".

I believe the 13 mm hex bolts that secure the Y-bracket are also 8 mm pitch diameter. I have a standard torque table for SAE bolts based on grade, pitch diameter, and course or fine thread. Unfortunately I don't have one for metric, but those bolts are similar to 5/16" SAE course, and 15 lb-ft would be about right, especially it they thread into aluminum. Disassembly inspection showed no sealer on the inboard location as called for in the procedure (specifically on both sides of the bracket surrounding the bolt hole), and as far as I can tell, that thread is blind. Nevertheless, I used sealer as it can do no harm.

Here are a few other tips:

1. Prior to placing the rod and lever on the tensioner housing, thread the adjuster nut all the way to the bottom of the rod thread. (Note that the rod and adjuster nut are left hand thread.) At this point the top of the rod thread should be protruding from the top of the nut about a quarter inch.

2. Assemble the components onto the lock bolt in this order - bracket, pointer, tensioner, rod and lever. MAKE SURE the rod is forward relative to the lever. If you install it "backwards" (rod to the rear of the lever) you can damage the tensioner rod and nut when tightening the adjuster nut. DO NOT install the shock to the tensioner at this time. Position the assembly such that the adjuster nut protrudes through the bracket hole and engage the lock bolt and thread to finger tight. Now install the three (13mm hex) Y-bracket hex bolts finger tight. The nut on the one bolt is a little tricky to get started, so have that magnetic finger handy, again, in case you drop it.

3. Once the tensioner is installed back the lock bolt off just enough from finger tight so the pulley can be moved back and forth. Make sure the pulley moves smoothly through its arc of travel from the inboard (left as you look at it) to outboard limits and note the approximate midpoint of the arc. As you move the pulley back and forth the tensioner nut should slide smoothly through the bracket hole. Now hold the pulley to the inboard limit with your left hand and use the fingers on your right hand to turn the tensioner nut clockwise. Once the base of the nut contacts the bracket, it should continue to turn easily and the pulley should move outboard. Keep turning the nut until the pulley moves to about the midway point of travel that you noted earlier. If the action is not smooth and low effort, the lever might be on backwards. You can use a flashlight to verify that the adjuster rod is positioned between the tensioner housing and lever, not behind the lever. Once this test is passed the assembly sequence should be correct and you can torque the three (13 mm hex) Y-bracket bolts.

4. Run the tensioner nut (CCW) back to the bottom of the rod thread or at least until the top of the rod is flush with the top of the nut. Compress the shock all the way (takes considerable force) and attach to the tensioner housing with the (11 mm hex) bolt finger tight. Move the tensioner pulley to about halfway between its limits of travel, align the shock with the upper mount and tighten the lower mount bolt. (You can't reach this bolt once the fan pulley is on.)

5. Install the pulleys. They can be torqued to 10 Nm by just holding the pulley with your hand, and make sure the fan pulley is in line with the others. It's easy to install backwards, which will offset it from the other pulleys. After making sure all the pulleys are in line, move the tensioner pulley to the inboard limit of travel (left as you look into the engine compartment and you may have to wiggle unattached top of the shock to keep it from interfering with anything solid so you can move the tensioner pulley all the way to the inboard limit) and install the belt.

6. With the belt installed, turn the tensioner nut CW until the base of the nut contacts the bracket, which takes all the slack is out of the tensioner rod, then set the pointer at the bottom of the ramp. (It "rachets" in small increments.) Now continue to turn the tensioner nut CW (I used a 13 mm socket on a speed handle) and notice that the pointer begins moving up the ramp. If the pointer does not move up the ramp in equal incrments with each consistent increment (say a half turn) of CW adjuster nut rotation, the rubber sleeve bushing (between the inner and outer tensioner segments) holding torque is below minimum and the tensioner must be replaced. Same if the pointer makes it only part way up the ramp and then stops moving as the adjuster nut is turned CW. If this is the case you can bend the adjuster rod if you keep turning the nut because the rod will eventually interfere with the adjuster housing. Assuming you have a good tensioner continue to turn the tensioner nut CW until the pointer reaches the top of the ramp or just a little beyond and then torque the lock bolt to 56 lb-ft.

7. At this point I suggest you recheck torque on all the pulley bolts, then expand the shock until you can install the upper mount bolt and nut. (The shock requires considerable force to compress, but very little to expand.)

8. At this point you're done except to reinstall the fan and shroud.

I'm still working on the old tensioner post mortum, but one thing I noticed is that I could use the tensioner swivel and rod to lever against the housing to turn the inner an outer tensioner segments relative to each other. This was not possible on the new tensioner with comparable torque, but there was nothing visually to indicate that the old tensioner bushing had failed. It's the friction torque of the rubber bushing that holds the belt tension, and if this friction torque degrades the pulley will move back inboard along its arc of travel, however, the "shock" (It's actually a damped gas spring.) should keep the belt from going completely slack, so the "shock" is basically a fail-safe device.

The way you can TELL if the tensioner is failing is to observe the pointer.

If the tensioner bushing holding torque degrades, the pointer will move BEYOND the top of the ramp. If the pointer moves to or beyond the solid line beyond the top of the ramp, the tensioner holding torque is below spec, so the pointer should be observed when you check oil or otherwise open the hood. Of course, this assumes that the pointer was properly set prior to tensioning and that tensioning was done correctly to place the pointer at the top of the ramp.

The complexity of this design defies what I consider to be good engineering, especially when compared to the belt tensioners on late model Ford and GM products.

I know I can change the belt on a Corvette or Mustang in about a minute, and I've never seen one of those simple mechanical spring tensioners fail. They don't have any rubber parts that can degrade and cause loss of belt tension.

I'd like to get my hands on the Kraut who designed this g...d d...d Mercedes drive belt tensioner and wring his freaking neck!!!

The design of these cars in many areas shows excellent consideration for maintenance such as the brakes (pad changes) and cooling system changes (The nipple on the end of the block and radiator drains makes attaching hoses easy for spill free coolant changes.), but this belt tensioner appears to be an exercise in making something that should be simple as complex and expensive as possible. An elegant design is one that does the job with the least cost and complexity. That is the essense of good design engineering!

Duke"
__________________
1987 300e "200,000+ and going strong"
Reply With Quote
  #5  
Old 07-14-2009, 02:28 PM
nate300d's Avatar
What did I just do?
 
Join Date: Mar 2007
Location: Edgerton OH 43517
Posts: 366
Oh God! What am I doing?!?!?

I have a 1991 300SE. When I bough the car back in March it had a 'chatter' that would last for a few seconds at a cold start that I new about. The owner believed that it was the smog pump.

When I replaced the smog pump I replaced the belt as well. I did not know how the tensioner on this worked. I thought that it was like any other spring loaded tensioner. I slipped the belt on going in order as the manual instructs. The belt seemed snug as I was expecting.

Since replacing the pump the noise has not gone away. Next I suspected the engine mounts. The passenger side was collapsed and the driver's seemed OK, but I went ahead and replaced both. No difference.

Now it has the chatter at a cold start at a bad noise at idle that makes the hood shake. If you bring it just off of idle it stops. With the engine running at I have pushed against the top end of the tensioner dampener. Doing this seems to reduced the noise about 90%.

I began searching and reading about the tensioner and found this thread. I went and check my belt. It is loose!!. I loosened the 19mm bolt ahd tried the jack screw....the @#$%@#% tension does not seem to move. I removed the belt to find that by hand I can removed the tensioner a few degrees, but aside from that it seems frozen. I have removed the 19mm bolt and the thing will not budge. How much of this f@#king car do I have to tear down to see and get to this tensioner. It is looking like I need to remove the PS pump and the pulley from the water pump, correct? Sould I plan on removing the radiator as well? You can not see anything in this area on this engine.

Hydronuclear, you are soooooo correct about the 'design' of this. It is from hell. So far I just have the fan, tensioner bolts, and air cleaner assembly removed. Two weeks ago I replaced the water pump on my 1997 5.7L Silverado is less time than I have invested in this job so far.
Reply With Quote
  #6  
Old 07-14-2009, 02:47 PM
babymog's Avatar
Loose Cannon - No Balls
 
Join Date: Jan 2006
Location: Northeast Indiana
Posts: 10,765
I replaced one last year, had to pull the fan shroud, the fan off of the clutch, and the two (PS and WP) pullies. No pumps or lines, should be over in a couple of hours maybe three.
__________________

Gone to the dark side

- Jeff
Reply With Quote
  #7  
Old 07-14-2009, 02:53 PM
nate300d's Avatar
What did I just do?
 
Join Date: Mar 2007
Location: Edgerton OH 43517
Posts: 366
Now that I have the belt off how do you hold the pulleys to remove the bolts that hold them?

Also, since I have removed the 19mm bolt shouldn't the tensioner at least be free?
Reply With Quote
  #8  
Old 07-14-2009, 03:29 PM
babymog's Avatar
Loose Cannon - No Balls
 
Join Date: Jan 2006
Location: Northeast Indiana
Posts: 10,765
The tensioner should be free to rotate, somewhat. Loosening the three other bolts (or at least the two accessible ones) helps.

Forgot that the lower bolt on the M103 tensioner is a ***** to loosen.
__________________

Gone to the dark side

- Jeff
Reply With Quote
  #9  
Old 07-14-2009, 03:34 PM
nate300d's Avatar
What did I just do?
 
Join Date: Mar 2007
Location: Edgerton OH 43517
Posts: 366
Quote:
Originally Posted by babymog View Post
The tensioner should be free to rotate, somewhat. Loosening the three other bolts (or at least the two accessible ones) helps.

Forgot that the lower bolt on the M103 tensioner is a ***** to loosen.
Uhmmm...I am lost. I removed the 19mm bolt and the bolt on the arm for the adjuster. Isn't that all?
Reply With Quote
  #10  
Old 07-14-2009, 05:12 PM
Registered User
 
Join Date: Nov 2007
Posts: 54
Y-bracket

On my 87 300e there was a "y" bracket that attached the tensioner to the front of the engine block. A PITA, but doable to remove. The directions mention these three bolts (one that has a nut behind the power steering pump (I believe).

The only way I was able to loosen the bolts holding free-spinning clutches off the various pumps was to use a Craftsman strap wrench and some elbow grease.

Don't lose heart, keep at it and keep track of how stuff came off. You'll get it.

BTW, the write-up was from Duke, not me.
__________________
1987 300e "200,000+ and going strong"
Reply With Quote
  #11  
Old 07-14-2009, 07:39 PM
Registered User
 
Join Date: Aug 2006
Posts: 726
I see in the service procedure for the M103 that the torque for the pulley to water pump bolts is 10 Nm. I question whether this is correct as they are M8 bolts. The M104 has a similar arrangement and the torque for the water pump and power steering pump is 32 Nm.

10Nm would be correct for the M6 fan pulley bolts.

Anyone know if there has been a correction or update to the M103 pulley torque specs?
Reply With Quote
  #12  
Old 07-14-2009, 08:42 PM
nate300d's Avatar
What did I just do?
 
Join Date: Mar 2007
Location: Edgerton OH 43517
Posts: 366
Quote:
Originally Posted by babymog View Post
The tensioner should be free to rotate, somewhat. Loosening the three other bolts (or at least the two accessible ones) helps.

Forgot that the lower bolt on the M103 tensioner is a ***** to loosen.
Where are these bolts?
Reply With Quote
  #13  
Old 07-14-2009, 10:42 PM
Registered User
 
Join Date: Jan 2008
Location: Melbourne Australia
Posts: 844
These are some of the parts you need to remove.
Reply With Quote
  #14  
Old 07-15-2009, 08:12 AM
nate300d's Avatar
What did I just do?
 
Join Date: Mar 2007
Location: Edgerton OH 43517
Posts: 366
Quote:
Originally Posted by Ivanerrol View Post
These are some of the parts you need to remove.
I have the fan and shroud removed. So far I understand that the PS and water pump pulleys need to be removed. What is the third pulley to be removed? Also what is that 'Y' stamping and the small flat piece above it?

Last edited by nate300d; 07-15-2009 at 09:40 AM.
Reply With Quote
  #15  
Old 07-15-2009, 11:16 AM
865sp300e's Avatar
Talent Scout
 
Join Date: Feb 2005
Location: Yardley, PA
Posts: 318
Quote:
Originally Posted by nate300d View Post
I have the fan and shroud removed. So far I understand that the PS and water pump pulleys need to be removed. What is the third pulley to be removed? Also what is that 'Y' stamping and the small flat piece above it?
Third pulley is for the fan, 'Y' bracket mounts the tensioner, the small flat piece is the pointer.

__________________
'86 300E 5 speed
'71 Triumph TR6
'46 Cushman Scooter
'41 Ford 9N tractor
Reply With Quote
Reply

Bookmarks


Posting Rules
You may not post new threads
You may not post replies
You may not post attachments
You may not edit your posts

BB code is On
Smilies are On
[IMG] code is On
HTML code is On
Trackbacks are On
Pingbacks are On
Refbacks are On


All times are GMT -4. The time now is 03:23 PM.


Powered by vBulletin® Version 3.8.7
Copyright ©2000 - 2024, vBulletin Solutions, Inc.
Search Engine Optimization by vBSEO 3.6.0
Copyright 2024 Pelican Parts, LLC - Posts may be archived for display on the Peach Parts or Pelican Parts Website -    DMCA Registered Agent Contact Page