

|
|
|
|
|
|
#1
 11-06-2010, 05:53 PM
|
||||
|
||||
|
Goal - Remove the front seats and apply Leatherique products, with seats in the basement.
I have the bolts removed, but am stumped with the 'power plug'. Several wires have an easy unplug, but the main bundle of wires doesn't seem to just unplug. Your suggestions are appreciated. I've attached a picture where the wire attaches to the seat. This is the driver seat. Thanks for the help
__________________
Thanks for the help Bill Fisher '86 560SL (186K) - Now a 'classic' : Registered as an Historic Vehicle 02 E430 in the stable '14 LS460 (Lexus) - - - - - '95 E420 (198K) found a new home '99 E320 (80K) (gave it's life for me as we hit a bumper) '95 E420 (231K) Sold to a happy buyer, new to Mercedes '90 300E (65K) Sold to an Mercedes Lover '92 190E (215K) - retired to the salvage yard '93 500SEL (214K) - Moved to another family, still runs like a young pup 
|
|
#2
11-06-2010, 06:25 PM
|
||||
|
||||
|
Under that cover, you will find that the wires are attached by two long double-inline connectors.
__________________
 Gone to the dark side - Jeff
|
|
#3
11-06-2010, 06:33 PM
|
||||
|
||||
|
Great news - but
Great news, but how do I remove the black cover?
I have the worst luck with breaking cover - so your hints removing the black cover is appreciated.
__________________
Thanks for the help Bill Fisher '86 560SL (186K) - Now a 'classic' : Registered as an Historic Vehicle 02 E430 in the stable '14 LS460 (Lexus) - - - - - '95 E420 (198K) found a new home '99 E320 (80K) (gave it's life for me as we hit a bumper) '95 E420 (231K) Sold to a happy buyer, new to Mercedes '90 300E (65K) Sold to an Mercedes Lover '92 190E (215K) - retired to the salvage yard '93 500SEL (214K) - Moved to another family, still runs like a young pup
|
|
#4
11-06-2010, 06:49 PM
|
|||
|
|||
|
Quote:
Disconnect the battery, there is 12V power at some of the connections you will be separating so you don't want to short any thing and blow a fuse. Referencing your attached picture, tilt the front of the seat down a bit to gain a little slack in the wiring (not the seat frame the entire seat, I'm assuming that you've already adjusted the seat frame so that the front of the seat is as high as it will go to give yourself as much room between the connectors and the seat itself), then you can lift the wiring out from under the black plastic covering it. With that wiring lifted a little take a small flat bladed screwdriver or a tapered shaft awl and from the right-hand side slide that inwards under the wiring and maneuver it to get it under the bottom edge of the plastic connector shell. Once you get it started you can carefully lever it up a bit and then slide the screwdriver deeper, do this until you get the first large connector off. Do it bit by bit and it will come off pretty easy, if you try to fast and use too much leverage you can crack the connector shell, This connector has 14 or 16 electric connectors in two rows so it's usually quite a bit of friction holding it in place. When doing this you want the tool you're using to slide down the center between the two rows of connectors. The next connectors are smaller plugs with fewer connections, there are tabs on the top of the upper connector shells that you can sometimes use to pull upwards but sometimes this will cause the upper plastic connector shell to separate from the lower when you pull too hard. Because there is a plastic divider between the connectors you really can't get anything directly under them from the side there may be a small shallow opening on the front side if not, I use a tool that has 90 degree bend at the end with a 1/2" long point, with that I can get the point down along side the connector shell and then twist it so that point levers the connector upwards, again a little on one side and then switch to the other. Here's a picture of what the connectors of the wiring loom attach to, so you can see and get a better idea of the arraignment of the seat frame side of the connection I'm describing. This is the picture of an 86 car so it's not exactly the same but it's similar enough to give you an idea of how things are generally arrainged. 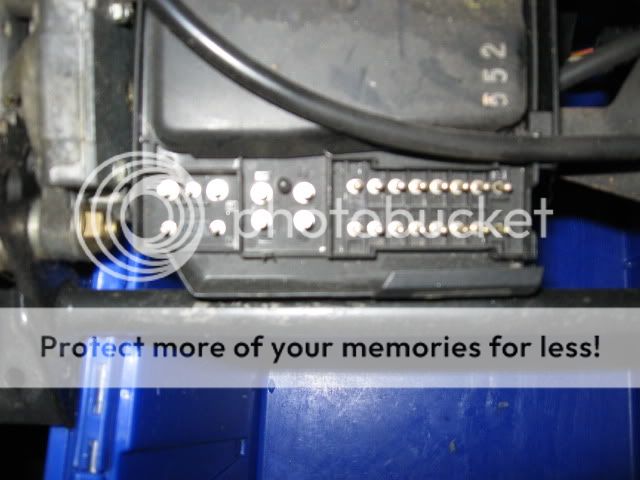
|
|
#5
11-06-2010, 06:55 PM
|
|||
|
|||
|
Quote:
|
|
#6
11-06-2010, 08:25 PM
|
||||
|
||||
|
Yes, I had the seat all the way down - bad thing
I was able to finally disconnect the wires by pushing them up. Disconnecting the battery is a good idea, I failed to consider. Thanks so much for the suggestion. I did not try to remove the bottom plastic cover - so I succeeded in NOT BREAKing it. The seat came out of the car with no damage. Thanks Now to get the sandpaper on the leather - oh, that's going to hurt. (Needed to rough up the leather for dying and filling the cracks) Thanks again If any one else is reading this and considering removing the seat - it was actually easy, and as I said, it was removed with no damage. But boy was it dirty under the seat. Carpet shampoo, here I come.
__________________
Thanks for the help Bill Fisher '86 560SL (186K) - Now a 'classic' : Registered as an Historic Vehicle 02 E430 in the stable '14 LS460 (Lexus) - - - - - '95 E420 (198K) found a new home '99 E320 (80K) (gave it's life for me as we hit a bumper) '95 E420 (231K) Sold to a happy buyer, new to Mercedes '90 300E (65K) Sold to an Mercedes Lover '92 190E (215K) - retired to the salvage yard '93 500SEL (214K) - Moved to another family, still runs like a young pup
|
 |
| Bookmarks |
|
|


 Linear Mode


