

|
|
|
|
|
|
|
|
#1
 12-11-2008, 04:32 AM
|
|||
|
|||
|
This is the original idea that I deleted b/c it was an incomplete thought. Now I've got it though. Your crank and IP are in relation to eachother since you have not messed with them (please verify). Could the chain have slipped on the crank? How was the chain stored when the head was off, was the crank moved at all? Assuming that this is the case, you have simply installed the camshaft in the wrong direction. You want the relation found at the top of this post, but the relation you have is at the bottom of the post. Your drip results suggest the same as well. In order to avoid removing the IP and the oil filter housing and all that mess, here is a possible shortcut: 1. Set the camshaft to 'lobes up' and TDC on the crank. 2. mark the chain in relation to the sprocket (for safekeeping) 3. remove the chain tensioner and the rocker arms 4. remove the sprocket from cam (and flip over that washer!) 5. CAREFULLY turn the crank one full revolution keeping some tension on the chain so nothing slips anywhere. 6. with your crank set at TDC, your IP should now be in the correct position. 7. Put the sprocket back on ensuring that the cam and crank are set to TDC and there is no slack between them on the IP side. In order to do this, you must remove the sprocket from the chain and determine which tooth is exactly 180* from the mark you just made. Re-install the sprocket by matching the new mark to the mark on the chain. 8. Do your drip timing again. If its all good ,you know the rest. The other option is to count teeth on the sprocket after setting the engine 'lobes down' in your case - but there is too much error involved. And the camshaft might move. Last edited by jt20; 01-19-2009 at 10:34 PM. 
|
|
#2
12-11-2008, 09:15 PM
|
|||
|
|||
|
This is starting to become confusing so lets break it down to more managable steps. Forget the camshaft and it's mark for the time being. Rotate the crankshaft to the position that you see or feel the timing vee in the timing port or window on your injection pump.
When you have accomplished this step post back and we will go to the next step. All you are going to be doing is breaking the checking down further into smaller self contained steps. Perhaps much easier than the whole picture at once at this stage. First we are going to get the injection pump to crankshaft relationship checked or corrected if needed. Remember that you may not pick up the pump indicator in the first revolution. It could as easily be present in the second revolution. If someone has a better or more sound approach chime in. At present it is just too confusing at least to me to proceed otherwise. Remember for the time being just ignore the camshaft. The old expression you have to start somewhere sound does seem to apply to your situation at present. Will slowly but methodically deal with each issue separatly. Last edited by barry123400; 12-11-2008 at 09:20 PM.
|
|
#3
12-11-2008, 09:26 PM
|
|||
|
|||
|
Quote:
|
|
#4
12-12-2008, 08:03 PM
|
|||
|
|||
|
remove the rocker arms
set engine to 'Lobes Down' and the crankshaft at TDC remove the spring in the tensioner on the passenger side of the head. mark the sprocket to the chain (for safe keeping). Measure 180* around the sprocket and mark the corresponding tooth. remove the sprocket from the cam. flip the washer!! spin the camshaft to meet the sprocket and line up the markers for TDC / lobes up. replace the cam sprocket. you should have only a very slight variance between the TDC readings on the cam and the TDC readings on the crank... Less than 6* of difference. button up. Last edited by jt20; 01-19-2009 at 10:35 PM.
|
|
#5
12-11-2008, 09:33 PM
|
|||
|
|||
|
the simplest way to imagine this is to begin with "the head was removed and replaced"
Move back in time and replace the camshaft properly. I am assuming that the crank relation to the IP is intact - I ask for confirmation. the only issue is the placement of the cam. draw yourself a picture and mimic the movement of the TDC marks on all three items.
|
|
#6
12-11-2008, 09:38 PM
|
|||
|
|||
|
Quote:
Give up the drip method.......he's not going to succeed with it.
|
|
#8
12-12-2008, 08:11 PM
|
|||
|
|||
|
the trickiest part will be managing the chain while you work. DONT LET IT GO ANYWHERE!
Make sure you have some mechanic's wire already cut and secured to something nearby, then when the chain is loose, attach it. When replacing the sprocket, it may seem like you do not know where to place it. Let the markings be your guide. Flipping that washer is the FIRST thing you must do after removing that sprocket. Make sure it lines up with the intended mark on the cam tower after flipping - the lobes should now be pointing up and the mark should be aligned. with the sprocket free from the chain you are going to have to spin it to match the cam, it can only go on one way (you already know which direction it faces, though..) DO NOT PULL THE CHAIN. Place it on the sprocket once you have determined which link is going to fall into which tooth and allow all the TDC marks to line up while there is NO SLACK ON THE IP SIDE of the chain - send all of the slack to the tensioner's side of the chain. Last edited by jt20; 12-12-2008 at 08:17 PM.
|
|
#9
12-12-2008, 09:09 PM
|
|||
|
|||
|
Hi again, At least one possible variable is okay. JT 20 is right all the rocker arms should be removed if the cam has to be turned quite a distance. Each rocker must be marked for its actual location on your engine as well. They wear in to specific locations.
The washers orientation if it has affected the timing marks positioning might mean very little movement is required. If that was so you might be able to leave the rocker arms on. This is highly unlikely though. You might establish this be peeking as further described. You could try to see if the cam can be moved the required amount with no interference. Yet the valves/pistons should present interference if there is much movement required. As for the washer etc. You are on the scene and it should be obvious what assembly methology is going to be correct from your cam lobes general positioning. With those rockers off you may have been able to bunch move the chain over the sprocket. With the tensioner removed a tooth or two at a time. If it is determined the washer requires reorientation the chain sprocket will have to be removed. You could slide the sprocket ahead a little first and examine the relationship of the keyway to the mark on the washer. Of course if the mark is directly above the keyway the orientation of the washer does not matter. At this point I think you have worked around this area enough to be in control. One last item though. Just out of curiosity where is the camshaft mark at present compared to where it should be? I believe all the confusion for you has ended as well or hope it has. If you are still working long hours take a minute to think things over as you go along. Keep us informed and again anyone should chime in that is able to present a better methology. I certainly do not know it all. I used to hang the timing chain from something overhead on the old mercedes gas engines. I do not know if this is really required on their diesels. Even a shock cord or wire as suggested by JT 20 will not hurt anything though. If you are still uncertain of anything at all post it. There are many on site with lots of experience. They like to help out when possible. You will be able to help others out with simular problems as well after this. Last edited by barry123400; 12-12-2008 at 09:27 PM.
|
|
#10
12-12-2008, 09:28 PM
|
||||
|
||||
|
Quote:
Quote:
Quote:
Quote:
good point. You will need to turn the crank to remove the rockers. Return the crank to TDC and your cam to 'Lobes down' before removing the sprocket.
|
|
#11
12-12-2008, 09:48 PM
|
|||
|
|||
|
JT 20. You obviously have more experience than myself. It would be very poor design if washer reversal changed orientation of the timing mark. Yet it could be so. I would see no alternative to putting mark directly above the keyway or exactly 180 degrees from it. Otherwise multiple disastors would have occured over time.
Also I for one did not try to displace your earlier advice. It was just the poster was becoming confused. I felt the injection pump position had to be known. Or at some point or in combination with the pump timing also not being correct he would be lost. Also we had to have the pump position verified to deal with the cam properly anyways. So if I did seem to interfere it was not with bad intent. Your subsequent suggestions since my last post are helpful to him as well. You can and probably will help me out someday hopefully. The poster will soon have transportation to go chase women. So he will soon be in over his head again. ") We may not have really helped him afterall. We may not have really helped him afterall.
Last edited by barry123400; 12-12-2008 at 09:54 PM.
|
|
#12
12-12-2008, 10:13 PM
|
|||
|
|||
|
I was very confused by the washer myself. I do recall though, when you set the engine @ TDC and remove the sprocket, that the Woodruff key is perfectly @ 12:00. And there is no other explanation for the lobes to be pointing down when the marks were lined up. It only happens once per full engine cycle.
It was a very good call to check the engine timing to be certain. I am often hasty. You can tell by this thread alone. I believe strongly in the system of checks and balances Barry, I try to take things stride as I am balanced. My intent is not solely to be negatory, but like you, simply to be certain. That is a challenge. Chasing women is a crucial part of all of our lives, and I want to ensure that it is impeded no further. The democratic process must be maintained.
|
|
#13
12-13-2008, 11:22 AM
|
|||
|
|||
|
place your bets
okie doke.
here's a question that relates to my planning of any upcoming procedure, as well as what could have possibly gone wrong during my head re-install: does anybody remember exactly what that washer looks like? (part #1860520152 'spacer washer', for those of you viewing from the future). if it looks like figure 1 or 2, i don't see that flipping the washer will change anything. if it looks like figure 3, it will look like figure 4 when flipped. (not 180º out as show in this post). (likewise, if it looks like figure 4 (or any variation thereof), it will look like #3 when flipped). make sense? change anything? for some reason, i vaguely recall asking myself during re-install "does it make any difference which way i install this washer?" and then i said to myself "self, no, it does not."  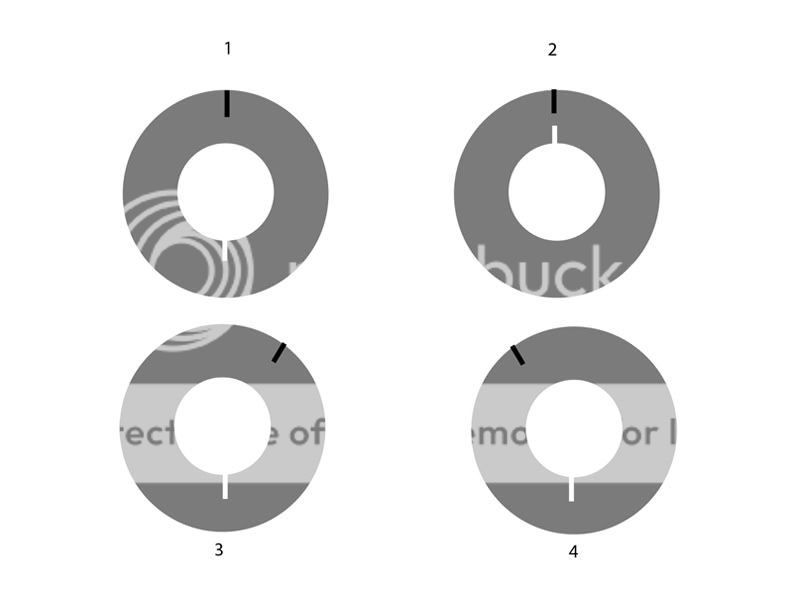 also, JT, what'd you mean (when refering to the rocker arms) by: Quote:
__________________
-lee '83 300CDT (286k) former proud owner of: '85 mercedes euro 300TD '80 mercedes 300TD '77 mercedes 280e '80 mercedes euro 250 '82 mercedes euro 250
|
|
#14
12-13-2008, 01:10 PM
|
|||
|
|||
|
Barry is right about the rockers, they want to be kept in their respective places due to wear. The rocker arms come in pairs for each cylinder. They 'rock' on a tube of metal. There are 2 seperate tubes that a set of rockers come on, one tube carries 2 pairs, the other carries 3 pairs. Keep them on the tube in the order in which they came out.
Someone else will have to chime in on the washer. Again, I am only presuming that #3 and #4 are the same and that you currently have the wrong orientation. A member named ZEKE recently replaced his woodruff key and posted pictures within the past month.
|
|
#15
12-13-2008, 01:24 PM
|
|||
|
|||
|
really?
looking at this picture, it seems to me to look more like #2...in which case, flipping the washer wouldn't change anything...i still lean towards thinking this is the case...as Barry said, "It would be very poor design if washer reversal changed orientation of the timing mark." i guess, either way, i'll soon be finding out!
__________________
-lee '83 300CDT (286k) former proud owner of: '85 mercedes euro 300TD '80 mercedes 300TD '77 mercedes 280e '80 mercedes euro 250 '82 mercedes euro 250 Last edited by blankenship; 12-13-2008 at 02:16 PM.
|
 |
| Bookmarks |
|
|


 Hybrid Mode


