

|
|
|
|
|
|
#1
 09-23-2008, 05:44 PM
|
|||
|
|||
|
How do you replace lower control arm bushing on W123
I am currently trying to replace the lower control arm bushings on my 85 300D turbo.
as i was trying to replace it i noticed it was under the large spring, and it is under high tension, is there any special way to remove the bushings without taking off the spring? 
|
|
#2
09-23-2008, 05:47 PM
|
||||
|
||||
|
you have to remove the spring. Only use a Klann spring compressor, don't use on from autozone.
__________________
1985 300TD Turbo Euro-wagon 1979 280CE 225,200 miles 1985 300D Turbo 264,000 miles 1976 240D 190,000 miles 1979 300TD 220,000 GONE but not forgotten 1976 300D 195,300 miles 1983 300D Turbo 175,000 miles http://i42.photobucket.com/albums/e3...e485-1-2-1.jpg
|
|
#3
09-23-2008, 06:06 PM
|
||||
|
||||
|
There are a few spring compressors to rent on the forum. I would replace everything at once. It's a pain to do this work...I just got done doing it. It makes a world of difference, you won't believe you are driving the same car!
__________________
My Primary Driver - '85 300CD - 4-speed conversion, 2.47 rear, lowered, euro headlights, rebuilding (not restoring so much) Wife's - '08 Saab Sportcombi Aero Riding a '03 Yamaha Warrior
|
|
#4
09-24-2008, 02:08 AM
|
||||
|
||||
|
There is a older Thread of another member doing the same thing and making a spring compressor for the front. But this compressor only for the front of a 123 pulls the front Spring up into the spring Perch.
I made mine from 1inch x 14 threads pre inch threaded rod and several nuts, washers for spacers, apiece of flat spring steel slightly over 1/4 inch thick, and a 1 inch pipe flange. I also had to buy a 1 1/2 inch Flare Nut Crow Foot to turn the nut from under the Hood as there is no room for a regular wrench. I had to cut a piece of the pipe Flange off for it to fit the top of the Spring Perch under the Hood. The bottom plate has an elongated hole so that the plate will tilt. Material cost was around $22 from an industrial surplus store; otherwise it would have cost around $10 more. 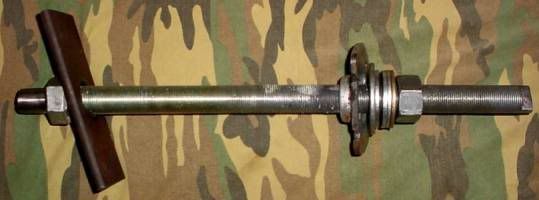
__________________
84 300D, 82 Volvo 244Gl Diesel Last edited by Diesel911; 09-24-2008 at 02:14 AM.
|
|
#5
09-24-2008, 05:11 AM
|
||||
|
||||
|
I bought
__________________
Have you ever noticed that anybody driving slower than you is an idiot, and anyone going faster than you is a maniac? As long as they would add one additional commandment for you to keep thy religion to thyself. George Carlin (Wonder where he is now..) 1981 240d (engine donor 1983 240d) recently rebuilt engine hurray! - No more.. fought a tree and the tree won. pearl black 1983 240d 4speed (Converted!@$$%) atleast the tranny was rebuilt.
|
|
#6
09-24-2008, 07:07 AM
|
||||
|
||||
|
Quote:
It took me almost a year to collect up all of the parts, from our own Fastlane Phil......but it was most definately worth the wait to do it all at one time, saves a lot of repetative labor, and screwing around with that damn spring....  ......I used the Advance spring compressor.....a real PITA, and dangerous..... ......I used the Advance spring compressor.....a real PITA, and dangerous.....SB 
__________________
 Diesels: '85 300D, "Max, Blue Benz", 155K, 27.0 MPG '84 190D 2.2, "Eva, Brown Benz", 142K, 40.2 MPG '77 240D (parts car) '67 Eicher ES 202 Tractor "Otto" (2cyl, Air Cooled, 30HP) Gassers: '94 Ford F-150, "Henry", 170K (300 Six) 17.5 MPG '85 190E 2.3, 148K....Parts Car '58 Dodge W300M Powerwagon (Flat Fenders) Less than 10 MPG
|
|
#7
09-24-2008, 08:43 AM
|
|||
|
|||
|
front end fix up
I just did this on my 87 SDL and it made a lot of difference. I rented the spring Compressor from overdrive. I would not risk my life trying to save $20. it cost $40 plus shipping ($7 each way). definately worth it. also got the parts from Fastlane.
__________________
 I love snow I love snow87 300SDL 245K (so far) 85 300cd 253K (so far) 2000 Chevy Silverado (gasser) 1993 Chevy 4x4 Diesel (auction truck) 2000 Monte Carlo (wife's car) Is evolution true, or is Jesus the creator. (John 1:1-3) I would rather trust Jesus on this one, Bill www.BillBaileyMinistries.org
|
|
#8
09-24-2008, 10:47 AM
|
|||
|
|||
|
Just finished this job
I just finished this same job last weekend and found out two things that really helped.
One is the spring compressor- the best is the official tool as mentioned earlier in the thread but if you don't have the cash to buy one or want to get the job done before you can arrange a rental I found that just about every other spring compressor available either won't fit or is very dangerous. In the end I used a Lisle spring compressor that actually bolts onto the srping instead of using hooks.  http://www.lislecorp.com/tool_detail.cfm?detail=1199 The description uses the words 'super safe' which made me feel better and I have always had good experience with Lisle. You can order these online for around $55 or I bought one locally from Parts Depot for just over $60 but got it that day. This compressor will compress the spring enough for you to replace the bushing with the control arm on the car but is not suitable if you want to remove and replace the spring itself. Just be sure to keep a jack or stand under the control arm while doing this for extra insurance. The other trick was in flaring the sleeve in the replacement bushing. When you put the new bushings in they are held in place by an aluminum sleeve that has to be flared on the end. The manual shows a special tool and there have been other posts by people using various devices. I had great success using lug nuts from my truck. A lug nut is hollow in the middle and has a cone on one side so I took a long 3/8" bolt with the appropriate stacks of washers and stuck it through the middle of the bushing, slid the lg not on, more washers and spacers as needed, and a 3/8" nut to tighten it down. Tightening the whole assembly caused the lug nut's cone to flare the end of the sleeve perfectly. Last edited by fdanielson; 09-24-2008 at 10:50 AM. Reason: Added picture
|
|
#9
09-24-2008, 02:35 PM
|
||||
|
||||
|
Quote:
If I spend that type of money on any tool I need to be able to use it on my other vehicles or it has to be something critical like the Timing Chain Crimping tool. You can rent but when you buy you have have a tool in hand that you can use on something else. By not renting you can work at your own pace and schedual. If I can make a tool that will do the same job; why not.
__________________
84 300D, 82 Volvo 244Gl Diesel Last edited by Diesel911; 09-24-2008 at 02:41 PM.
|
|
#10
07-07-2015, 11:27 AM
|
|||
|
|||
|
Quote:
Technical question ..... since this home built spring compressor isn't intended to remove the spring from the car I'm guessing it will not be necessary to compress the spring to the degree one would to remove the spring completely. Only, in the case of lower contol are refurbish, enough to withdraw the spring from the lower control are so it can be removed and replaced. Thus: the stresses would be less. Such a huge diameter rod ... can I ask, with that lower plate, its just over quarter inch thickness .... the photo isn't easy to see .... can I ask how wide that plate is you used. Take an inch + from its width for the threade rod ... the material you made the plate from must be 3 inches, or so, wide, to retain the beef necessary to exert the force to compress the spring... after punching such a large hole in it. Yes?? thx Rocket99
|
|
#11
07-07-2015, 06:25 PM
|
||||
|
||||
|
Quote:
I have not had to use that Tool since I did the original Job so I am not sure where it is to measuer the Plate thickness. Take a look at the picture and the threaded Rod is 1 inch. Measure a cross the threaded rod in the Picture and then do the same with the Plate that is in the picture and you will get an idea how thick the Plate is. I think there is another in the there was another one in the Homemade special tools http://www.peachparts.com/shopforum/general-information/239902-home-made-special-tools-where-members-can-share-how-they-made-special-tools.html
__________________
84 300D, 82 Volvo 244Gl Diesel
|
|
#12
07-07-2015, 07:09 PM
|
|||
|
|||
|
got 'er done
used 3/8 in. thick by 5.5 in. by 3 in. cold rolled steel, its just a bit too thick so grinding some thickness off along the path of spring contact , just a smidge, was necessary, its OK, worked
3/4 in X 10 thread per inch rod normal nut on bottom coulpling nut above to engage more thread on the active end it did compress the spring enough to lift it off that spring seat / plate now the lower ball joint is stuck previously, cleaning the control arm to remove insulating grime, where the ball joint needs to break lose, and propane torch heat plus that harbor freight seperator you pictured the the thread: http://www.peachparts.com/shopforum/diesel-discussion/323469-lower-ball-joint-separator-w123.html has worked, not so far though
|
 |
| Bookmarks |
|
|


 Linear Mode


