

|
|
|
|
|
|
#46
 01-09-2009, 12:30 PM
|
|||
|
|||
|
I got my Superior kit the other day and it didn't have any instructions on how to put them together, what I got are stacked 2-3 shift instruction with two springs stapled in a ziploc bag and a photocopy of B1-ACV-11, softer 1-2 shift for 1990 & up.
I have an 87 300D that does not shift to third gear and I think bob is the one who recommended and gave the link for the superior kit, can anyone email ot IM me the instruction or give me a link on the instructions so that I can try to put this kit in this weekend. Thanks Chuck thefishdaddy@yahoo.com 
|
|
#47
01-09-2009, 03:36 PM
|
|||
|
|||
|
Quote:
|
|
#48
01-10-2009, 04:18 AM
|
|||
|
|||
|
Tango,
I got the email and will try to see if I can figure this thing out and hopefully there wont be another earthquake Like the one we had last night, while I'm under a very heavy and greasy car. thanks a lot Chuck
|
|
#49
01-16-2009, 01:18 PM
|
|||
|
|||
|
I went in and change the K1 and K2 springs and made a few mistakes, not really fully understanding the instructions on what springs goes with what, I have an 87 300D and the transmission says 722.3x forgot the last few numbers. I will just post the pics of what I have done, not knowing all the technical names of the parts or right terms to use so just bare with me, maybe someone can give me a dumb proof way of installing this kit, like what color goes to what end.
This is what the K2 springs look like when I just got them out of the transmission.  After a little bit of cleaning and taking it apart   This is where the white plastic and the short spring go, do I need to replace this spring.  This is where the broken and the smaller diameter spring go in, I am missing all the plastic parts the same problem with Bobs car, and where can I buy these parts or the whole K2 kit, what is the part number, as you can see the inside of the green plastic thing is worn out, on the instruction that Tango emailed me and Bob post, there is a 3 train and a 2 train spring on the K2, I think I have the 2 train springs so do I go to step 5 (late 722.3 and all 722.4 models): it says install the original inner spring inside the red spring installed in step 3, I dont have a red spring in my kit the only red spring is a very tiny one, what I do have that fits are blue, kinda orangie one and a maroon colored one.  This is the K1 springs except the Blue and deep purple springs those came from the superior kit, is there any other springs that is in the superior kit that goes in with the K1. 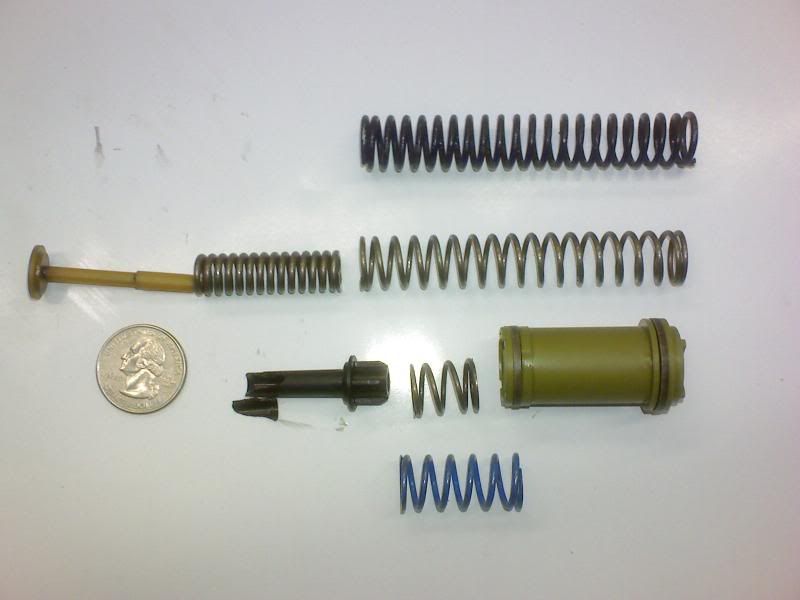 This is what I Broke when putting them together, the white and the black plastic stuff cant hold the purple spring together and I accidentally broke it, where can I buy these parts coz I went to the House of Imports in Buena Park, showed them a photo of the one that is on the forum part number A 126 270 44 77 and the guy in the parts counter cant find it, and I went check out fastlane and its not listed there.    I think I have a big problem my Transmission Pan looks bad, there are little bits of metal dust particles in the bottom its like metal mud, am I in trouble or is this normal.    Thanks for all the help that I got, Bob asked me what I was doing driving a 20 year old car 120mph, read in this forum to do an Italian tune up on this car and that I did, it was a good idea that time and now that I thought about it, that probably killed my transmission. Chuck Last edited by whunter; 02-04-2010 at 08:05 AM. Reason: attached pictures
|
|
#50
01-16-2009, 02:16 PM
|
|||
|
|||
|
Quote:
Quote:
|
|
#51
01-16-2009, 05:03 PM
|
|||
|
|||
|
Tango,
So on the K2 just the smaller spring that goes inside the red spring not to include the white plastic thing onthe other end with the spring, and on the K1 just the purple spring pics. below, top photo of K1 and bottom is the K2. Chuck 
Last edited by whunter; 02-04-2010 at 08:06 AM. Reason: attached picture
|
|
#52
03-05-2009, 02:00 PM
|
||||
|
||||
|
Great info, thanks for sharing!
Now, I may be a little late to the party... but one major item has been overlooked here. The transmission shift point (controlled by the control cable) and shift firmness (controlled by the vacuum signal) on the 1987-1993 300D are based ENTIRELY on throttle position. Why is this critical? Because if your engine power output is below normal (due to ALDA issues, or any of a dozen other reasons)... the tranny will shift like crap (often a late, high rpm, harsh shift). But there may be nothing at all wrong with the tranny, or springs, or anything else. Fix the engine power output, and the tranny problems may go away. Also, make sure the VCV on the side of the injection pump is set correctly. This is not a "seat of the pants" adjustment, there is one proper setting, and you don't tweak it either way. (It can cause weird shift issues if this is mis-adjusted!) See the FSM for the official procedure (click here), but basically you loosen the mounting bolts, have a helper press the pedal to the floor (or pull the throttle cable to WOT), gently rotate the VCV (from full CCW turn it CW) until resistance is felt, then tighten down the bolts. Often it ends up right in the middle of the adjustment range. This is the FIRST step in correcting diesel tranny issues. The second step is making 100% sure that all the Tecalan vacuum tubing is intact and not leaking, along with checking the rubber fittings. Replace anything that is cracked, brittle, soft, or otherwise questionable. Then you have to fix the engine power output, particularly the off-idle power (generally fixed with ALDA adjustment). When everything is set correctly, the transmission shifts should be butter smooth cold or hot, at light or medium throttle, with zero flaring. At WOT (kickdown) the shifts should be firm, and should occur at 4800rpm for each up shift. My '87 tranny has 300kmi on it, with all the original "K" springs (no Superior kit needed), and it shifts perfectly. But I've also spent a lot of time getting the engine power delivery correct (0-60 in 10 seconds), setting the VCV to spec, and replacing every vacuum tube & rubber hose in sight. It's a good idea to replace all of the old fossilized stuff. Hope this helps! 
__________________
Check out my website photos, documents, and movies! Last edited by whunter; 02-04-2010 at 08:09 AM. Reason: removed dead link
|
|
#53
03-18-2009, 07:38 AM
|
|||
|
|||
|
DOES THIS apply to ME?!?!
Quote:
Dave, Does this apply at all to the 617 VCV configuration as well, or just the six-cans? I'm replacing my modulator today (it's leaking down in seconds,) and hoping that the spring on the old one is broken, as I have the most erratic shifts one could imagine, with lots of unpredictable flaring and the occasional case of whiplash. I can't seem to adjust the modulator for firm shifts (or at all.) I have never heard of this and can't find [ed:doesn't mean it's not there] any reference to this in my FSM, but it's one of those PDF ones where the search function doesn't want to work...
__________________
83 300SD, Euro Delivery, Mesa Red, 275k, running strong & quick. Stop Struggling and get free. 
|
|
#54
03-18-2009, 11:55 AM
|
||||
|
||||
|
Quote:
Although I couldn't find anything in the 617 FSM specifically related to the VCV, check out this PDF for adjusting the throttle linkage... it may be of some help. FYI - I updated the previous post with a link to the OM603 procedure for adjusting the VCV (this obviously won't help for the 617, though). 
|
|
#55
03-19-2009, 08:48 AM
|
|||
|
|||
|
Look here before you start pulling valve bodies and throwing check balls around
Quote:
In the process, I have found that my modulator spring was no longer adjustable - the stop on the end of the spring had rusted through, and the adjuster was nonfunctional rendering the adjuster useless. Mod replacement eliminated the 2/3 flare completely, so to those of you who say "wouldn't a bad mod produce hard shifts?" I say NOT if the spring is shot. Look here before you start pulling valve bodies and throwing check balls around the garage..http://www.peachparts.com/shopforum/showthread.php?p=2144030#post2144030 I could still use an updated K2 spring train, I think, still a little mushy on the 3/4.
__________________
83 300SD, Euro Delivery, Mesa Red, 275k, running strong & quick. Stop Struggling and get free.
|
|
#56
04-14-2009, 06:57 PM
|
|||
|
|||
|
Trying to get my head around this...
My superior kit just arrived, and I am a bit daunted.
I've read through this thread exhaustively, as well as the instructions from the superior kit and some other threads. Please, please tell me if this is all correct, please, someone: I have an early, soft 2/3 and flaring, mushy 3/4. I need, therefore, to replace the K1 & K2 accumulator valve springs, which require the VB to be removed, de-filtered, and turned upside-down before lifting off the lower VB. The separator plate must remain conspicuously in place, against the thicker, upper valve body (now on the bottom) to prevent the loss / misplacement of the check balls. I would do well to drop a few of the 15 VB bolts in loosely to keep the separator plate in place, maybe from the top before inverting the unit onto a clean surface. This modification improves 2/3 timing and firms both 2/3 and 3/4 somewhat. I will be installing the "normal firm shift" for 2/3 and the "even more firm" for the 3/4, as the 3/4 has always been mushy and 2/3 is soft, but fine in a pinch. For the "even more firm" 3/4, I will be retaining the original small spring coaxially inside the replaced large red spring *edit* for 2 spring trains, pink alone for 3s*edit*. This can be done without pulling the VB, but since I'm doing accumulator valve springs, I still need to pull the VB; might do it best all at once. Have I got this all correct? I'm not made of time, money, or extra cars, and I want to be certain that I've got the basic idea before doing the driveway backstroke. 
__________________
83 300SD, Euro Delivery, Mesa Red, 275k, running strong & quick. Stop Struggling and get free.
Last edited by iandiam; 04-14-2009 at 07:10 PM. Reason: accuracy
|
|
#57
04-14-2009, 07:22 PM
|
|||
|
|||
|
Quote:
|
|
#58
04-14-2009, 07:39 PM
|
|||
|
|||
|
Quote:
is there a rule of thumb about which direction, looser or tighter on the bowden cable, corresponds to earlier or later shifts?
__________________
83 300SD, Euro Delivery, Mesa Red, 275k, running strong & quick. Stop Struggling and get free.
|
|
#59
04-14-2009, 08:18 PM
|
|||
|
|||
|
Quote:
Quote:
|
|
#60
04-14-2009, 08:39 PM
|
|||
|
|||
|
Quote:
Quote:
__________________
83 300SD, Euro Delivery, Mesa Red, 275k, running strong & quick. Stop Struggling and get free.
|
 |
| Bookmarks |
|
|


 Linear Mode


