

|
|
|
|
|
|
#61
 11-09-2020, 08:21 AM
|
|||
|
|||
|
Quote:
After thinking a bit more on it, I'm planning on cutting out a window here (below) to access the firewall portion that's rusted. I figure keeping water out of the firewall is more important than keeping water from entering the inner wheel well. 
__________________
Onus probandi incumbit ei qui dicit, non ei qui negat I recondition w123/w126/w124/w140/r107/r129/ steering boxes! 1984 300D "Elsa" odo reset 6/2011 147k 1983 300TD "Mitzi" ~268k OM603 powered 1995 E300 "Adelheid" 262k [Sold] 
|
|
#62
11-09-2020, 10:42 AM
|
||||
|
||||
|
Dont know if it would help in your case, but I used stainless pop rivets as well as bolts in places where welding was not practical. Was able to coat with POR before installing and .in some cases seam sealer afterwards.
|
|
#63
11-09-2020, 11:26 AM
|
|||
|
|||
|
Quote:
I have and continue to use seam sealer on all seams as a backup measure. It should not be used as a primary means to stop water.
__________________
Onus probandi incumbit ei qui dicit, non ei qui negat I recondition w123/w126/w124/w140/r107/r129/ steering boxes! 1984 300D "Elsa" odo reset 6/2011 147k 1983 300TD "Mitzi" ~268k OM603 powered 1995 E300 "Adelheid" 262k [Sold]
|
|
#64
11-09-2020, 04:09 PM
|
||||
|
||||
|
Quote:
I have been around the block a few times, and the places I found that repairs rusted down the road were often adjacent to the welds. Not easy to rustproof backside of welds in some areas, like rockers. The part highlighted above can work both ways  I see no problem using mechanical joints, especially for non-critical jobs like closing up a hole in a firewall. I suspect the S/S rivets I have used are plenty strong enough. Riveted joints are standard in many applications - aircraft, ships, boats etc. Interestingly, the MB factory/dealer kit for replacing troublesome previously welded spring perches on the W210, uses heavy duty pop rivets that I believe are Monel. And this IS an important structural joint. Previously, the sheet metal welds rusted out under the seam sealer where they couldn't be easily inspected. Just my 2c worth, but carry on, you are doing a great job.
__________________
Graham 85 300D  ,72 350SL, 98 E320, Outback 2.5 ,72 350SL, 98 E320, Outback 2.5
Last edited by Graham; 11-10-2020 at 10:49 AM.
|
|
#65
11-10-2020, 10:52 AM
|
|||
|
|||
|
Quote:
Sure, the w120 spring perch does use rivets. 6.4 mm diameter high strength steel rivets. I'm guessing on the sheet metal thickness, but even at 3mm thick the diameter of the rivets is double the thickness. These are really beefy rivets of a specific material. This is a different application as well as this spring perch joint doesn't flex, the floor of the car does. Cyclic loading of a fastened joint reduces the ability of the fastener to maintain a clamping force when the joint has movement. Cylinder head bolts are torqued to yield; that joint isn't going to have any movement. With rivets in the floor, the joint will have flex as the material around it is quite flexible and never was designed to be rigid. That means that over time the rivets will be cycled and loosen their clamp on the panels. This will lead to the rivets rounding out the holes and eventually failing. The final important thing is that rivets are not a waterproof joint. They may mechanically join a seam, but even the overlapping material is not waterproof. Unless a rubberized sealer tape/material or hardening compound were added between the two sides of the material, this is not waterproof. (And if sealer were added between the panels, then rivets would be even worse of a choice). Seam sealer should always be considered a secondary waterproofing measure as it will break down over time. All this is to say that rivets can and should be used in applications where they have been specifically designed to be used. Floor panel replacement is not an area where rivets are a good application.
__________________
Onus probandi incumbit ei qui dicit, non ei qui negat I recondition w123/w126/w124/w140/r107/r129/ steering boxes! 1984 300D "Elsa" odo reset 6/2011 147k 1983 300TD "Mitzi" ~268k OM603 powered 1995 E300 "Adelheid" 262k [Sold]
|
|
#66
11-10-2020, 11:29 AM
|
||||
|
||||
|
I at first offered a suggestion that I thought might have been helpful in your firewall repair. (not floors, but they could be used there too)
For others reading this, there is absolutely no problem in using stainless rivets or bolts on steel sheet metal. The area of the fastener contact is so small in relation to the sheet that galvanic corrosion is not a factor. I do have a background in this subject as well as in-service experience on my two 35-50 yr old Benzes, but will leave it at that. It's your car and I won't bother you any more.
__________________
Graham 85 300D ,72 350SL, 98 E320, Outback 2.5
|
|
#67
11-10-2020, 06:09 PM
|
||||
|
||||
|
Just so happen to be doing the same repair under my peddle.
Just so happen to be doing the same repair under my peddle. Welded it all in place and used a really good seam sealer on both sides of the repair when done

|
|
#68
11-16-2020, 09:12 AM
|
|||
|
|||
|
I cut the window out.
It felt really weird to be cutting out a section of perfectly good metal that was going to be welded back in again, but it had to be done.  And the nice big hole.  I had to be careful as just above this cutout is a seam of the hinge pocket which is welded on this inner panel. The seam isn't fully welded and has at least two areas I can see that are designed to let water weep through. So when I weld this panel back in I have to make these welds decently smooth to keep water from catching on them.
__________________
Onus probandi incumbit ei qui dicit, non ei qui negat I recondition w123/w126/w124/w140/r107/r129/ steering boxes! 1984 300D "Elsa" odo reset 6/2011 147k 1983 300TD "Mitzi" ~268k OM603 powered 1995 E300 "Adelheid" 262k [Sold]
|
|
#69
11-16-2020, 09:21 AM
|
|||
|
|||
|
I had another friend ask me how I made curved patches where I didn't have a replacement panel for it. Its the same process for the seat mounts that I had to replicate, but in thinner metal.
Here's a play by play for small patch I did on Friday. Here's what I started with.  I didn't quite like the amount detail that I'd be left fiddling with, so I cut out a bit more to make the patch a bit easier to fit/weld.  I start with a piece of cardstock just a bit bigger than the patch. (not that you guys don't know what a square piece of paper looks like) 
__________________
Onus probandi incumbit ei qui dicit, non ei qui negat I recondition w123/w126/w124/w140/r107/r129/ steering boxes! 1984 300D "Elsa" odo reset 6/2011 147k 1983 300TD "Mitzi" ~268k OM603 powered 1995 E300 "Adelheid" 262k [Sold]
|
|
#70
11-16-2020, 09:25 AM
|
|||
|
|||
|
I'll choose a starting edge for the patch and use my fingernail to rub the edge of the metal into the paper. Dirty hands help.
  Then I'll cut out that section and get it to fit, trimming where I need to. 
__________________
Onus probandi incumbit ei qui dicit, non ei qui negat I recondition w123/w126/w124/w140/r107/r129/ steering boxes! 1984 300D "Elsa" odo reset 6/2011 147k 1983 300TD "Mitzi" ~268k OM603 powered 1995 E300 "Adelheid" 262k [Sold]
|
|
#71
11-16-2020, 09:32 AM
|
|||
|
|||
|
I'll keep this process up, using the starting edge of the patch as the fixed point and bending the cardstock as gently as I can (to mimic what the metal will do), until I have a profile of the patch.
 Then trace that out onto some metal and cut it out. (I intentionally cut this out to the outer edge of the tracing line to ensure that I didn't mess up and cut the patch too small) 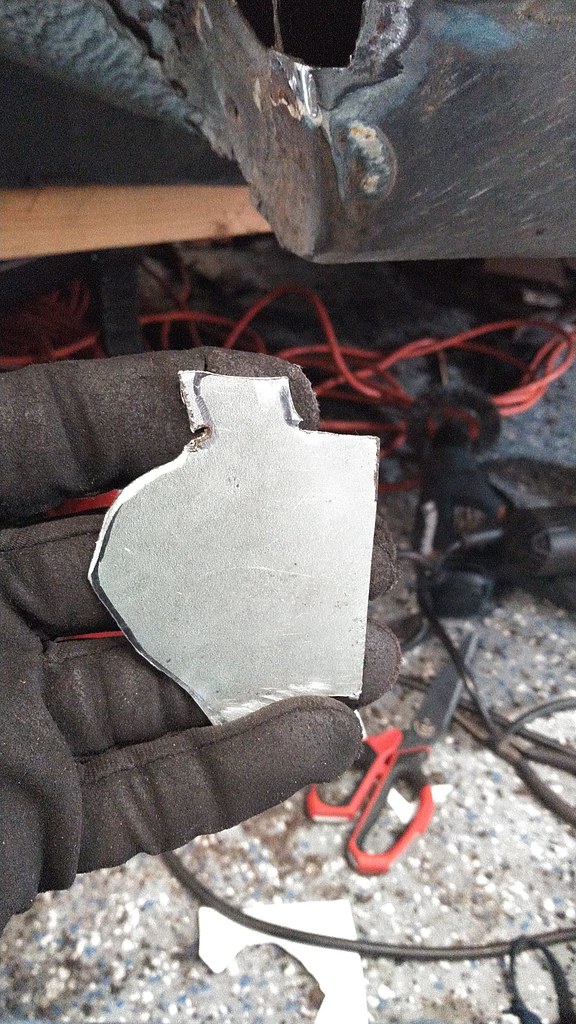 Once its cut out, I start fitting the same area I started with on the cardstock profile. 
__________________
Onus probandi incumbit ei qui dicit, non ei qui negat I recondition w123/w126/w124/w140/r107/r129/ steering boxes! 1984 300D "Elsa" odo reset 6/2011 147k 1983 300TD "Mitzi" ~268k OM603 powered 1995 E300 "Adelheid" 262k [Sold]
|
|
#72
11-16-2020, 09:39 AM
|
|||
|
|||
|
After about 45 minutes of cutting, fitting, trimming, refitting, bending, etc, I end up with a piece that I think fits in the hole with about a millimeter of gap all around.
  After that the patch gets sprayed and wiped clean, then hit with two coats of self etching, weld through primer. And then it gets tacked into place, tapped with a hammer until it fits, then stitch welded all around. Once I'm happy I grind back the welds to make sure they are continuous, weld in any areas that need work and grind gain. This is the final product.  I will note that I ground these welds flush as I could as I know this patch will be visible from the outside of the car even with the trim pieces and inner fender lining on. Paint only does so much and I don't want to have to do any filler at this point in the project.
__________________
Onus probandi incumbit ei qui dicit, non ei qui negat I recondition w123/w126/w124/w140/r107/r129/ steering boxes! 1984 300D "Elsa" odo reset 6/2011 147k 1983 300TD "Mitzi" ~268k OM603 powered 1995 E300 "Adelheid" 262k [Sold]
|
|
#73
11-16-2020, 09:53 AM
|
|||
|
|||
|
Good thing for that you have such cheap labor available, otherwise you'd have a million dollar car!
 Looking good!  I find one of these: https://www.matcotools.com/catalog/product/MDHD1/UTILITY-DOLLY/ to be very handy in doing the forming. If you do buy one of these, get a good one. The HF models are not very hard and will mar. The dents/imperfections will then be transferred to the surface you are working. A good body hammer is very helpful. https://www.amazon.com/Fairmount-Utility-Pick-Hammer-Fiberglass/dp/B00BEGGGXO/ref=sr_1_5?_encoding=UTF8&c=ts&dchild=1&keywords=Body+Hammers+%26+Dollies&qid=1605540845&s=automotive&sr=1-5&ts_id=15707081
__________________
Whatever story you're telling, it will be more interesting if, at the end you add, "and then everything burst into flames. ― Brian P. Cleary, You Oughta Know By Now Last edited by Mike D; 11-16-2020 at 10:36 AM. Reason: Drank a second cuppa
|
|
#74
11-17-2020, 12:28 AM
|
||||
|
||||
|
Looks good to me ! .
I know a young fellow who likes to go to remote Desert junkyards with me to buy up old and dented fenders, hoods and so on ~ he uses the sheet metal to make patches like you do here, he says the metal is different and using the old typ of rust free metal makes for easier works and better repairs...
__________________
-Nate 1982 240D 408,XXX miles Ignorance is the mother of suspicion and fear is the father I did then what I knew how to do ~ now that I know better I do better
|
|
#75
11-17-2020, 08:37 PM
|
|||
|
|||
|
Another patch.
 And the pedal is in!!!  Man that felt good seeing it in place. I'm sooooo ready to drive Elsa again.
__________________
Onus probandi incumbit ei qui dicit, non ei qui negat I recondition w123/w126/w124/w140/r107/r129/ steering boxes! 1984 300D "Elsa" odo reset 6/2011 147k 1983 300TD "Mitzi" ~268k OM603 powered 1995 E300 "Adelheid" 262k [Sold]
|
 |
| Bookmarks |
|
|


 Linear Mode


